### [How to Get a Free Email Domain in 2026 (5 Methods Compared)](https://wpmailsmtp.com/how-to-create-email-domain-for-free/)
**Published:** March 9, 2022
**Author:** Rachel Adnyana
**Excerpt:** Do you want to know how to create your own email domain? It's easier than you think!
In this post, we'll show you how you can create an email with your domain name so you can look more professional, authoritative, and trustworthy during email communication with clients.
**Content:**
A free email domain isn’t a single product. It’s a category of methods, ranging from web-hosting bundles to standalone free plans to email-forwarding tricks. Which one fits depends on what you already have (a domain, hosting, an existing inbox you’d rather keep using) and what you actually need (just an address vs. full mailbox storage vs. business-grade features).
This guide compares five free methods, walks you through each one, and helps you pick the right fit. The first method (Bluehost) bundles a free domain with paid hosting, which is the cheapest route if you’re starting a website from scratch anyway. The others (Zoho Mail, Cloudflare + Gmail, mail.com) cost nothing on their own.
**Quick answers**
- **What is an email domain?** The part of an email address after the @ symbol. A custom email domain (like `you@yourbusiness.com`) replaces the generic part (like `@gmail.com`) so your address matches your website and looks professional.
- **Can it really be free?** Yes, with caveats. The cheapest path depends on what you already own. If you need hosting for a website, Bluehost throws in the domain and email. If you already own a domain, Zoho Mail’s Forever Free plan covers email at zero cost. If you want to keep using Gmail, Cloudflare’s free email routing handles the forwarding.
- **Which method should you pick?** Skip to [“Which method should you pick?”](#which-method-should-you-pick) below for the decision guide. Short version: Bluehost if you need hosting, Zoho if you already own a domain, Cloudflare + Gmail if you want to send and receive through Gmail.
## Free Email Domain: 5 Ways to Get One in 2026
Each method below produces the same end result, an email address at a custom domain, but the trade-offs are different. The comparison table shows the structural differences at a glance. The walkthroughs below it show what setup actually looks like.
- [Compare the 5 free email domain methods at a glance](#compare-the-5-free-email-domain-methods-at-a-glance)
- [Method 1: Bluehost, free domain with hosting](#method-1-bluehost-free-domain-with-hosting)
- [Method 2: Zoho Mail Forever Free](#method-2-zoho-mail-forever-free)
- [Method 3: Cloudflare Email Routing plus Gmail](#method-3-cloudflare-email-routing-plus-gmail)
- [Method 4: mail.com (free domain from a shared pool)](#method-4-mail-com-free-domain-from-a-shared-pool)
- [Method 5: Other notable options](#method-5-other-notable-options)
- [Which method should you pick?](#which-method-should-you-pick)
- [Make sure your custom domain emails actually deliver](#make-sure-your-custom-domain-emails-actually-deliver)
- [Frequently asked questions about free email domains](#frequently-asked-questions-about-free-email-domains)
### Compare the 5 free email domain methods at a glance
MethodCostCustom domain you ownInbox storageBest for**Bluehost (free with hosting)**Free domain year 1 with a paid hosting plan (~$2.95/mo intro, renews higher)Yes, registered to you100 MB free per mailbox, expandable with the Pro Email add-onYou’re setting up a website anyway**Zoho Mail Forever Free**Free for up to 5 users at one domainYes, you bring your own5 GB per userYou already own a domain**Cloudflare Email Routing + Gmail**FreeYes, you bring your ownUses your existing Gmail account’s 15 GB free quotaYou want to keep using Gmail and own the domain**mail.com**FreeNo, you pick from mail.com’s shared poolAmple free storageYou don’t have a domain and don’t want one**ImprovMX (forwarding only)**FreeYes, you bring your ownNone of its own, it forwards to an inbox you already haveYou only need to receive at the custom address, not sendA few callouts on the table. Bluehost is the only paid option on the list, but the email + domain part is genuinely free (year one) if you’d be paying for hosting either way. mail.com is the only one where you don’t own the domain itself, which limits brand control. ImprovMX is forwarding-only, which means it routes incoming mail to a personal inbox but doesn’t give you a mailbox at the custom address.
### Method 1: Bluehost, free domain with hosting
**Use this when** you need website hosting anyway and want the simplest path to a custom-domain mailbox.
Bluehost includes a free domain registration for the first year with every shared hosting plan, plus email accounts at that domain. After year one the domain renews at its normal price (usually $10 to $20 depending on the extension). The hosting itself starts around $2.95 per month on a multi-year intro promotion and renews higher.
#### Step 1: Sign up for a Bluehost hosting plan
Head to [Bluehost](https://wpmailsmtp.com/go/bluehost/) and click the **Get Started Now** button.
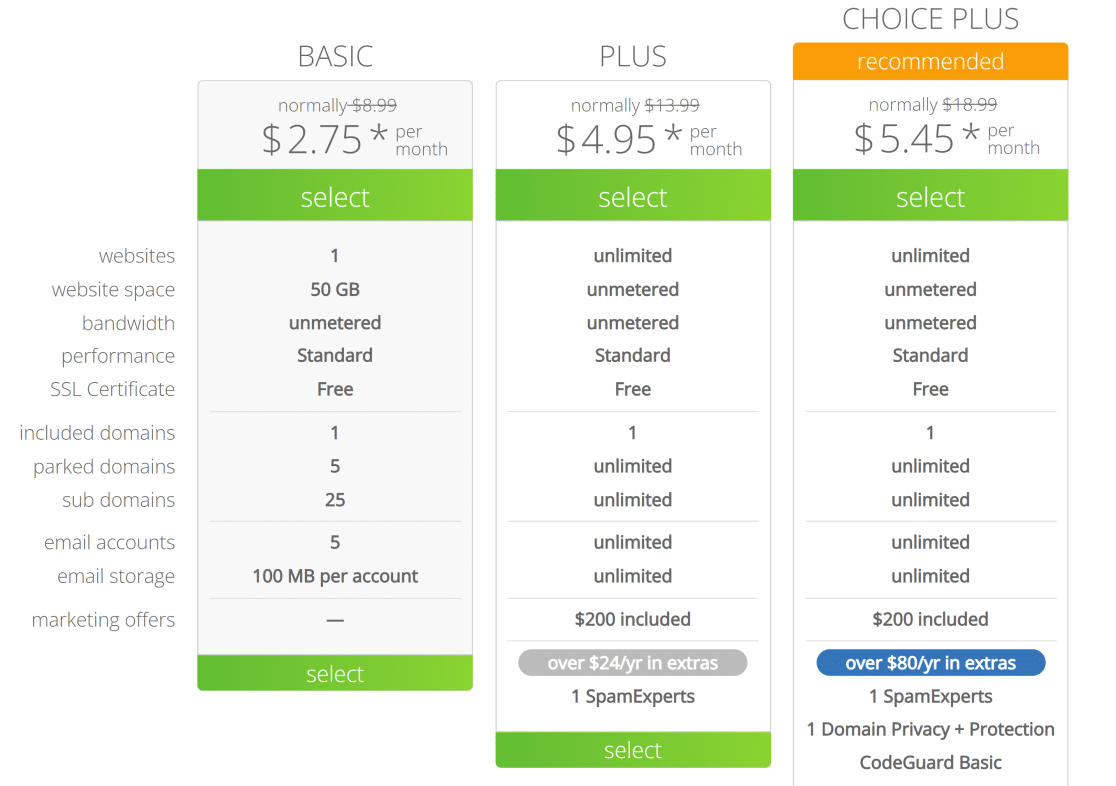
On the next screen, pick a hosting plan. All the shared plans include free email at a custom domain, so the difference between tiers is about bandwidth, storage, and how many websites you’ll be running. Click **Select** under the plan that fits your situation.
#### Step 2: Register your free domain
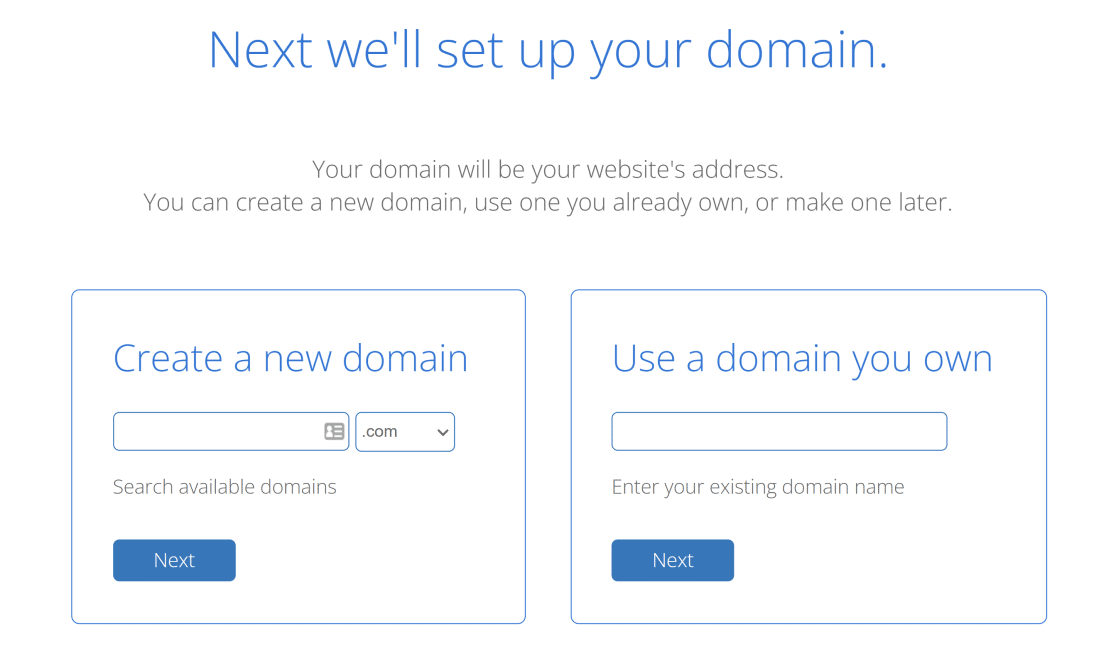
Bluehost will ask for a domain name. This is both your website domain and your email domain, so pick something that represents your brand.
If you haven’t settled on a business name yet, the [free business name generator at Nameboy](https://www.nameboy.com/business-name-generator/) is a quick way to brainstorm. It checks availability as you go.
Enter your chosen name, then continue to the billing screen. Once you complete the purchase, Bluehost registers the domain and provisions the hosting account. You’ll get a welcome email when everything is ready.
#### Step 3: Create your custom email address
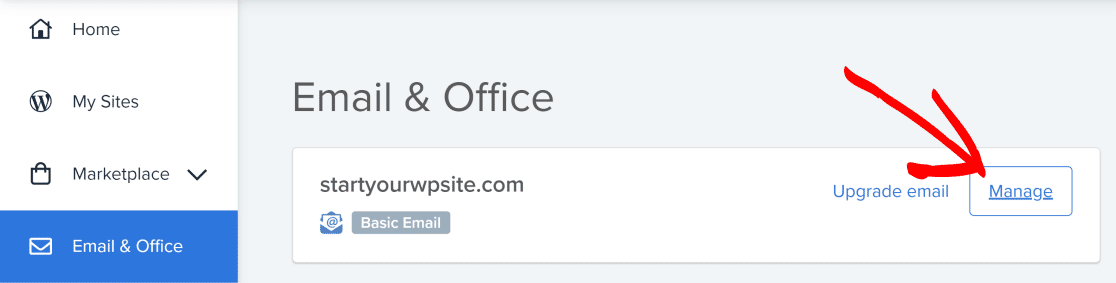
Log in to your Bluehost dashboard. In the left menu, click **Email & Office**, then click **Manage** next to your domain.
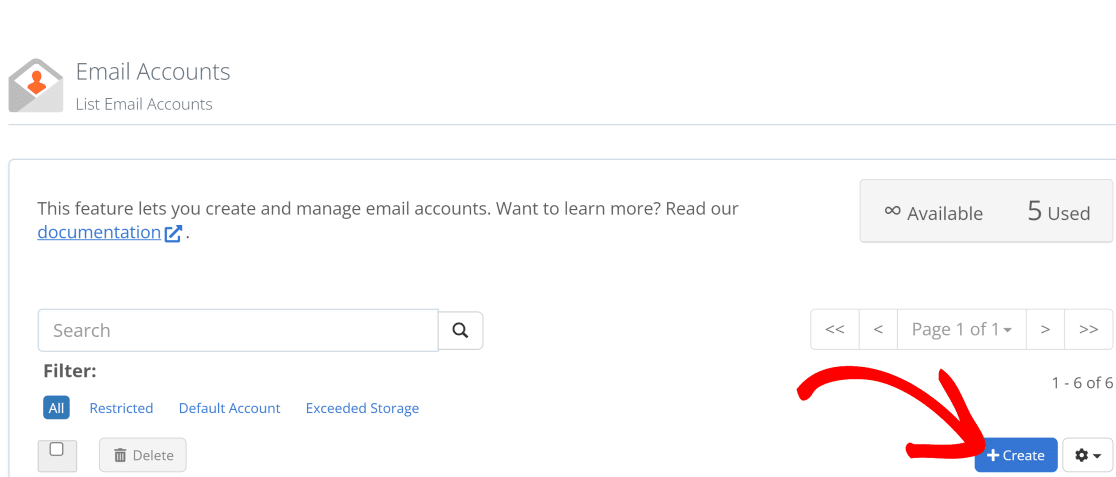
Click the **Create** button to start a new email address.
Pick the username (the part that goes before the @). It’s worth knowing that [email addresses aren’t case sensitive](https://wpmailsmtp.com/are-email-addresses-case-sensitive/), but most senders default to lowercase by convention.
For the password, click **Generate** to let Bluehost create a strong one for you.
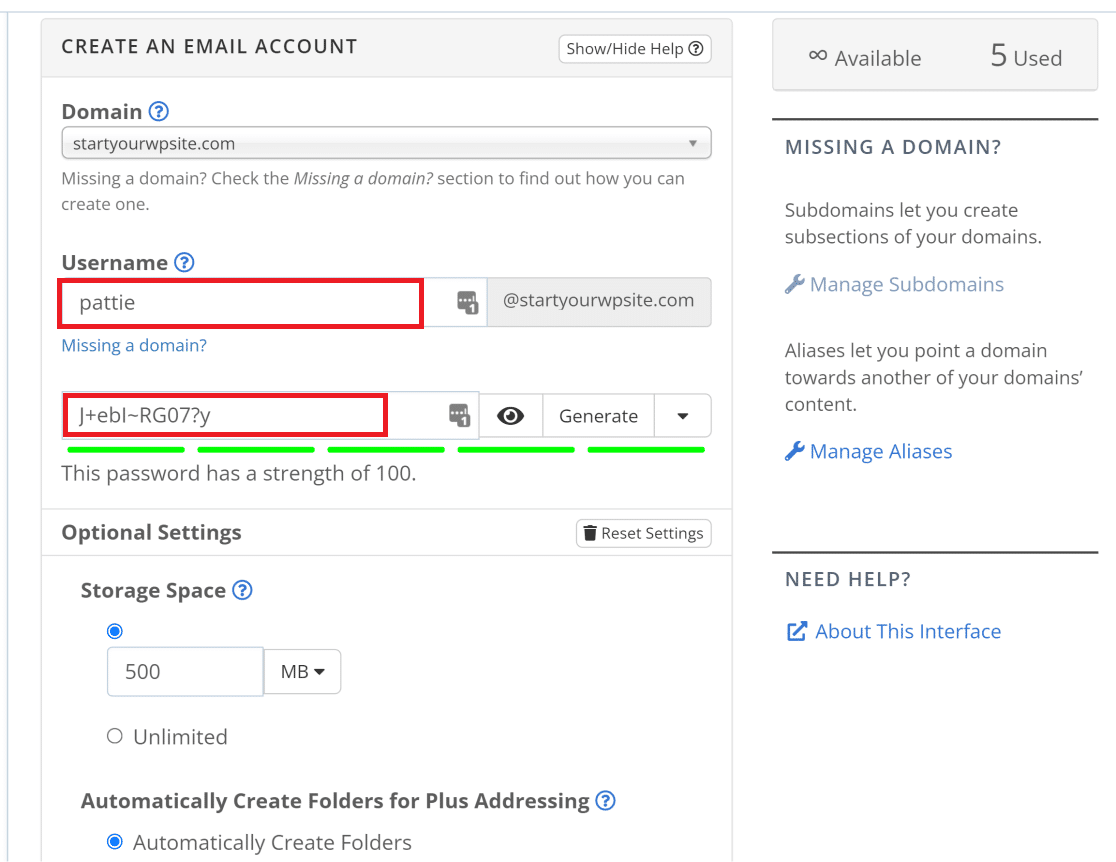The Basic shared plan caps each mailbox at 100 MB, which is fine for low-volume use. If you need more storage, you can either upgrade the hosting plan or add **Bluehost Professional Email**, which expands mailboxes to 10 GB or more and adds spam filtering.
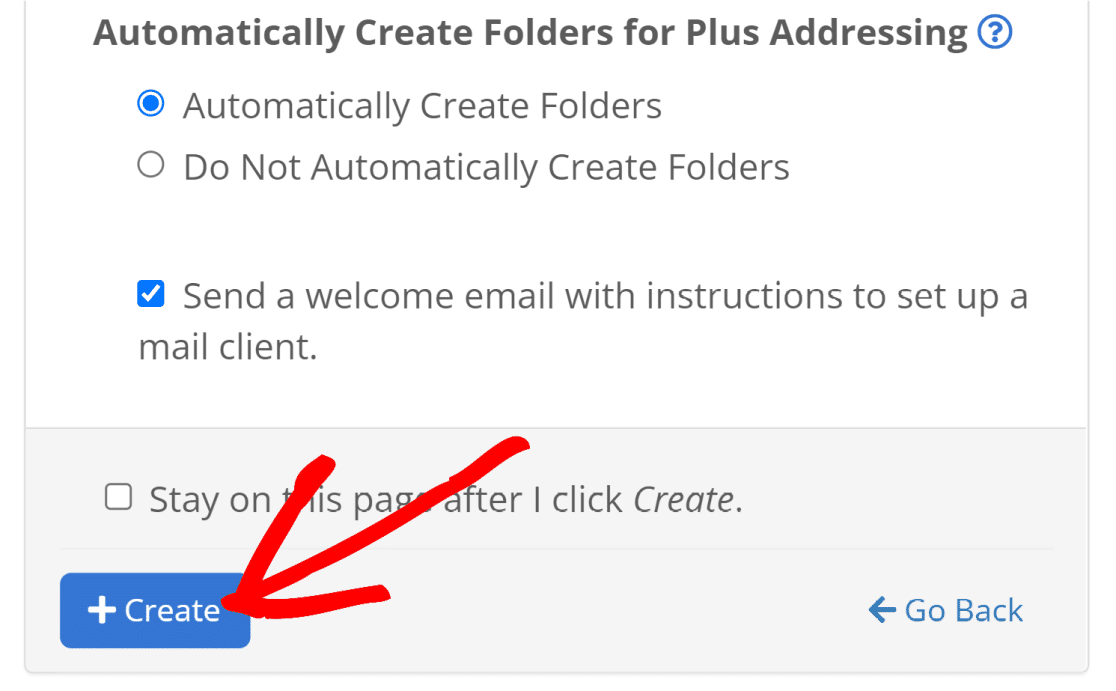
Scroll down and click **Create** to finish.
#### Step 4: Access your inbox
Back on the Email & Office page, click **Check Email** next to your new address.
Click **Open** to launch the webmail interface.
You’re in. The default webmail client (Roundcube) handles basic sending and receiving from a browser.
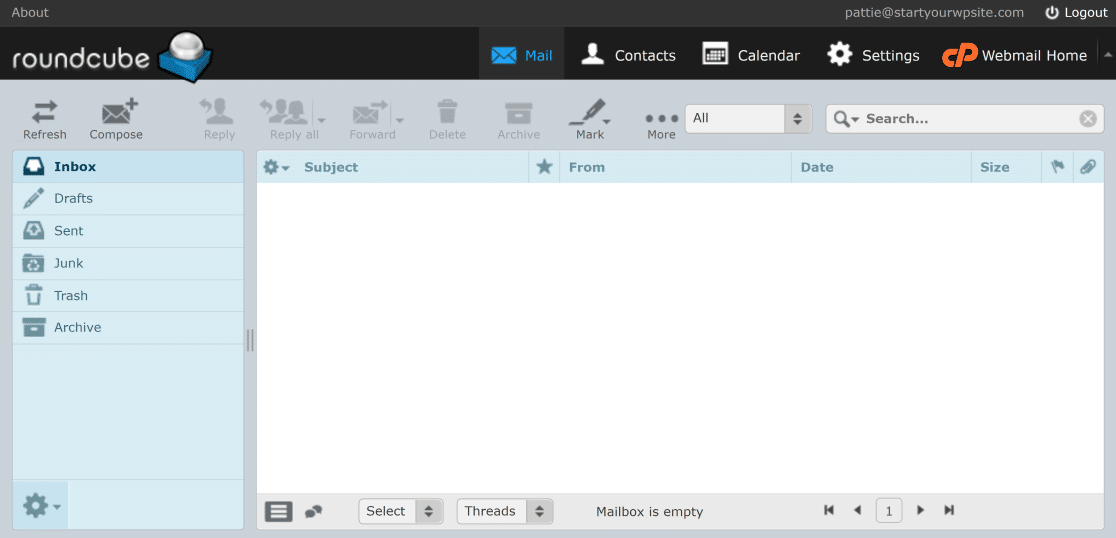To use the mailbox in a desktop client like Outlook or Apple Mail, enter the IMAP and SMTP credentials Bluehost lists under the account settings. Username is the full email address, password is what you just set.
### Method 2: Zoho Mail Forever Free
**Use this when** you already own a domain and want zero ongoing email cost.
Zoho Mail’s Forever Free plan is the cleanest “free email at your own domain” option on the list. Up to 5 users at one domain, 5 GB of storage each, full IMAP and POP support, and standard SPF and DKIM setup. The catch is the plan is intentionally limited. No mail forwarding beyond Zoho, no full-featured admin console, web-based access is restricted to Zoho’s mail UI on the free tier. For up to 5 mailboxes at a single domain with basic needs, it works.
Here’s the setup:
1. **Sign up at zoho.com/mail** and choose the Forever Free plan during signup. You’ll be asked for a domain you already own.
2. **Verify domain ownership.** Zoho gives you a TXT record to add to your domain’s DNS. Add it at your registrar, wait for propagation (usually under an hour), and confirm in Zoho’s admin panel.
3. **Add MX records.** Zoho provides two MX records (`mx.zoho.com` and `mx2.zoho.com`) to add to your DNS. These route incoming mail to Zoho’s servers.
4. **Set up SPF and DKIM.** Zoho’s setup wizard generates the exact records to paste. Adding both is non-negotiable in 2026, mail providers reject unauthenticated bulk email outright.
5. **Create user mailboxes.** From the Zoho admin console, add up to 5 users at your domain. Each gets 5 GB and full sending and receiving capability.
6. **Connect a mail client (optional).** Zoho exposes standard IMAP and SMTP endpoints if you want to use Outlook, Apple Mail, or any other desktop client.
The free plan never converts to paid automatically. If you outgrow 5 users or 5 GB, Zoho’s Mail Lite paid plan runs about $1 per user per month, which is still cheaper than most alternatives.
### Method 3: Cloudflare Email Routing plus Gmail
**Use this when** you want to send and receive at a custom domain through Gmail without paying for anything.
This is the most powerful free setup, but it’s also the most technical. The trick is splitting send and receive:
- **Incoming mail** at `you@yourdomain.com` gets routed by Cloudflare’s free Email Routing service to your existing Gmail address.
- **Outgoing mail** uses Gmail’s “Send mail as” feature with your domain’s SMTP server (which Cloudflare doesn’t provide, so you’ll pair it with a free or cheap SMTP service like SendLayer’s free tier).
The result: you read and reply at your custom domain inside Gmail, on every device, without paying for an email service.
Setup walkthrough:
1. **Move your domain DNS to Cloudflare** if it isn’t already there. Cloudflare’s free tier handles DNS for unlimited domains. Their setup wizard imports your existing records automatically.
2. **Enable Email Routing.** In the Cloudflare dashboard, open your domain, click **Email** in the left menu, and turn on Email Routing. Cloudflare adds the required MX records for you.
3. **Add a destination address.** This is your existing Gmail inbox. Cloudflare sends a verification email to confirm.
4. **Create routing rules.** A catch-all rule routes everything sent to `*@yourdomain.com` to your destination. Or set up specific addresses (`hello@`, `sales@`, etc.) and let everything else bounce.
5. **Verify receipt.** Send a test email to `anything@yourdomain.com` from a different account. It should arrive in your Gmail inbox within seconds.
6. **Configure send-from in Gmail.** Open Gmail Settings, go to the **Accounts and Import** tab, click **Add another email address** under “Send mail as.” Enter your custom address. Gmail will ask for SMTP server details, you’ll point it at whatever SMTP service you’re using to send (SendLayer’s free tier, your hosting provider’s SMTP, or Gmail’s own SMTP if you’ve configured an app password).
7. **Set the custom address as default** (optional). In the same Accounts and Import tab, mark your custom domain address as the default sender.
Two notes on this method. First, deliverability depends entirely on the SMTP service you pick for sending. Gmail’s spam filters score the sending IP, not Cloudflare. Pick a reputable transactional SMTP provider. Second, this is a forwarding setup, which means there’s no inbox at the custom domain itself. If your Gmail breaks, you lose access.
### Method 4: mail.com (free domain from a shared pool)
**Use this when** you just need a professional-looking email address and don’t have or want to register a domain.
mail.com is the only method on the list that gives you a free email address without requiring you to own a domain. You pick a username and pair it with one of mail.com’s 100-plus shared domain extensions (`@accountant.com`, `@consultant.com`, `@usa.com`, `@chef.net`, and dozens of others). The address is yours, but the domain is shared with everyone else who picks that extension.
Setup is the simplest of the methods:
1. **Visit mail.com and click Sign Up.**
2. **Pick a username and a domain** from the dropdown. The “professional” extensions (`consultant.com`, `engineer.com`, `accountant.com`) often have more availability than the generic ones.
3. **Create your password and complete signup.** The account is active immediately.
4. **Access via webmail or mobile app.** mail.com offers iOS and Android apps plus IMAP and POP access for desktop clients.
The trade-off is brand recognition. `jane@consultant.com` looks more polished than `janesmith847@gmail.com`, but it’s still not as authoritative as `jane@yourbusiness.com`. For a side project, a freelance gig, or a job hunt where you want a clean separation from personal email, mail.com works. For a business that will own a domain anyway, the other methods are better.
### Method 5: Other notable options
A few more options worth a quick mention if the four above don’t fit.
- **ImprovMX (free forwarding).** Routes anything sent to `*@yourdomain.com` to a personal inbox. Setup is one MX record plus an account at improvmx.com. The free tier covers basic forwarding with limited daily volume. Useful when you want the look of a custom domain address without managing a separate mailbox, but it’s receive-only, so you reply from your personal address unless you also set up SMTP separately.
- **Google Workspace** (paid). Not free, but worth knowing about. Pricing starts around $6 per user per month and includes Gmail at a custom domain, Drive, Docs, Calendar, and the full Workspace suite. Use this when free-tier limitations are blocking real work.
- **Fastmail.** Paid (around $5 per user per month with annual billing) with a 30-day free trial. Strong privacy positioning, no ads, custom domains across all tiers. A good fit if you want a paid alternative to Google or Microsoft.
### Which method should you pick?
The answer depends on what you already have and what you need next. A quick guide:
- **You’re starting a website from scratch and need hosting too.** Bluehost is the cleanest path. The hosting cost is what you’d pay anyway, the domain is free for year one, and the email is bundled. One vendor, one bill.
- **You already own a domain and just want free email on it.** Zoho Mail Forever Free is the answer. Five mailboxes at 5 GB each, real IMAP and SMTP support, and a setup that takes about 30 minutes once DNS is ready.
- **You already use Gmail and want to keep using it.** Cloudflare Email Routing plus Gmail’s “Send mail as” feature gives you a custom-domain address inside the Gmail interface you already know. It’s the most powerful free setup, with the most moving parts.
- **You don’t have a domain and don’t want to deal with one.** mail.com gives you a professional-looking address at a shared domain in five minutes.
- **You only need to receive at the custom address.** ImprovMX is a one-MX-record setup that forwards everything to your existing personal inbox.
- **Your needs exceed the free tiers.** Google Workspace, Fastmail, and Zoho Mail Lite all start around $1 to $6 per user per month. The jump to paid is usually worth it once your business sends real volume.
### Make sure your custom domain emails actually deliver
A free email domain only matters if the messages you send actually land in the inbox. As of 2026, that means three things: authenticated sending, a verified return path, and a domain reputation that mail providers trust.
The authentication piece is non-negotiable. Every custom domain that sends email needs three DNS records, [SPF, DKIM, and DMARC](https://wpmailsmtp.com/dmarc-spf-dkim/). SPF authorizes which servers can send for your domain, DKIM signs each message so receivers can verify the content wasn’t modified, and DMARC ties them together and tells receivers what to do when authentication fails. Gmail and Yahoo have rejected non-compliant mail outright since November 2025. Whichever method you picked above, your provider will give you the exact records to add. Zoho, Cloudflare, and Bluehost all generate them automatically during setup.
The fourth DNS record worth knowing about is the [PTR record](https://wpmailsmtp.com/what-is-ptr-dns-record/), the reverse DNS entry that maps your sending IP back to your domain. Mail providers check it on every connection. Missing or generic PTR records hurt deliverability even when SPF, DKIM, and DMARC all pass.
If your WordPress site sends email (contact form notifications, WooCommerce order receipts, password resets), there’s one more thing to set up. By default, WordPress uses PHP’s `mail()` function, which sends without any authentication. Your records can be perfect, but if WordPress is sending from your web host’s shared IP, the authentication still fails.
The fix is to route WordPress mail through an authenticated SMTP service. [WP Mail SMTP](https://wpmailsmtp.com/) does this with one-click integrations for SendLayer, SMTP.com, Brevo, Gmail, Microsoft 365, Amazon SES, Mailgun, SendGrid, Postmark, and SparkPost. The free Lite version includes a Domain Checker that validates your SPF, DKIM, and DMARC records directly inside WordPress, and the [improved email deliverability features](https://wpmailsmtp.com/features/improved-email-deliverability/) flag misconfigurations before they cause silent delivery failures.
[Fix Your WordPress Emails Now](https://wpmailsmtp.com/pricing/)
### Frequently asked questions about free email domains
The questions below come up most often when readers are picking between the methods above. Each answer is self-contained.
#### What is an email domain name?
Your email domain name is the part of the address after the @ symbol. For `jane@yourdomain.com`, the email domain is `yourdomain.com`. Most businesses use a custom email domain that matches their website rather than a shared one like `@gmail.com` or `@yahoo.com`. It looks more professional and reinforces the brand on every message.
#### Can I really get a custom email domain for free?
Yes, with caveats. Methods 1 through 3 above let you send and receive at a custom domain you own without paying for an email service specifically. The free part comes from bundling email with something you’re already paying for (hosting), using a generous free tier (Zoho), or routing through a free tool (Cloudflare). mail.com is free without needing your own domain, but you’ll be limited to its shared pool of extensions.
#### How long does setup take?
Most of the methods take under 30 minutes once you have a domain ready. Bluehost is the slowest of the four because you’re setting up hosting at the same time, budget an hour. Cloudflare + Gmail forwarding takes about 15 minutes if your DNS is already at Cloudflare. mail.com is a 5-minute signup with no DNS work involved.
#### Will a free email domain hurt my email deliverability?
A free setup doesn’t hurt deliverability by itself. What matters is the underlying authentication, your custom domain needs SPF, DKIM, and DMARC records set up correctly before transactional emails will reliably hit inboxes. Free providers like Zoho and Cloudflare let you configure these the same as paid providers. The deliverability section above covers the details.
#### How do I point my domain to my email service?
You add specific DNS records at your domain registrar or wherever you manage DNS. The exact records depend on your email provider. SPF authorizes the provider’s servers, DKIM signs your messages, and MX records direct incoming mail. Every email service provides the exact records to copy. Add them, wait up to 48 hours for propagation, and verify with the service’s connection test.
#### Will my email domain ever expire?
The domain expires (usually yearly), not the email service. If you let your domain registration lapse, both your website and your email stop working. Most registrars send renewal reminders 30, 14, and 1 days before expiration. Auto-renewal is the safest option for any domain you actually use.
#### Can I use my free custom email with Outlook or Apple Mail?
Yes for Bluehost, Zoho, and mail.com. All three give you standard IMAP and SMTP credentials you can plug into any mail client. The Cloudflare + Gmail method works through Gmail’s own clients (web and mobile) and lets you add the address as a “Send mail as” identity inside any IMAP client connected to Gmail. ImprovMX is forwarding-only, so reading happens in your existing inbox regardless of client.
#### What’s the difference between a free email domain and a free email account?
A free email account is an address at someone else’s domain, like `you@gmail.com` or `you@yahoo.com`. A free email domain means you own (or control) the part after the @, like `you@yourbusiness.com`. The first option doesn’t cost you anything but uses someone else’s branding. The second carries your own brand. This article is about the second.
### Next, Set Up an Email Subdomain
Now that you have a custom domain and email address, consider [setting up an email subdomain](https://wpmailsmtp.com/what-is-an-email-subdomain-and-why-should-you-use-one/) for transactional or marketing mail. A subdomain (like `mail.yourdomain.com`) keeps your main domain’s reputation isolated from anything you send in volume, which protects your inbox placement over time and helps avoid common problems like [WordPress emails going to spam](https://wpmailsmtp.com/wordpress-emails-going-to-spam/) or [WooCommerce notifications failing to send](https://wpmailsmtp.com/woocommerce-not-sending-emails/).
For a broader overview of what makes the difference between inbox and spam, see our guide to [email deliverability](https://wpmailsmtp.com/email-deliverability/).
[Fix Your WordPress Emails Now](https://wpmailsmtp.com/pricing/)
Ready to fix your emails? [Get started today](https://wpmailsmtp.com/pricing) with the best WordPress SMTP plugin. If you don’t have the time to fix your emails, you can get full White Glove Setup assistance as an extra purchase, and there’s a 14-day money-back guarantee for all paid plans.
**Categories:** WordPress Tutorials
**Tags:** Bluehost, custom domain, custom email, email domain
---