Wondering how WP Mail SMTP can tell if your emails are reaching users’ inboxes? Our plugin uses two methods to determine if emails are delivered, depending on which mailer you use.
This guide will explain how WP Mail SMTP is able to verify email delivery.
Verifying Email Delivery With Webhooks
The first way WP Mail SMTP verifies email delivery is with webhooks subscriptions. This method is available for the following mailers:
When you enable email logging in WP Mail SMTP, a webhook connection will automatically be created between your site and your mailer account. Whenever one of your emails is successfully delivered, an event will be triggered on your mailer’s server. Then your email logs will be updated with the appropriate status.
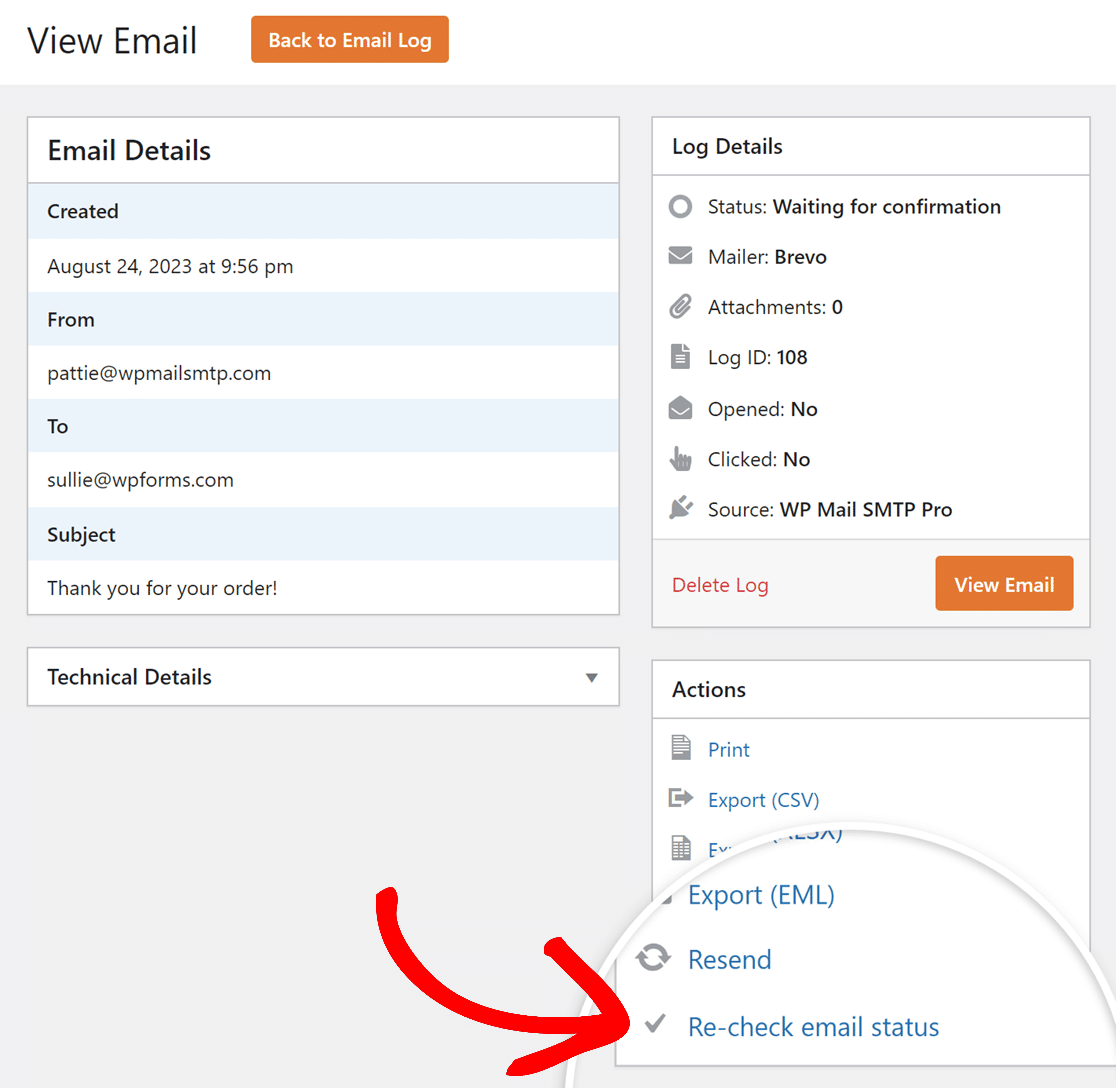
WP Mail SMTP categorizes email statuses into: Failed, Sent, Confirmed, and Waiting which can be viewed from WP Mail SMTP » Email Log. If an email is in the Waiting state, this means the delivery status is still being confirmed.
To reconfirm the status of Waiting emails, click on its Subject to open the individual email log page. From there, click on Re-check email status under the Actions section to get its latest status.

Webhooks are the default method WP Mail SMTP uses to verify email delivery because it’s more accurate than the Action Scheduler method.
Using Webhooks With Constants
If you’ve used constants to secure your WP Mail SMTP settings, then you must manually unsubscribe from your webhooks connection if you change your mailer settings.
You can do so from your mailer account dashboard or in your WP Mail SMTP Email Log settings.
Note: SMTP.com does not enable you to unsubscribe from webhooks in your account dashboard. You’ll need to do so from your WP Mail SMTP Email Log settings instead.
Securing Your Webhooks Connection
Since incoming webhook requests are configured at the server level, there’s usually no need to take additional steps to secure it.
However, some mailers enable you to whitelist your IP address or take other actions to protect your site if you feel it’s necessary. Check out the resources below or contact the support team for your mailer for details.
- Protecting webhooks connections in Postmark
- Securing your webhooks in Brevo (Sendinblue)
- Webhooks authentication in SparkPost
To make your Mailgun webhooks more secure, first get the HTTP webhook signing key from your Mailgun account.
Then, you’ll need to access your site files and add the signing key as a constant in your wp-config.php file.
Note: If you’re not sure how to locate and edit the wp-config.php file, check out WPBeginner’s guide for more details.
Once the file is open, paste the following code snippet.
Make sure to replace your-signing-key-here with your actual HTTP webhook signing key. After making the changes, save and close the wp-config.php file.
Disabling the REST API While Using Webhooks
Please note that WP Mail SMTP webhooks require the REST API to function properly.
If the REST API is disabled for your site, all emails will have the Waiting status because incoming requests will be blocked.

Verifying Email Delivery With Action Scheduler
If WP Mail SMTP cannot use webhooks to verify email delivery, it will use Action Scheduler instead.
This is the case if you are using an unsupported mailer, if you’re running a WordPress multisite installation, or if your webhooks connection fails for some reason.
Action scheduler is a library that manages cron jobs in WordPress. For the purposes of verifying email delivery for WP Mail SMTP, it will determine your emails’ status via a secure API. Over a period of 45 minutes, it will check 3 times to see if an email was delivered.
If the API does not return any data after those 3 attempts, the email will be marked as sent and an error message reading, “API did not return any data” will appear.
Frequently Asked Questions
Below, we’ve answered some of the top questions about email deliverability statuses in WP Mail SMTP.
Why is my email status showing Waiting for confirmation?
This can occur if your web host is blocking incoming webhook requests on your site. In Cloudflare for instance, if you have the Bot Fight Mode enabled on your account, it’ll prevent incoming webhooks, leading to the Waiting for confirmation status.
That’s it! Now you know how WP Mail SMTP checks that your emails have been delivered.
Next, would you like to learn more about how to monitor your emails’ status with email logs? Check out our guide to viewing email logs in WP Mail SMTP for all the details.
