AI Summary
Would you like to use your Gmail or Google Workspace (formerly G Suite) account to fix email delivery issues on your site? WP Mail SMTP’s Google Workspace / Gmail option uses Google’s API to securely authenticate your site’s emails, helping them to arrive successfully in your users’ inboxes.
This tutorial will show you how to set up WP Mail SMTP using the Google Workspace / Gmail mailer with your Gmail or Google Workspace email address.
Installing and Configuring the WP Mail SMTP Plugin
Before getting started, you’ll need to install and activate the WP Mail SMTP plugin.
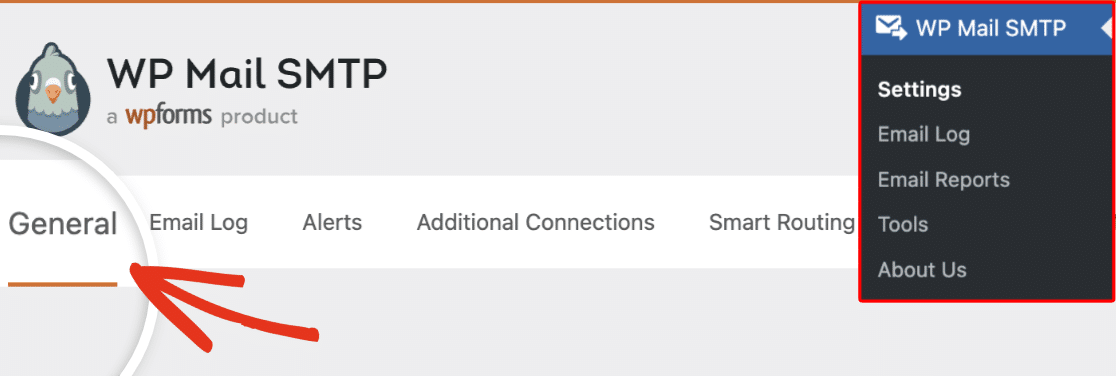
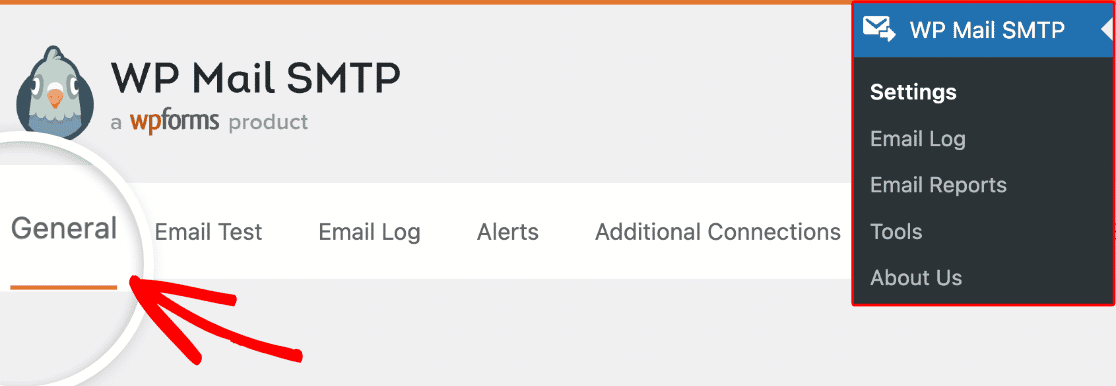
Once you’ve verified your license, you’re ready to configure the plugin’s settings. You can find them by going to WP Mail SMTP » Settings and looking under the General tab.
Below, we’ll cover the settings needed for this setup.
From Email
This is the email address that all of your site’s emails will be sent from. You can type your email address into the field provided, including any aliases you’ve configured, after you connect your site to the Gmail API in later steps.

The Force From Email option will make it so that all the emails sent from your site come from the address you’ve entered.
Note: In order to use multiple Gmail aliases throughout your WordPress site as the From Email address, make sure to leave the Force From Email box unchecked.
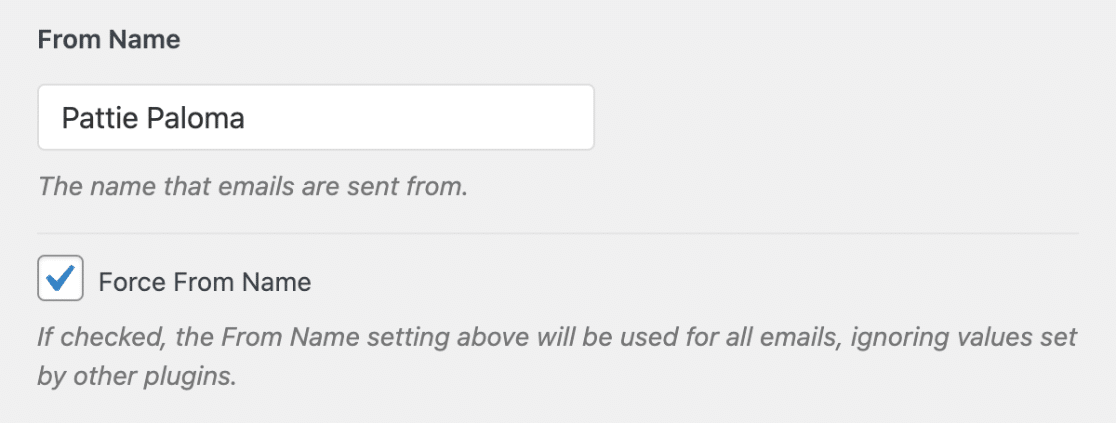
From Name
Below the From Email, you can set the From Name. This is the name associated with the emails your site sends out. By default, it will be set to your site’s name, but you can adjust it to anything you’d like.
You can also check the Force From Name option to apply this setting site-wide.
Mailer
This is where you can choose which mailer you’d like your site to use. Select the Google / Gmail option.
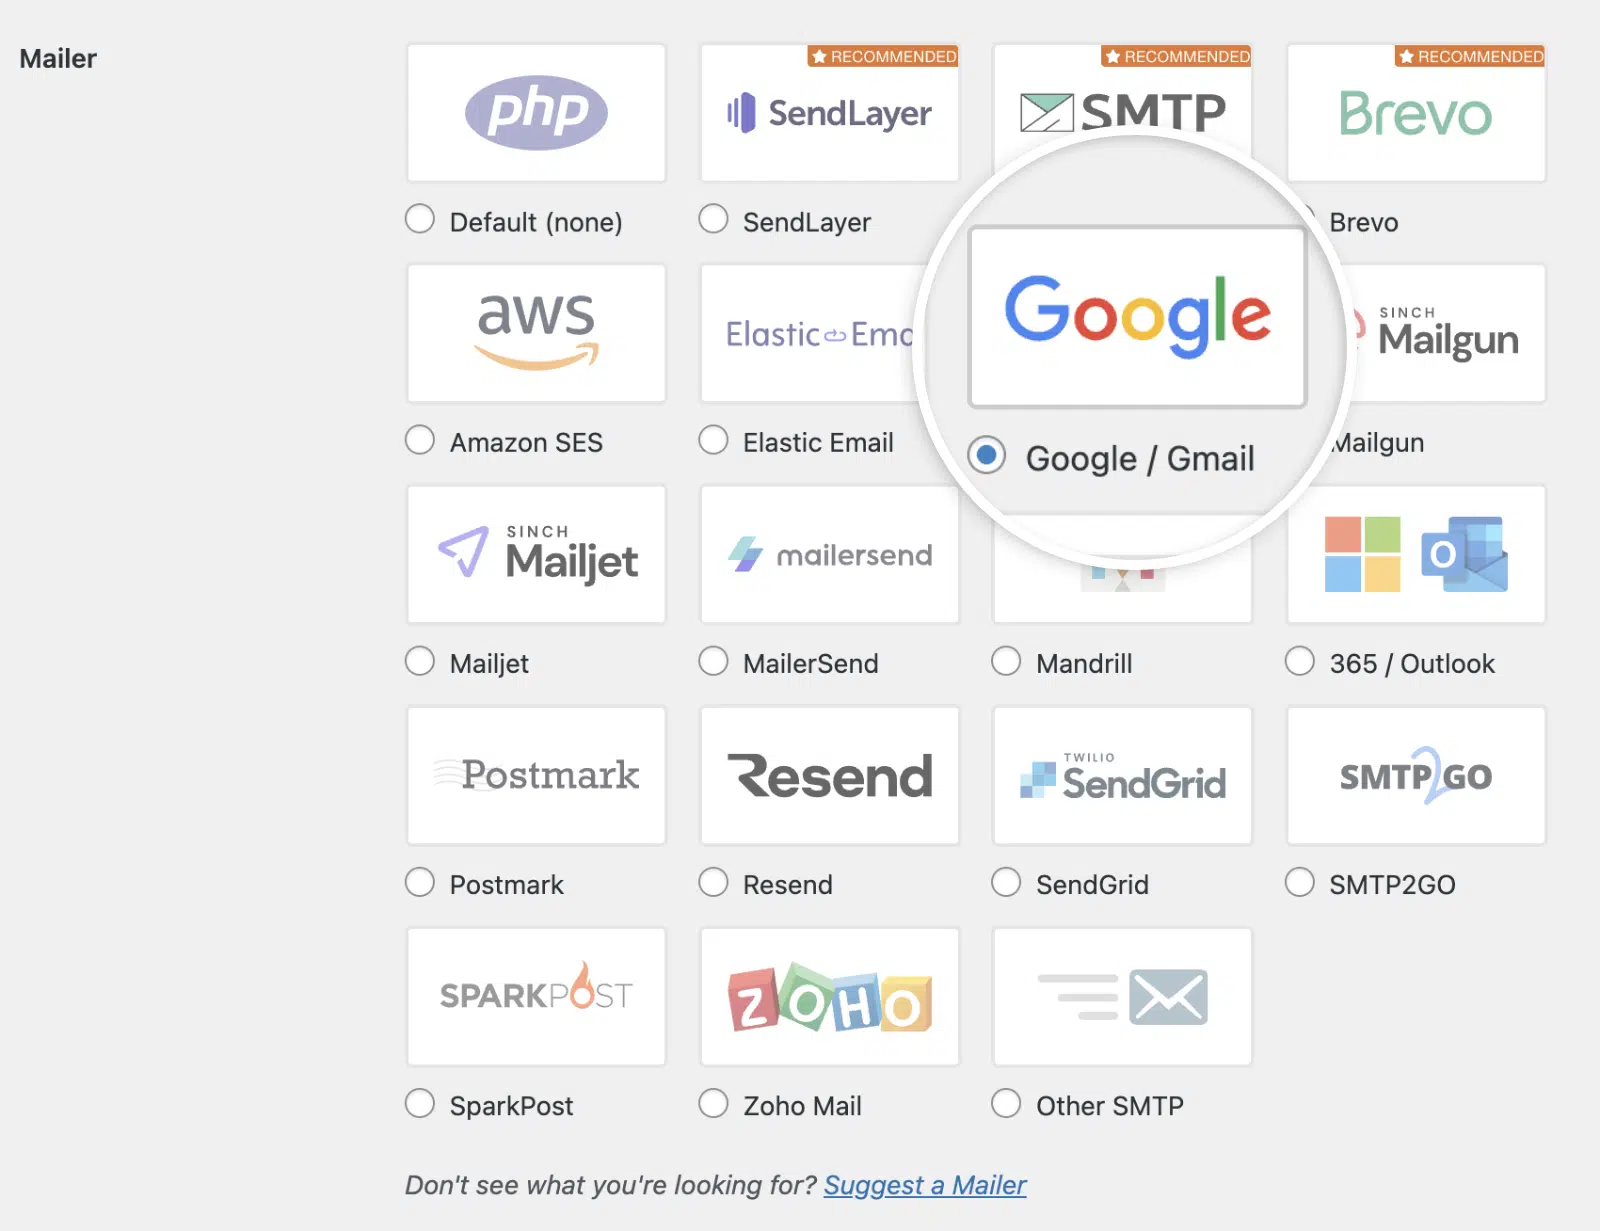
Once you’ve chosen this mailer, you should see a new section appear titled Google / Gmail with more authorization options.

There are two ways to configure the Google Workspace / Gmail mailer: Using the One-Click Setup or manually creating a custom Google app to generate your Client ID and Client Secret.
If you’re deciding between One-Click Setup and manual setup, here’s a quick comparison:
| Manual Setup | One-Click Setup (Pro) | |
|---|---|---|
| Ease of Use | Step-by-step guide to assist you | Instant connection with minimal steps |
| Technical Steps | Requires creating a Google app and configuring credentials | No manual configuration needed |
| Time Required | Approximately 30-60 minutes | Less than 2 minutes |
| Support | Access to extensive documentation | Priority support from our team |
| Ideal For | Users who prefer detailed setup and learning process | Users seeking the fastest and easiest setup |
Looking for the quickest way to get started? One-Click Setup simplifies the process so you can start sending emails right away.
👉 Upgrade to Pro & Enable One-Click Setup
However, if you prefer to set things up manually, jump to the creating a web app section of this guide to continue.
Activating One-Click Setup
For an easier and quicker email setup, we recommend using the One-Click Setup feature. It allows you to connect your site to Gmail / Google Workspace with just a few clicks.
After selecting Google / Gmail as your mailer in the WP Mail SMTP settings, you will find the option to activate the One-Click Setup. Simply switch this toggle to the ON position to begin the simplified setup process.

For more detailed information on the One-Click Setup process, be sure to check out our guide on Google Workspace / Gmail Mailer One-Click Setup.
Creating a Web App in Your Google Account
You’ll be coming back to WP Mail SMTP’s settings page a little later, so for this step, open a new tab or window in your browser.
In the new tab or window you’ve opened, log in to your Google account and open your Google Cloud Console.
Note: Before continuing, be sure to sign out of all other Google accounts besides the account you’ll be using for the SMTP setup.
Also, if you’re using Google Workspace, make sure that the Google account you use has permission to send emails (in other words, access to its own inbox).
If it’s your first time using Google Cloud Console, you may see a pop-up asking you to select your country and agree to the Terms of Service. Go ahead and do so, then click on AGREE AND CONTINUE to move on to the next step.

If you’ve logged in to the Google Cloud Console before, you’ll likely bypass the Terms of Service.
Creating or Choosing a Project
First, you’ll need to choose a project to use for your app. You can select an existing one or create a new one.
To do so, click on the projects dropdown in the toolbar at the top of your dashboard.

In the popup that appears, select an existing project from the list or click on New Project in the top right corner.

If you selected an existing project, move on to the next step. For a new project, enter a project name and select an organization and location from the dropdowns.

Then click on the CREATE button.
Enabling the Gmail API
Next, you need to enable the Gmail API for your project. In your Google Cloud Console sidebar, go to APIs & Services » Library.
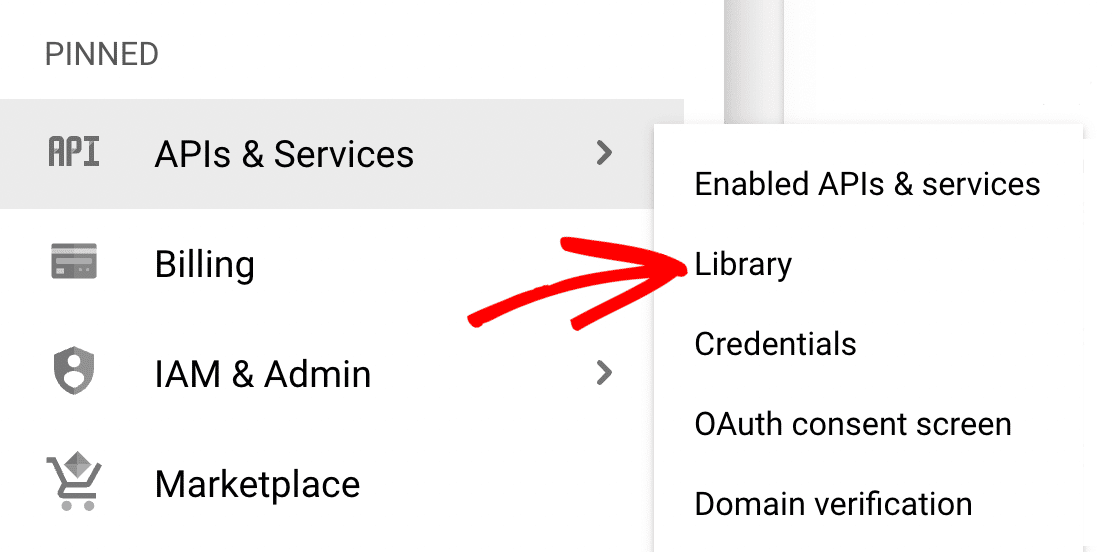
Note: If you don’t see APIs & Services in the sidebar, it may be found by scrolling down and clicking on MORE PRODUCTS.
Then look under Category and click on Google Workspace, or enter “Gmail API” in the search bar.

Click on the Gmail API result.

On the Gmail API page, click on the blue ENABLE button.

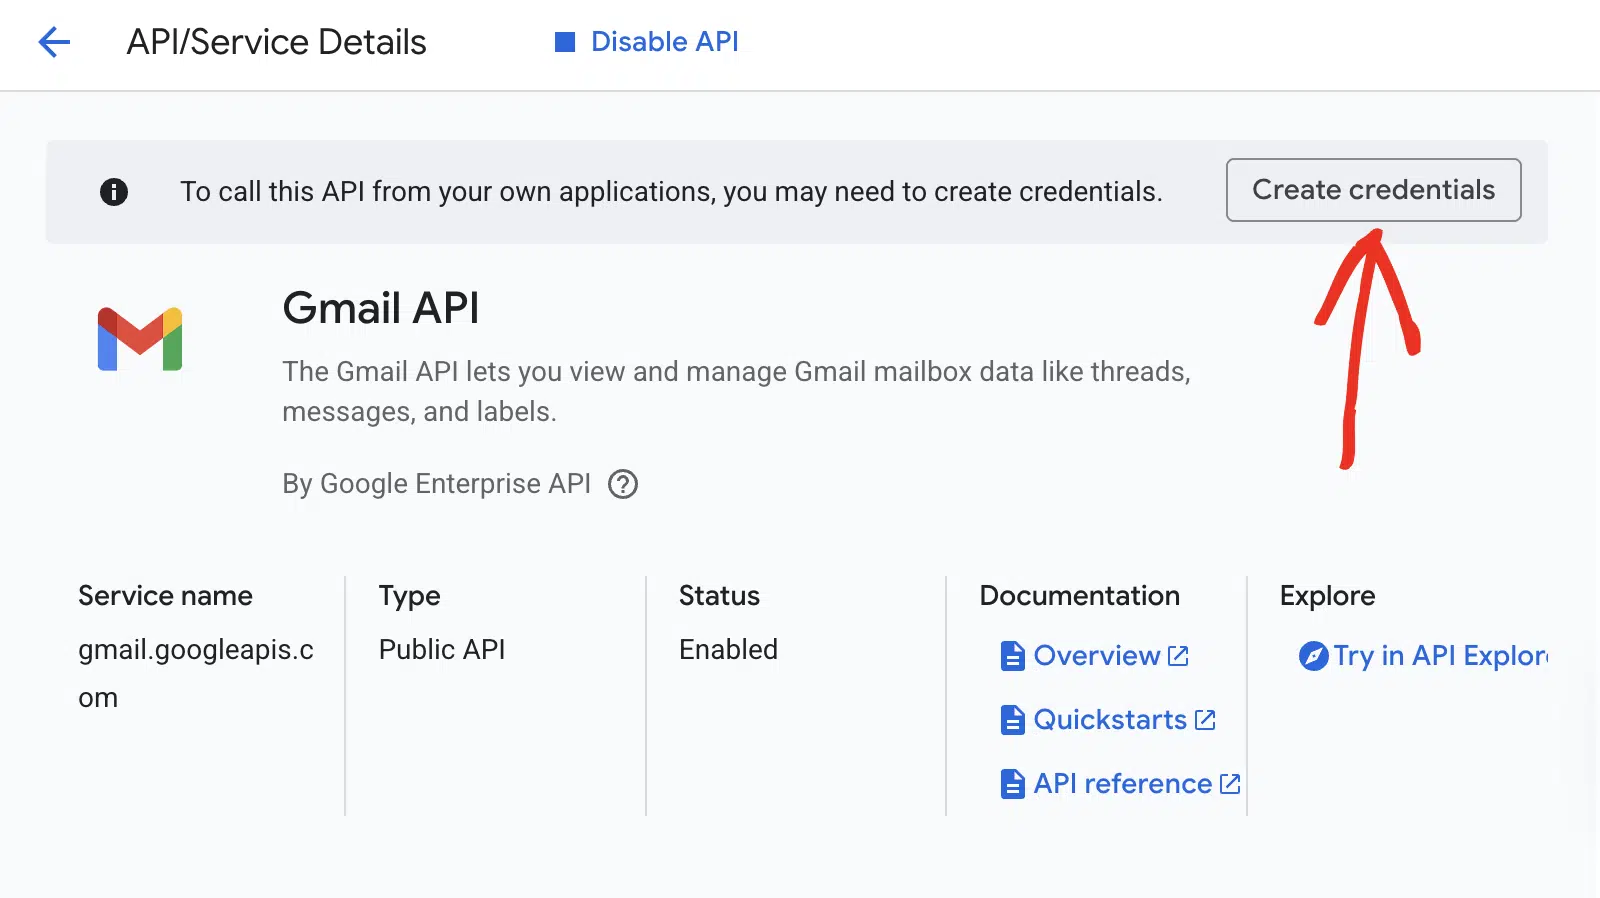
Creating Your Application’s Credentials
After you enable the Gmail API, you should be redirected to the Gmail API Overview page. Here, click the Create credentials button.
On the next page, Google will ask a few questions to determine the Credential Type you need. From the Select an API dropdown, choose Gmail API.
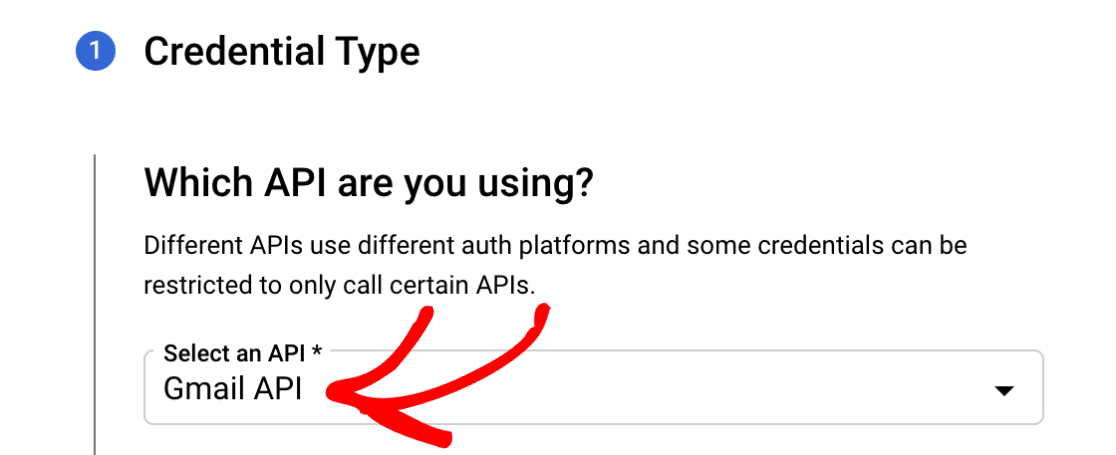
Note: If you don’t see an option for the Gmail API in the dropdown, be sure that you have the Gmail API enabled for your account.
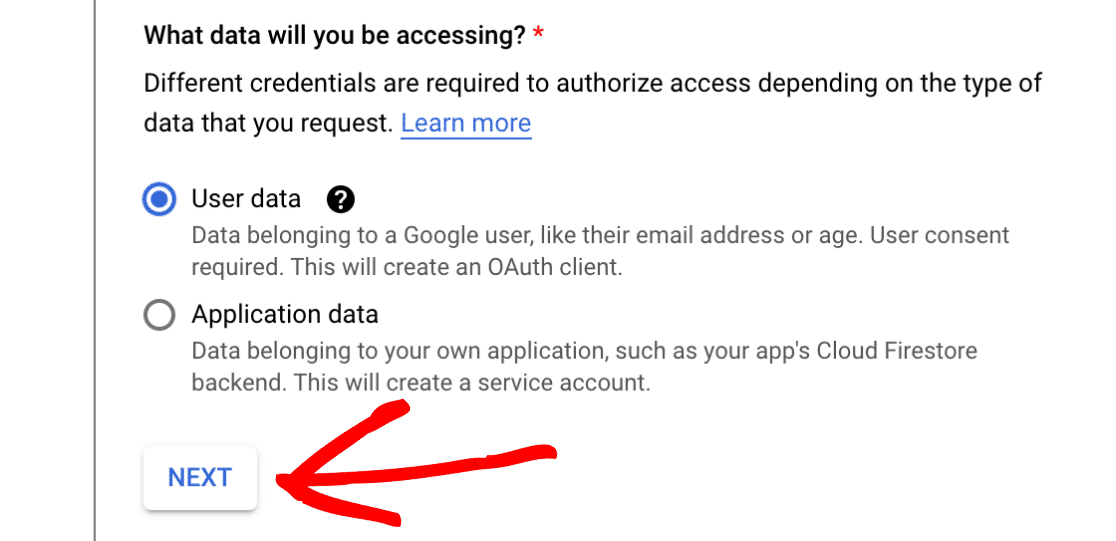
Next, under What data will you be accessing?, select the User data option. Then click the NEXT button to proceed.
Configuring Your OAuth Consent Screen
Google will then ask for some basic information about your app.
This section is mostly for personal use since no one else will be using your app. However, some fields are still marked as required:
- App name: Enter an app name of your choice (e.g., Pattie’s App).
- User support email: Select your email address from the choices provided.
- App logo: If you’d like, you can upload a logo for your app. This is optional.
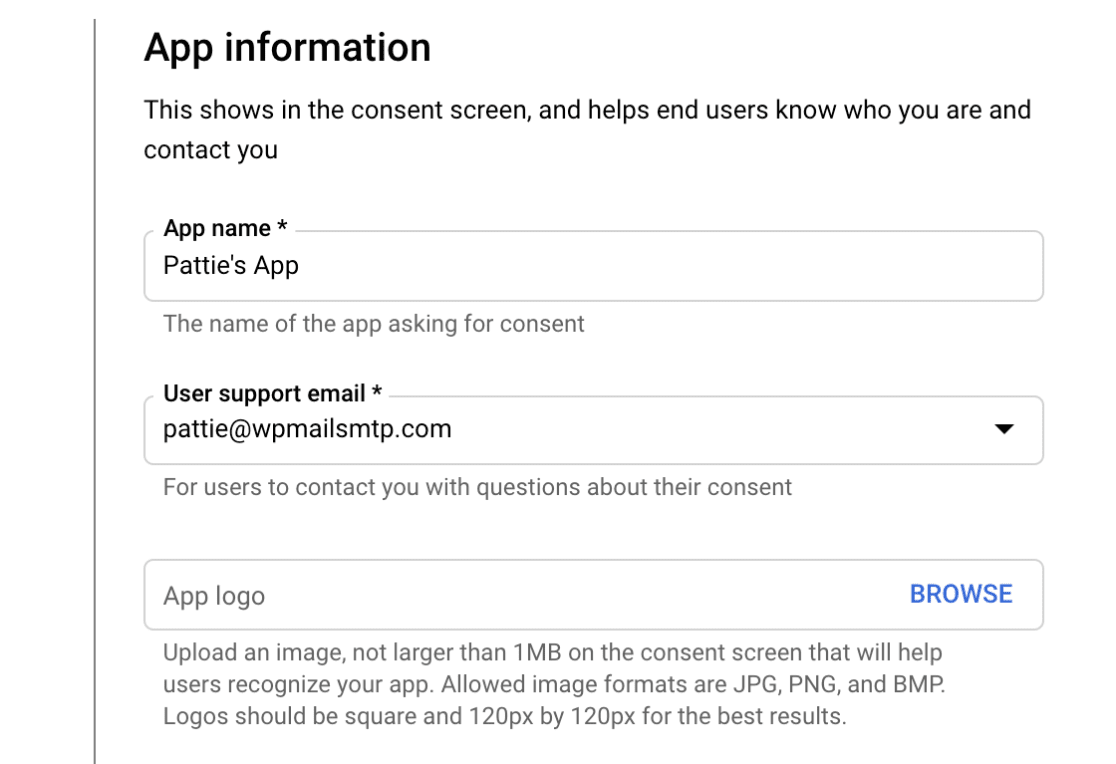
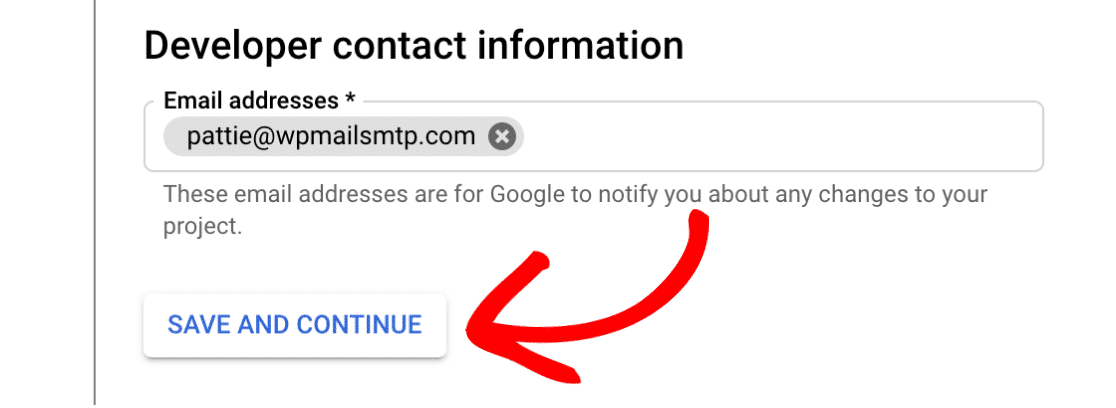
Finally, add your email address in the Email addresses field. Then click on the SAVE AND CONTINUE button to proceed to the next step.
Configuring Scopes (Optional)
This is an optional step that we’ll be skipping for this tutorial. Scroll down to the end of the Scopes section and click on the SAVE AND CONTINUE button to proceed.
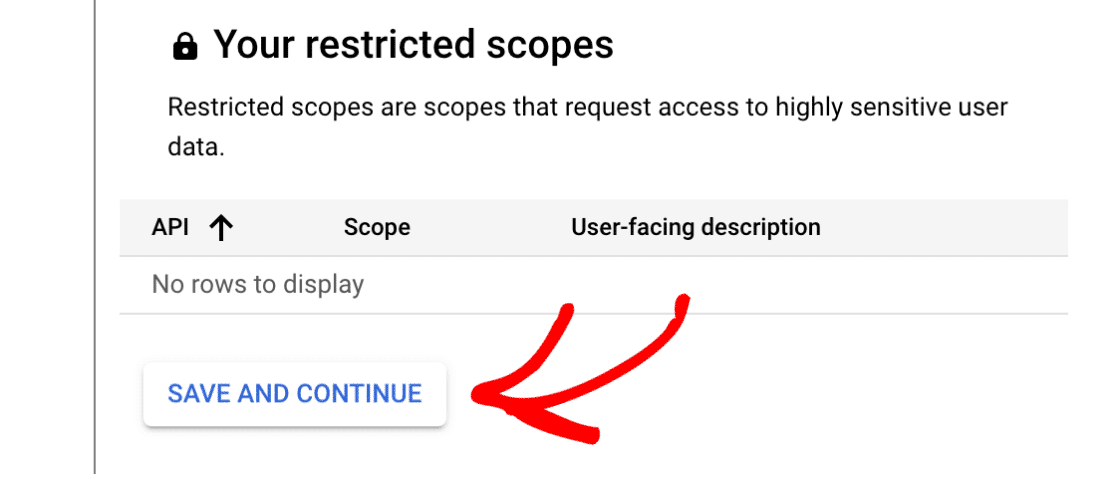
Note: For more information on Gmail API scopes, please see Google’s developer documentation.
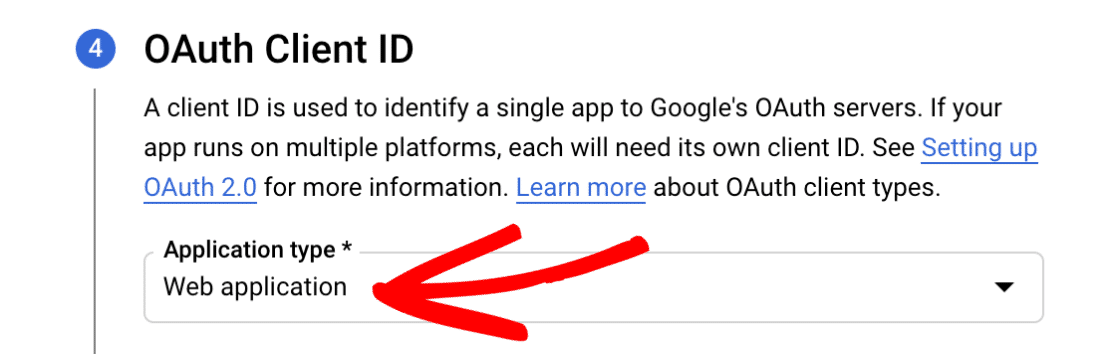
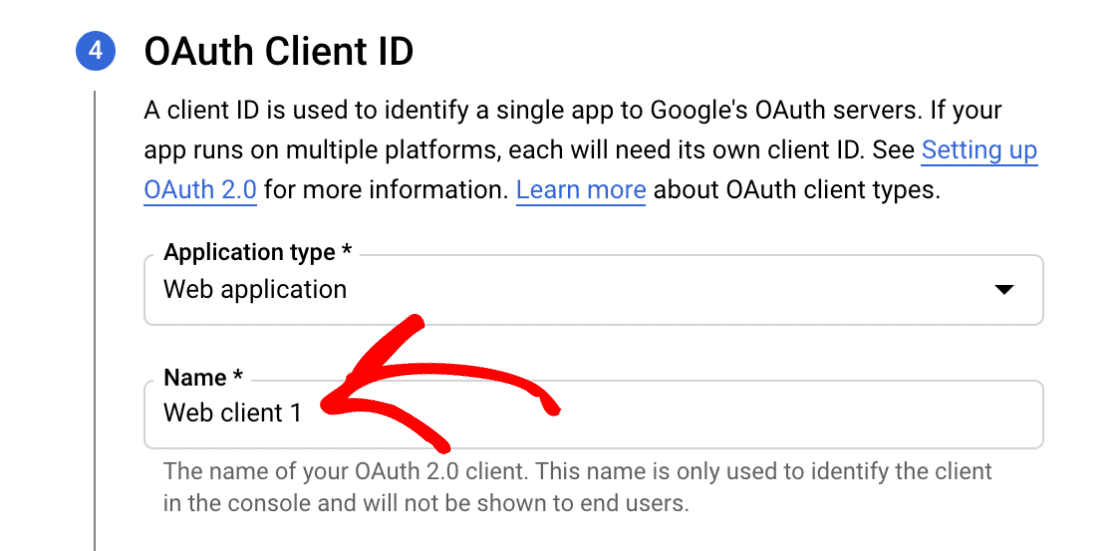
Setting Up Your OAuth Client ID
Next, you’ll need to fill out some information about your OAuth Client ID.
From the Application type dropdown, select the Web application option. Once you do so, more fields will automatically populate.
You can leave the Name field as the default value or change it to something more relevant. For this example, we’ll keep the default name, Web client 1.
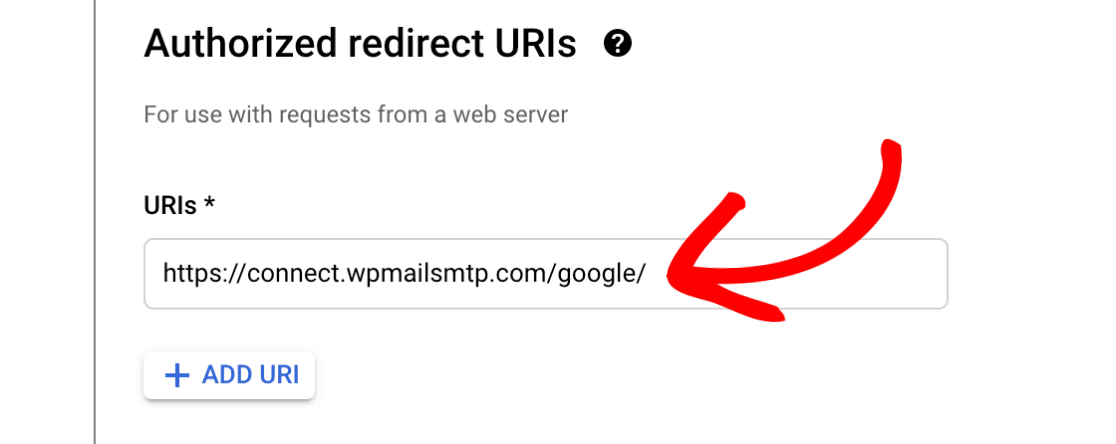
Next, skip the Authorized JavaScript origins section and scroll to Authorized redirect URIs.
Click on the + ADD URI button and input the following: https://connect.wpmailsmtp.com/google/. You can also copy this value from your WP Mail SMTP settings and paste it here if you prefer.
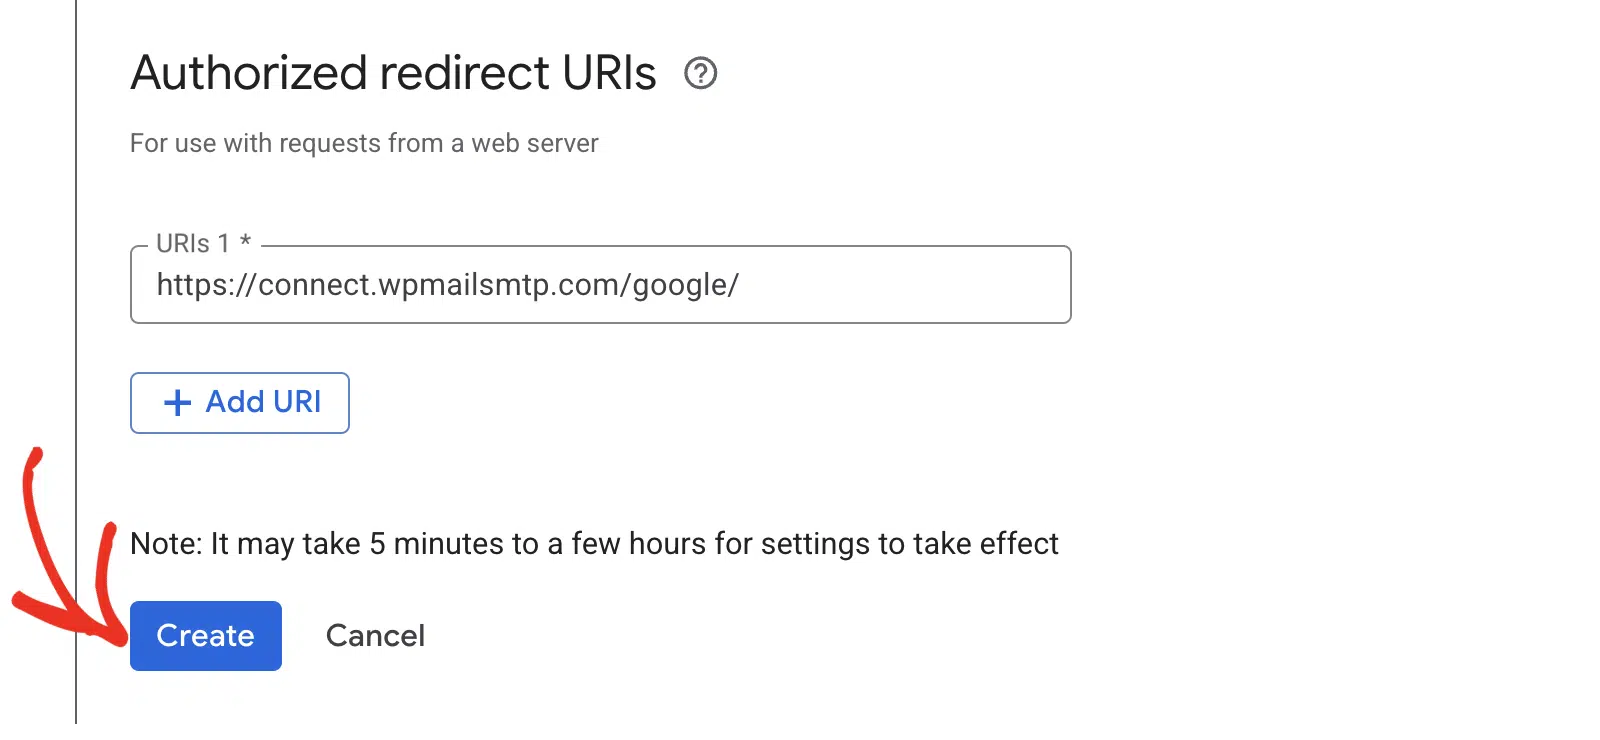
Then click the Create button to complete this step.
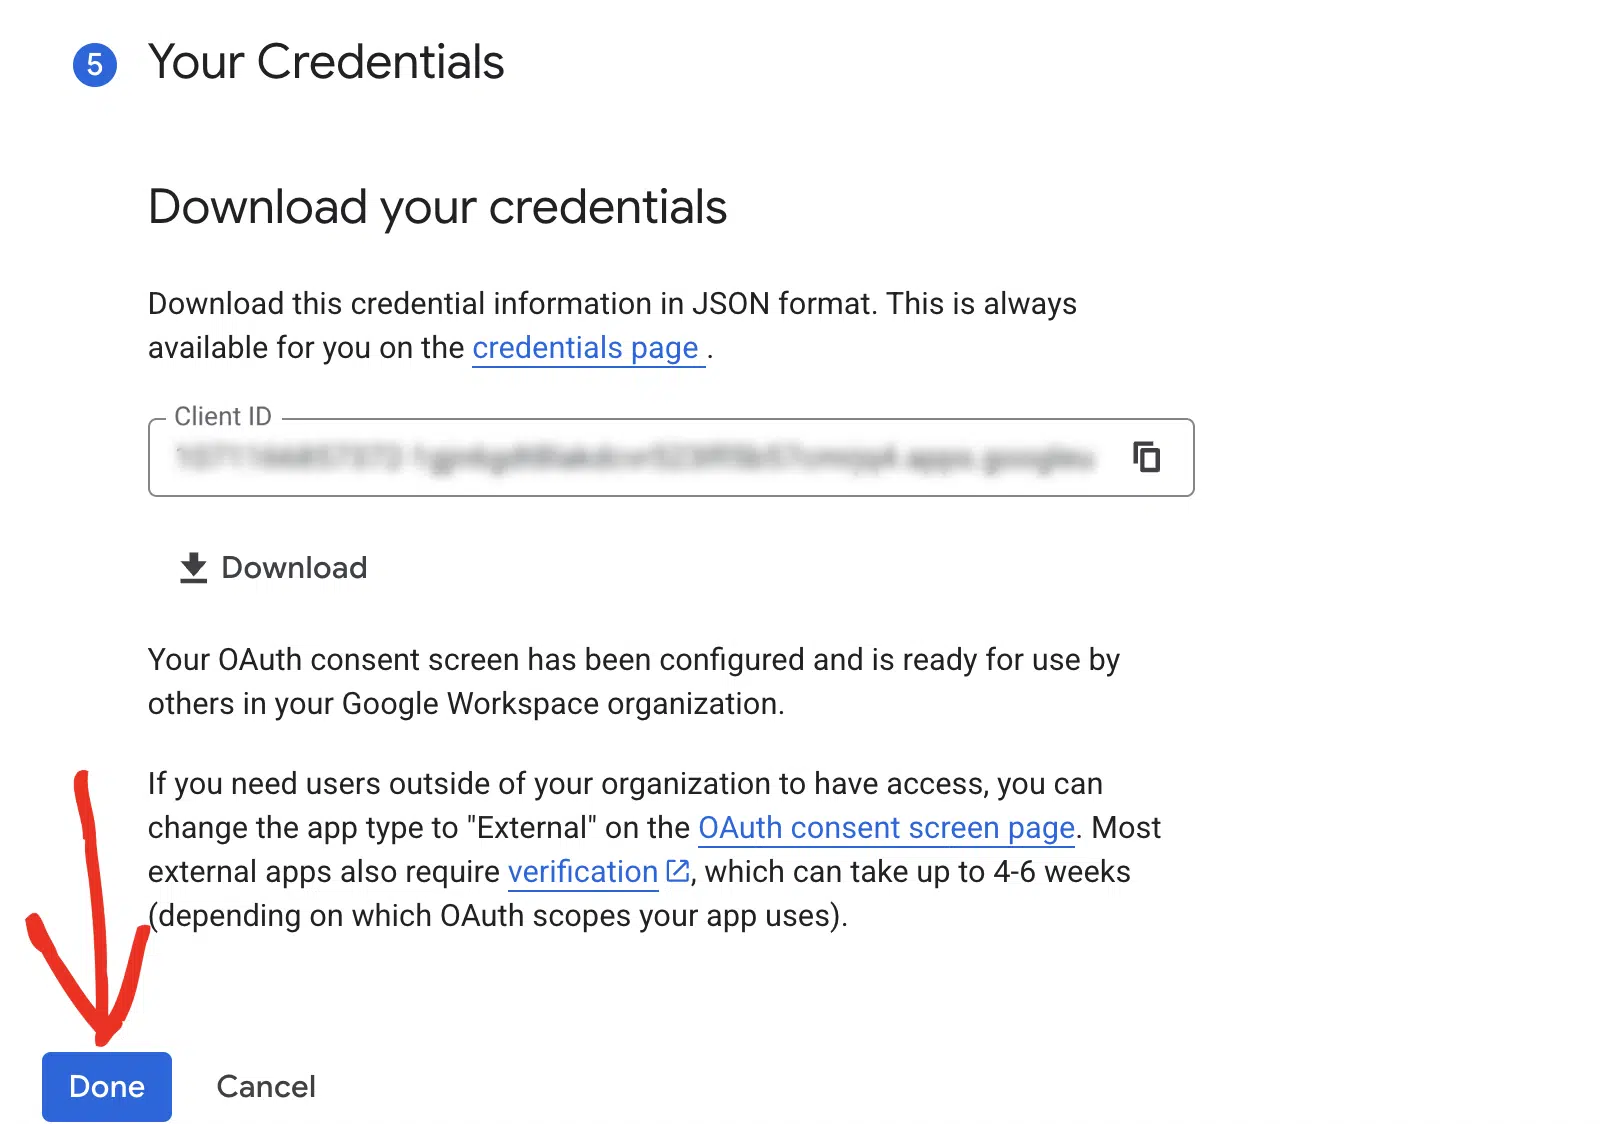
Once your app has been created, the Your Credentials section will expand to show you your Client ID. There’s no need to copy it now, as you’ll access it from another area in a later step.
Instead, go ahead and click the DONE button at the bottom of the page.
Updating the Publishing Status From Testing to Production
Google will put your app into Internal mode by default. It’s really important that you switch it to External mode and publish it. Otherwise, your app will be super limited and won’t function properly.
In your Google Cloud Console sidebar, go to APIs & Services » OAuth consent screen.
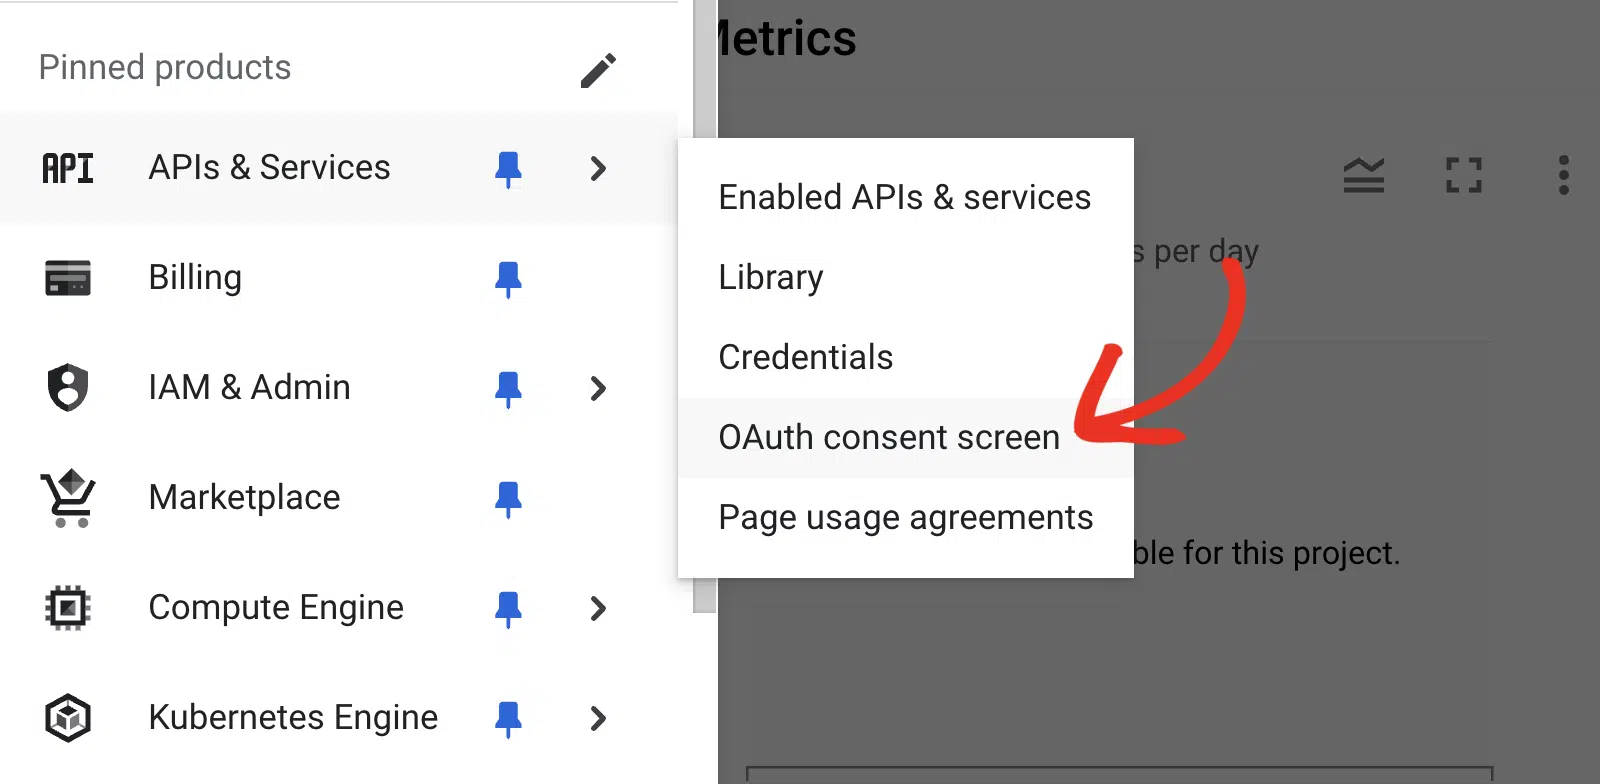
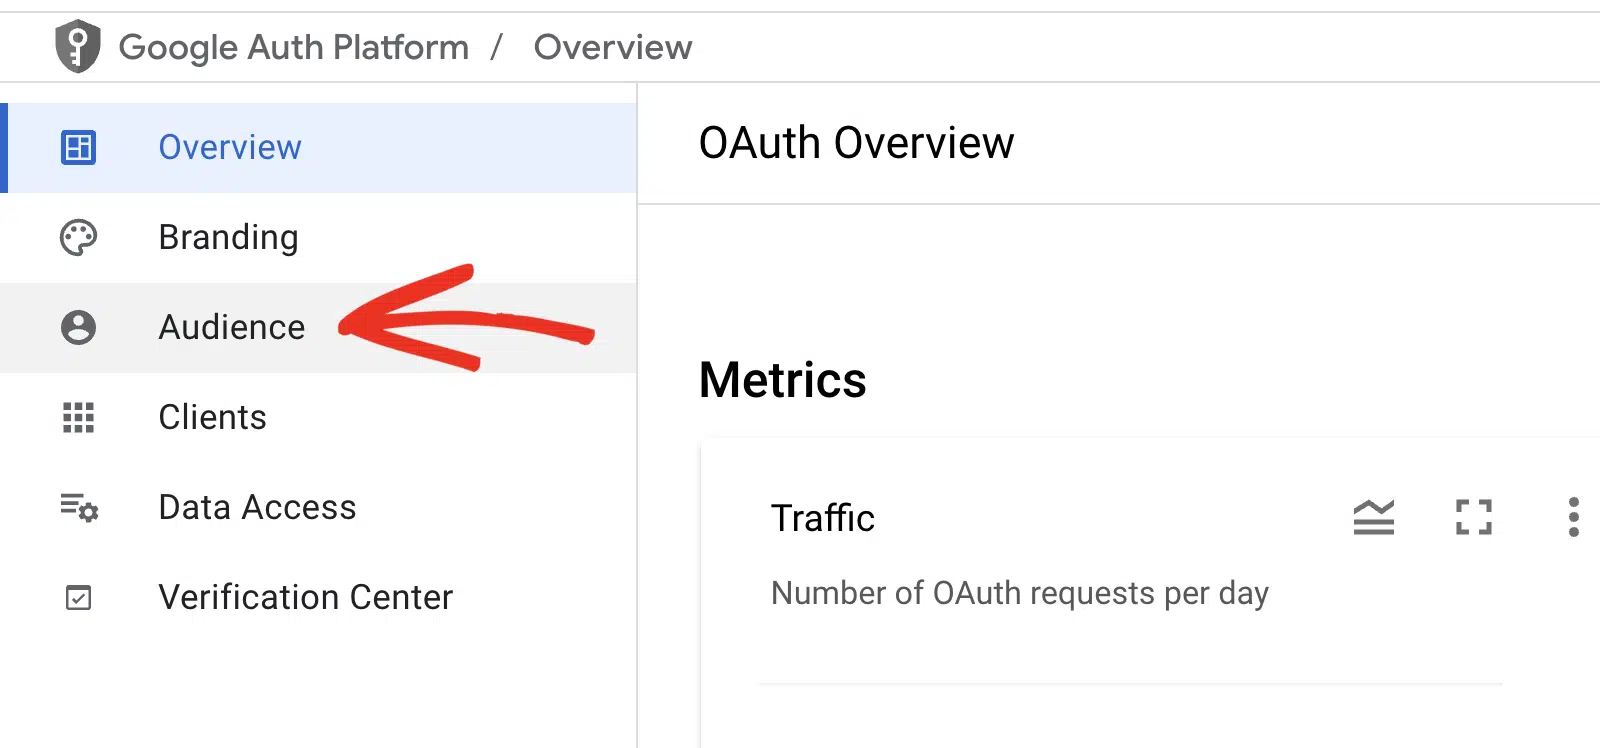
Then select the Audience tab.
The exact screen you’ll see next will vary depending on whether you’re using a free Gmail account or a Google Workspace account.
Google Workspace Users
Under User type, click on the MAKE EXTERNAL button.
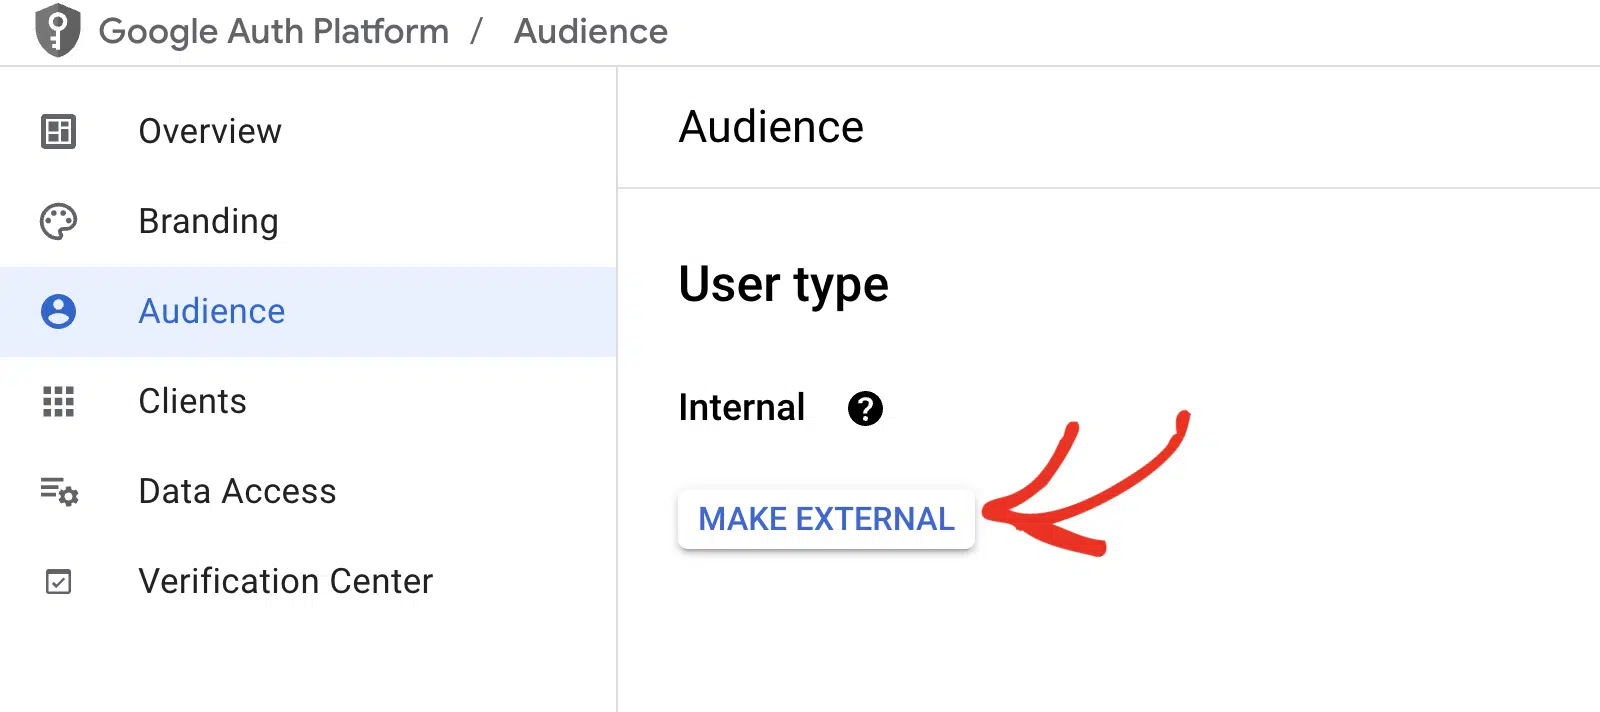
Note: Only users within your organization can access your app if the User type is set to Internal. For example, if your Workspace domain is example.com, users can only access your app using an @example.com email address.
External email addresses will see an error that reads Error 403: org_internal when granting WP Mail SMTP access to your app.
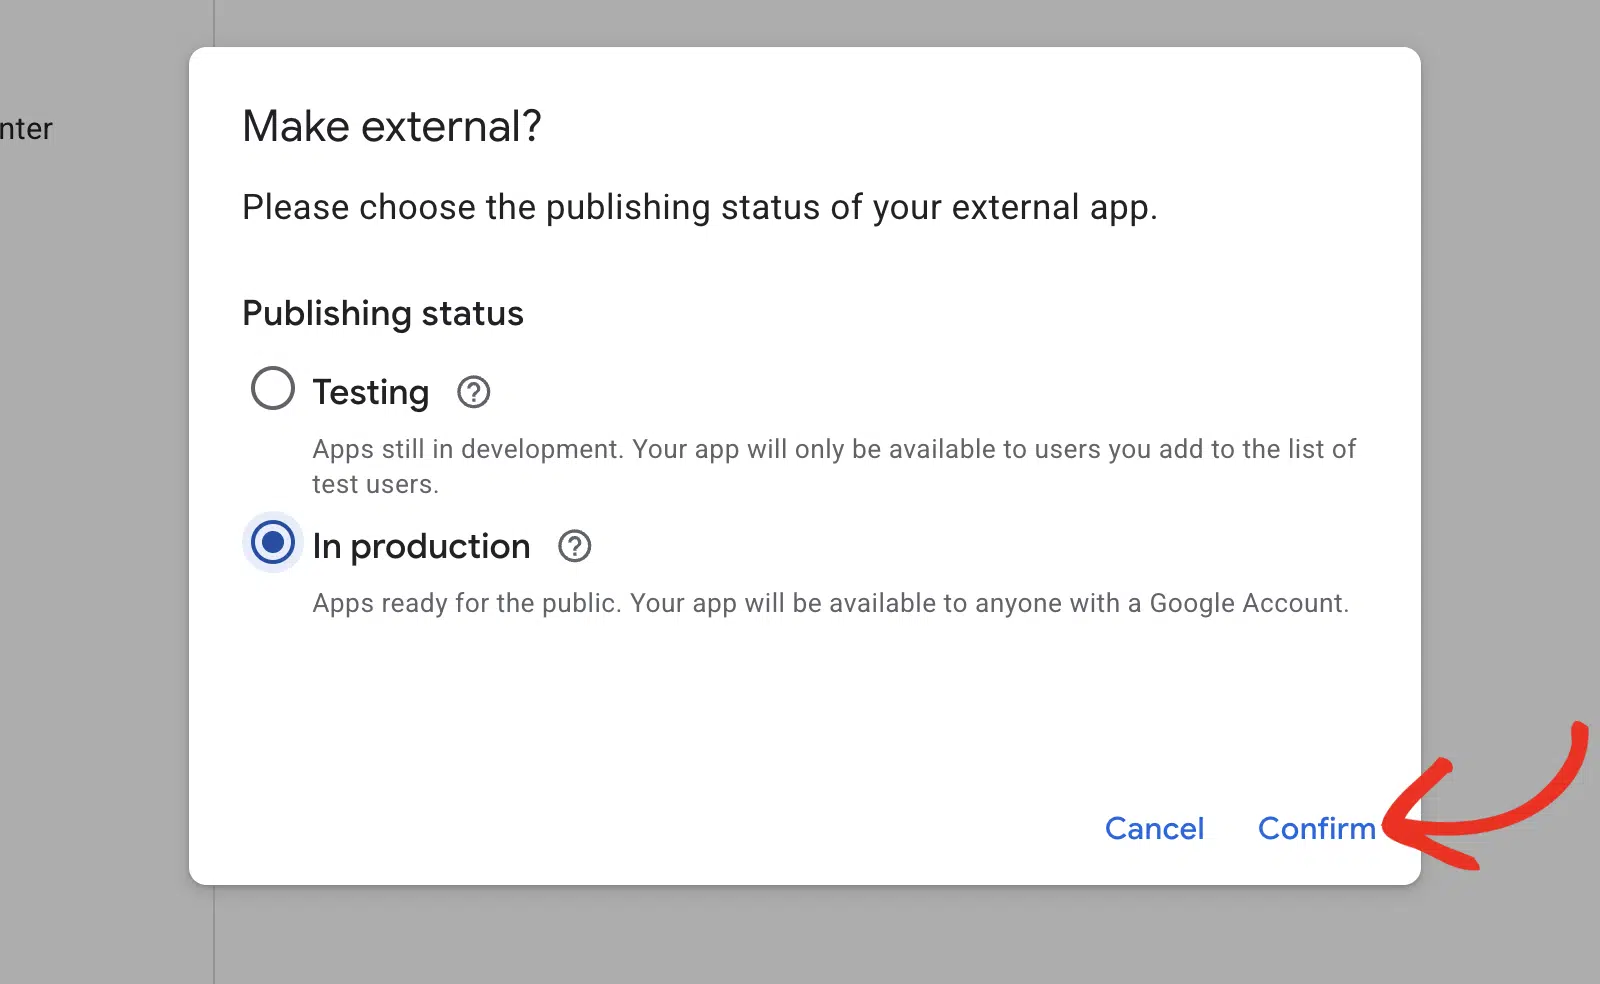
In the pop-up window that appears, select the In production option. Then click on Confirm.
Gmail Users
If you’re not using Google Workspace, you won’t see the MAKE EXTERNAL option. Instead, you’ll need to publish your Google app.
Under Publishing status, you’ll see the app status is set to Testing. Go ahead and click the PUBLISH APP button to update your app status.
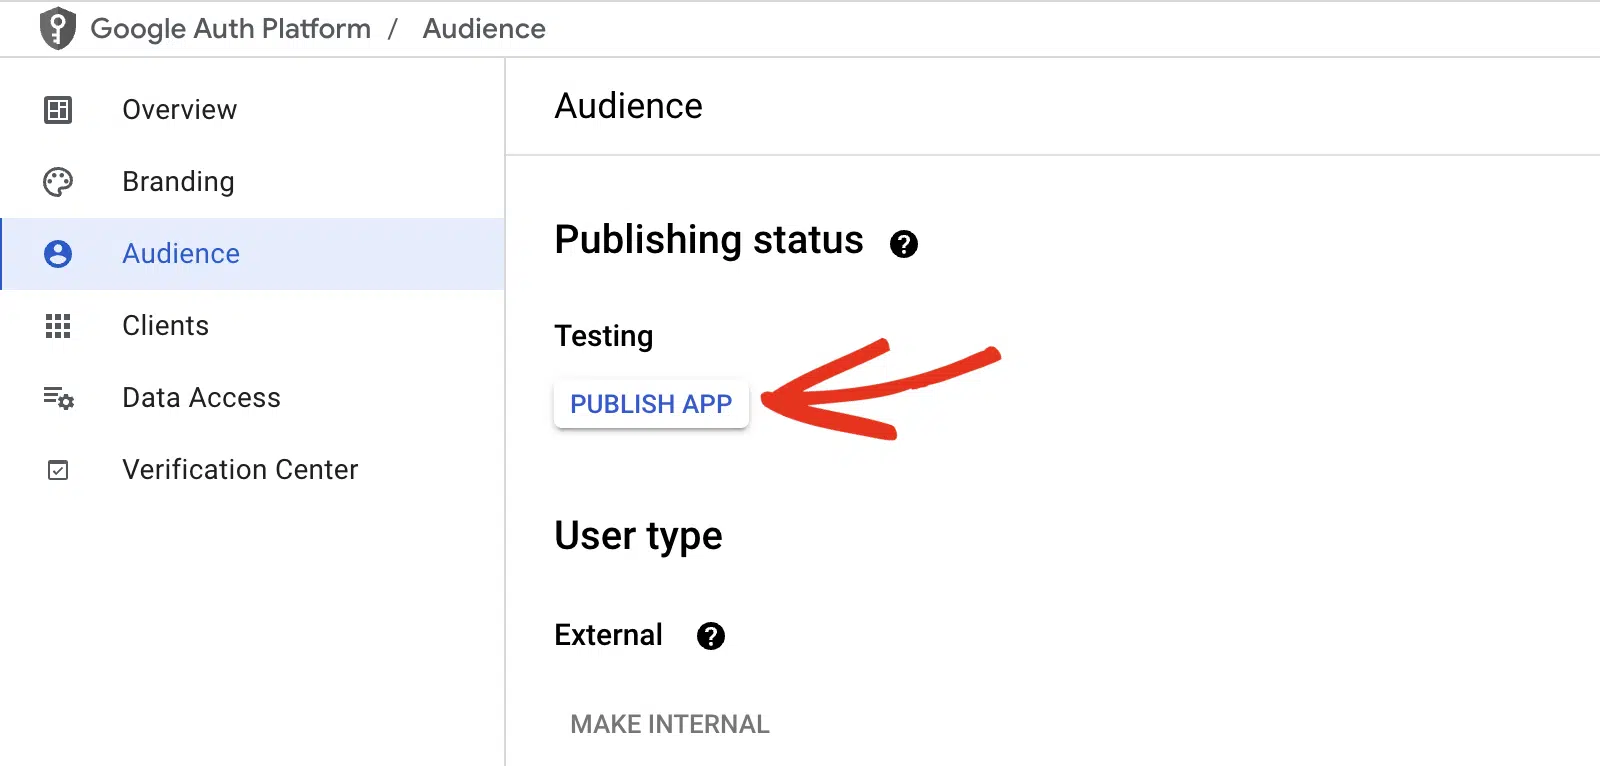
In the overlay that appears, click CONFIRM to publish your app.

Once confirmation is complete, you’ll see that your app’s Publishing status is now In production.

Granting Your Site Google / Gmail Permissions
Next, navigate to APIs & Services » Credentials in the left side menu.
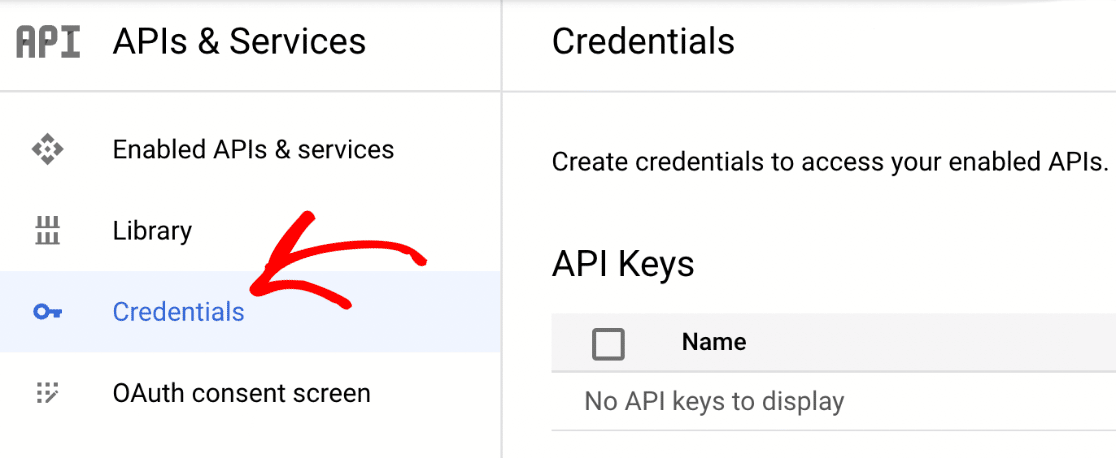
Once there, look under the OAuth 2.0 Client IDs section. You’ll see the details of the web application you just created. To view the Client ID and Client Secret, click the pencil icon.
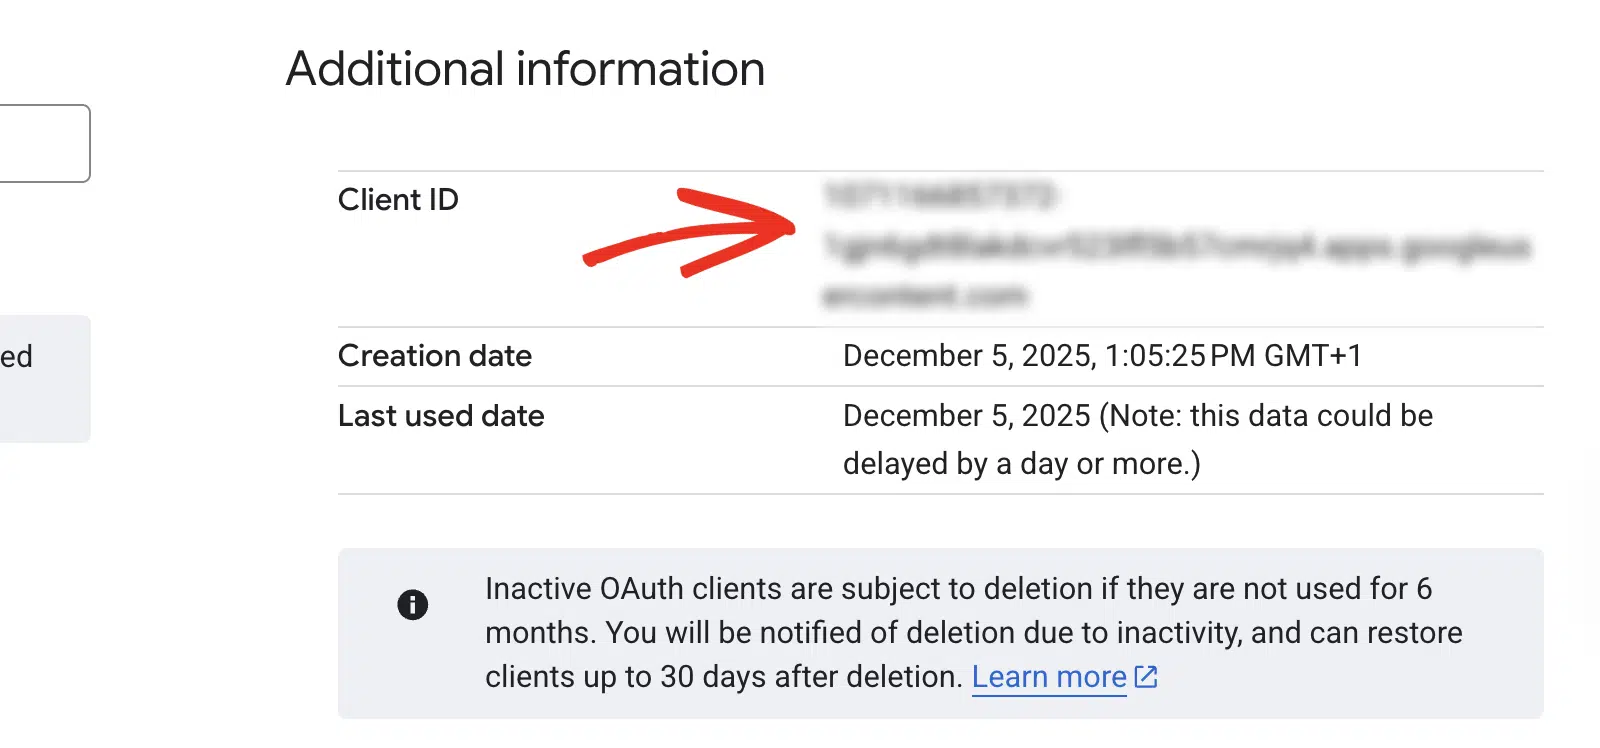
This will open all of the details for your app. On the right side of this page, you’ll see the Client ID.
Scroll down to the Client secrets section. Then click the + Add secret button.
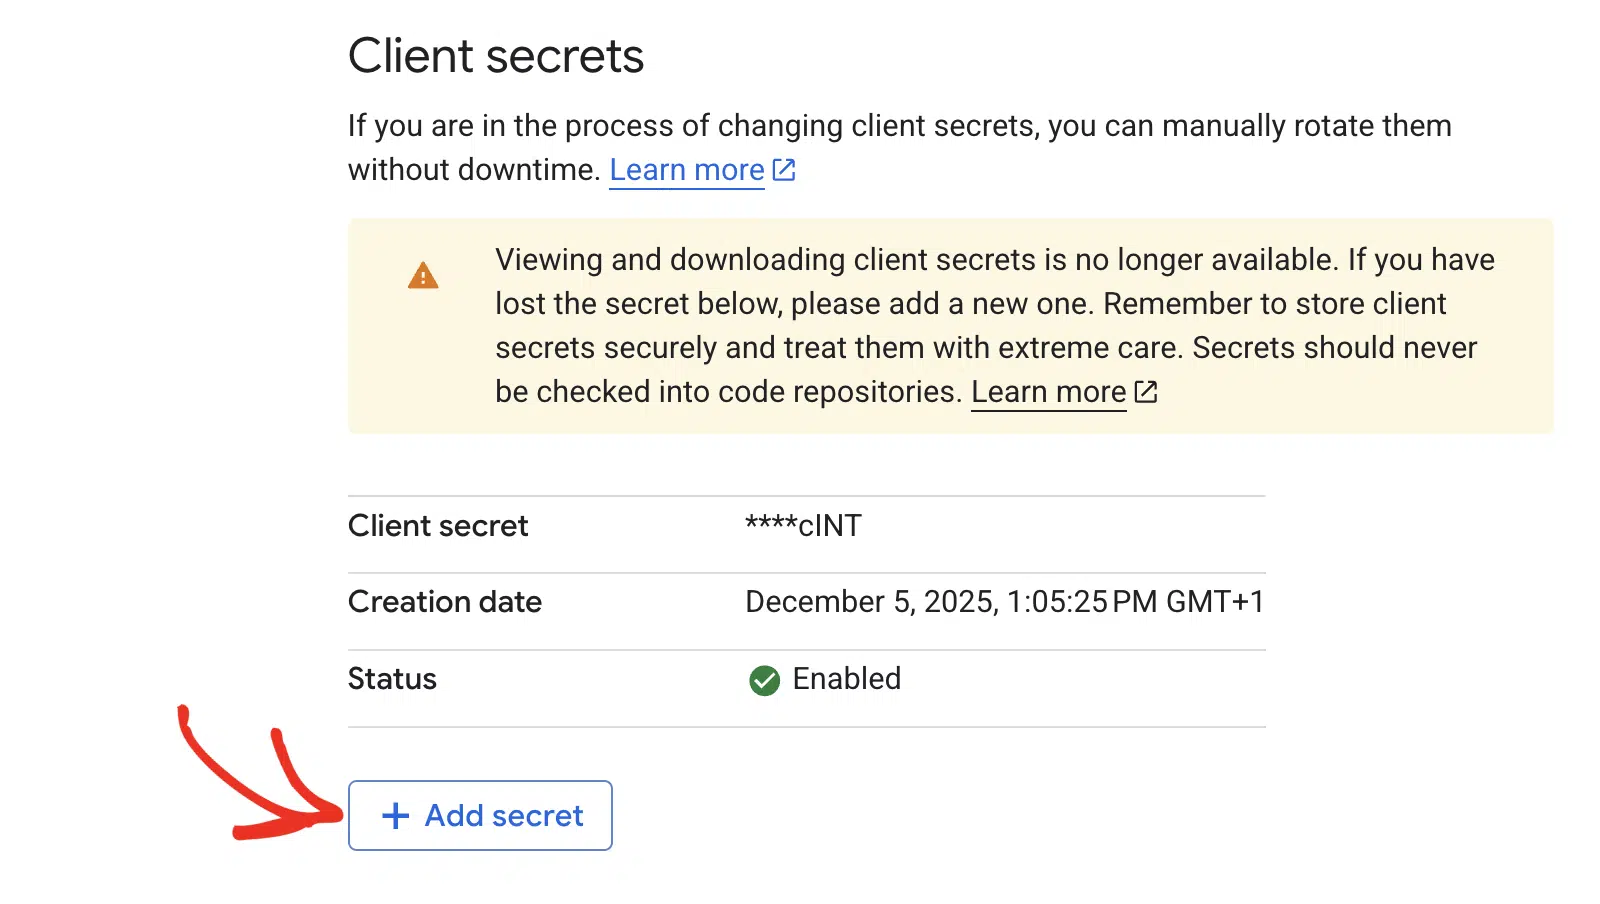
You’ll see the new Client secret below the default one. Click the copy icon to copy its value.
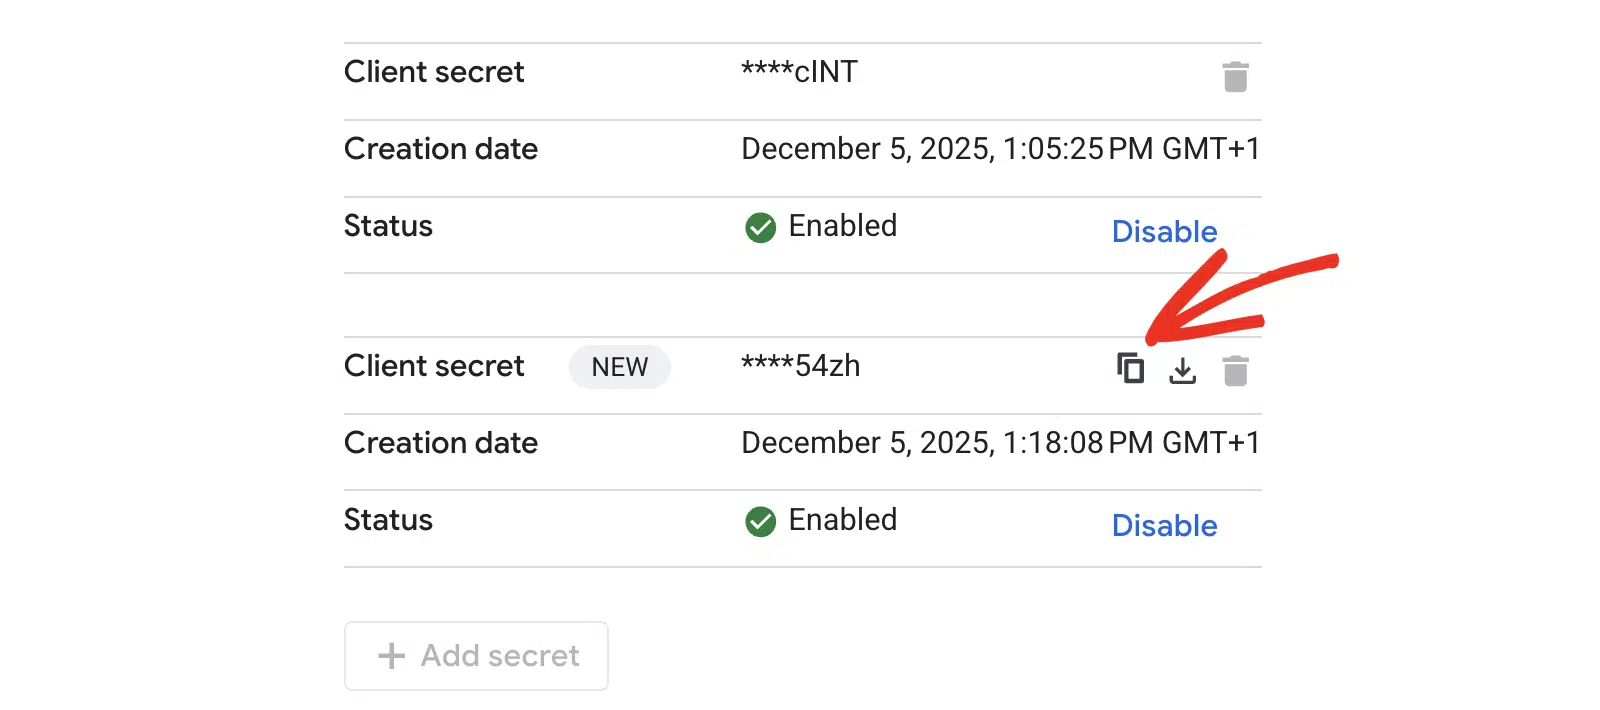
Go ahead and copy both of these values into the corresponding fields in your WP Mail SMTP settings.

Note: Be very careful not to copy any extra text or spaces with your Client ID or Client Secret, as this will result in an error in the next step.
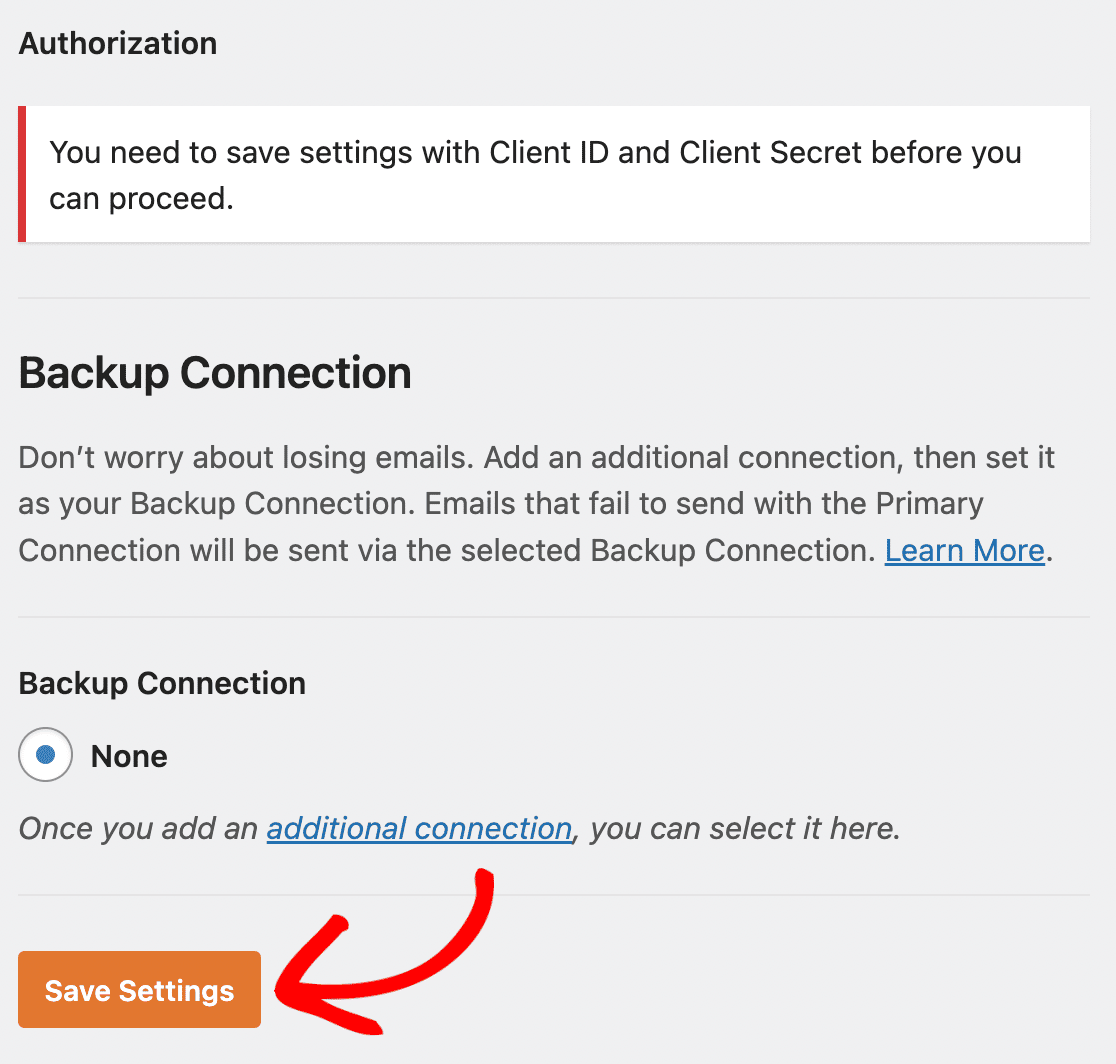
Once you’ve added these values, click the Save Settings button at the bottom of the page.
After saving your settings, the page will refresh. You must grant permission before Google allows our plugin to use your Gmail API to send emails.
To do this, scroll to the bottom of the WP Mail SMTP settings page and click the button labeled Allow plugin to send emails using your Google account.

This will open a login screen for Google. Go ahead and log in to the account you’re setting up SMTP with.
Next, you’ll see a screen asking for permission for this site to send emails on your behalf.
When you’re ready, click the Allow button to proceed.

Bypassing Google’s Verification Warning (Free Gmail Users Only)
You might see the following screen if you are connecting with a free Gmail account. Go ahead and click on the Advanced link in the bottom left corner.
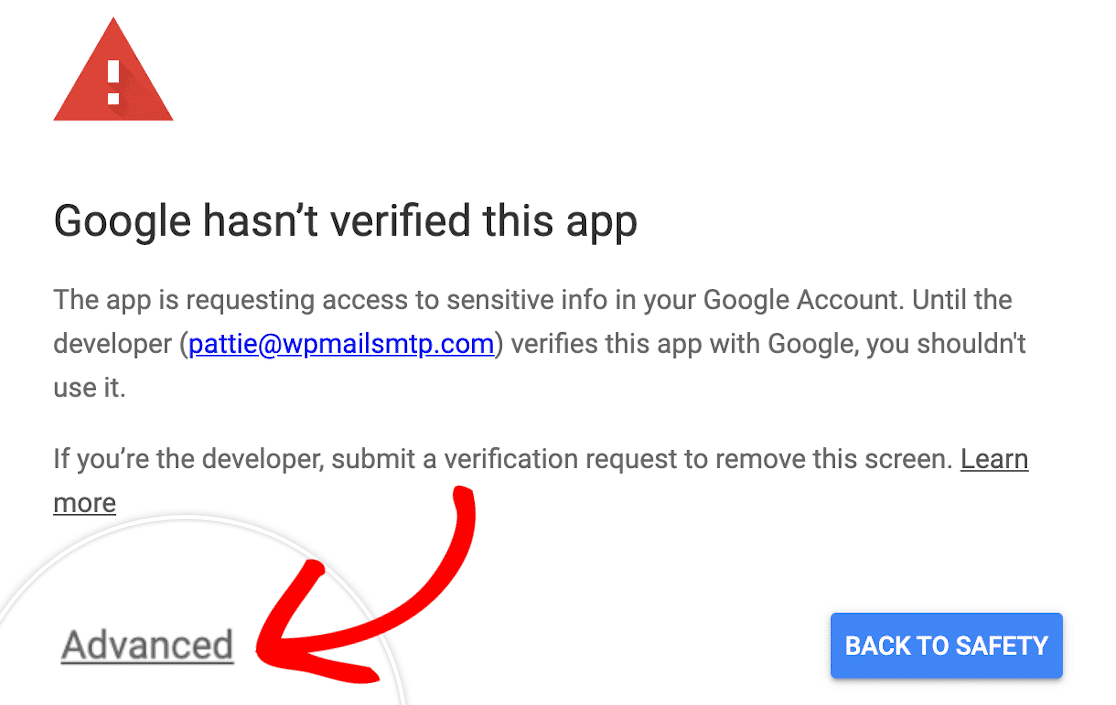
In the expanded section, click on Go to wpmailsmtp.com (unsafe). Don’t worry, Google only displays this warning because it hasn’t verified your app. There is no need to verify it since you created this app just for your own use.
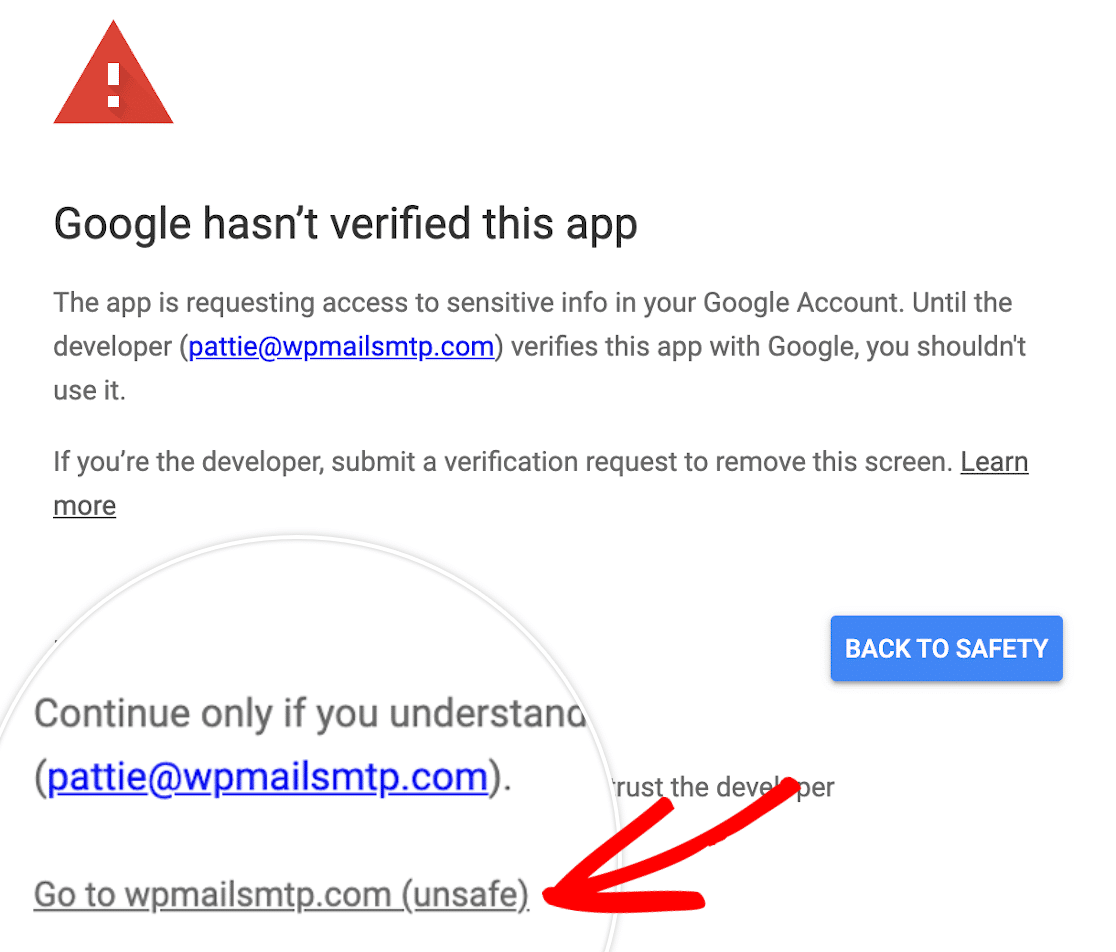
Then click on the Allow button as shown above.
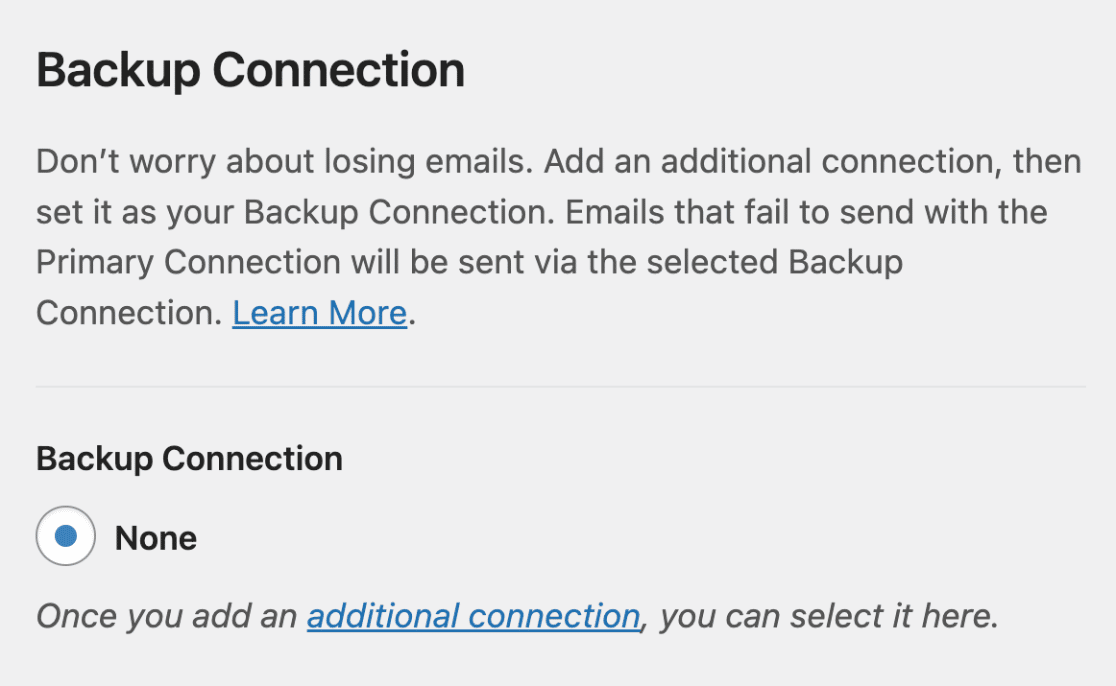
Backup Connection
Setting up a Backup Connection is optional and isn’t required to complete your Google Workspace / Gmail mailer setup. However, to further improve email deliverability, we recommend configuring an additional connection to serve as a backup in case your Primary Connection fails.
Note: Want to route your emails through a specific additional connection based on a set of rules or conditions? Be sure to check out our tutorial on Smart Routing to learn how.
Sending a Test Email
Next, you’ll be returned to your WP Mail SMTP settings, and a success message will be displayed. Once the connection is complete, you’re ready to send a test email. To do so, navigate to WP Mail SMTP » Tools and open up the Email Test tab.

Once the Email Test tab is open, you’ll need to enter an email address whose inbox you have access to.
Note: If you’ve set up an additional connection, you’d be able to choose between your Primary Connection and other connections when sending a test email.
Next, choose whether to send a plain text or HTML email. Unless you know you’ll only be sending plain text emails, we recommend leaving the HTML setting toggled ON. Then click the Send Email button.
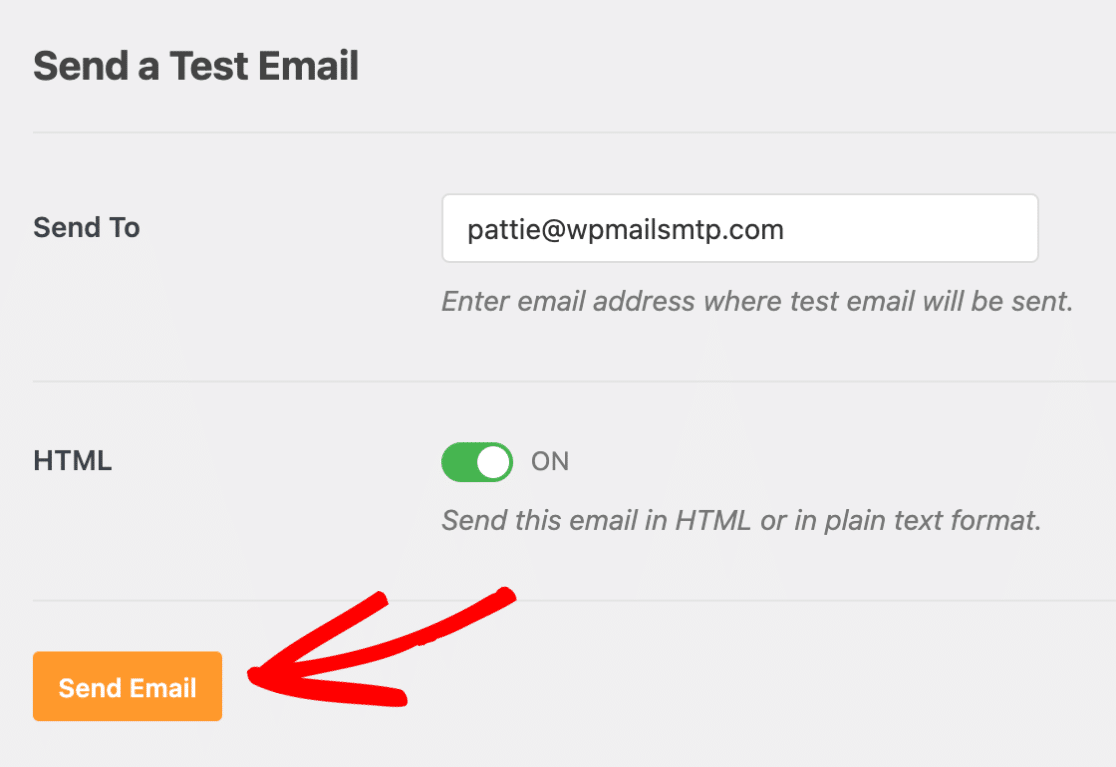
You’ll see a success message when the test email has been sent.

You should also soon receive the test email at the email address you entered.

Frequently Asked Questions
These are some of the top questions we receive about setting up the Google Workspace / Gmail mailer.
What if the test email doesn’t send successfully?
If the SMTP test email isn’t able to send, a debug log will appear with additional details. Here are some of the possible error messages and how to resolve them.
401. That’s an error.

Error: invalid_client
This error appears when the Client ID isn’t able to be read properly. To fix it, try copying and pasting your Client ID again and check that there’s no whitespace or extra text.
400. That’s an error.

Error: invalid_request

Missing required parameter: client_id
This error will display when the Client ID field is empty or not able to be read properly. To fix it, try copying and pasting your Client ID again and check that there’s no whitespace or extra text.
cURL error 60: SSL certificate problem
This message means that the server is missing a certificate that’s required for SMTP to work. To fix this, you’ll need to contact your site’s hosting provider to ask them to install this certificate (most likely the cacert.pem certificate, though it’s best to ask your host to check).
“code”: 401,

“message”: “Login Required”
If you see this in the debug message, you still need to grant permission for WP Mail SMTP to access your Google account. For instructions on how to fix this, please see Step 4 of this tutorial. Also, be sure to check that the From Email in your SMTP settings matches the email used to set up your Google app.
Request Entity Too Large

Error 413
If you’re seeing this error, it’s likely that files being sent through your forms exceed Gmail’s limit for direct file attachments in emails. This limit is applied to the sum of the message’s text as well as the encoded attachment. To prevent this error, you’ll need to make sure that all files are no larger than 22 MB.
There was a problem while retrieving Auth for gmail: Could not json decode the token
This error is a possible indicator that another plugin (such as UpdraftPlus) is loading a different version of Google’s API on the site, creating a conflict. If possible, the conflicting plugin should be deactivated. Otherwise, it’s recommended that you set up a different mailer.
If none of the above apply, or the test email still isn’t working, your Google account may have the Gmail API disabled. To check on this, follow Google’s guide to enabling an API.
What if I see a screen that says, “This app isn’t verified”?
When you click the Allow plugin to send emails using your Google account button in your WP Mail SMTP settings, Google might display a screen that says, “This app isn’t verified. This app hasn’t been verified by Google yet. Only proceed if you know and trust the developer.”
There’s no need to worry, though. This message is only referring to the app that you created in your own Google account, so you are actually the developer in this case.
To bypass this message, click Advanced and then click Go to wpmailsmtp.com (unsafe).
What if I want to switch to a different email later?
If you’d like to change to a different Gmail or Google Workspace email address, you’ll need to repeat all the tutorial steps above. This includes generating a new Client ID and Client Secret under this other email account.
When you get to the Authorization step (Step 4), save your settings and click the Remove Connection button. This will remove the authorization for your original email account and allow you to repeat the authorization steps with your new email.

Does the Google Workspace / Gmail mailer support aliases?
Yes, as of July 2020, WP Mail SMTP supports Gmail aliases. For more details on how to set up an alias in Google, check out its guide on how to send emails from an alias.
Can I use the Google Workspace / Gmail mailer if I have 2 Factor Authentication (2FA) enabled on my Google account?
You can definitely use 2 Factor Authentication with WP Mail SMTP’s Google Workspace / Gmail option. However, it’s important to note that if you choose to disable 2FA, or change the password on your account, you’ll need to go through the setup process again.
When authorizing my app, I get the following error message:
Error 403: access_denied. The developer hasn’t given you access to this app.
This message means that your app’s permissions are set to the testing mode in Google Cloud.
To fix this, be sure to switch the mode from testing to production and try authorizing your app one more time.
If I change my password, will I need to reconnect?
Yes, if your password is changed, the existing connection will be invalidated. To fix this, you will need to create a new connection, using your new credentials.
Do I need to submit my app to Google for verification in order for it to work with WP Mail SMTP?
It isn’t required for you to submit your app for verification. However, you’re welcome to do so if you’d like. If you choose to submit your app for verification, you can continue the authorization process in WP Mail SMTP without waiting for Google’s verification.
Why is the redirect URI pointing to connect.wpmailsmtp.com?
We set the redirect URI to pass through our site so we can resolve the 403 forbidden error some users experience when mod_security prevents them from completing the OAuth connection.
Note: The redirect URI is added for verification purposes alone. We don’t store or have access to any data from your website.
How do I change the redirect URI so it points to my own site?
If you prefer not to use the default OAuth redirect URI (connect.wpmailsmtp.com) for added security and privacy, you can easily redirect it to your own website.
To do this, you’ll first need to add the following code snippet to your WordPress site.
Note: For help with adding snippets to your site, please see our tutorial on adding code snippets using the WPCode plugin.
Next, head to your mailer settings in WP Mail SMTP » Settings » General and copy the new URL from the Authorized redirect URI section.
Finally, go to your Google App’s OAuth Client ID settings and replace the existing redirect URI with the one you’ve just copied. This ensures that the authorization requests will now be directed to your own website.
When adding the redirect URI, I get the following error message:
Invalid source: URIs must not contain a path or destination with “/”
This error occurs when you add the redirect URI to the Authorized JavaScript origins section instead of the Authorized redirect URIs section.
To resolve this issue, remove the URI you added from the Authorized JavaScript origins section and add it to the Authorized redirect URIs section. See the client ID section for additional details.
What should I do if I encounter a “redirect_uri_mismatch” error during setup?
This error usually means there’s a mismatch in the Authorized redirect URI in your Google Cloud Console. It should be set to https://connect.wpmailsmtp.com/google/. Also, ensure that for your Google app, you’ve updated the publishing status from Testing to Production.
For more guidance on fixing this error, please see SendLayer’s documentation on resolving the Redirect URI Mismatch error.
WP Mail SMTP periodically stops working, and I keep getting the following error message:
"Mailer: Google / Gmail

{

"error": "invalid_grant",

"error_description": "Bad Request"

}
This error usually indicates that there are permission issues due to the Client Secret key being invalidated. It could happen when you change your Gmail password or enable 2FA on your account.
To resolve this, you’ll either need to regenerate your tokens or go through the setup process again.
To regenerate your tokens, log in to the Google Cloud Console, then select Credentials under the API & Services section.
On the OAuth 2.0 Client IDs section, you’ll need to click the pencil icon to edit your credentials.
Next, scroll to the Client secrets section and click + Add secret to generate a new key.
After generating the new secret, you’ll need to update the Client Secret in WP Mail SMTP settings with the new key. Go ahead and copy the Client Secret key.
Then log in to your WordPress dashboard and go to WP Mail SMTP » Settings.
On the General tab, scroll down to the Google / Gmail section and paste the key you copied into the Client Secret field.

Once you’ve added the new Client Secret, be sure to save your changes.
After sending a test email, I see the following error message:
The test email might have been sent, but its deliverability should be improved.
This error usually occurs if you’re using a custom domain email address and haven’t added SPF and DKIM records for the domain. You’ll need to add both records to your domain’s DNS to fix this issue.
If you’re seeing the following SPF error message:

It means your domain is missing the SPF record required by Google to verify your domain. To fix this, you’ll need to add the SPF record to your domain’s DNS. For steps on how to access this record, check out Google’s SPF guide.
You’ll likely see two options on the Google SPF documentation page: Define your SPF record—Basic and Define your SPF record—Advanced. Follow the steps in the Basic option to get your SPF record. Then proceed to add the record to your domain’s DNS.
Note: If you’d like to learn how to add DNS records to your domain’s DNS, be sure to check our DNS records guide for more information.
If you’re seeing the following DKIM warning:

You’ll need to add the DKIM record required by Google to verify that emails come from authorized domains. For steps on how to get this record, check out Google’s DKIM guide.
You may also see the following error message after sending a test email:

This error indicates that you’ve added multiple SPF records to your domain’s DNS. If you’ve previously added an SPF record from a different mailer, you’ll likely encounter this error. For steps on how to resolve this issue, check out our guide to learn how to merge all SPF records on your domain’s DNS.
That’s it! Now you know how to set up WP Mail SMTP’s Google Workspace / Gmail mailer on your WordPress site.
Next, would you like to know how to effectively troubleshoot issues in WP Mail SMTP? Be sure to check out our tutorial on troubleshooting WP Mail SMTP for more details.