AI Summary
Are you looking to use Mandrill with WP Mail SMTP to improve email deliverability on your WordPress site? Mandrill is a reliable transactional email API service from Mailchimp that provides powerful email delivery infrastructure with detailed analytics and tracking capabilities.
This tutorial will show you how to set up the Mandrill mailer in WP Mail SMTP.
What Is Mandrill?
Mandrill is a transactional email API service provided by Mailchimp. It’s designed specifically for sending automated, one-to-one emails like password resets, order confirmations, and other transactional messages with high deliverability rates.
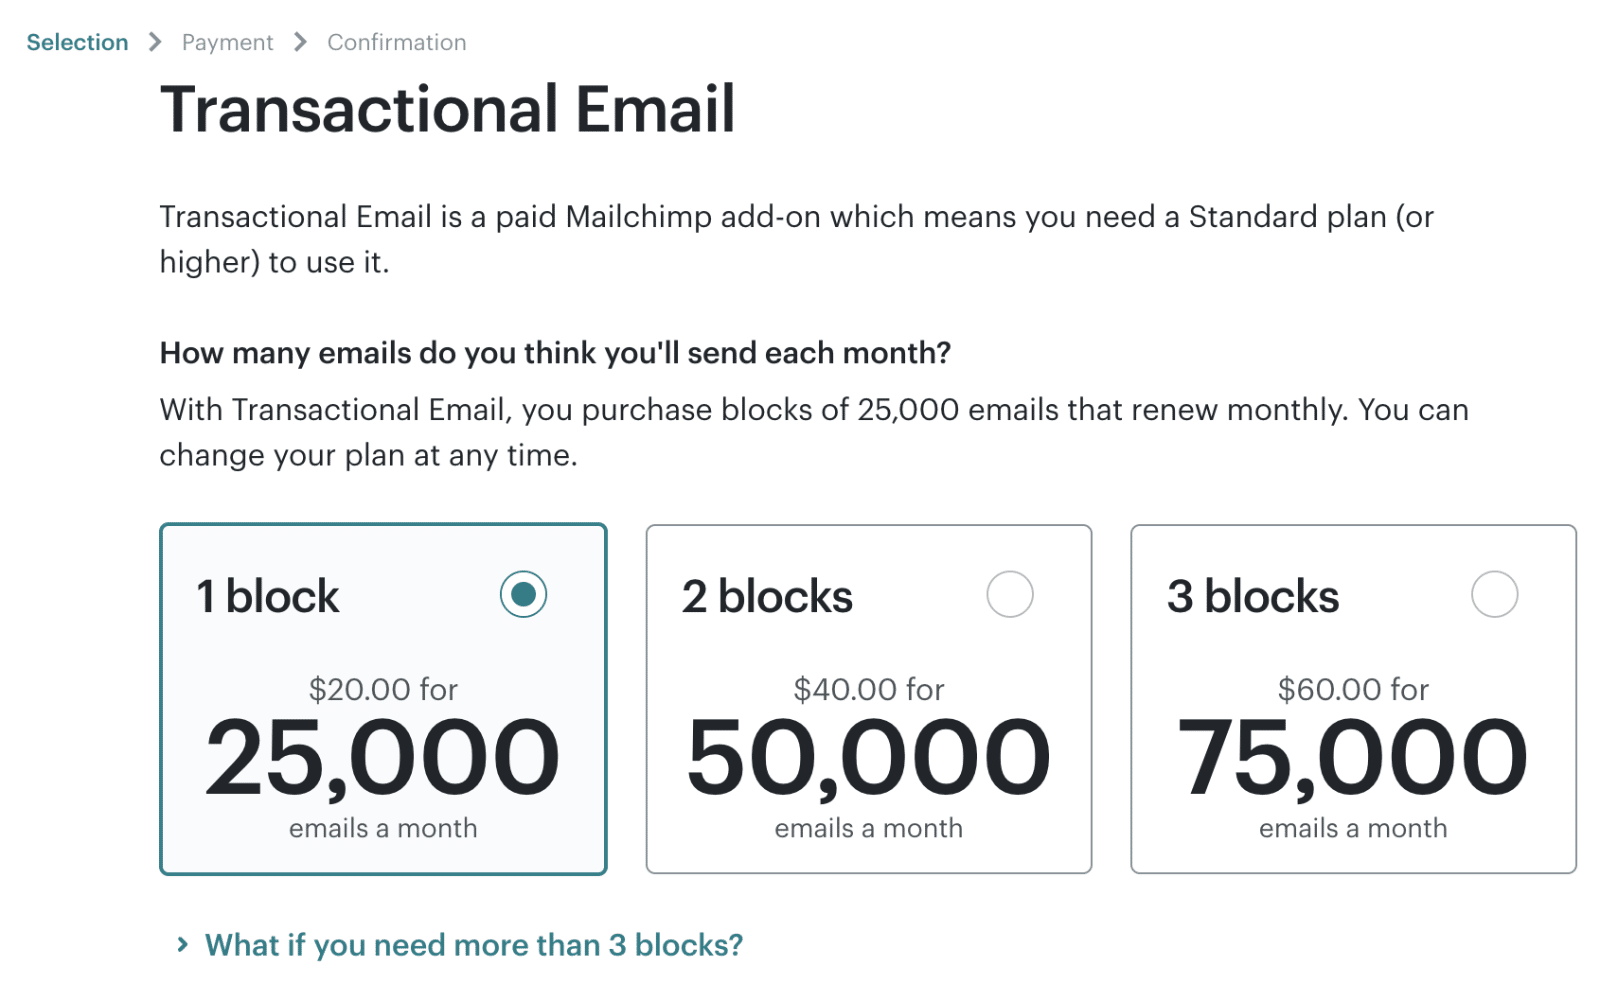
- Cost: Mandrill provides a free trial plan that lets you send 500 emails. However, the free plan only allows sending to addresses in your verified domain. Pricing varies based on your email volume, starting with a block of emails per month.
- From Email Requirements: You’ll need to use an email address at your verified domain (e.g., [email protected]) to use Mandrill with WP Mail SMTP.
- Bottom Line: Mandrill is an excellent choice for businesses that need reliable transactional email delivery with detailed analytics and high deliverability rates.
Note: For more information about our supported mailers, please check out the complete guide to mailers in WP Mail SMTP.
Setting Up Your Mandrill Account
To start using Mandrill, you’ll need to create a Mailchimp account first, as Mandrill is part of the Mailchimp platform. Visit Mailchimp’s Transactional Email page to get started.
If you already have a Mailchimp account, proceed to log in to your account dashboard. Mandrill is available as an addon for Mailchimp users.
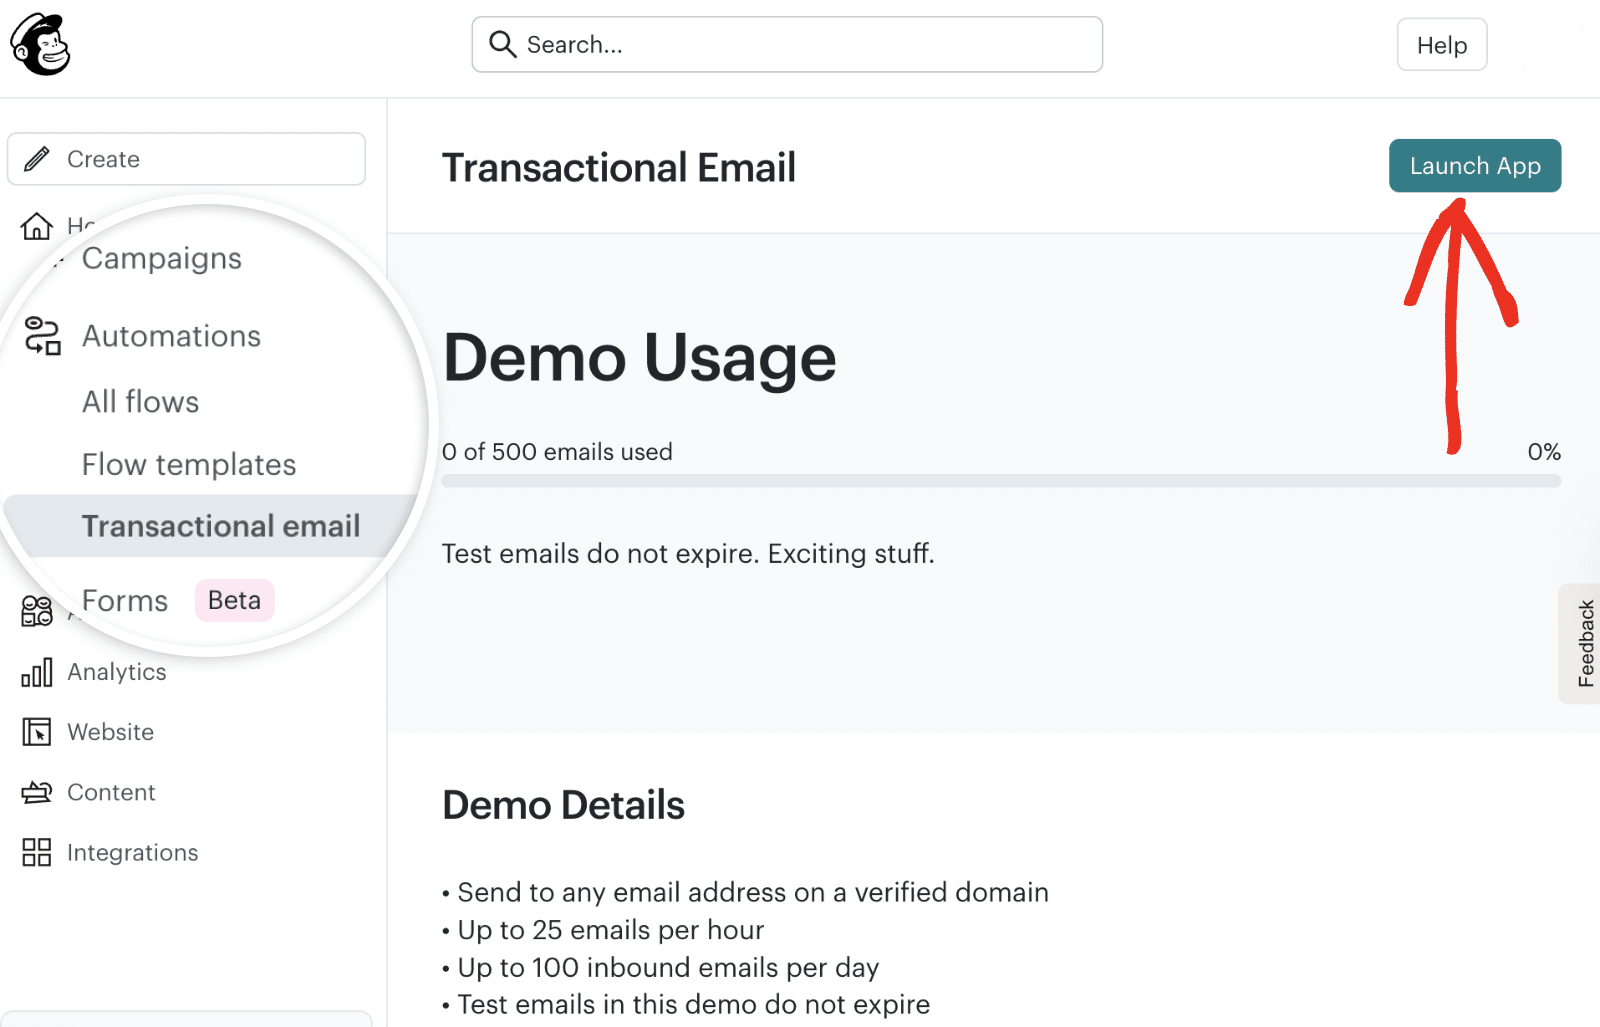
Once you’re logged in to your Mailchimp account, you can access Mandrill by navigating to Automations » Transactional email. Then click the Launch App button to proceed.
You’ll be redirected to the Mandrill account area. If you haven’t already, you’ll need to sign up for Mandrill’s paid service to send emails beyond the demo limitations.
After creating your account, you’ll be directed to your Mandrill dashboard, where you can configure your email settings.
Authorizing Your Domain
Before you can send emails through Mandrill, you must verify ownership of your sending domain. This process involves adding DNS records to your domain settings and helps improve email deliverability.
Adding Your Sending Domain
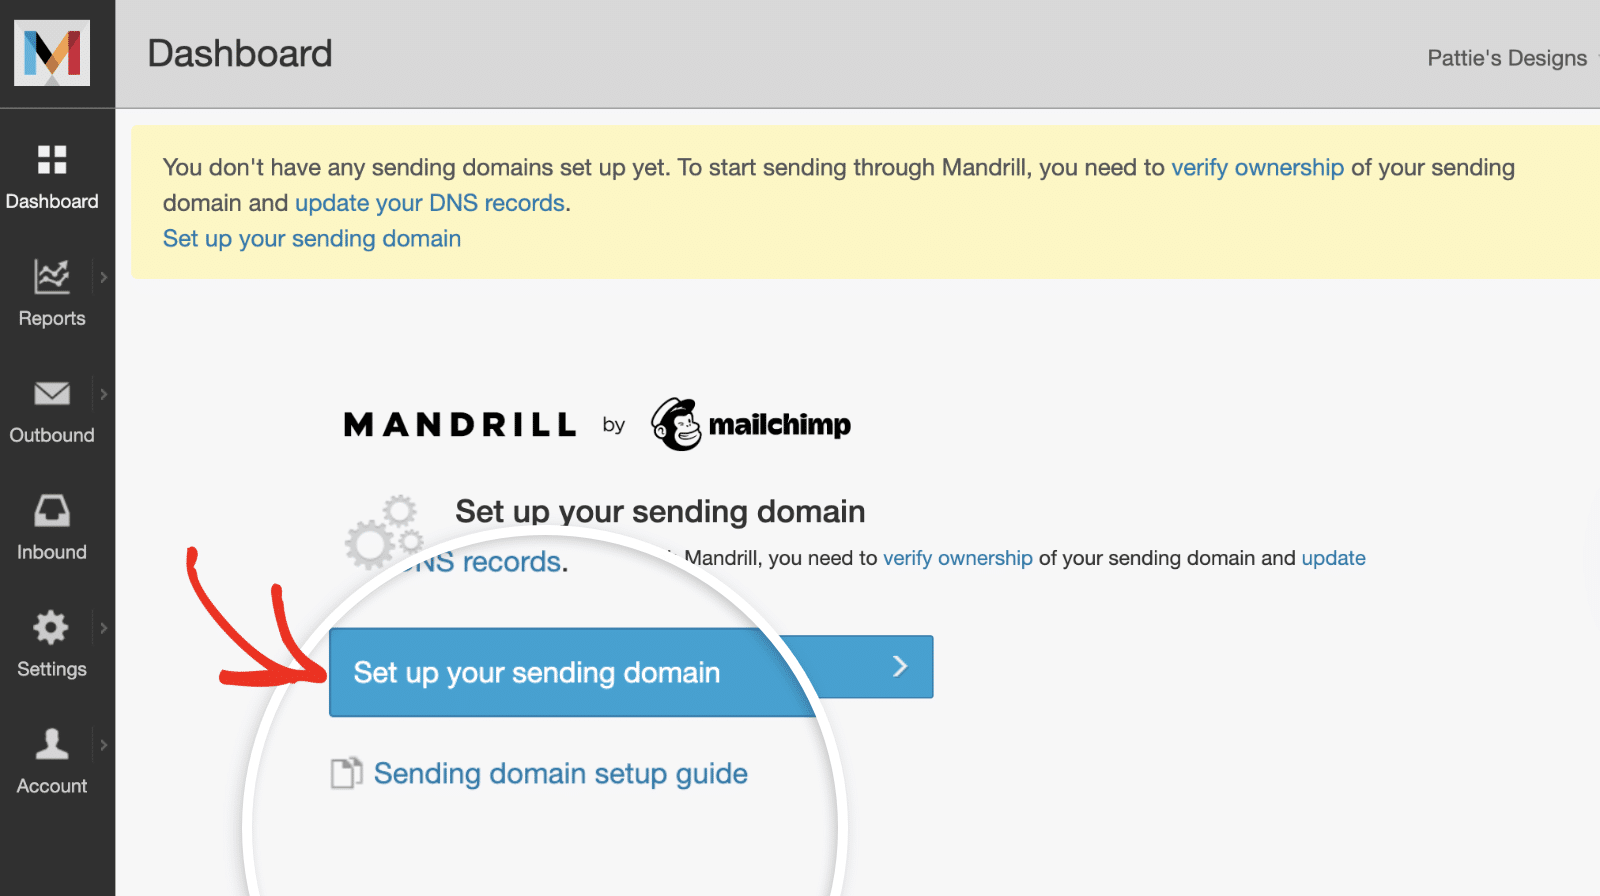
From your Mandrill dashboard, you’ll see a notification that you need to set up your sending domain. Click the Set up your sending domain button to begin.
After that, enter your domain name in the domain field and click the + Add button to proceed.

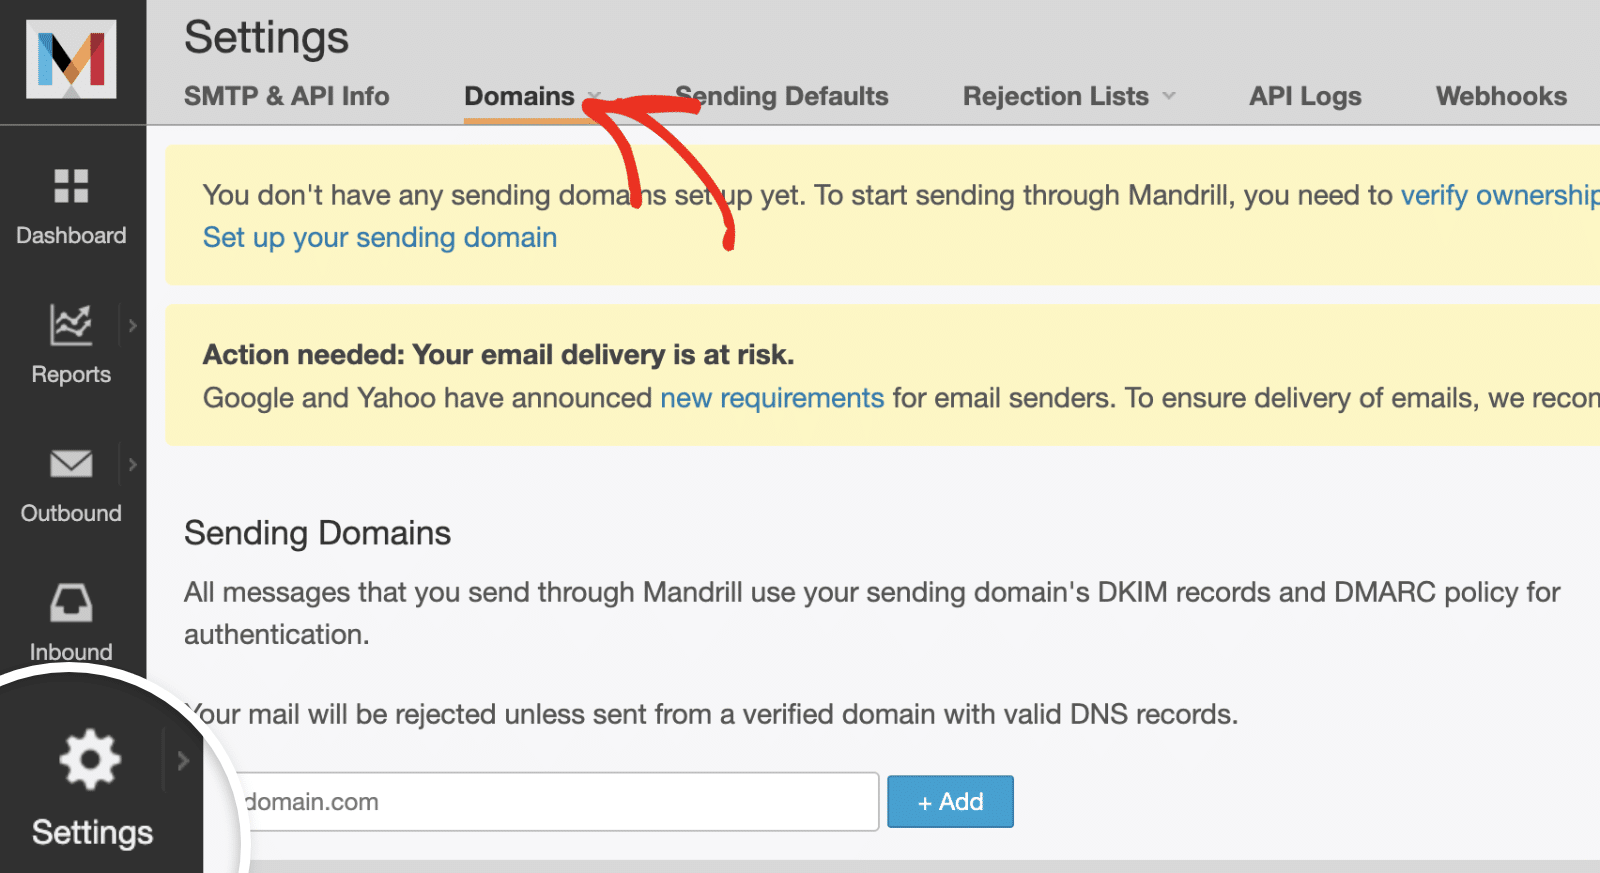
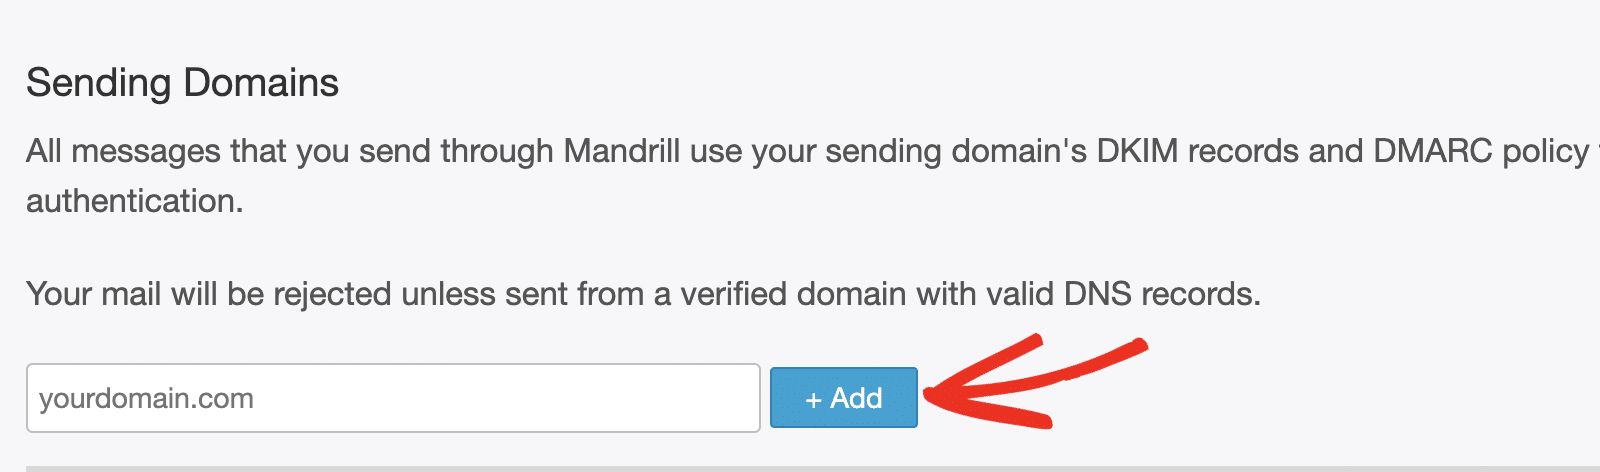
Alternatively, you can navigate to Settings and then click on the Domains tab to manage your sending domains.
On the Sending Domains page, enter your domain name in the field provided and click the + Add button.
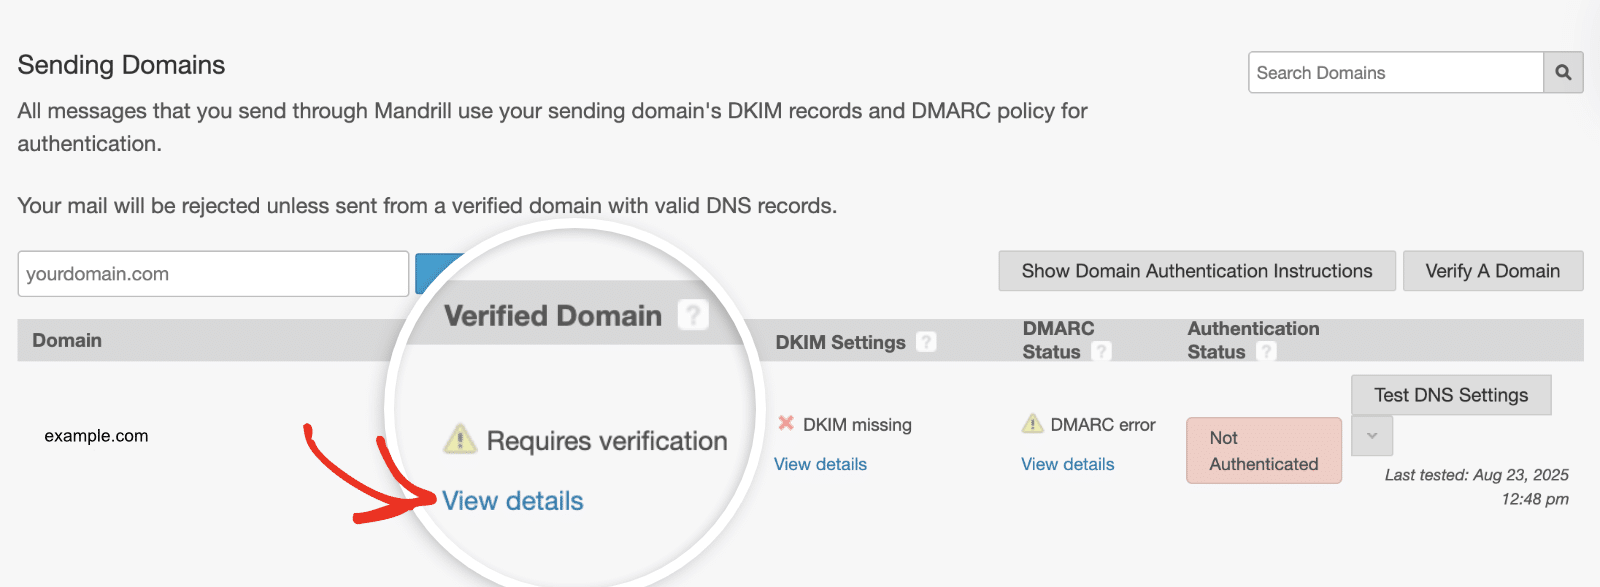
Verifying Your Domain
After adding your domain, you’ll need to verify that you own it. To do so, click View details below the Verified Domain column.
In the overlay that appears, Mandrill will provide two verification methods: adding DNS records to your DNS settings or receiving verification emails.
If you choose the TXT record method, you’ll see a unique verification code that you need to add to your domain’s DNS settings.
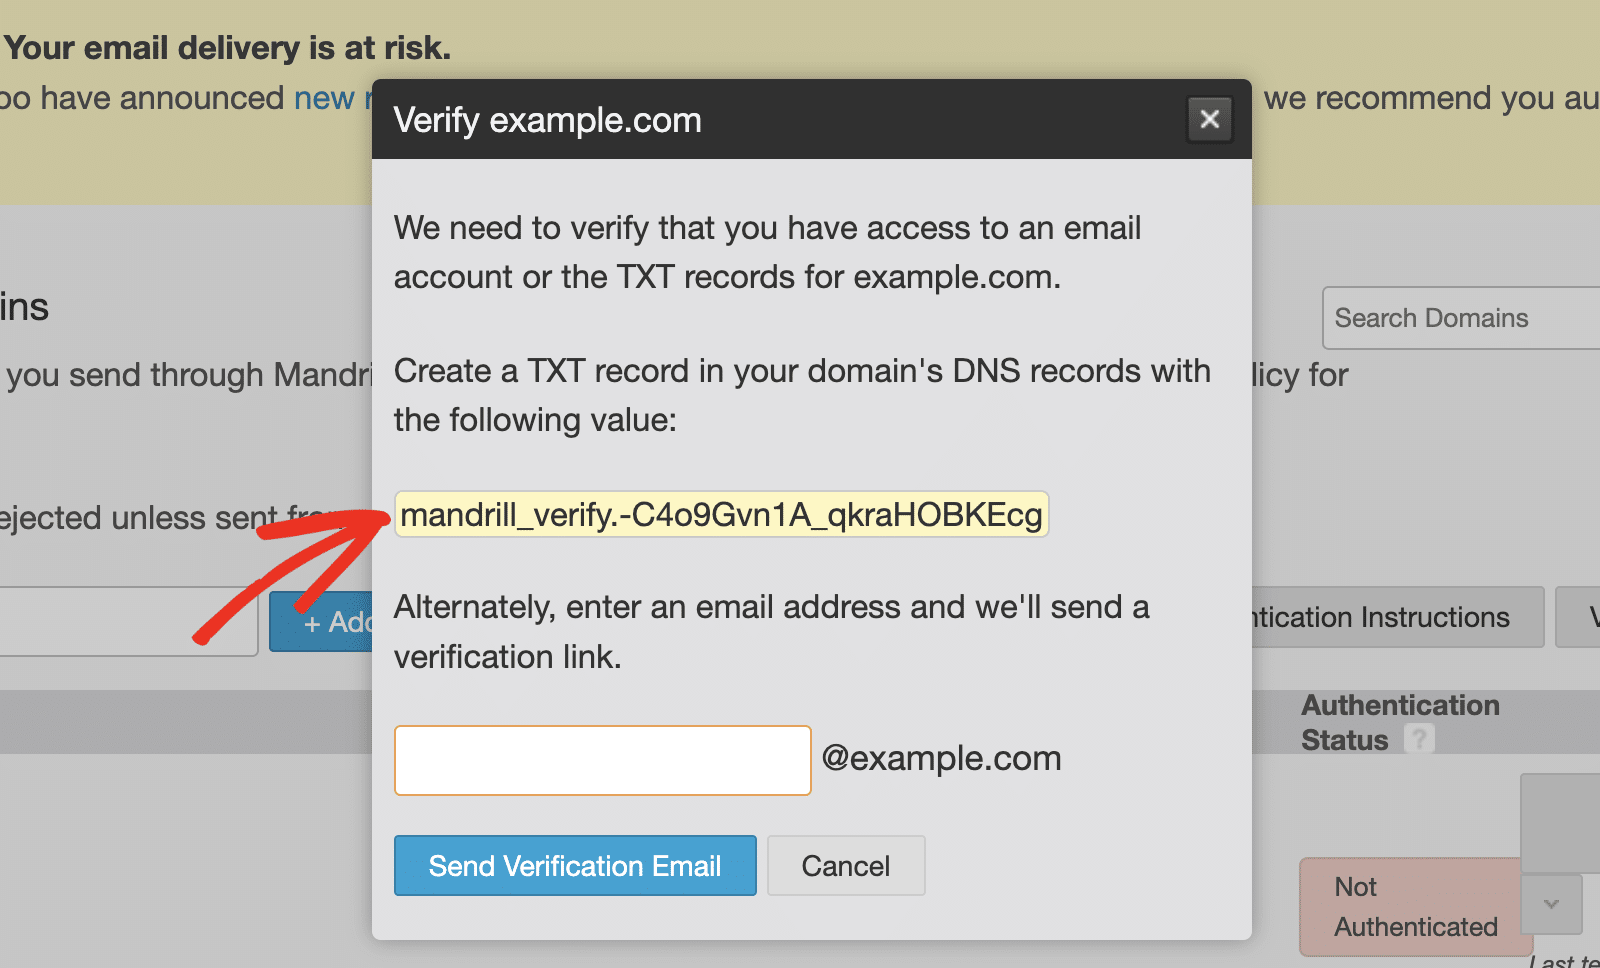
Alternatively, you can enter an email address at your domain, and Mandrill will send a verification link to that address.
Setting Up DNS Records
In addition to the domain verification record, you’ll need to set up DKIM and DMARC records for proper email authentication.
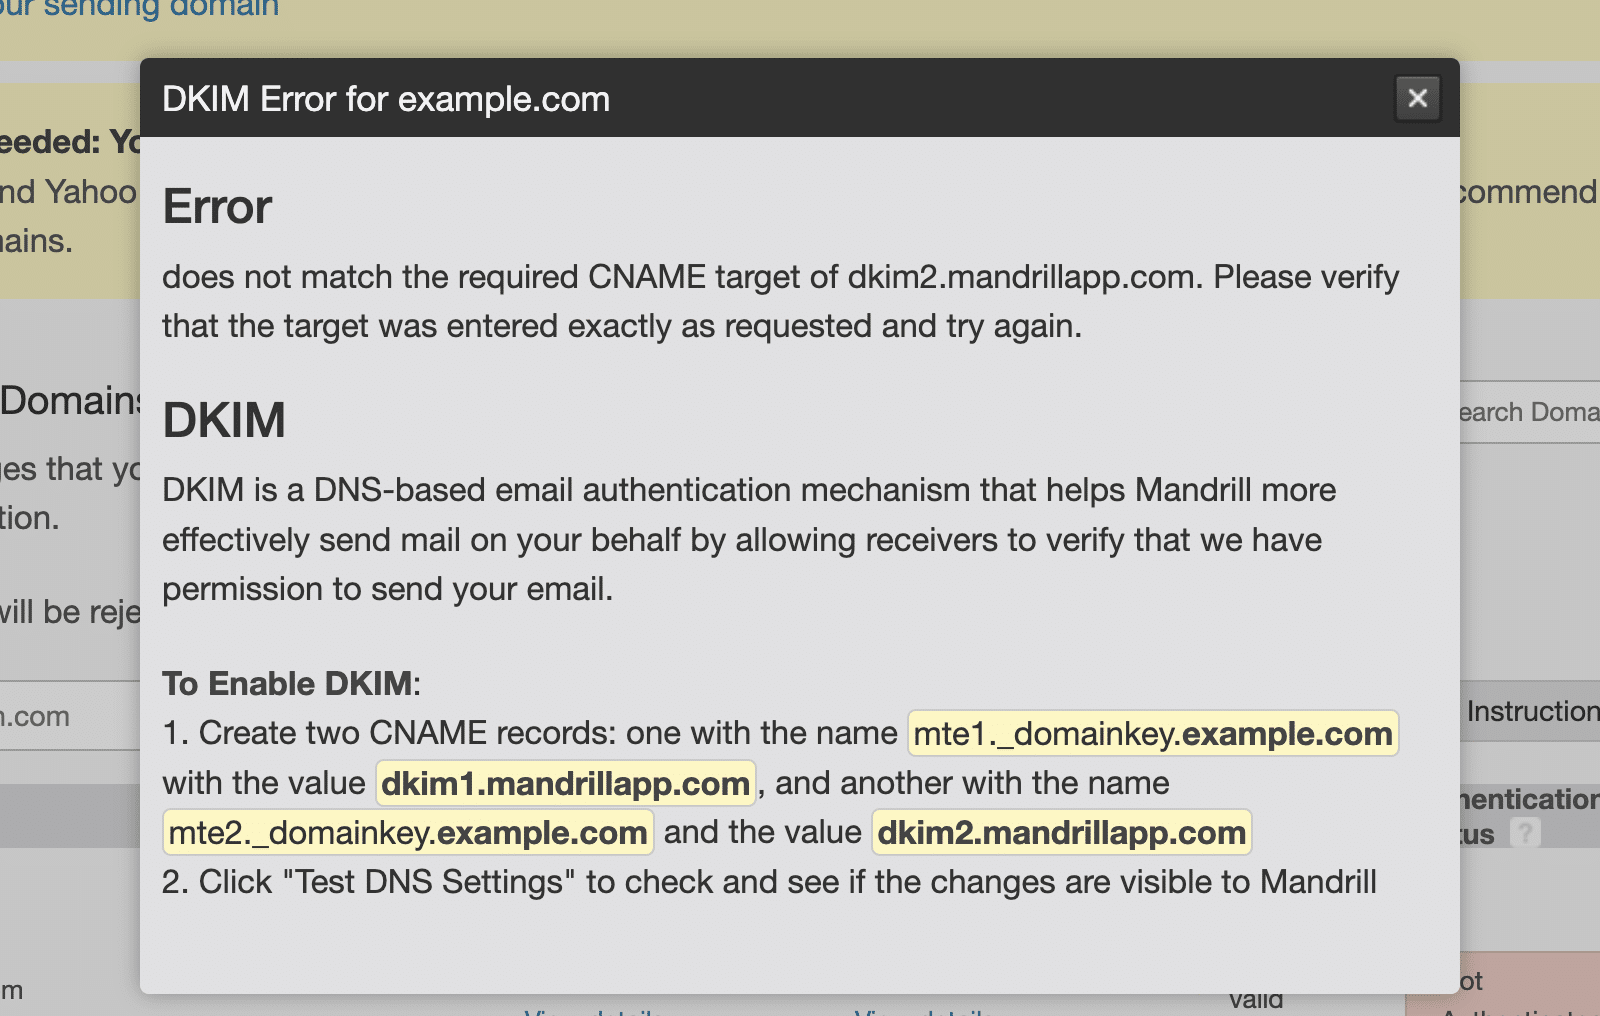
To add the DKIM records, click View details next to your domain’s DKIM Settings.
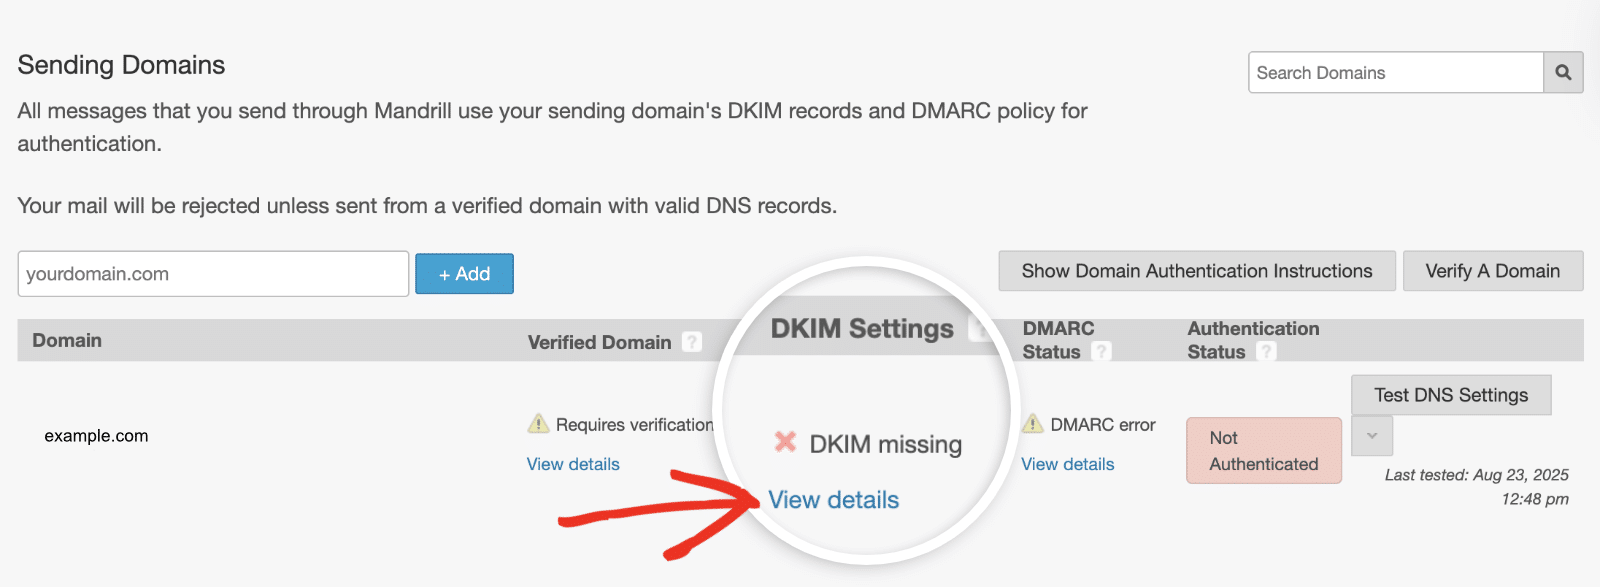
Mandrill will provide two CNAME records for DKIM (e.g., mte1._domainkey and mte2._domainkey) that you need to add to your DNS settings.
After that, click View details below the DMARC Status column to access the DMARC record.
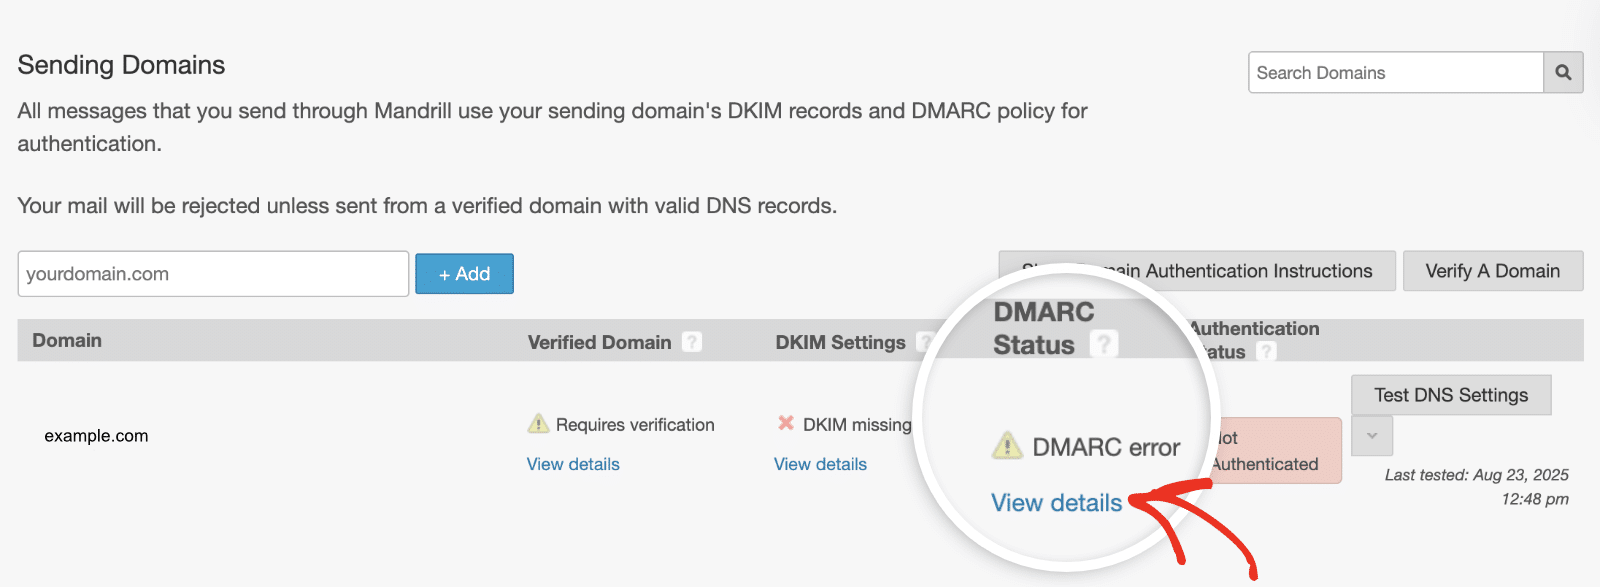
In the overlay that appears, you’ll find the required DMARC policy needed to authenticate your domain. You’ll need to add the DNS records to your site’s DNS settings.
Note: We have a detailed guide on how to add DNS records for various domain registrars. Please see our tutorial on how to add DNS records for WP Mail SMTP mailer settings.
After adding the DNS records, click the Test DNS Settings button to check if your records are properly configured.
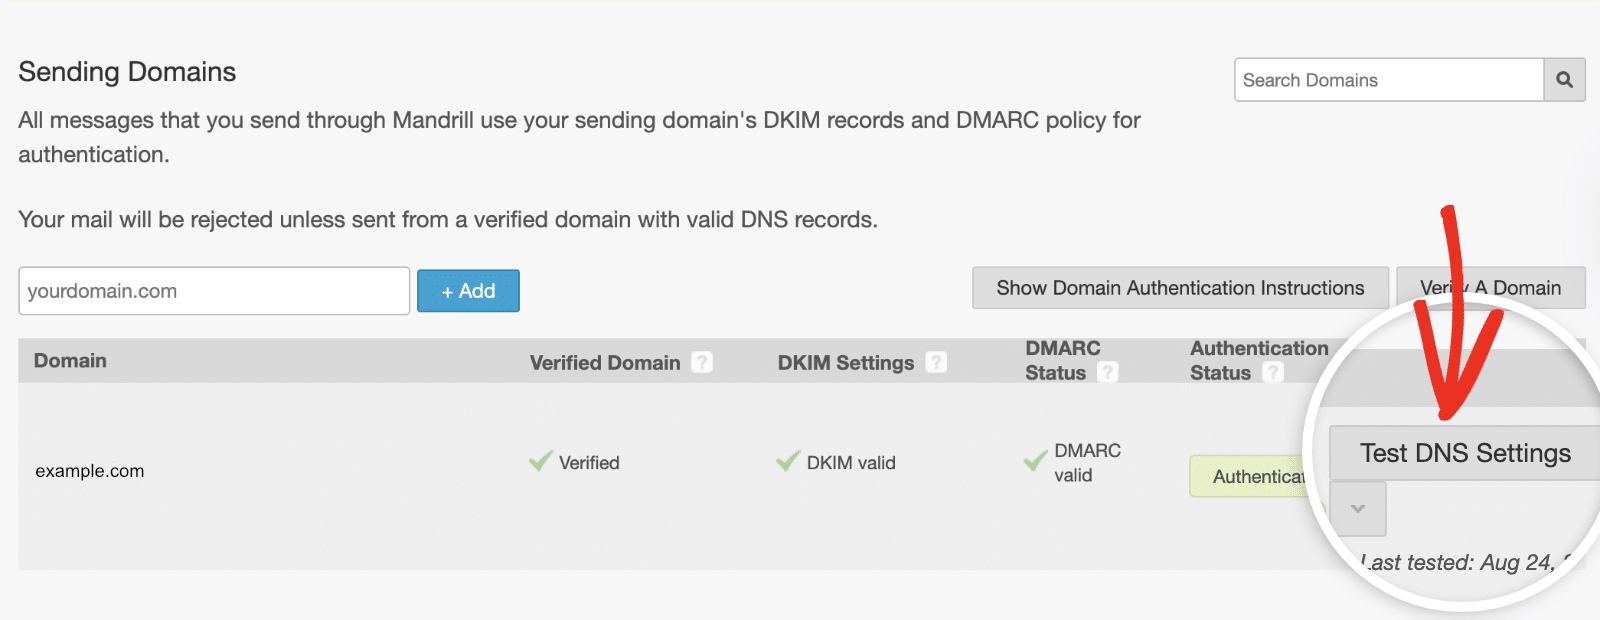
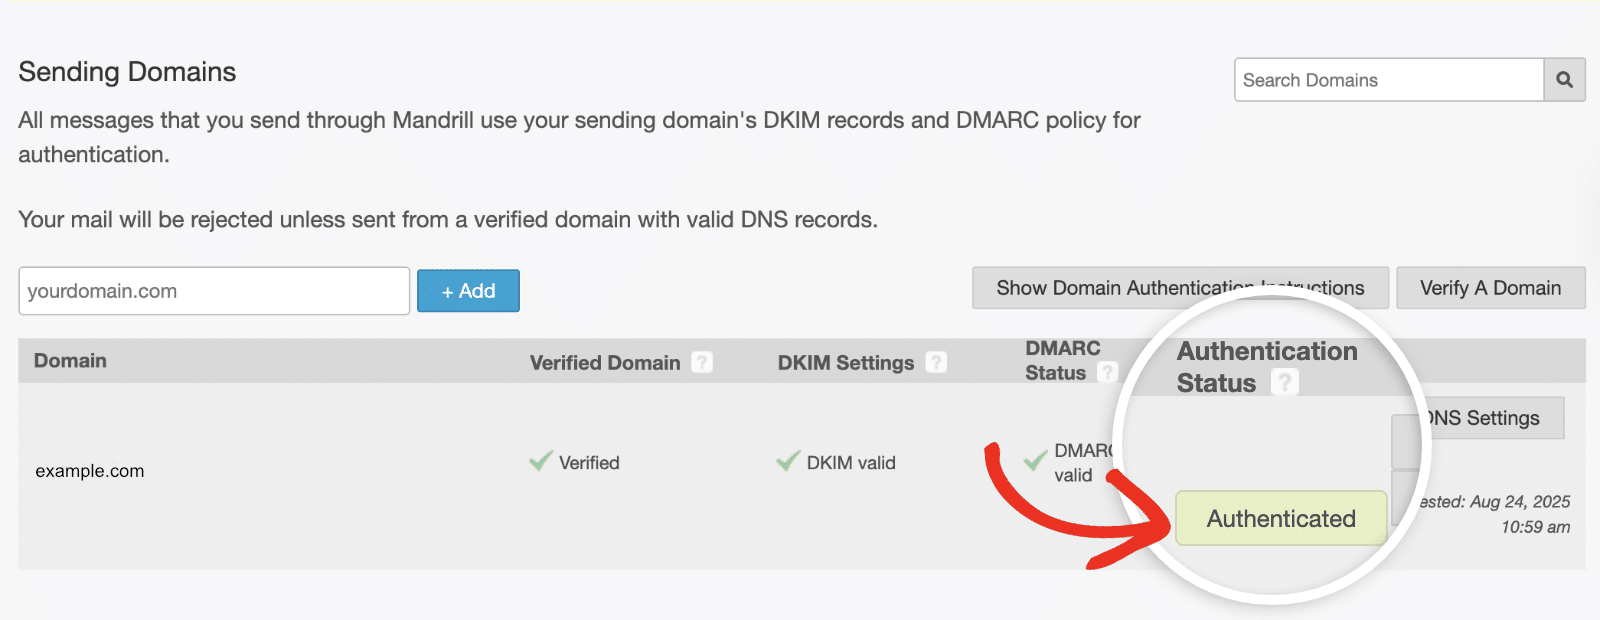
You should see Authenticated in the Authentication Status column if your DNS settings are propagated. However, you can proceed with the configuration as it might take a while to propagate.
Note: DNS propagation can take up to 48 hours to complete.
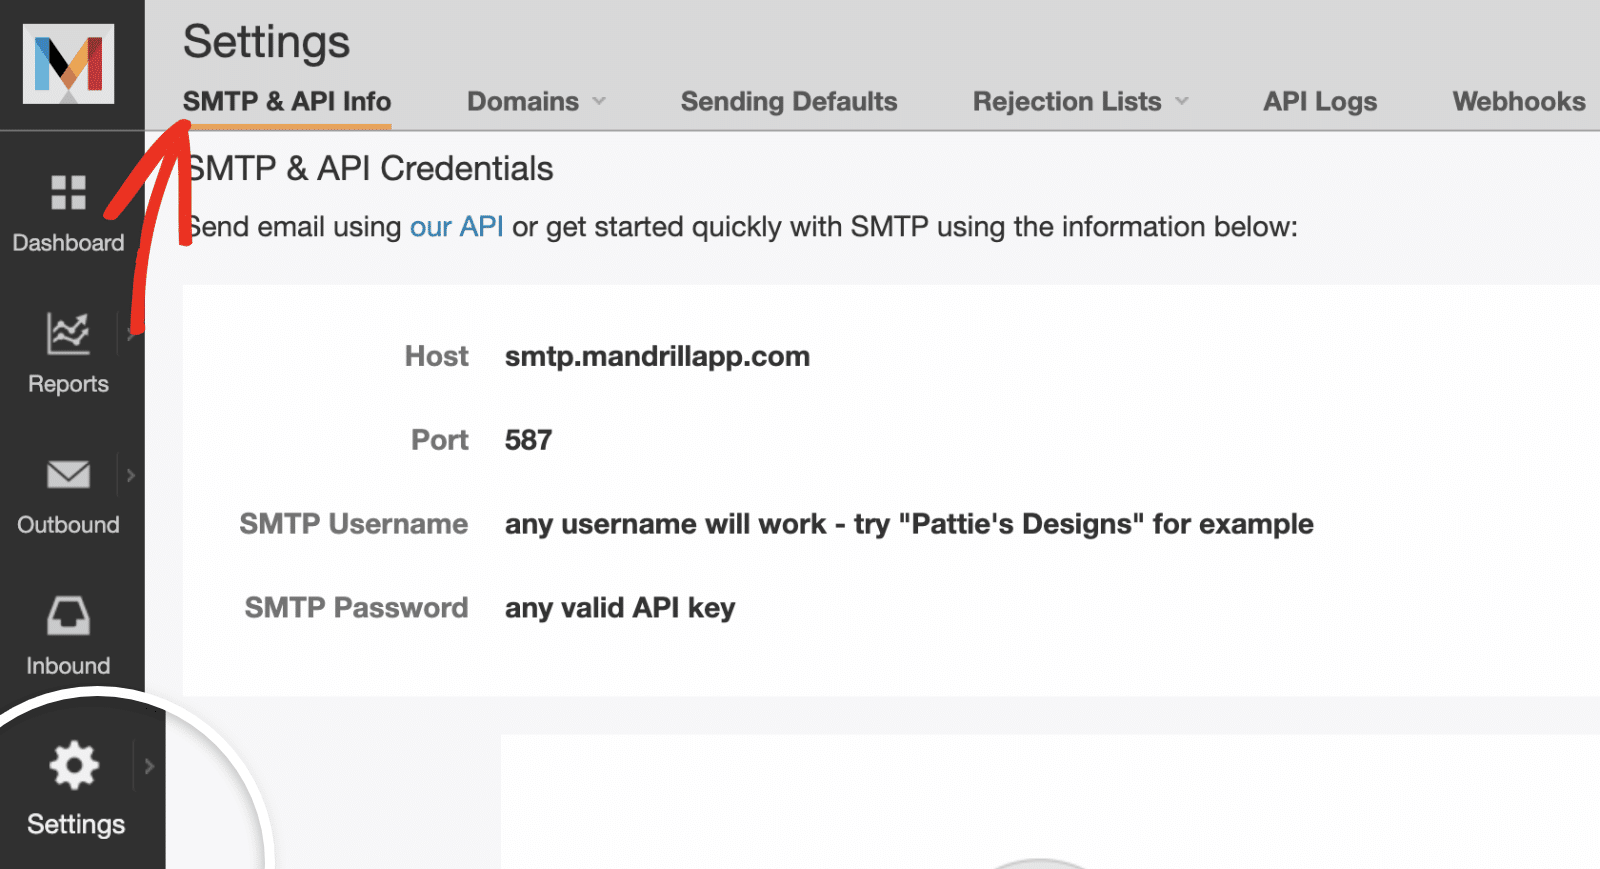
Creating Your API Key
To connect WP Mail SMTP to Mandrill, you’ll need to create an API key. From your Mandrill dashboard, navigate to Settings and then click on the SMTP & API Info tab.
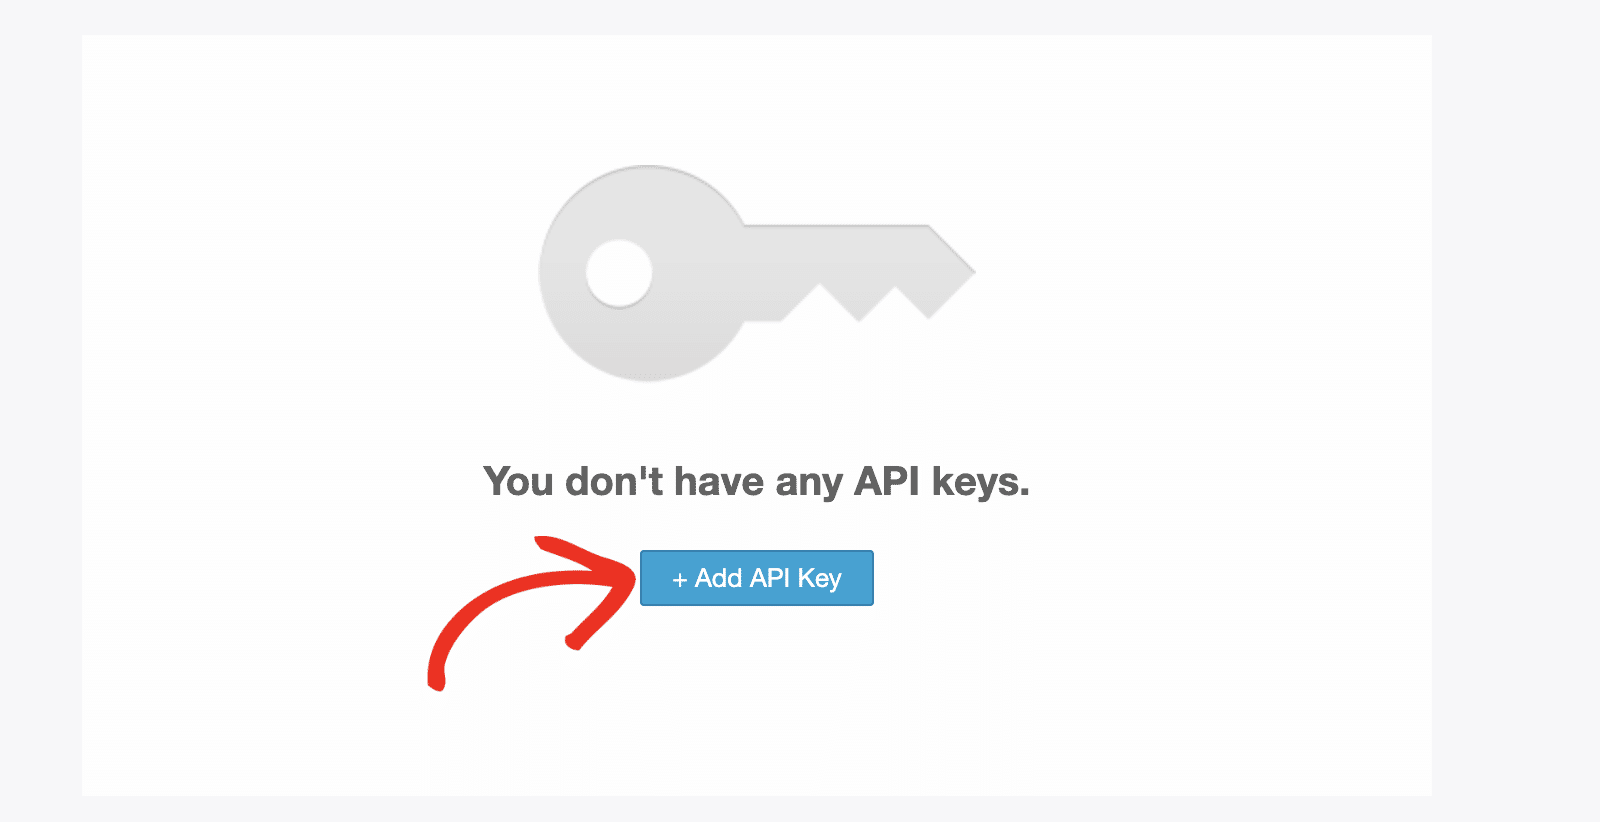
If you don’t have any API keys yet, you’ll see a message saying “You don’t have any API keys.” Go ahead and click the + Add API Key button to create one.
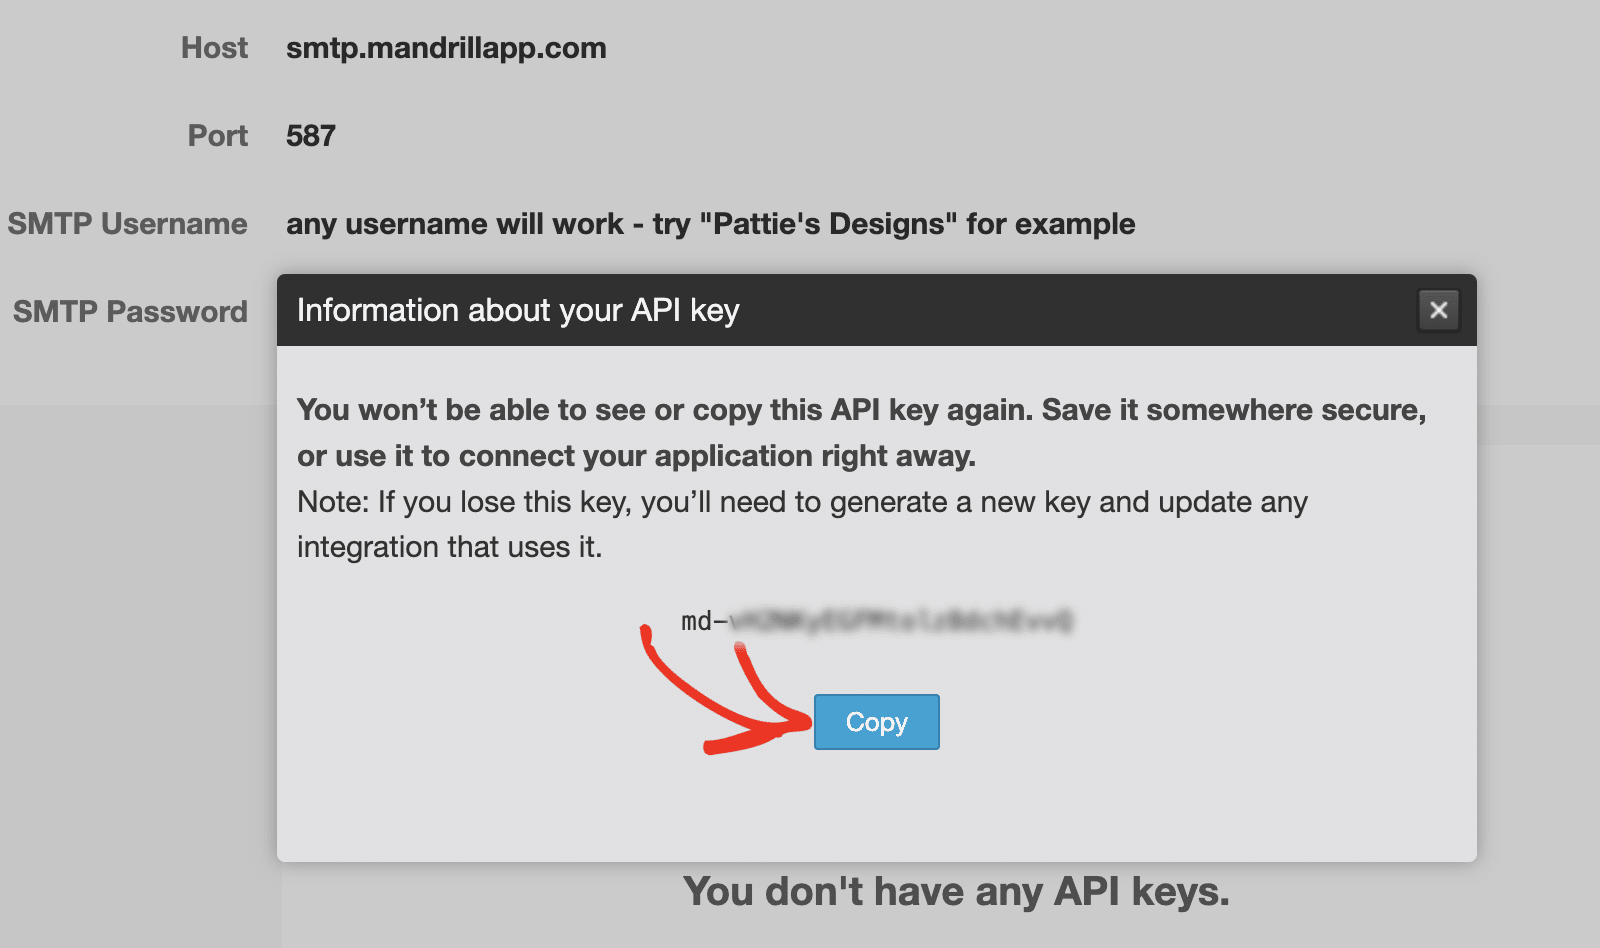
After creating the API key, an overlay will appear with important information about your new key. Go ahead
Setting Up WP Mail SMTP
Now that you’ve configured your Mandrill account and obtained your API key, you can set up WP Mail SMTP to use Mandrill for sending your WordPress emails.
Before you get started, be sure to install and activate the WP Mail SMTP plugin.
Once WP Mail SMTP is installed, go to WP Mail SMTP » Settings and select the General tab to open the plugin settings page.

From Email
The From Email is the address your site’s emails will be sent from. This must be an email address at the domain you verified with Mandrill.
For example, if you verified example.com, the From Email address must contain example.com (e.g., [email protected]).

If you’d like the From Email to be the same site-wide, toggle the Force From Email option. This will override the email settings throughout your site, ensuring consistency across all outgoing emails.

Note: For more details, see our guide on how the Force From Email setting works.
From Name
The From Name will be set to your site name by default. However, you can change this to any text you’d like to appear as the sender’s name in recipients’ inboxes.

You can also choose to enable the Force From Name option to apply this setting to emails site-wide.

Mailer
Under the Mailer section, select Mandrill.
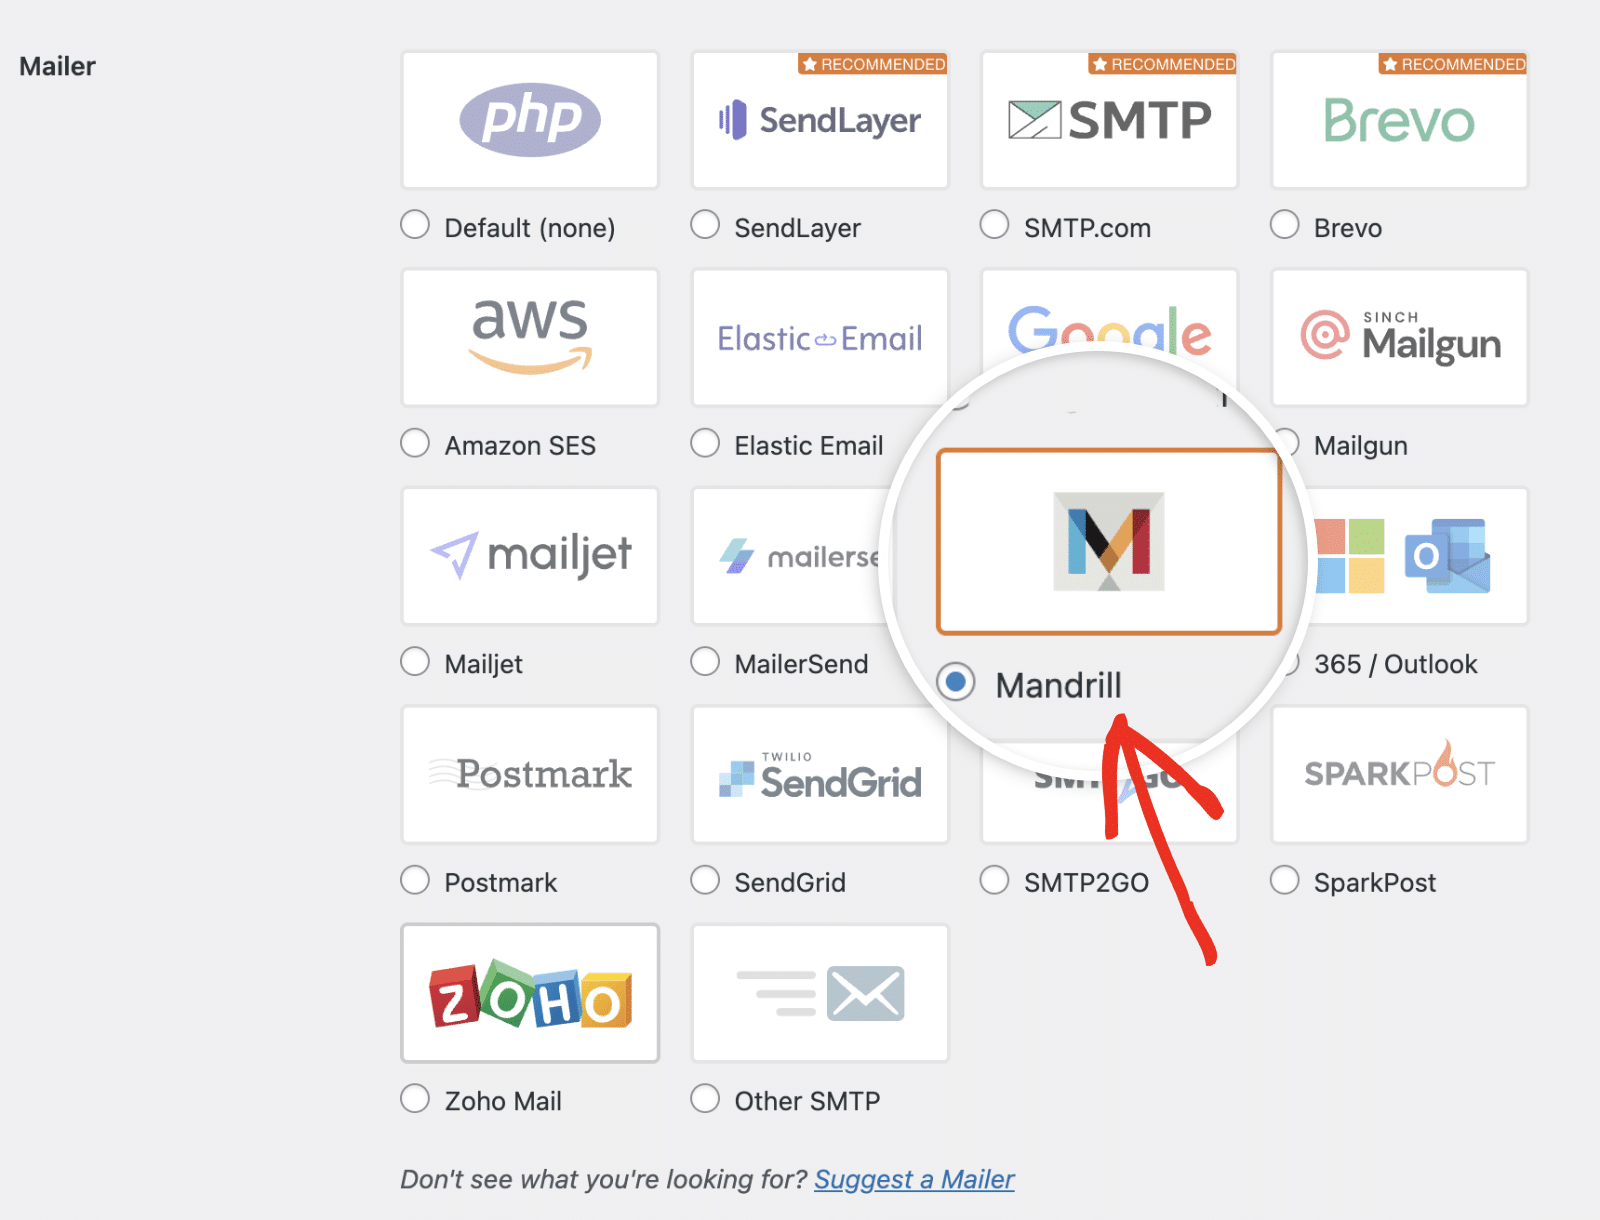
After selecting Mandrill, you’ll see additional configuration options, including the API key field.
API Key
Go ahead and paste the API key you copied from your Mandrill account into the API Key field.
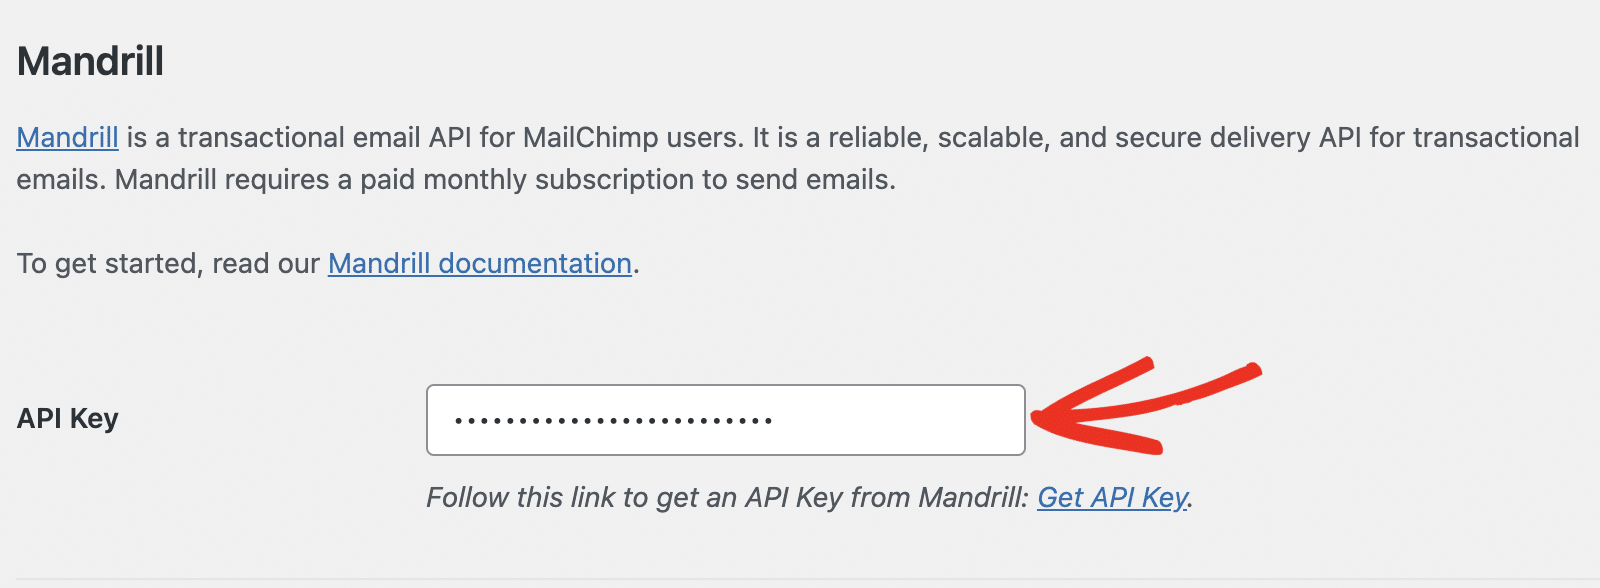
There’s also a convenient link to get your API key directly from Mandrill if you need to create a new one.
Backup Connection
Setting up a Backup Connection is optional and isn’t required to complete your Mandrill mailer setup. However, to further improve email deliverability, we recommend configuring an additional connection to serve as a backup in case your Primary Connection fails.
Once you’ve configured your mailer settings, be sure to click the Save Settings button.

Sending a Test Email
Note: Your Mandrill domain verification and DNS records need to be properly configured before you can successfully send emails.
After configuring your settings, you should send a test email to verify everything is working correctly. To do so, go to WP Mail SMTP » Tools and select the Email Test tab.
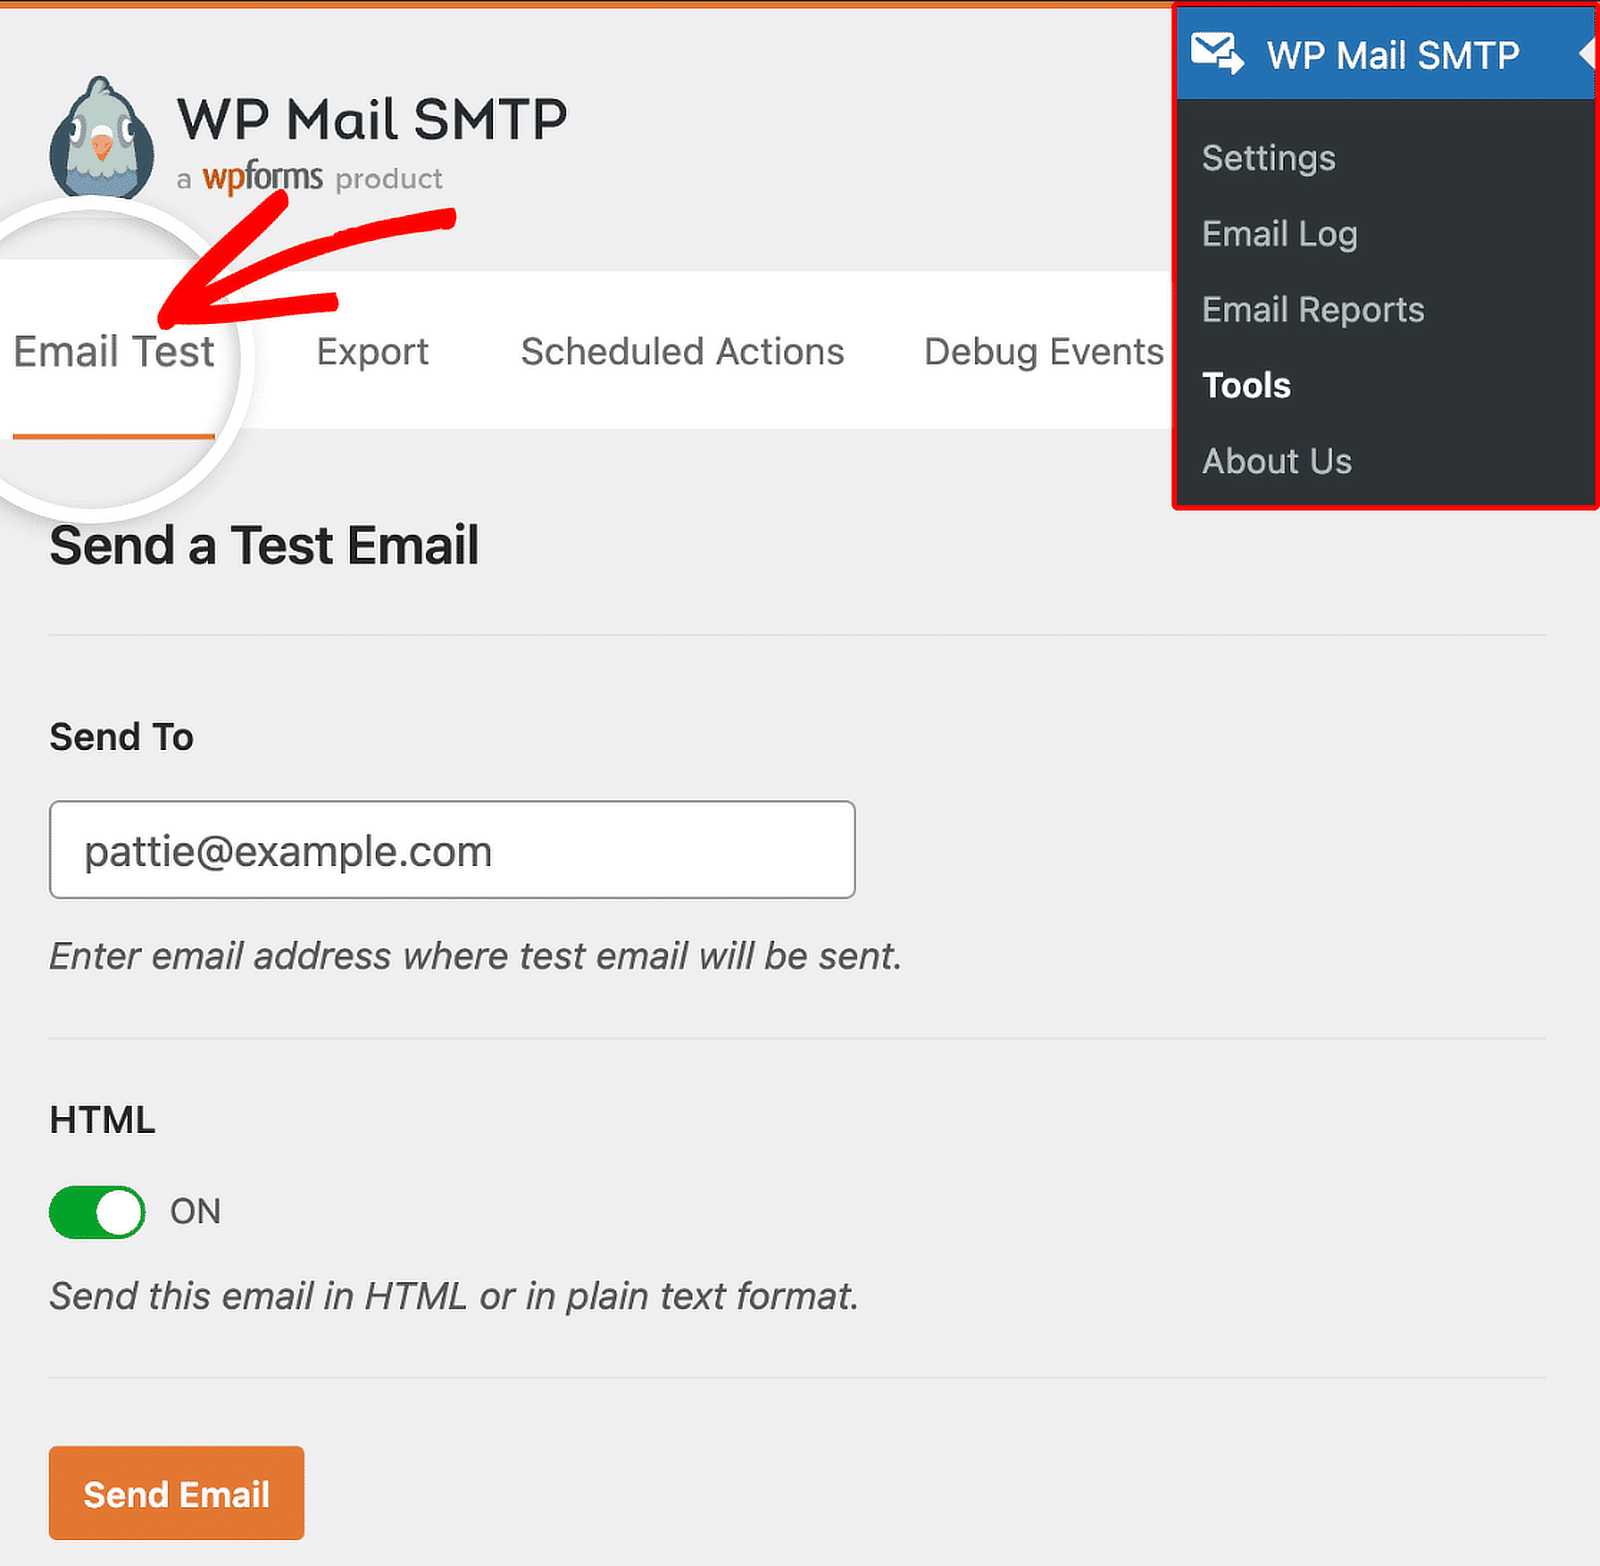
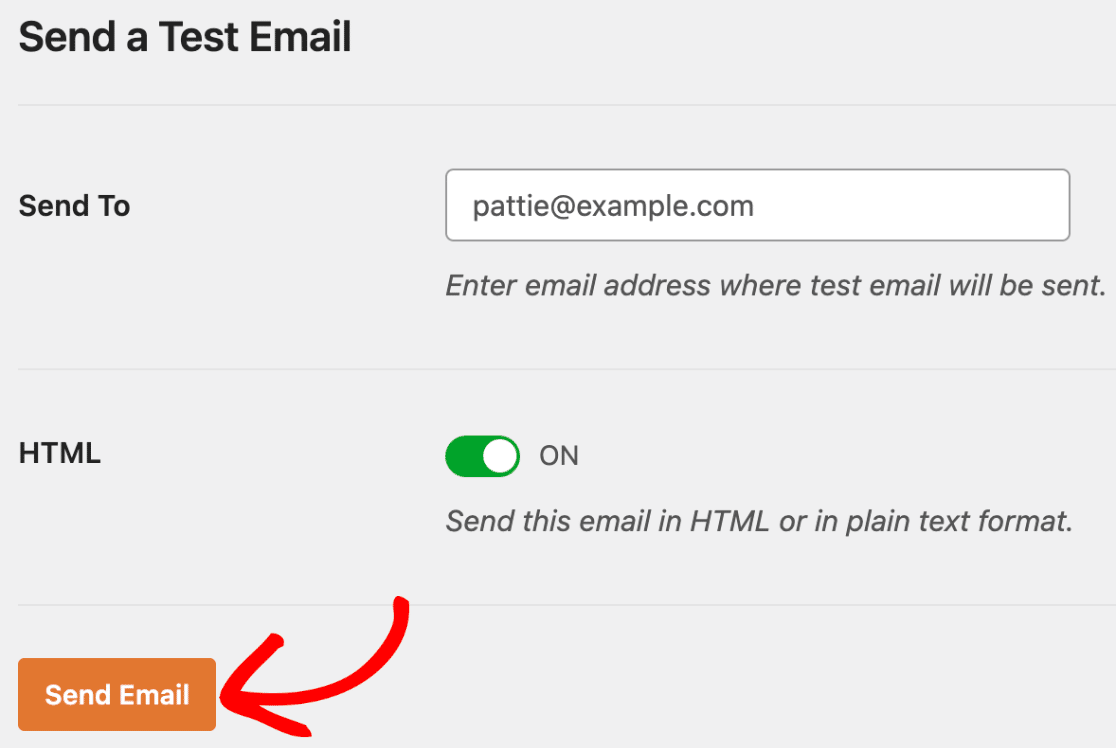
In the Send To field, enter any email address you have access to. We recommend leaving the HTML setting toggled ON unless you know you’ll only be sending plain text emails.
Note: If you’ve set up an additional connection, you’ll be able to choose between your Primary Connection and other connections when sending a test email.
Next, click the Send Email button to send your test email.
After sending the email, you should see a success message.

If you check the inbox for the email address you entered, you should have received the test email, confirming that your Mandrill integration is working properly.
That’s it! You’ve successfully set up Mandrill with WP Mail SMTP.
Next, would you like to monitor your email delivery performance? Check out our guide on using Email Logs in WP Mail SMTP to track and analyze your email sending activity.