
AI Summary
Email has a trust problem. There’s no built-in way to prove a message actually came from the domain it claims to be from, which is why someone can send an email that looks like it’s from your boss, your bank, or your business with little more than a few minutes of setup.
SPF, DKIM, and DMARC are the three DNS records that fix this. Together, they tell receiving mail servers which servers are allowed to send for your domain, whether each message has been tampered with in transit, and what to do when one of those checks fails.
This guide explains what each one does, how they work together, the order to set them up, and how to test them. As of 2026, all three are required for any business that sends email. Gmail, Yahoo, and Microsoft enforce it directly, and skipping any of them drops your inbox placement.
Quick answers
- What are SPF, DKIM, and DMARC? Three DNS records that work together to verify your emails are genuinely from you. SPF authorizes which servers can send for your domain, DKIM adds a cryptographic signature proving the message wasn’t altered, and DMARC tells receivers what to do when SPF or DKIM fails.
- Do you need all three? Yes. Each one fixes what the others miss, and since February 2024, Gmail and Yahoo require them for senders of 5,000+ emails per day.
- What order do you set them up in? SPF first, then DKIM, then DMARC, with verification between each step.
- Check yours now: Use the free checker on this page to test all three records on your domain.
SPF, DKIM, and DMARC: Email Authentication Explained
The three records are independent checks that combine into one policy. Once they’re in place, you stop having to guess why a password reset never arrived or why a transactional email went to spam.
- What are SPF, DKIM, and DMARC?
- What is SPF?
- What is DKIM?
- What is DMARC?
- Why you need all three
- Are SPF, DKIM, and DMARC required in 2026?
- The setup order that matters
- Where to add SPF, DKIM, and DMARC records
- How to test SPF, DKIM, and DMARC
- Troubleshooting common failures
- WordPress-specific notes
- FAQs on SPF, DKIM, and DMARC
What are SPF, DKIM, and DMARC?
SPF, DKIM, and DMARC are three DNS records that authenticate the email coming from your domain.
- SPF (Sender Policy Framework) lists every server that’s allowed to send mail for your domain.
- DKIM (DomainKeys Identified Mail) adds a cryptographic signature to each message so receivers can confirm the content wasn’t changed in transit.
- DMARC (Domain-based Message Authentication, Reporting, and Conformance) tells receivers what to do when SPF or DKIM fails, and ties both checks to the visible
From:address.
Each one fixes a different gap. SPF stops unauthorized servers from claiming your domain, DKIM stops anyone from modifying your messages mid-flight, and DMARC stops attackers from passing SPF or DKIM with a different domain while spoofing yours in the visible From: line.
Quick comparison
| SPF | DKIM | DMARC | |
|---|---|---|---|
| What it does | Lists servers allowed to send mail for your domain | Signs each email so receivers can confirm it wasn’t modified | Tells receivers what to do when SPF or DKIM fails |
| How it works | Receiver compares the sending IP to a list in your DNS | Receiver verifies a cryptographic signature against your public key | Receiver applies your policy (deliver, spam, or reject) to failing mail |
| What it doesn’t do | Doesn’t check the visible From: address, breaks on forwarding | Doesn’t say which servers can send, can break if relays modify mail | Doesn’t authenticate anything on its own, relies on SPF and DKIM |
| Where it lives in DNS | TXT record at your apex domain | TXT record at [selector]._domainkey.yourdomain.com | TXT record at _dmarc.yourdomain.com |
| Required in 2026? | Yes | Yes | Yes |

When an email arrives at Gmail, Outlook, or any other inbox, three checks happen one after the other. The receiver looks up your SPF record and compares the sending IP to the list. The receiver checks the DKIM signature against the public key in your DNS. Then the receiver reads your DMARC policy and decides what to do with the result.
What is SPF?
SPF is a TXT record in your DNS that lists every server and service authorized to send email on behalf of your domain. It’s the first line of defense against domain spoofing.
A basic SPF record looks like this:
v=spf1 include:sendlayer.net ~allThe parts:
v=spf1declares this is an SPF record.include:sendlayer.netauthorizes a sending service, here SendLayer. Each sending tool gets its owninclude:directive.~allis the catch-all rule for anything that doesn’t match. The tilde means “soft fail,” which allows the email but flags it. Use-allfor “hard fail” (reject) once you’re confident your record covers every legitimate sender.
When an email arrives, the receiving server takes the IP it came from and checks whether that IP is allowed by your SPF record. If yes, SPF passes. If not, SPF fails.
What SPF can’t do
SPF has two well-known limitations. It breaks on email forwarding. When someone forwards your email, the forwarding server uses its own IP, which isn’t in your SPF record, so SPF fails even though the original was legitimate. It also only checks the return-path, not the visible From: address. An attacker can pass SPF with a domain they control while making the From: line look like yours. That’s why DMARC alignment matters (more on that below).
The 10-DNS-lookup limit
SPF records are limited to 10 DNS lookups total (RFC 7208). Every include:, a, mx, ptr, and exists: directive counts toward the limit. Add too many sending services and you’ll hit a PERMERROR, at which point every authentication fails silently.
Most domains hit this when they stack multiple marketing tools, CRMs, transactional services, and helpdesks. If you’re close to the limit, follow our guide on how to merge multiple SPF records into a single, flattened record.
And note, you can only have one SPF record per domain. If you try to add a second, RFC 7208 says receivers must treat the whole setup as invalid, the same effect as having no SPF at all.
What is DKIM?
DKIM adds a cryptographic signature to every email you send. The signature is generated using a private key held by your sending service, and your DNS holds the matching public key. Receiving servers compare the two to confirm the email actually came from your domain and that nothing in it was modified in transit.
A DKIM record in DNS looks like this:
selector1._domainkey.example.com. IN TXT "v=DKIM1; k=rsa; p=MIGfMA0GCSqGSIb3DQ..."The selector (“selector1” in this example) tells receiving servers which DKIM key to look up. Most providers rotate keys periodically and use different selectors for different sending streams, so the selector name is part of the record location.
Every email you send carries a DKIM-Signature header that looks something like this:
DKIM-Signature: v=1; a=rsa-sha256; d=example.com; s=selector1; h=from:to:subject:date; bh=...; b=...The d= tag is the domain claiming the signature. The s= tag is the selector. That’s the DNS record receivers will look up.
What DKIM can’t do
DKIM is powerful but it has limits. It doesn’t say which servers are allowed to send for your domain. That’s SPF’s job. An attacker can spoof your domain without DKIM signing, and DKIM alone has no opinion about that. It can also break if a relay server modifies the message body, for example a mailing list that adds a footer to outgoing mail. And DKIM has no enforcement built in. A receiving server can ignore a failed signature unless DMARC tells it not to.
DKIM key length
Modern DKIM keys are 2048 bits, which produces a public key string longer than 255 characters, the maximum length of a single TXT record value. Most DNS providers handle this automatically by splitting the value across multiple quoted strings, but some don’t. If your DKIM record won’t save or won’t validate, see our guide on how to split a DKIM record.
What is DMARC?
DMARC ties SPF and DKIM together and tells receiving servers what to do when authentication fails. It’s the only one of the three that generates reports back to you.
A typical DMARC record looks like this:
_dmarc.example.com. IN TXT "v=DMARC1; p=quarantine; rua=mailto:[email protected]; pct=100; aspf=r; adkim=r"
Each tag has a job:
v=DMARC1declares this is a DMARC record.p=is the policy, one ofnone,quarantine, orreject.rua=is where aggregate reports get sent.pct=is the percentage of mail the policy applies to (useful for gradual rollouts).aspf=andadkim=control alignment mode, relaxed (r) or strict (s).
Policy progression, from none to quarantine to reject
DMARC enforcement is a journey, not a switch. The three policies are stages, and you progress through them as your confidence grows.

- p=none is monitor mode. Failing emails are delivered normally, but you receive reports about them. Always start here.
- p=quarantine sends failing emails to the recipient’s spam folder. Move here after 2 to 4 weeks at p=none with no legitimate mail failing.
- p=reject rejects failing emails outright (a
550SMTP error). Move here after another 2 to 4 weeks at p=quarantine.
Jumping straight to p=reject is the most common cause of DMARC-related outages. You’ll discover legitimate sending sources you forgot about (your CRM, your marketing tool, your support desk) only after they get rejected. Always start at p=none, read the reports, then escalate.
DMARC aggregate reports
When you set rua= in your DMARC record, you’ll start receiving daily XML reports from every mail provider that handles your domain’s email, including Google, Microsoft, Yahoo, and others. These reports show every IP that sent mail under your domain and whether SPF and DKIM passed and aligned for each one.
The raw XML is noisy and machine-readable, so most teams plug their rua= address into a DMARC reporting service (Postmark, dmarcian, EasyDMARC, and similar) that parses the reports into a readable dashboard. It’s the only practical way to discover legitimate sending sources you might have missed before tightening your policy.
DMARC alignment
DMARC introduces a concept the other protocols don’t have, called alignment. SPF and DKIM each pass when their respective check is valid, but DMARC only counts that pass if the authenticated domain matches the visible From: address.
There are two flavors of alignment.
- SPF alignment means the
smtp.mailfrom(return-path) domain matches theFrom:domain. - DKIM alignment means the
d=tag in the DKIM signature matches theFrom:domain.
DMARC passes if at least one of these aligns AND the underlying check passed.
Relaxed alignment (the default) allows subdomain matches, so mail from mail.example.com aligns with a From: at example.com. Strict alignment requires an exact match. Most senders use relaxed unless they have a specific security reason for strict.
Alignment is the most common reason for DMARC failure even when SPF and DKIM both pass individually. Many sending services authenticate using their own domain (e.g., sendgrid.net), not yours, which means SPF and DKIM pass but DMARC fails because nothing aligns with example.com. Fixing alignment usually means switching to a custom return-path or branded DKIM signing offered by your provider.
How to add a DMARC record
If your email provider gives you a specific DMARC record, add that. If not, this is a safe generic starter record at _dmarc.yourdomain.com:
v=DMARC1; p=none; rua=mailto:[email protected];This puts you in monitor mode with reports coming to a mailbox you control. For full setup including report handling and policy progression, see our dedicated guide on how to create a DMARC record.
Why you need all three
Each protocol fixes what the others can’t. Here’s the breakdown.
| SPF | DKIM | DMARC | |
|---|---|---|---|
| What it prevents | Unauthorized servers sending as your domain | Email content being modified in transit | Attackers spoofing your From: address even when other checks pass |
| What it checks | Sending IP against your authorized list | Cryptographic signature against your public key | Alignment between authentication results and the From: domain |
| Common failure | Legitimate mail breaks on forwarding | Mailing-list relays modify the body and break the signature | Both SPF and DKIM fail alignment with the visible domain |
| If you skip it | Any server can claim to send as your domain | Anyone can modify your email in transit undetected | Failed authentications get no enforcement |
Run with only SPF, and you’re vulnerable to alignment-based spoofing, where an attacker authenticates with their own domain while displaying yours. Run with only DKIM, and any server can still claim to be you. Run with only DMARC, and you have no underlying authentication for it to enforce. All three together is the only configuration that actually works.
Are SPF, DKIM, and DMARC required in 2026?
Email authentication moved from best practice to non-negotiable between 2024 and 2026. Here’s where things stand.
Bulk senders (5,000+ emails per day to Gmail or Yahoo)
- February 2024. Gmail and Yahoo introduced bulk sender requirements. SPF, DKIM, and DMARC are all required. One-click unsubscribe headers are required. Spam complaint rate must stay below 0.3%.
- May 2025. Microsoft introduced equivalent requirements for Outlook.com, Hotmail, and Live.com.
- November 2025. Gmail moved from soft deferrals (temporary 421 errors) to permanent rejection (550 errors) for non-compliant messages. There’s no grace period anymore. Non-compliant mail is rejected outright.
Lower-volume senders (under 5,000 per day)
You’re not technically subject to the bulk sender rules, but the underlying authentication checks apply to every connection. Missing SPF, DKIM, or DMARC drops inbox placement by up to 76% even at low volume. The rules nominally target bulk senders, but the spam filters use the same signals for everyone.
Compliance contexts
- PCI DSS v4.0 includes email authentication requirements for organizations handling payment card data.
- CISA Binding Operational Directive 18-01 requires all U.S. federal agencies to deploy SPF, DKIM, and DMARC with
p=reject. - Similar requirements exist in the UK (NCSC), Australia (ACSC), and Canada (CCCS) for government and critical infrastructure.
Even if you’re sending 50 emails a month from your contact form, you still need all three records.
The setup order that matters
Add SPF first. Then DKIM. Then DMARC. With waits between each. This order is non-negotiable, and getting it wrong is the most common reason new deployments break delivery.

Why this order matters
DMARC checks the results of SPF and DKIM. If you add DMARC before those two are in place and validated, every email fails authentication. With a policy of p=quarantine or p=reject, your mail starts going to spam or getting rejected the moment DMARC propagates. Many providers won’t even let you add a DMARC record until SPF passes validation.
Time until each one is active
- SPF: 5 to 30 minutes
- DKIM: 1 to 4 hours
- DMARC: 1 to 24 hours
After each record propagates, send a test email to a Gmail address you control and check the headers via Show original. Both SPF and DKIM should show PASS before you add DMARC.
Where to add SPF, DKIM, and DMARC records
All three records are added as TXT records in your domain’s DNS settings, the same place you manage A records, MX records, and nameservers. Where exactly that lives depends on who’s managing your DNS.
Shared hosts (Bluehost, SiteGround, HostGator)
Most shared hosts include a DNS Zone Editor in their control panel under Domain or DNS Management. Look for an option to add a TXT record.
Domain registrars (GoDaddy, Namecheap, Google Domains)
If your hosting and domain are separate, your DNS usually lives with your registrar. Look for DNS Settings or Manage DNS in your domain dashboard.
Cloudflare
Open the Cloudflare dashboard, select your domain, click DNS on the left menu, and add a new TXT record. Here’s the editor view.

Vercel
If Vercel hosts DNS for your domain, open the project, click Settings » Domains » DNS Records, and add a new TXT record. The Host field accepts @ for the apex (used for SPF) and _dmarc for DMARC.
Netlify
Netlify DNS lives under Domains in your team dashboard. Click the domain, then Set up Netlify DNS if you haven’t already, then add records under DNS records.
Squarespace
Squarespace handles DNS through Domains » [domain name] » DNS Settings » Custom Records. Add TXT records with Host = @ for the apex domain, or _dmarc for DMARC.
WP Engine
WP Engine doesn’t host your DNS by default, so you’ll add SPF, DKIM, and DMARC records at whichever registrar you use for the domain (GoDaddy, Namecheap, Cloudflare, and so on). What you’ll need from WP Engine is the right value for your SPF include: so their mail servers can send on behalf of your site. Find this in the WP Engine User Portal under your environment’s DNS or mail settings. Their typical SPF include is mail1.wpengine.com. Add it to your existing SPF record alongside any other senders, never as a second v=spf1 record.
How to test SPF, DKIM, and DMARC
Three reliable ways to verify all three records are doing what you expect.
Gmail “Show original”
Send a test email from your domain to a Gmail address you control. Once it arrives, open the email, click the three-dot menu in the top right, and choose Show original. Look for these three lines near the top.
- SPF: PASS (with your domain)
- DKIM: PASS (with
header.d=showing your domain) - DMARC: PASS
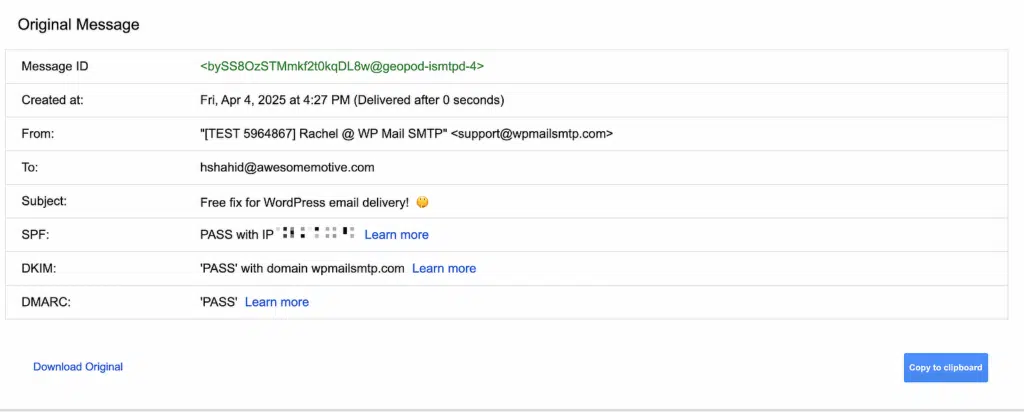
If any of these show FAIL or NEUTRAL, jump to the troubleshooting section below.
WP Mail SMTP’s Domain Checker
WP Mail SMTP’s email test tool validates all three records automatically every time you send a test email, no separate tool required. It flags missing records, multiple SPF records, DKIM signature problems, DMARC alignment failures, and PTR record issues, all from your WordPress admin. The Domain Checker is free in WP Mail SMTP Lite.

Online checkers
MxToolbox, dmarcian, and HostedScan all offer free SPF, DKIM, and DMARC lookups. Enter your domain and you’ll get a quick pass/fail status for each record, plus diagnostics for common errors like too many DNS lookups or syntax problems.
Troubleshooting common failures
If your records are set up but authentication is still failing, one of these scenarios is almost always the cause. Each one follows the same template, symptom to likely cause to diagnosis to fix.
1. Gmail rejected your email with “550-5.7.26”
Symptom. Gmail bounces with a 550-5.7.26 SMTP rejection. The full text usually reads something like “Gmail requires all senders to authenticate with either SPF or DKIM.”
Likely cause. No valid SPF or DKIM on the sending domain, or both are misconfigured.
Diagnosis. Run your domain through the checker at the top of this page, or use the WP Mail SMTP Domain Checker. The result will show which of the three records is missing or failing.
Fix. Add a valid SPF record and confirm DKIM is signing for your sending domain. Resend after both records propagate. For the full diagnostic, see our guide on fixing Gmail blocking emails.
2. “Action needed: SPF record required by your SMTP server hasn’t been added”
Symptom. Your SMTP provider’s dashboard shows a warning that your SPF record is missing or doesn’t include them.
Likely cause. Your provider’s include: directive isn’t in your domain’s SPF record.
Diagnosis. Run dig TXT yourdomain.com, or use the checker above. Look for the SPF record and confirm whether the provider’s domain (e.g., sendlayer.net, _spf.google.com) is in the list.
Fix. Add the provider’s include: to your existing SPF record. For example, an SPF record using SendLayer plus Google Workspace would read v=spf1 include:sendlayer.net include:_spf.google.com ~all. Never create a second SPF record on the same domain.
3. DMARC fails despite SPF passing
Symptom. Gmail’s Show original shows SPF: PASS but DMARC: FAIL.
Likely cause. SPF alignment failure. Your return-path domain doesn’t match the visible From: domain.
Diagnosis. Look at the smtp.mailfrom value in headers. Does it match the domain in From:?
Fix. Either change your sending service’s return-path to your domain (most providers offer a “custom return-path” or “bounce domain” setting), or rely on DKIM alignment instead, which is often easier to configure.
4. DKIM signature missing from received emails
Symptom. Headers show no DKIM-Signature: line at all.
Likely cause. DKIM isn’t actually configured on the sending side, or the wrong selector is being used.
Diagnosis. Send a test from another tool (Gmail directly, or another SMTP service) to compare. Check your SMTP provider’s dashboard for DKIM status, since most show whether the selector is verified.
Fix. Re-verify the DKIM CNAME or TXT records exist exactly as your provider specified. The selector name in your DNS record must match what the provider is signing with. Typos here are extremely common.
5. SPF “permerror: too many DNS lookups”
Symptom. Mail servers reject your messages with an SPF PERMERROR.
Likely cause. Your SPF record contains more than 10 DNS lookups (the RFC 7208 hard limit). Common when stacking include: directives for multiple services.
Diagnosis. Use an SPF flattener tool to count your lookups. Each include:, a, mx, ptr, and exists: counts.
Fix. Remove unnecessary includes, or use an SPF flattening service that resolves the includes into direct IP entries. Full walkthrough at our SPF merge guide.
6. Multiple SPF records on the same domain
Symptom. SPF PERMERROR or NEUTRAL despite having a valid-looking record.
Likely cause. You have two or more SPF TXT records. RFC 7208 says this is invalid, and receivers will treat it as if no SPF record exists.
Diagnosis. Run dig TXT yourdomain.com, or use MxToolbox’s SPF lookup. If you see two records starting with v=spf1, that’s the problem.
Fix. Combine the include: directives from both records into a single record. See the merge walkthrough above.
7. DKIM record too long for DNS
Symptom. Your provider gave you a DKIM key, but DNS won’t accept it.
Likely cause. Single TXT records have a 255-character per-string limit. DKIM 2048-bit keys exceed this and must be split into multiple quoted strings within the same record.
Diagnosis. Count the characters in your key. Over 255 means this is the issue.
Fix. Split the value into 255-character chunks, each in quotes, like "v=DKIM1; k=rsa; p=ABC..." "DEF..." "GHI...". Most modern DNS providers do this automatically. Some don’t. See the DKIM key length section above for the full guide.
8. DMARC alignment failure (the silent killer)
Symptom. SPF: PASS and DKIM: PASS but DMARC: FAIL.
Likely cause. Neither protocol is aligned with the From: domain even though both individually pass.
Diagnosis. Compare three values in headers, the From: domain, the smtp.mailfrom domain, and the DKIM d= tag. At least one of the last two must match the first.
Fix. Configure your sending service to use your domain in either the return-path (for SPF alignment) or the DKIM signature (for DKIM alignment). Most providers default to their own domain. You have to opt in to alignment.
9. DMARC p=reject blocking your own legitimate emails
Symptom. Customers stop getting your transactional emails (password resets, receipts), but your test sends work fine.
Likely cause. You moved to p=reject too quickly, before catching all the legitimate sending sources in your SPF.
Diagnosis. Check your DMARC aggregate reports. They show every sender that’s been failing under your domain. Legitimate ones will be obvious (your CRM, marketing tool, helpdesk).
Fix. Move back to p=quarantine or p=none. Use the DMARC reports to add the missing legitimate senders to SPF. Wait 2 to 4 weeks until reports show 0% failure of legitimate mail, then re-enforce.
10. Records added but not propagating
Symptom. You added the records, but tools still say they’re missing.
Likely cause. DNS caching at your registrar, your local resolver, or the receiving server. Common with low-TTL changes after high-TTL records were previously cached.
Diagnosis. Run dig +trace TXT yourdomain.com from a different network, or query Google DNS directly with dig @8.8.8.8 TXT yourdomain.com. If those show the record but your tester doesn’t, it’s caching.
Fix. Wait. Most propagation completes within an hour for SPF and up to 24 hours for DMARC. If after 48 hours you still see nothing, recheck that the record was saved correctly at your registrar. A common gotcha is interfaces that need a confirmation step you missed.
WordPress-specific notes
WordPress has a specific email problem. By default, it uses PHP’s mail() function, which sends messages without any authentication. Your SPF, DKIM, and DMARC records can be perfectly configured, but if WordPress is sending email through PHP mail() from your web host’s shared IP, and that IP isn’t in your SPF record, every authentication check fails.
The fix is to route all WordPress email through an authenticated SMTP service. WP Mail SMTP does this with one-click integrations for SendLayer, SMTP.com, Brevo, Gmail/Google Workspace, Microsoft 365, Amazon SES, Mailgun, SendGrid, Postmark, SparkPost, and others. Each integration is pre-configured to authenticate properly and align with your domain. WP Mail SMTP’s improved email deliverability features include the free Domain Checker that flags missing or misconfigured SPF, DKIM, and DMARC records directly inside WordPress.

If your WordPress emails are landing in spam, missing or misaligned authentication is usually the cause. The full diagnosis lives in our guide on why WordPress emails go to spam. For setup, our WordPress email validation guide walks through verifying the records.
FAQs on SPF, DKIM, and DMARC
These are the most-searched questions about email authentication, organized from the most-asked to the most technical. Each answer is self-contained.
What is the difference between SPF, DKIM, and DMARC?
SPF says who can send, DKIM proves emails are genuine and unaltered, and DMARC enforces what happens when either check fails.
SPF authorizes sending servers, DKIM adds a tamper-proof cryptographic signature, and DMARC sets the policy receivers follow when SPF or DKIM fails alignment. You need all three because each covers a gap the others leave open. SPF without DKIM breaks on forwarded mail. DKIM without SPF lets unauthorized servers claim your domain. Both without DMARC means receiving servers have no enforcement instruction when something fails.
Do you need all three, SPF, DKIM, and DMARC?
Yes. Since February 2024, Gmail and Yahoo require all three for senders of 5,000+ emails per day, and Gmail began rejecting non-compliant mail outright in November 2025. Even below that threshold, missing any of the three reduces inbox placement.
SPF and DKIM each fail in different situations (SPF breaks on forwarding, DKIM breaks if a relay modifies the message), so a single-protocol setup breaks unpredictably.
Can you use DMARC without SPF or DKIM?
Technically DMARC passes if either SPF or DKIM passes and aligns, so you can run DMARC with only one. In practice you should set up both, because each fails in scenarios the other survives.
Running DMARC with only SPF means forwarded emails fail. Running it with only DKIM means messages modified in transit fail. Both together give reliable authentication.
What does p=none, p=quarantine, and p=reject mean?
These are DMARC enforcement levels, in order of strictness.
p=none is monitoring mode. It reports failures but blocks nothing, and it’s where every domain should start. p=quarantine sends failing emails to the spam folder. p=reject blocks failing emails entirely.
Move from none to quarantine to reject gradually, only after your reports confirm no legitimate mail is failing.
What order should you set up SPF, DKIM, and DMARC?
Set up SPF first, then DKIM, then DMARC. DMARC reads the results of SPF and DKIM, so adding it first causes every email to fail authentication immediately.
Add SPF, wait for it to propagate, add DKIM, verify both pass in a Gmail Show original check, then add DMARC starting at p=none.
How do you check if SPF, DKIM, and DMARC are set up correctly?
Use a checker tool (like the free one at the top of this page) that looks up all three records for your domain and reports their status.
You can also verify manually. Send an email to a Gmail address, open it, click the three-dot menu, choose Show original, and confirm SPF, DKIM, and DMARC each show PASS.
What is DMARC alignment?
Alignment is the check that makes DMARC meaningful. It confirms the domain that passed SPF or DKIM matches the domain in the email’s visible From: address.
SPF alignment requires the return-path domain to match the From: domain. DKIM alignment requires the signature’s d= tag to match it. The most common cause of DMARC failure is misalignment, not an outright SPF or DKIM failure.
What does the “550-5.7.26” Gmail error mean?
The 550-5.7.26 error means Gmail rejected your email because the sending domain isn’t authenticated. Gmail now requires all senders to authenticate with SPF or DKIM.
To fix it, add a valid SPF record and a DKIM signature for your sending domain, then confirm both pass before resending. The first troubleshooting item above walks through the full diagnostic.
What does it mean when Gmail “Show original” shows SPF, DKIM, and DMARC PASS?
It means your email was properly authenticated. SPF PASS confirms the email came from an authorized server. DKIM PASS confirms the message wasn’t altered in transit. DMARC PASS confirms the authenticated domain aligns with your visible From: address.
All three passing is the result you want. It maximizes inbox placement.
Do SPF, DKIM, and DMARC stop emails going to spam?
They’re necessary but not sufficient. Authentication tells mailbox providers your emails are genuinely from you, which is a prerequisite for inbox placement, but other factors still matter. These include sender reputation, content quality, engagement rates, list hygiene, and a valid PTR record.
Set up all three first, then address the other email deliverability factors.
What’s the best tool to check DMARC, SPF, and DKIM?
The fastest way is a checker that tests all three at once, like the free one on this page. For ongoing monitoring, Google Postmaster Tools shows how Gmail evaluates your authentication, and WP Mail SMTP’s built-in Domain Checker verifies all three records directly inside WordPress.
What’s the full form of SPF, DKIM, and DMARC?
SPF stands for Sender Policy Framework. DKIM stands for DomainKeys Identified Mail. DMARC stands for Domain-based Message Authentication, Reporting, and Conformance.
Together they form the standard stack for authenticating email and protecting a domain from spoofing.
Next, Check Your PTR Record
SPF, DKIM, and DMARC are three of the four DNS records that matter for email deliverability. The fourth is your PTR record, the reverse DNS entry that maps your sending IP back to your domain. Mailbox providers check it on every connection, and a missing or generic PTR will hurt your deliverability even when SPF, DKIM, and DMARC all pass.
For the full breakdown, see our guide to PTR records and reverse DNS.
Ready to fix your emails? Get started today with the best WordPress SMTP plugin. If you don’t have the time to fix your emails, you can get full White Glove Setup assistance as an extra purchase, and there’s a 14-day money-back guarantee for all paid plans.