Do you want to configure your WordPress SMTP settings and set up emails?
In this guide, I’ll show you how to set up WordPress SMTP by yourself.
If you’re not confident in doing that, I’ll also explain how to get our team to handle WordPress email settings for you!
Where Is the SMTP Setting in WordPress?
By default, WordPress doesn’t have native SMTP settings. In order to configure SMTP on your WordPress for emails, you’ll want to install the WP Mail SMTP plugin.
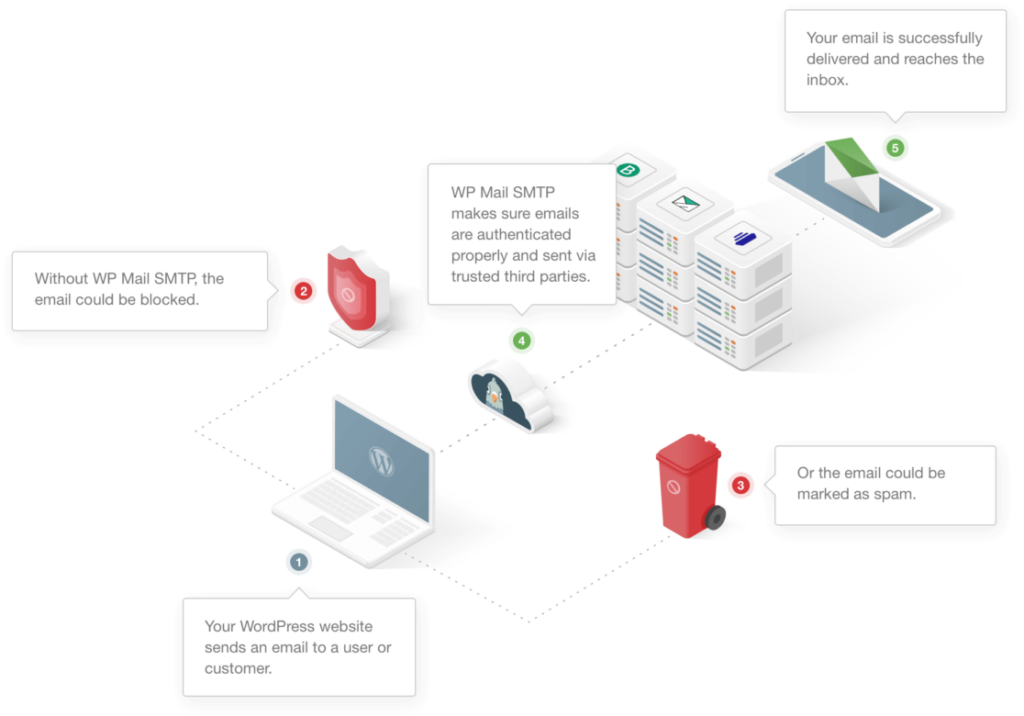
WP Mail SMTP takes over the default method of sending email in WordPress, which uses the unreliable PHP mail system. It gives you a full settings page where you can enter your SMTP details.
In effect, WP Mail SMTP reconfigures your site’s mail function so that it uses SMTP rather than PHP mail. This is much more reliable because SMTP includes the necessary authentication details in your messages to ensure successful email delivery.
How to Configure Your WordPress SMTP Settings for Emails
Let’s take a look at 2 ways to set up your WordPress email settings using WP Mail SMTP. I’ll start with the easiest option!
Method 1: Get Full White Glove Setup for WordPress SMTP
Setting up WordPress SMTP can be pretty overwhelming if you’re a beginner. If you’re not confident setting up email in WordPress, you can let the experts do it for you
That’s why WP Mail SMTP provides a full White Glove Setup service. It makes the WordPress mail server setup effortless. Note: Our White Glove Setup service is only available with a WP Mail SMTP license.

Our White Glove Setup service includes complete configuration and testing for your new email provider using your verified email account. That means we’ll:
- Add your preferred From Name and From Address
- Set up all of the required DNS records with your hosting providers
- Test mailer so you know your WordPress emails are delivering properly.
If you want to use WP Mail SMTP without the hassle and have your email delivery issues fixed once and for all, this is likely the best option for you.
Our White Glove Setup service is available with SendLayer, SMTP.com, or Brevo (formerly Sendinblue). All 3 of these email providers have a proven track record of excellent email deliverability.
You can purchase White Glove Setup with your license, or if you prefer, you can add it on later. To get setup assistance, see how to request White Glove Setup.
If you’d prefer to configure WordPress SMTP settings yourself, let’s walk through the process next.
Method 2: Add WordPress SMTP and Email Settings Yourself
When you install WP Mail SMTP, it’s important to choose a mailer and complete the entire set up process. If you leave the plugin on the default setting (PHPMailer), it won’t do anything to help with email deliverability.
Luckily, email set up is simple. We’ve created custom setup docs for every email provider to help you with the setup process. This method works with any version of WP Mail SMTP, including the free version.
I’ll show you how to install the Pro version here so you can see the useful features that are included with Pro.
Step 1: Install the WP Mail SMTP Plugin
First, install WP Mail SMTP if you haven’t done that already.
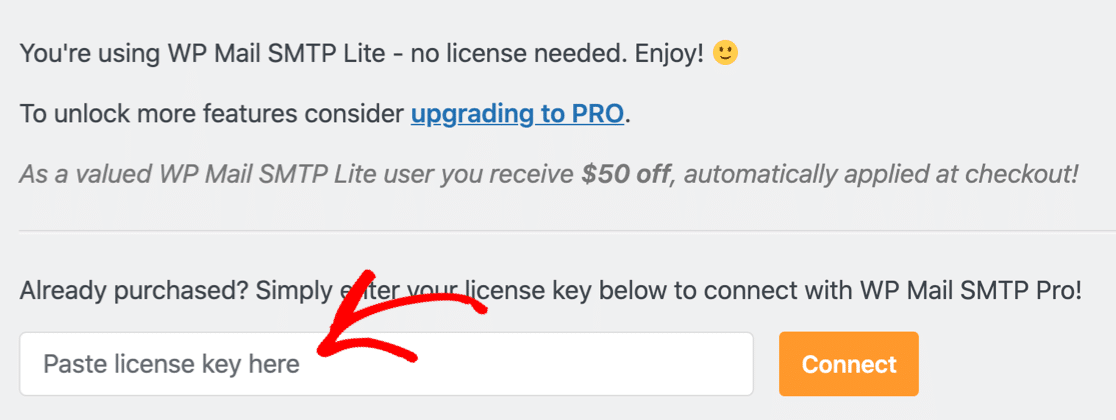
If you’re upgrading from Lite to Pro, you can paste your license key into the field on the plugin settings page to automatically upgrade.
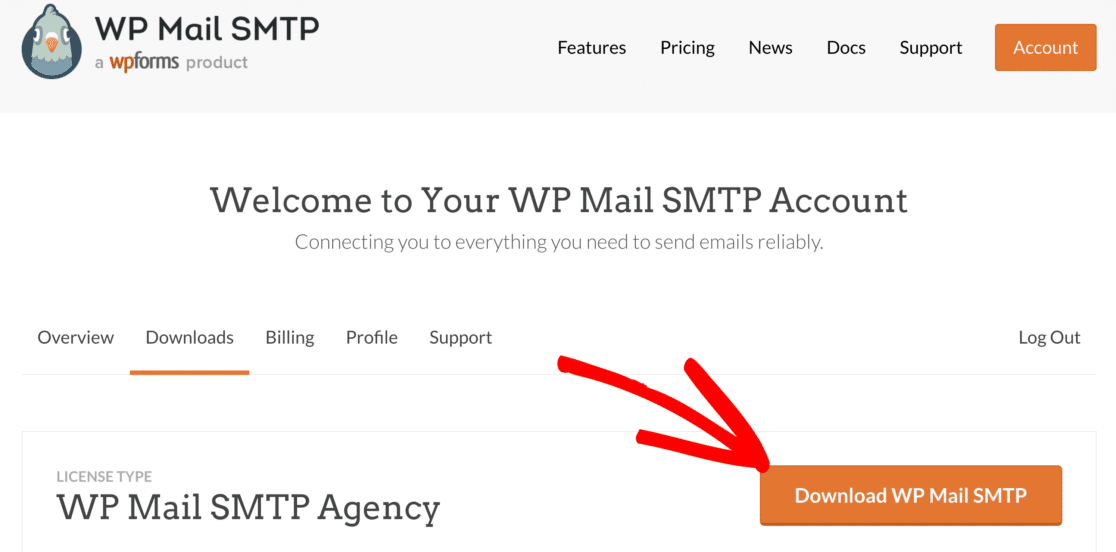
If you’re new to WP Mail SMTP, log in to your WP Mail SMTP account and switch to the Downloads tab. You can download the latest version of the plugin file by clicking the orange button.
Now, log in to the WordPress dashboard and upload the plugin to install it. If you need help with this, check out this guide on how to install a WordPress plugin.

Once the plugin is installed, be sure to Activate it. This will launch the Setup Wizard in your browser.
Step 2: Connect to a Mailer Service
In this step, let’s connect your website to a mailer service of your choice. Click the Let’s Get Started button to begin the Setup Wizard.

Now it’s time to start the WordPress mail server setup process. If you aren’t sure which email provider to use, we have some tips that might help:
- For general usage, we recommend SendLayer, SMTP.com, or Brevo. These are professional transactional email providers with either a free trial or a completely free plan.
- Other SMTP is a good option if you want basic email sending through an external SMTP server. It also provides strong encryption with TLS and SSL standards. But keep in mind that some hosts, including GoDaddy and A2 Hosting, may block external SMTP connections.
- Our Gmail mailer is perfect if you have a Gmail or Google Workspace account. Setting up this mailer takes a little longer than some of the other options, but it allows you to send email from any Gmail alias in WordPress.
Once you have chosen a mailer, go ahead and select it in the wizard.
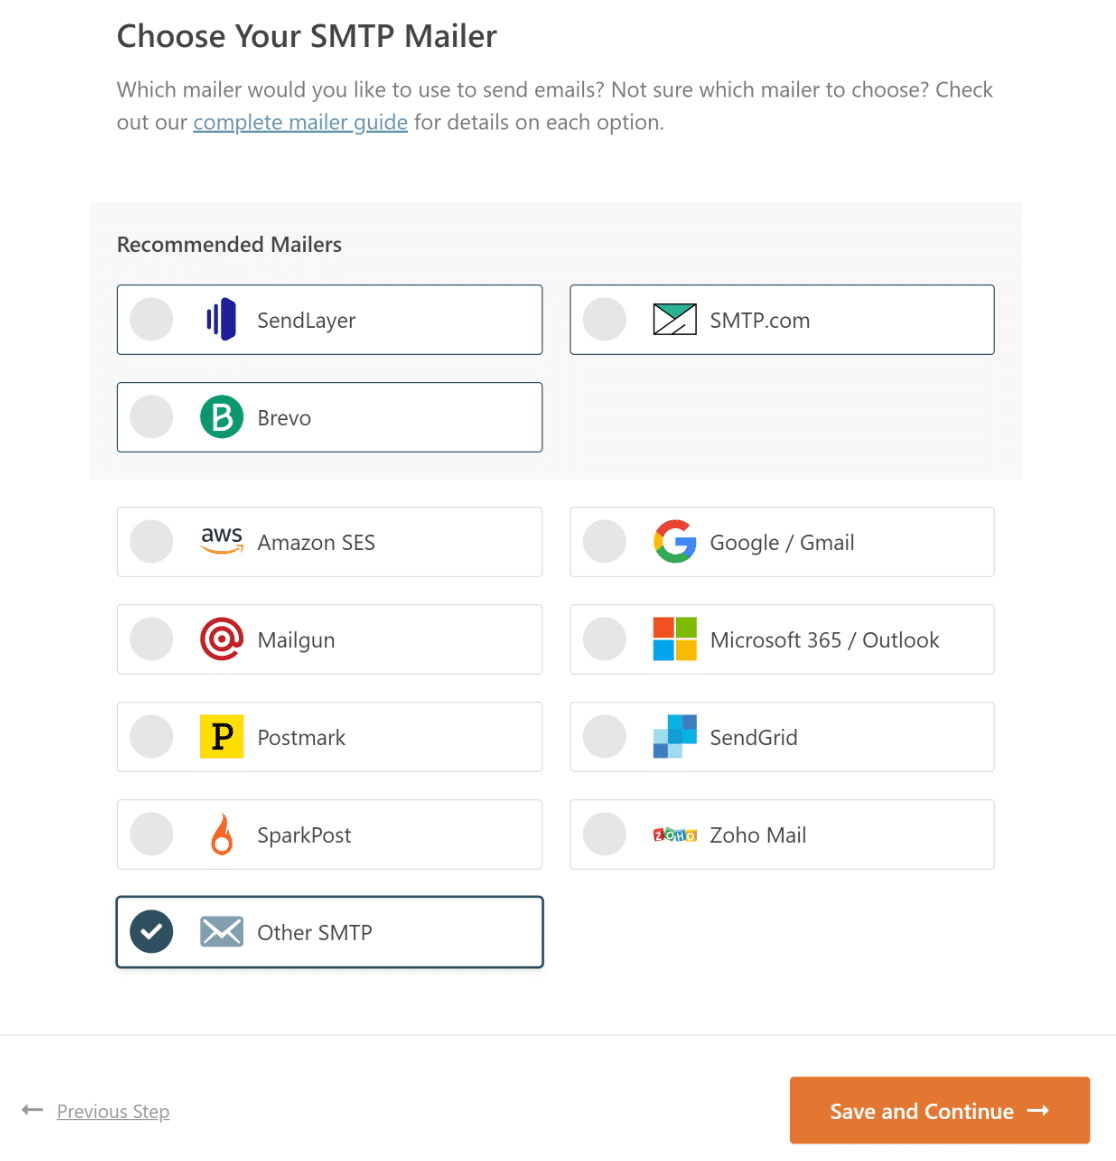
Now it’s time to create your account with your preferred mailer and connect it with your WordPress site. We’ve created detailed documentation for each email provider to make this really easy.
Click on your provider in the table below to open the documentation page in a new tab and follow the steps to configure WordPress email settings.
| Mailers available in all versions | Mailers in WP Mail SMTP Pro |
|---|---|
| SendLayer | Amazon SES |
| SMTP.com | Microsoft 365 / Outlook.com |
| Brevo | Zoho Mail |
| Google Workspace / Gmail | |
| Mailgun | |
| Postmark | |
| SendGrid | |
| SparkPost | |
| Other SMTP |
You’ll find complete instructions in the docs above, such as which SMTP port to use (if you choose Other SMTP), connect your email service with WP Mail SMTP using an API key, and how to configure WordPress SMTP settings overall.
When you’ve set everything up and verified that everything is working OK with your test email address, switch back to this guide to follow the remaining steps in the wizard.
Step 3: Enable Email Logging and Email Alerts
After successfully adding your WordPress email settings, WP Mail SMTP will ask you which additional features you’d like to enable. There are 2 features enabled by default:
- Improved Email Deliverability
- Email Error Tracking
If you have the Pro version, you’ll also be able to turn on the Detailed Email Logs and Instant Email Alerts.
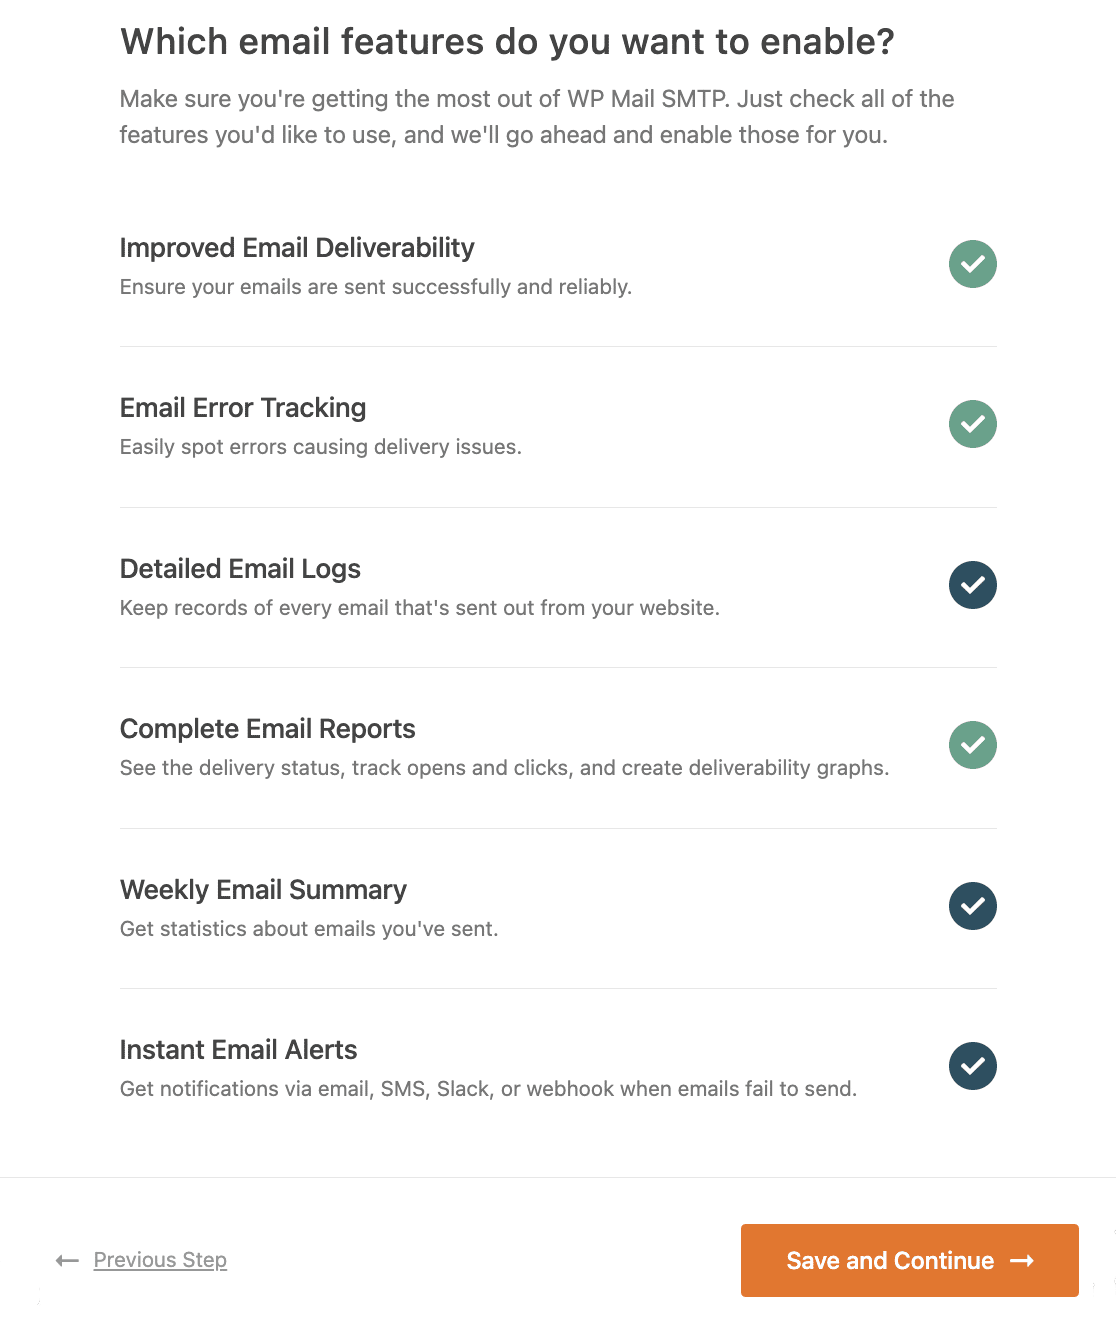
- Detailed Email Logs will track the headers, subject line, and other information about the email. When this feature is enabled, it will automatically turn on Complete Email Reports as well. You’ll have the option to enable the Weekly Email Summary feature if you want to receive a summary of your logs each week.
- Instant Email Alerts send you an email whenever your site fails to send an email. This lets you fix the problem quickly so your users don’t miss any important information.
Step 4: Enable Additional Email Log Settings
If you enable email logs, the next step in the Setup Wizard will let you enable some additional settings related to this feature.
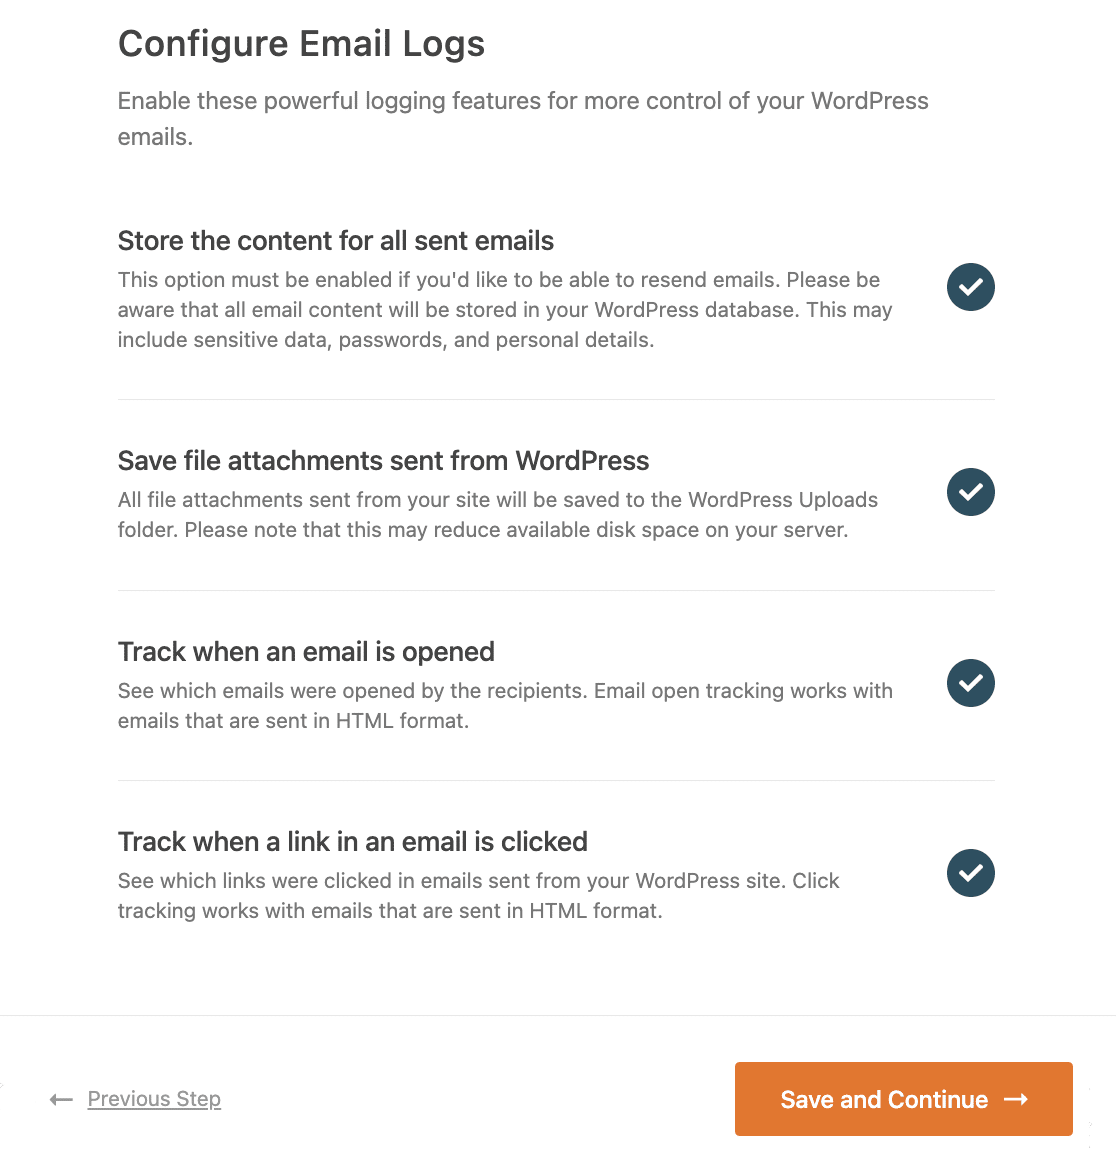
These options include:
- Store the content for all sent emails. This will store all the content of the emails sent from your WordPress site in its database. You must enable this option if you want to resend emails.
- Save file attachments sent from WordPress. This will save attachments from your WordPress emails in your site’s Uploads folder.
- Track when an email is opened. Enabling this option will let you see when recipients open emails from your site.
- Track when a link in an email is clicked. See when recipients have clicked links in your WordPress emails.
These email logging features are really useful for a variety of scenarios. For instance, if you’re running an online store with WooCommerce, you can audit order emails easily with the complete email logs at your disposal.
Check out how to log WordPress emails to see how it works. For the final step of the Setup Wizard, copy the license key from the WP Mail SMTP account and paste it into the box to enable Pro features and future updates.

That’s it! You’ve done everything to configure SMTP settings on your WordPress website for outgoing emails.
Finally, I’ll show you some of our most useful Pro features: how to set up additional connections and how to resend emails from WordPress.
If any of your WordPress email notifications fail, these features can help make sure they’re still delivered. However, the steps below are optional and not necessary to configure WordPress email.
Step 5: Set Up Additional Connections
WP Mail SMTP lets you connect your site to multiple mailers in the Additional Connections settings. This enables you to use 2 Pro features:
- Backup Connection: If an email fails to send using your Primary Connection (the mailer you set up in the earlier steps of this tutorial), then WP Mail SMTP will automatically try to send it again using your Backup Connection.
- Smart Routing: Set up conditional logic to route your emails through different mailers based on custom rules. This is useful if you’re sending different types of emails and want to use the best mailer for each one. For example, you can use a transactional mailer for your eCommerce order notifications and a different mailer for your newsletter and marketing emails.
To set up additional connections, go to WP Mail SMTP » Settings in your WordPress admin area and click Additional Connections.
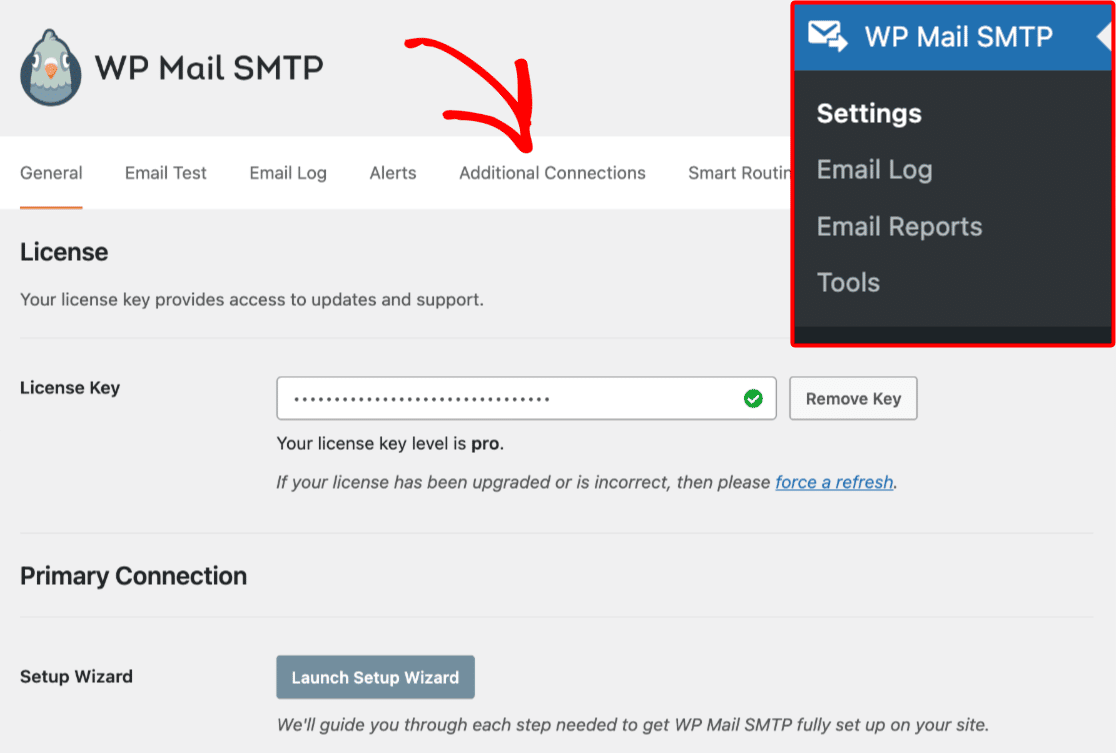
Here you can set up your 2nd connection the same way you did the 1st one:
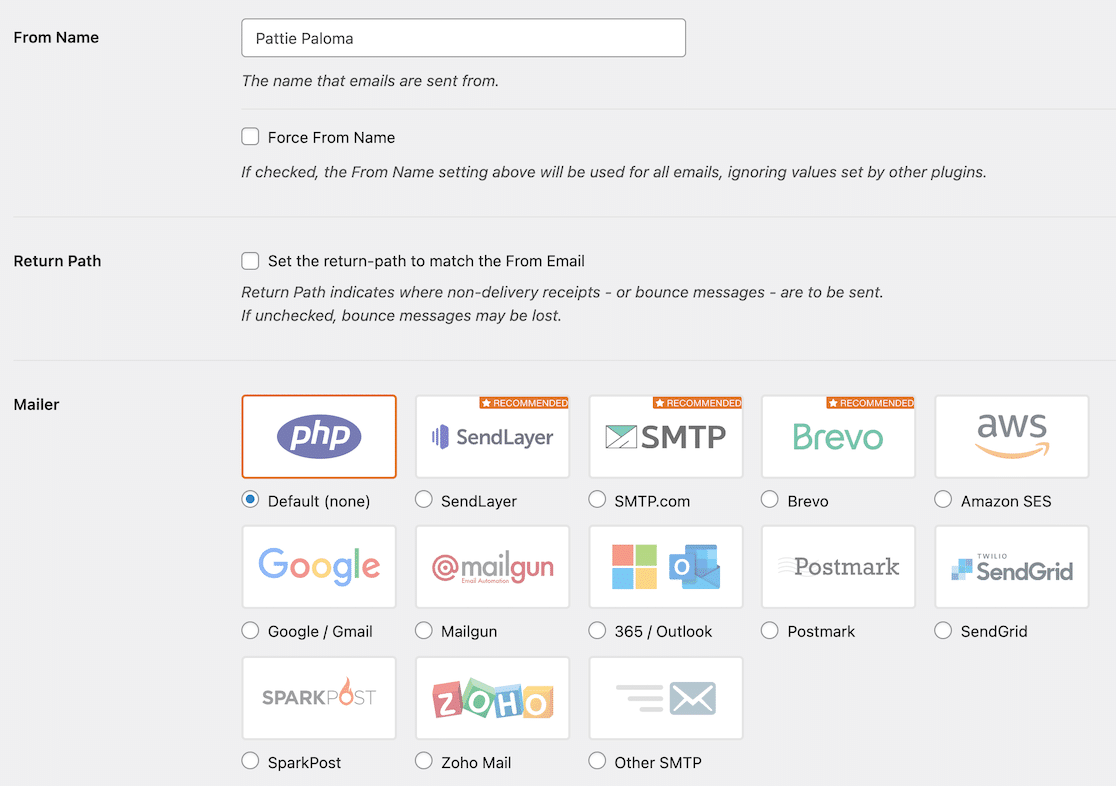
After you’ve filled in all the settings for your additional connection, you can setup a Backup Connection and / or Smart Routing.
Step 6: Set Up a Backup Connection
To set up a Backup Connection, go to the General settings page and scroll down to the Backup Connection section. Then select the mailer you want to use as your Backup Connection.
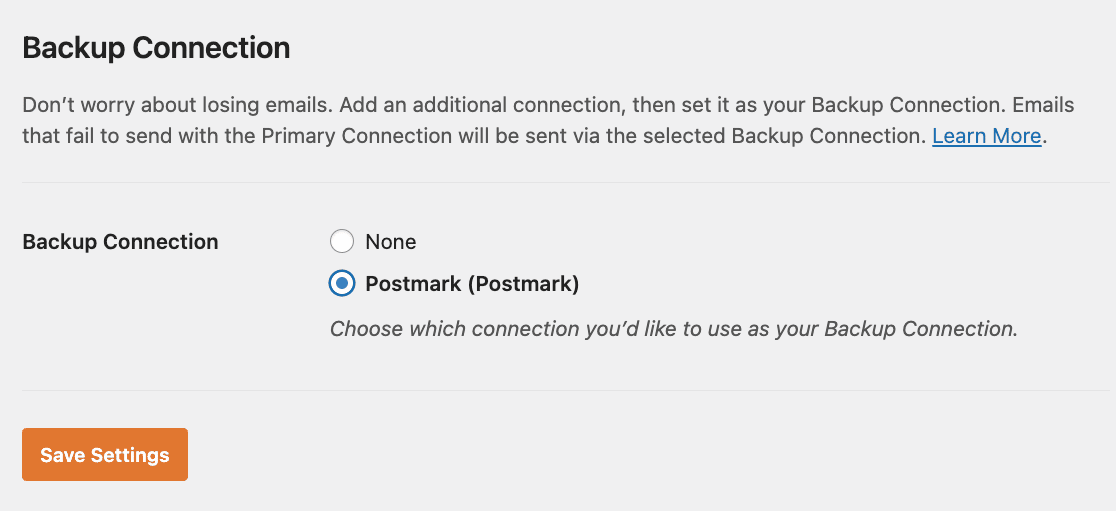
Click Save Settings when you’re done.
Step 7: Configuring Smart Routing
To set up Smart Routing, go to the Smart Routing settings page. Here you can set up your conditions for sending emails using an additional connection.
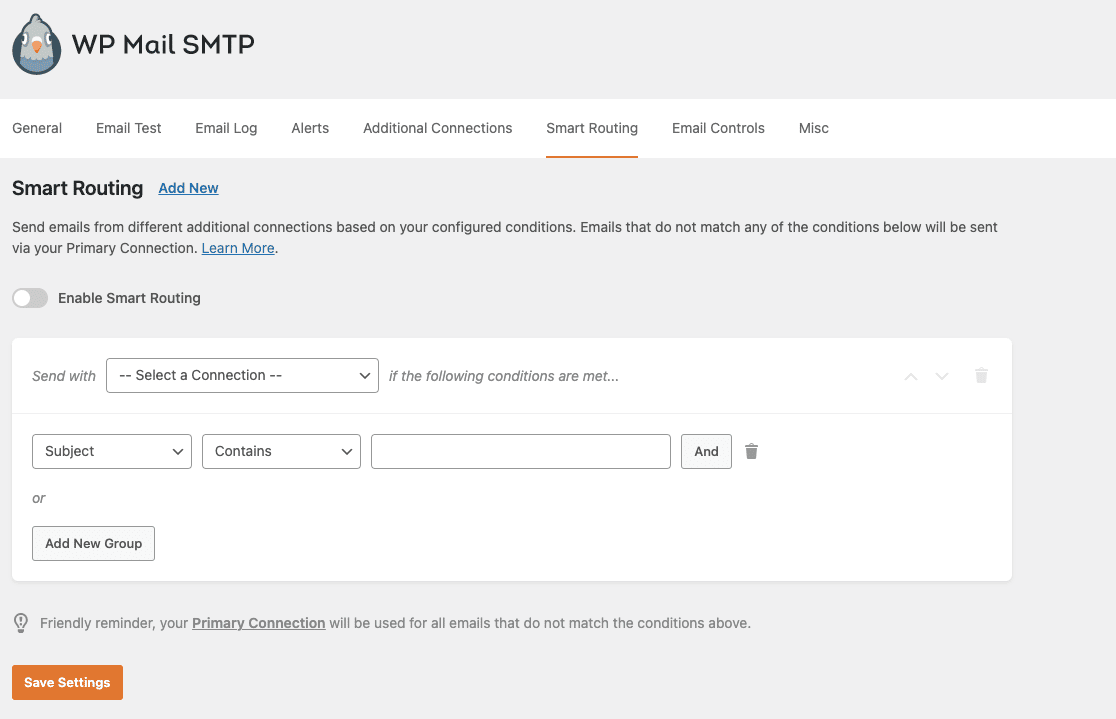
Use the dropdowns to create your Smart Routing rule(s). Any emails that do not meet the conditions you set up here will be sent using your Primary Connection.
Click Save Settings when you’re done.
Step 8: Resend Failed Emails
If a WordPress email fails, or you want to forward it, WP Mail SMTP makes it easy to resend any email with just a few clicks.
This feature is available in the Pro license or above.
To set up email resend, we need to make sure that you’re logging the entire contents of your emails first. If you didn’t enable this option in the Setup Wizard, go to WP Mail SMTP » Settings.
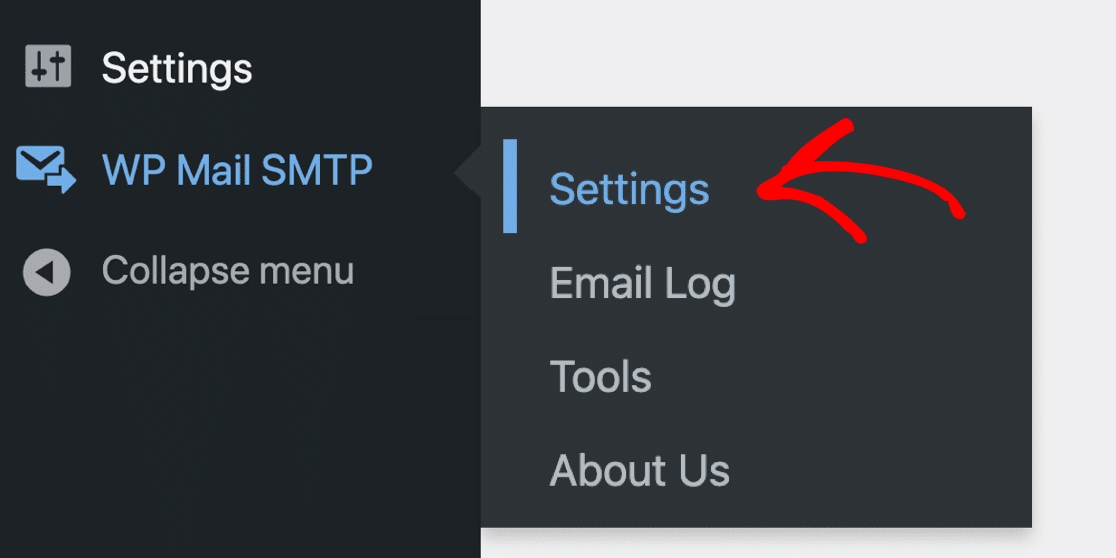
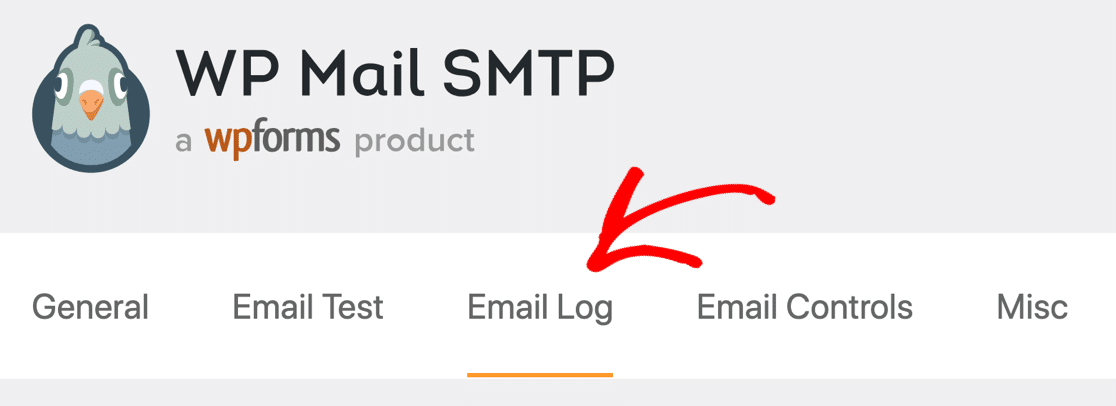
Next, click the Email Log tab to open your email log settings.
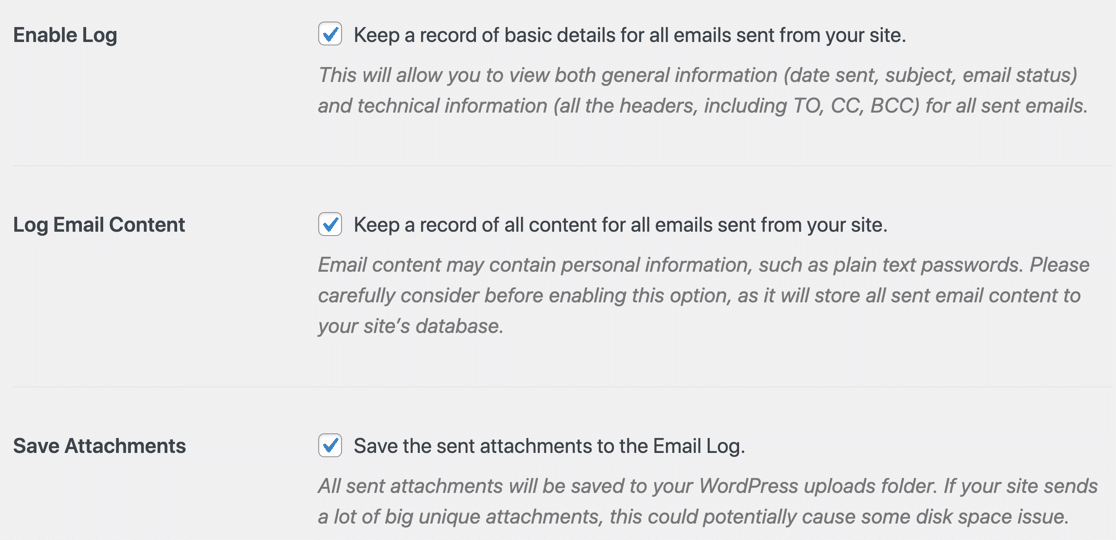
On this page, make sure you have the the Enable Log, Log Email Content, and Save Attachments settings are enabled in the plugin’s Email Log settings page:
Now you’ll want to send an email from your site so you have some data in your email log. For example, you could submit a message from your site’s contact form, or register a new user.
Once that’s done, we can test the email resend feature.
First, open WP Mail SMTP » Email Log to view your log entries.
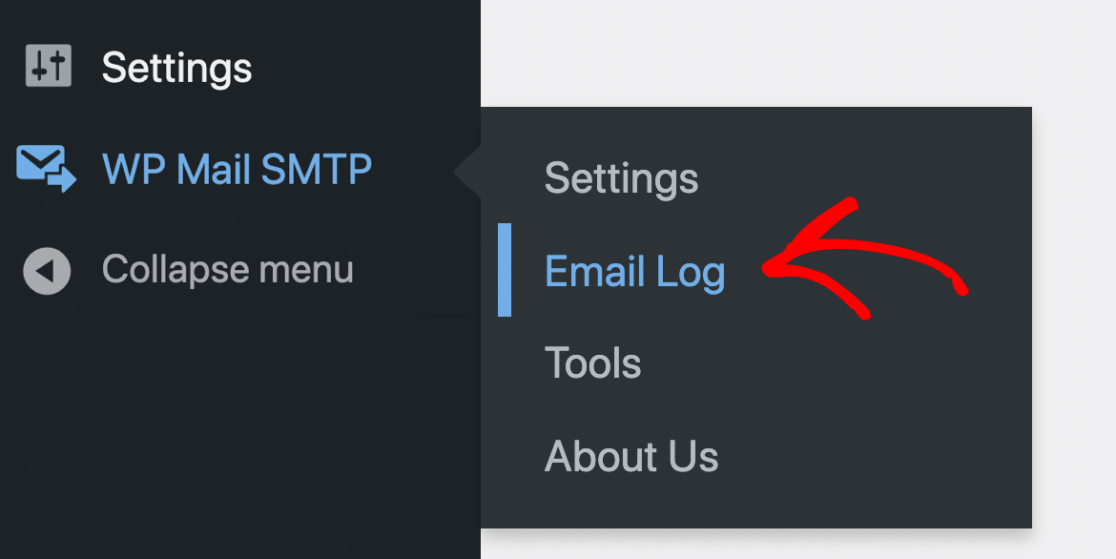
Now click on View Log for any email that you want to resend.

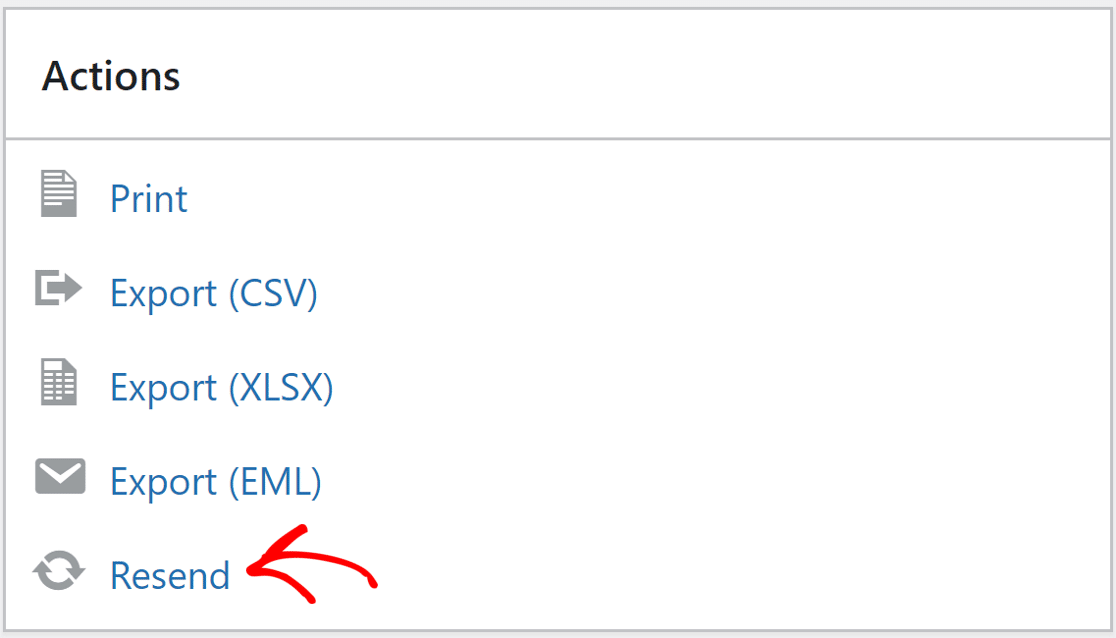
In the email log screen, click the Resend button under Actions on the right sidebar.
A popup will appear to confirm the email recipient. You can change the recipient or add multiple email addresses separated by commas.
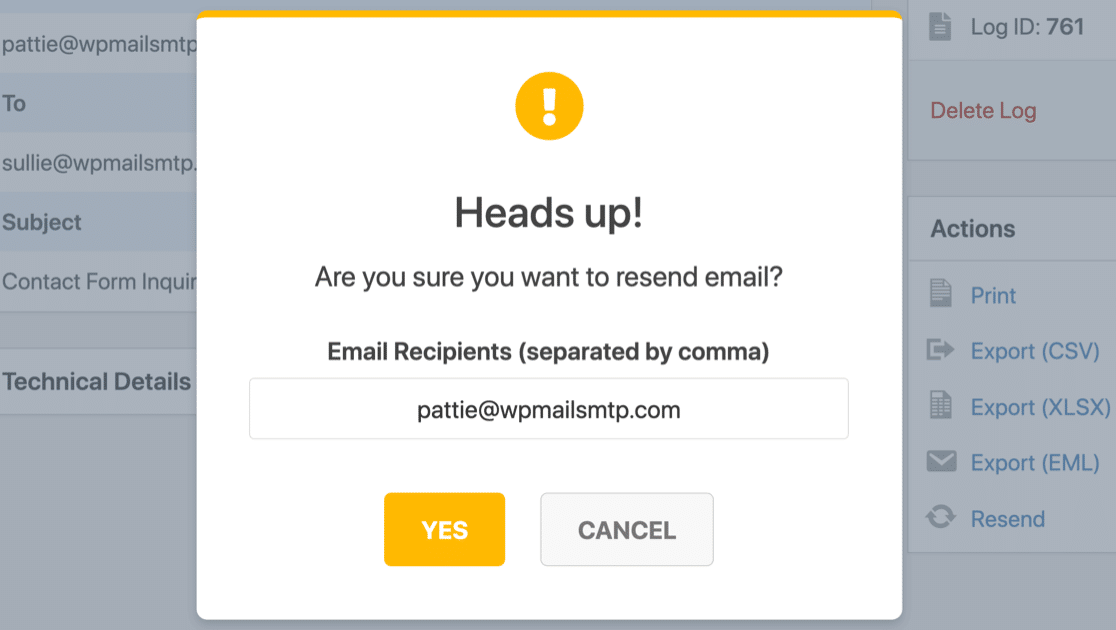
Click YES and WP Mail SMTP will resend that email to all addresses you type in.
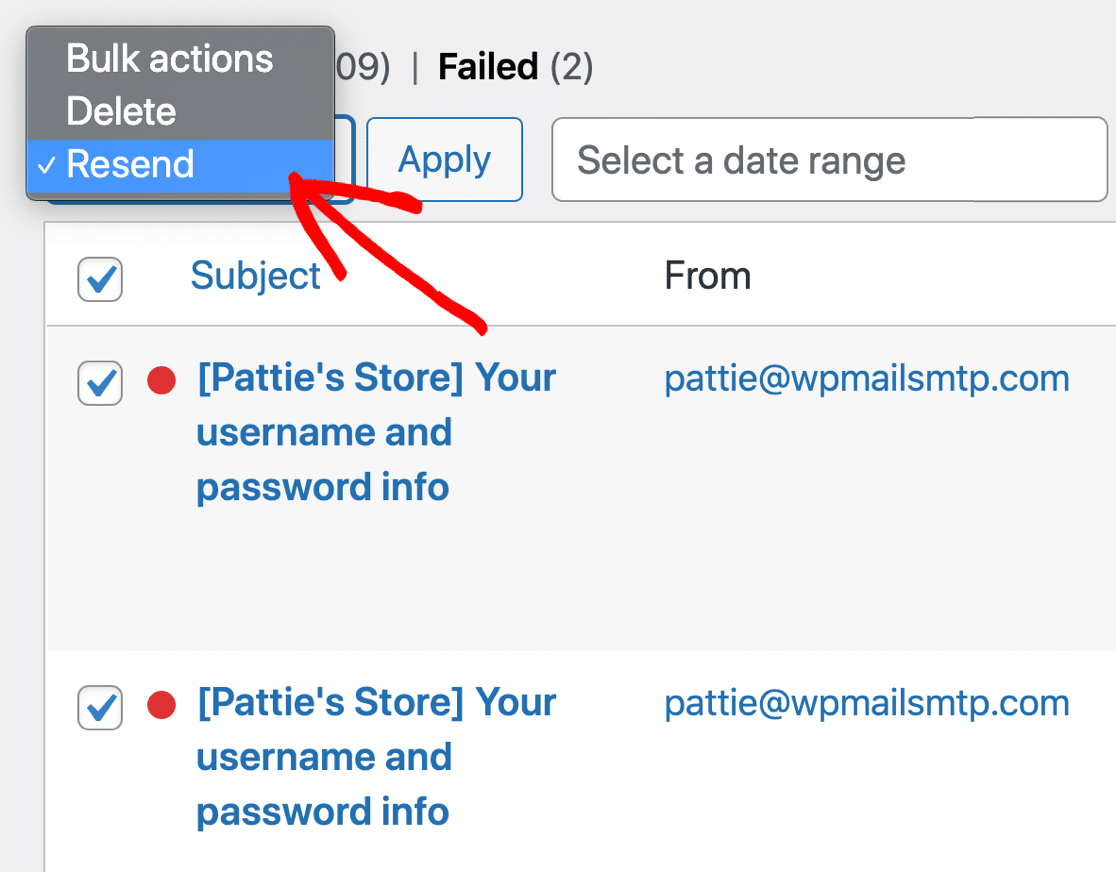
If you want, you can also resend emails in bulk. To do that, you can select the emails and use the dropdown on the main email log screen to send them again.
This feature is ideal for resending failed emails quickly. It’ll automatically resend them to the email address they were originally sent to.
If all of your emails are failing to send, you might have made a mistake during the configuration.
You can troubleshoot the problem by using a test email to make sure there are no errors in the settings you’ve entered.
That’s it! You now know how to configure your WordPress SMTP settings to send email without issues.
FAQs on WordPress SMTP Settings
Want to know more about using SMTP to deliver emails in WordPress? I’ve got you covered.
How do I set up SMTP in WordPress?
You can set up SMTP in WordPress using an SMTP plugin. We recommend WP Mail SMTP — it’s the best SMTP plugin for WordPress because it has email logging, email failure alerts, and many more useful features.
What is WP Mail SMTP?
WP Mail SMTP is the best SMTP plugin for WordPress. It lets you fix your emails by sending them through an email provider. This is more reliable than sending emails from your webserver. You can read more about the plugin in this WP Mail SMTP review.
How do I set up WP Mail SMTP with Gmail?
You can set up WP Mail SMTP with Gmail by following the steps in our Gmail setup doc.
You can also use WP Mail SMTP to send emails from a Gmail alias, which gives you the flexibility of using multiple email senders in WordPress.
Why am I not receiving emails from my WordPress site?
In most cases, you won’t receive emails if your messages are being caught by a spam filter between your web host (where the email is generated) and your mailbox.
Emails pass through multiple servers on their way to your mailbox. Any one of these could be catching your messages and marking them as spam.
This can happen suddenly. One day, everything might work just fine, and your emails might be delivered without a hitch.
Next, you might find that your emails just stop working. Sometimes this happens because your server is IP on a blacklist or errors with SMTP hosts, but it’s hard to know.
If your email is not getting through, or it’s being filed in the junk mail, check out our guide on how to stop WordPress emails going to spam.
How do I fix email not sending in WordPress?
This usually happens when your web host blocks emails. You can fix this by using SMTP. Just install WP Mail SMTP and connect it with a service like Gmail or SendLayer.
What are the SMTP settings for WP Mail SMTP?
The settings depend on which email provider you use. For example, Gmail uses smtp.gmail.com on port 587 with TLS. WP Mail SMTP lets you choose a provider and fills most of this for you automatically.
Do I need a paid SMTP service?
Not always. Some providers, like Brevo, offer a free plan. But if you’re sending a lot of emails (like newsletters or WooCommerce order emails), a paid service is more reliable.
How do I test SMTP in WordPress?
Go to WP Mail SMTP » Tools » Email Test. Enter your email address and click Send Email. If you get the message, your SMTP setup is working.
Next, Check Your DNS Settings
Your DNS settings are usually held by your hosting company or domain registrar. There re 3 important DNS records that stop emails going to spam: DMARC, DKIM, and SPF.
- You can start by creating a DMARC record for your domain. This will save your domain from being used to send phishing emails.
- We’ve also got a guide to explain how to combine more than one SPF record.
- And you can split your DKIM record if it’s too long.
Ready to fix your emails? Get started today with the best WordPress SMTP plugin. If you don’t have the time to fix your emails, you can get full White Glove Setup assistance as an extra purchase, and there’s a 14-day money-back guarantee for all paid plans.
If this article helped you out, please follow us on Facebook and Twitter for more WordPress tips and tutorials.

