
Riepilogo AI
Quando qualcuno effettua un ordine sul vostro negozio WooCommerce, le notifiche via e-mail aiutano a mantenere tutto in movimento sia da parte vostra che da parte del cliente.
Queste e-mail possono confermare gli ordini, avvisare dei nuovi acquisti, inviare aggiornamenti sulla spedizione o persino notificare ai clienti il reset della password.
Se non li avete mai configurati prima, non preoccupatevi. Il processo è molto semplice e, una volta presa la mano, vi accorgerete di quanto tempo si risparmia.
Ho lavorato su diversi negozi WooCommerce ed è per questo che le notifiche via e-mail sono sempre una delle prime cose che rivedo. Seguite questi passaggi per configurarle in un attimo!
Passo 1: aprire le impostazioni e-mail di WooCommerce
Il primo posto che controllo sempre quando devo impostare le notifiche via e-mail in WooCommerce è la scheda Email nelle impostazioni del plugin.
Per accedervi, è sufficiente accedere alla dashboard di WordPress e andare su WooCommerce " Impostazioni. Da qui, fate clic sulla scheda Email in alto.
Vedrete una tabella che elenca tutte le e-mail predefinite che WooCommerce invia. Ad esempio, le e-mail di nuovi ordini per l'amministratore, le e-mail di elaborazione degli ordini per i clienti e le notifiche per i rimborsi o la reimpostazione della password.

Ogni e-mail dell'elenco mostra a chi è destinata, qual è il tipo di contenuto e se è attualmente attivata. Sarà possibile fare clic su una qualsiasi di esse per apportare modifiche in un secondo momento.
Di solito mi prendo un minuto per scrutarli tutti e assicurarmi che siano attivi quelli giusti, soprattutto per quanto riguarda gli ordini non andati a buon fine o gli avvisi di scorte scarse. Questi tendono a essere trascurati se si va di fretta.
Passo 2: modificare le singole e-mail come richiesto
Una volta entrati nella scheda Email di WooCommerce, dovrete fare clic su ogni tipo di email, una per una. È possibile modificare le singole e-mail facendo clic sul pulsante Gestisci .

Inizio sempre con quelle più importanti, come i nuovi ordini, gli ordini completati e le fatture dei clienti. Ogni e-mail ha una propria pagina di impostazioni in cui è possibile apportare modifiche in base alle proprie esigenze.
All'interno delle impostazioni di ogni e-mail, sono presenti alcuni campi che è possibile aggiornare. Il destinatario è solitamente impostato sull'e-mail dell'amministratore per gli avvisi del negozio, ma è possibile aggiungerne altri se necessario.

Per quanto riguarda l'oggetto, mi piace aggiungere un tocco di branding. Qualcosa come "Grazie per il tuo ordine da [Nome del tuo negozio]" rende il messaggio più personale.
È inoltre possibile aggiornare l'intestazione dell'e-mail e il testo del corpo se si desidera includere un breve messaggio o aggiungere un po' di personalità. Di solito mantengo questo testo semplice, in modo che rimanga chiaro e non confonda i clienti.
Passo 3: selezionare il formato e il modello di e-mail
Successivamente, dovrete scegliere il formato per ogni e-mail. Io scelgo sempre l'HTML, perché ha un aspetto più curato e mi permette di includere il mio logo e i colori del marchio.
Ma se si desidera mantenere le cose più pulite o se si riscontrano problemi di visualizzazione, è possibile passare al testo normale. L'opzione Multipart invia entrambi i formati contemporaneamente, in modo che il client di posta elettronica possa scegliere quale mostrare.

Potete anche personalizzare il modello di e-mail e assicurarvi che ogni e-mail segua le linee guida e lo stile corretti che dovete seguire.
È sufficiente fare clic sul pulsante Visualizza modello. Questo vi reindirizzerà alle impostazioni del modello di e-mail, dove potrete personalizzare i seguenti aspetti delle e-mail di WooCommerce.
- Immagine dell'intestazione dell'e-mail: Incollate il link a un'immagine che desiderate utilizzare nella parte superiore delle vostre e-mail. Potete caricare l'immagine prima in Media " Aggiungi nuovo nella vostra dashboard di WordPress.
- Colore principale del modello: controlla il colore d'accento utilizzato nel modello di e-mail, ad esempio i pulsanti e le intestazioni.
- Sfondo dell'e-mail: Modificare lo sfondo dell'intero layout dell'e-mail, che avvolge la casella di contenuto.
- Sfondo del contenuto: Consente di regolare il colore di sfondo dell'area del messaggio vero e proprio (dove appaiono i dettagli dell'ordine o il testo).
- Colore del testo: utilizzare questa opzione per modificare il colore del testo all'interno del corpo dell'e-mail per una migliore leggibilità o per un look più in linea con il marchio.
- Footer Message: Add custom text at the bottom of each email. You can include site details using placeholders like: {site_url} to show your site’s web address and {site_title} to insert your site’s name
- Colore del testo del piè di pagina: ora è possibile controllare completamente il colore del testo del piè di pagina. È possibile digitare direttamente un codice HEX o utilizzare lo strumento di selezione dei colori che appare quando si fa clic sulla casella di immissione.

Queste modifiche non solo contribuiscono ad abbinare lo stile del vostro negozio, ma aiutano anche a far percepire ai clienti le vostre e-mail come più professionali e affidabili.
Passo 4: migliorare la deliverability delle e-mail di WooCommerce
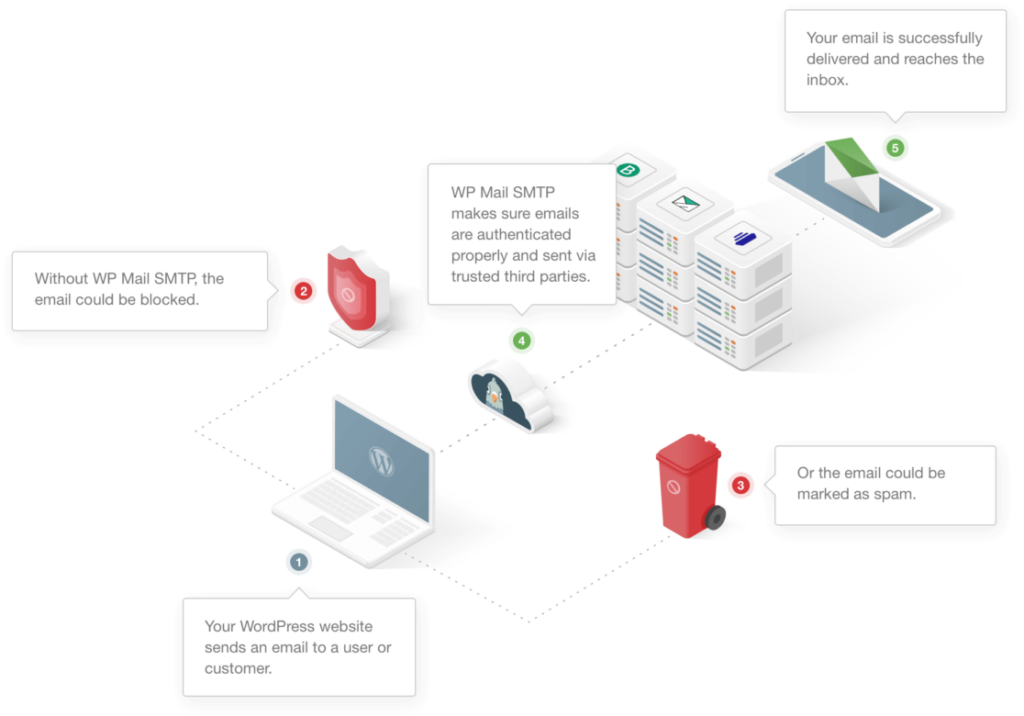
Se le vostre e-mail di WooCommerce finiscono nello spam o non vengono visualizzate affatto, è molto probabile che non siano state inviate nel modo giusto.
Ho avuto a che fare con questo problema sui siti dei clienti più volte di quante ne possa contare. Di solito il problema è dovuto al fatto che il sito WordPress cerca di inviare e-mail senza un'autenticazione adeguata.
È qui che entra in gioco WP Mail SMTP. Lo consiglio sempre quando le e-mail di qualcuno vengono perse o contrassegnate come spam. Assicura che le vostre e-mail siano inviate da un mailer affidabile.
Iniziate installando e attivando il plugin WP Mail SMTP. Se volete accedere alla registrazione delle e-mail, agli avvisi e al supporto avanzato, vi consiglio di scegliere la versione Pro. È quella che uso su tutti i negozi che gestisco.
Una volta che il plugin è attivo, avviare la configurazione guidata. Ogni passaggio viene illustrato in modo chiaro, il che è di grande aiuto se è la prima volta che si configura l'SMTP.
Successivamente, si sceglierà il servizio da utilizzare per l'invio delle e-mail. WP Mail SMTP supporta opzioni come SendLayer, Brevo, Amazon SES, Gmail e altre ancora.
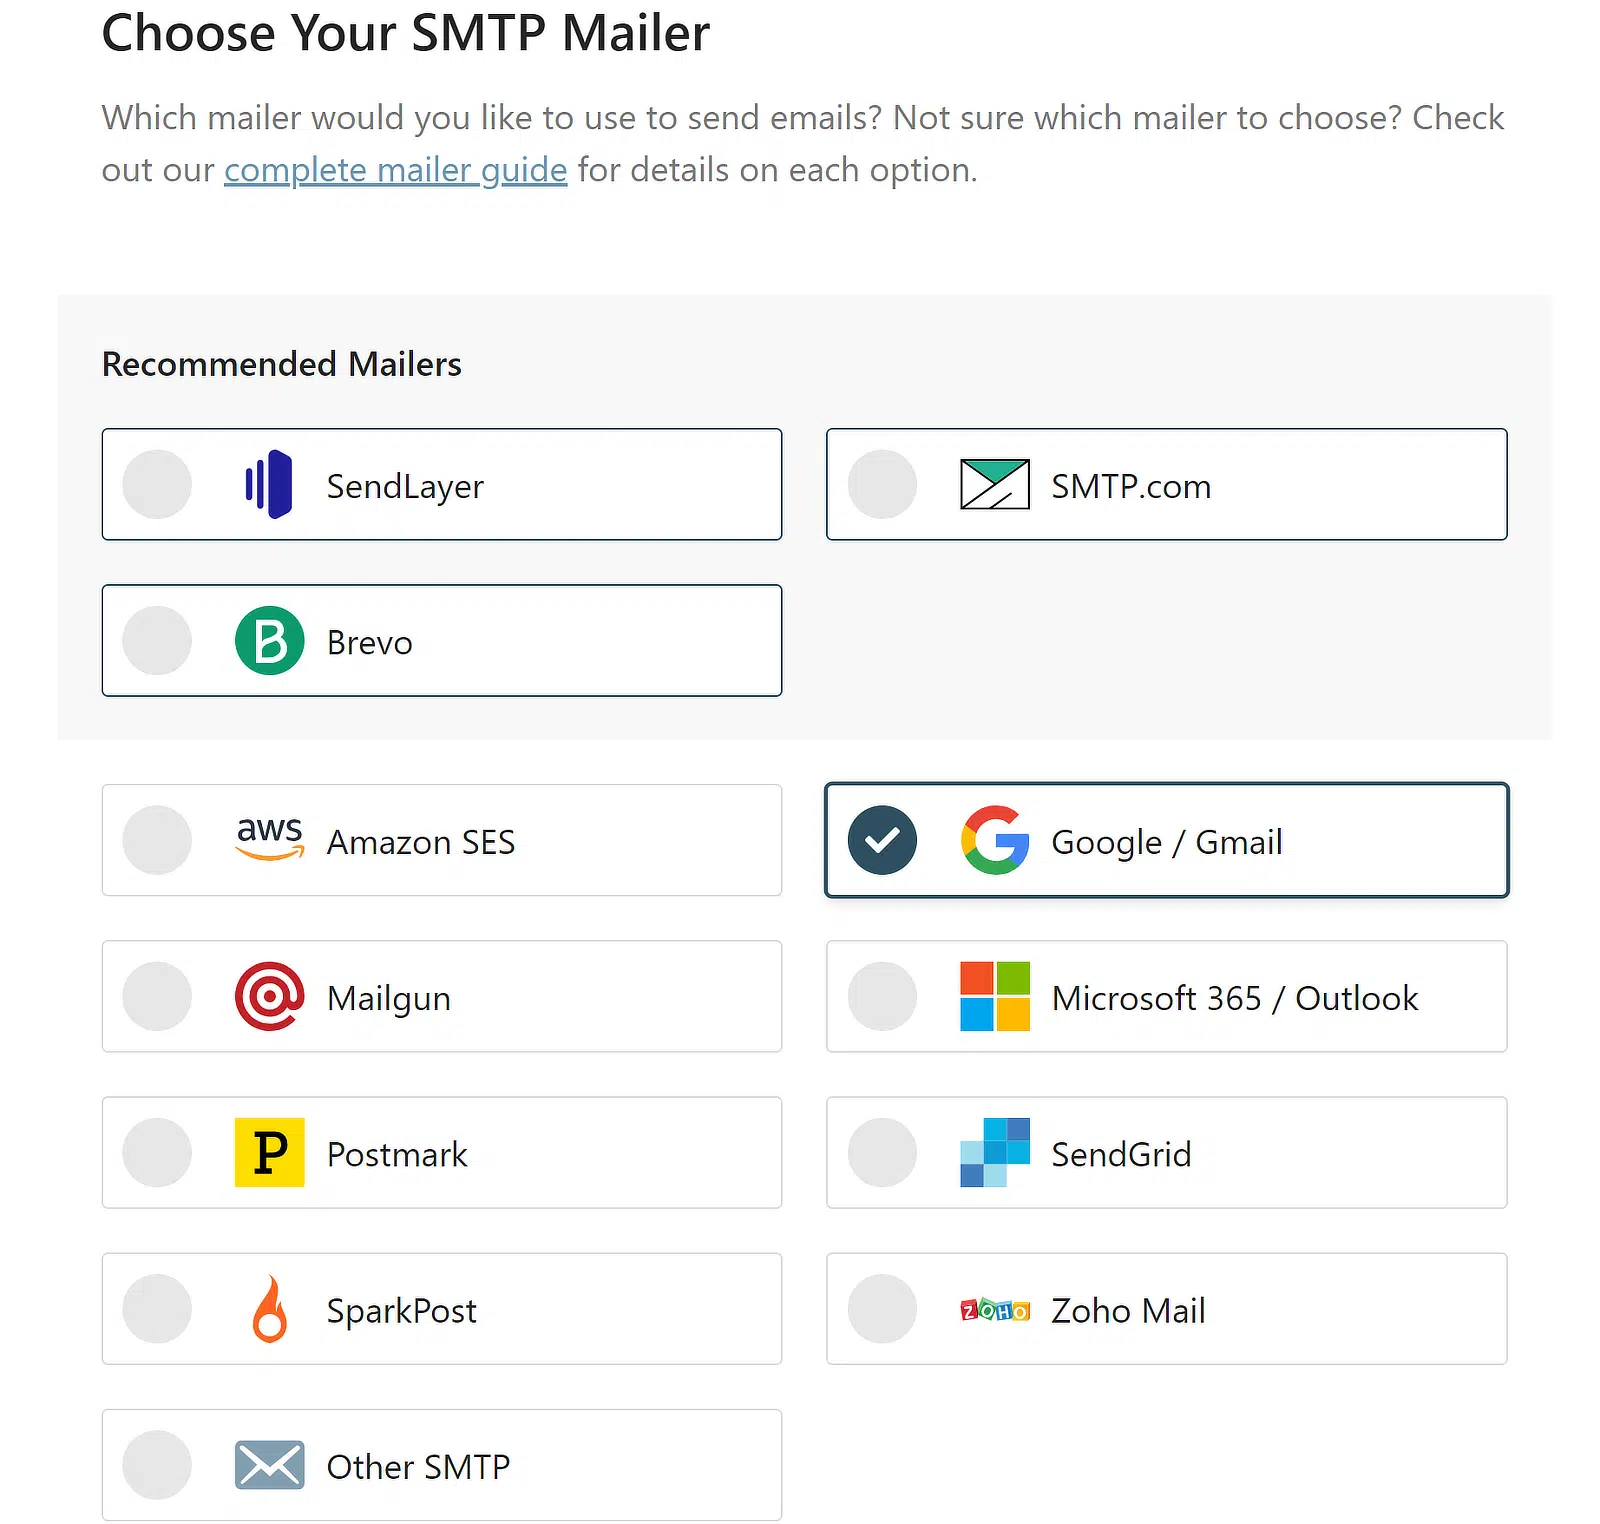
Qualunque sia il servizio scelto, basta seguire le istruzioni fornite. Di solito è necessario copiare una chiave API o alcuni dettagli di connessione. Potrebbe sembrare un po' tecnico, ma le guide integrate lo rendono piuttosto facile da seguire.
Correggete subito le vostre e-mail di WordPress
Passo 5: inviare un'e-mail di prova da WP Mail SMTP
Una volta che tutto è stato configurato, andate su WP Mail SMTP " Strumenti e aprite la scheda Test e-mail . Da qui è possibile regolare le impostazioni prima di inviare l'e-mail di prova.
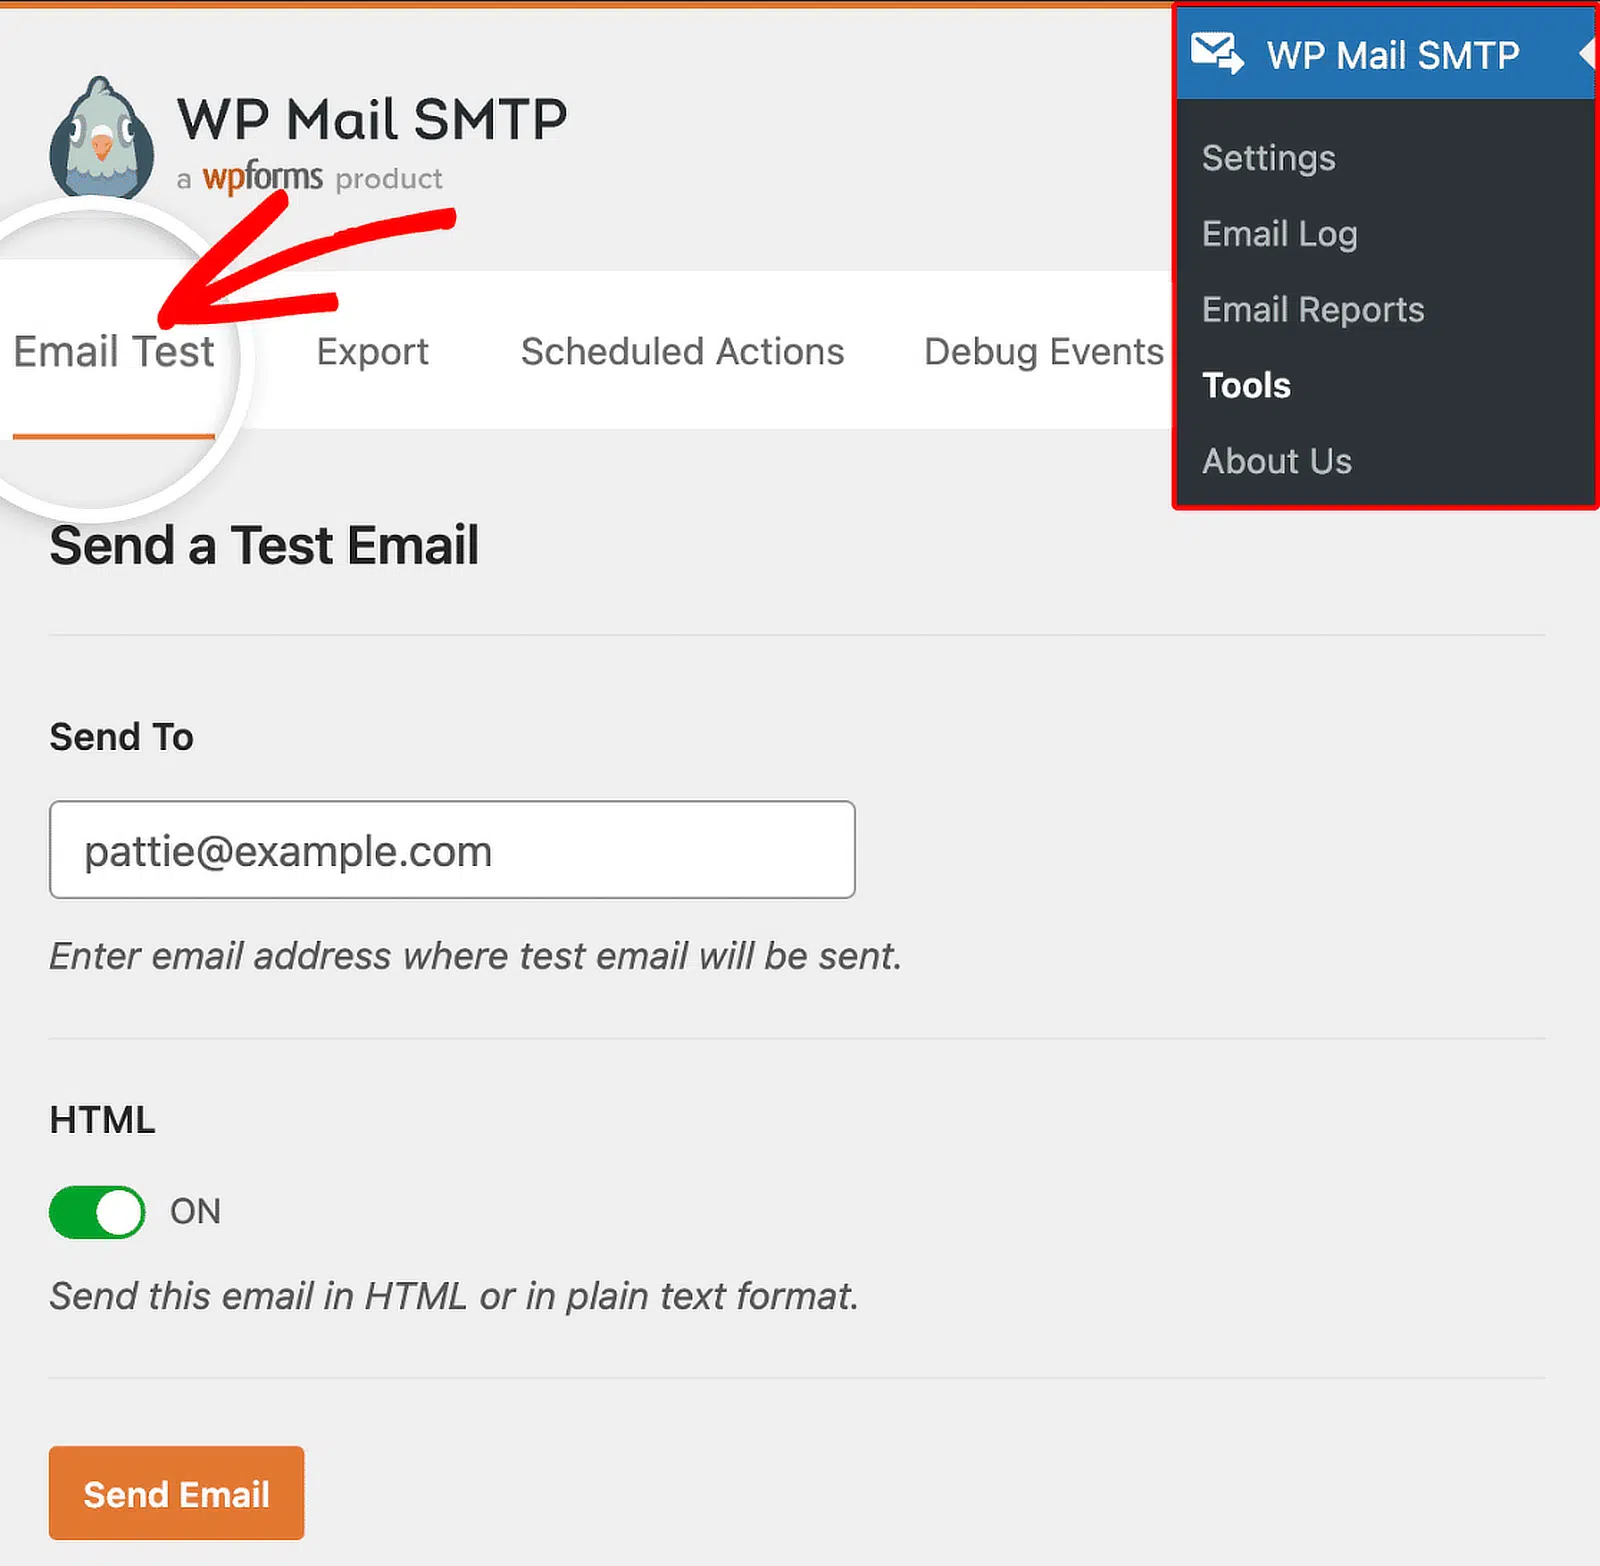
Iniziate impostando l'indirizzo e-mail al quale desiderate ricevere il messaggio di prova. Per impostazione predefinita, questo corrisponde all'e-mail collegata all'account utente di WordPress.
Ma se si preferisce utilizzare un indirizzo diverso, come una casella di posta del team o un altro account personale, è possibile aggiornarlo direttamente nel campo.
La prossima opzione è quella di inviare l'e-mail in formato HTML. Di solito la tengo attivata perché la maggior parte delle e-mail di WooCommerce sono progettate in HTML. Una volta fatte queste scelte, cliccate sul pulsante Invia e-mail .
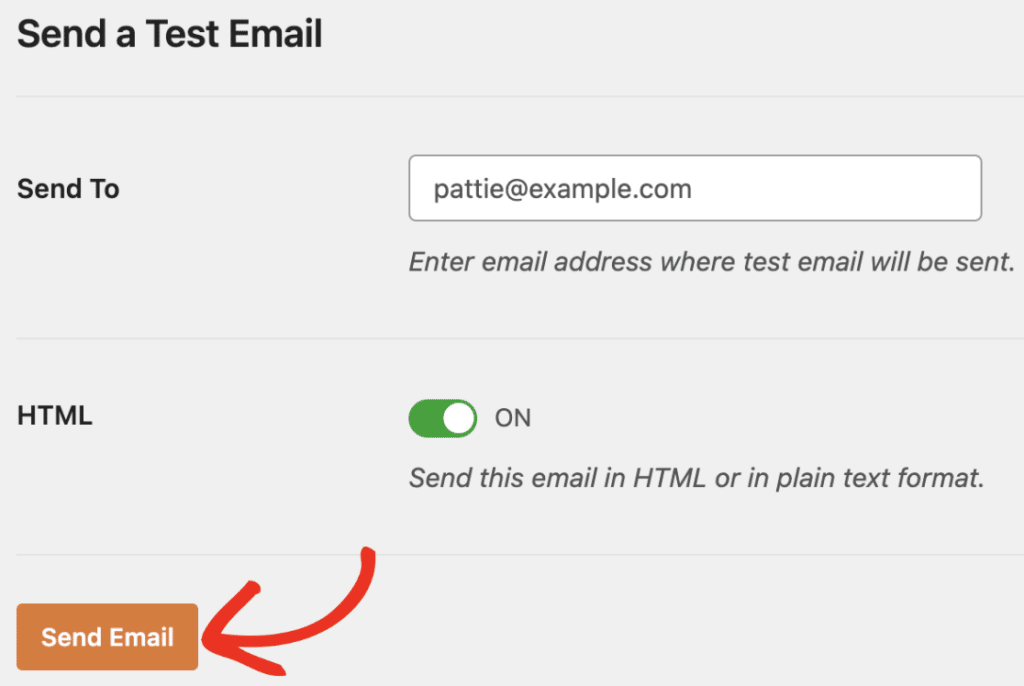
Dovreste riceverlo subito nella vostra casella di posta elettronica. In caso contrario, riceverete un messaggio di errore con maggiori dettagli sull'errore, oltre a consigli su cosa fare successivamente.
Seguite i passaggi consigliati nel messaggio di errore e inviate un'altra e-mail di prova. Se il problema non è ancora risolto, contattate il nostro team di assistenza.
Domande frequenti su come impostare le notifiche via e-mail di WooCommerce
Le notifiche via e-mail di WooCommerce sono un argomento di grande interesse per i nostri lettori. Ecco le risposte ad alcune domande comuni al riguardo:
Perché WooCommerce non invia automaticamente le email?
Se WooCommerce non invia le e-mail, spesso è a causa di problemi del server o di impostazioni SMTP mancanti.
Ho visto che questo accade quando il sito utilizza la funzione di posta predefinita di PHP, che molti host bloccano.
Un plugin come WP Mail SMTP può aiutare a risolvere il problema collegando il vostro negozio a un servizio di posta elettronica affidabile!
Come verificare se WooCommerce sta inviando email?
È possibile verificarlo effettuando un ordine di prova o reimpostando la password. Se non si riceve l'e-mail, controllare la cartella spam.
Consiglio anche di attivare i log delle e-mail in WP Mail SMTP. In questo modo è facilissimo vedere se le email sono state inviate o non sono andate a buon fine.
Come posso aggiungere notifiche e-mail personalizzate a WooCommerce?
Andate su WooCommerce " Impostazioni " Email nella vostra dashboard. Da qui è possibile fare clic su ciascun tipo di e-mail e modificare l'oggetto, il messaggio e i destinatari.
Li modifico sempre per assicurarmi che siano in linea con il mio marchio e che vadano alle persone giuste.
Quindi, imparare a registrare le e-mail di WooCommerce
La registrazione delle e-mail consente di monitorare la deliverability delle e-mail e di vedere le e-mail che il vostro negozio sta inviando ai clienti. Consultate questa guida per trovare un modo semplice per registrare, tracciare e reinviare le e-mail di WooCommerce.
Correggete subito le vostre e-mail di WordPress
Siete pronti a sistemare le vostre e-mail? Iniziate oggi stesso con il miglior plugin SMTP per WordPress. Se non avete il tempo di sistemare le vostre e-mail, potete ottenere l'assistenza completa di White Glove Setup come acquisto aggiuntivo e c'è una garanzia di rimborso di 14 giorni per tutti i piani a pagamento.
Se questo articolo vi è stato utile, seguiteci su Facebook e Twitter per altri consigli e tutorial su WordPress.