
AI Summary
Ever wondered how to practice IP Warming responsibly and what typical example schedules look like?
IP warming is critical in ensuring your emails reach their destination without getting flagged as spam.
Use Email Rate Limiting in WP Mail SMTP! 🙂
In this guide, I’ll explain the essentials of IP warming and show you how to build your email-sending reputation gradually.
In This Article
What is IP Warming?
When you send a lot of emails all at once from a new IP address, ISPs might think you’re a spammer.
Therefore, IP warming is the process of slowly increasing the number of emails sent from a dedicated IP address to help build a good reputation with Internet Service Providers (ISPs).
To warm up an IP, send a few emails to your most engaged subscribers and slowly increase the volume over time. This shows ISPs that you are a trustworthy sender and that people want to receive your emails.
Also Read: Email Compliance: Guide to CAN-SPAM, GDPR, and More
Why is IP Warming Important?
When you send emails from a new dedicated or shared IP address, ISPs watch your sending behavior closely. Gradually increasing your sending volume shows ISPs that you are a legitimate sender.
ISPs examine your sending history, engagement rates, and how recipients interact with your emails. A positive reputation means your emails are more likely to be delivered successfully.
Using IP warmup improves your chances of higher engagement rates, as emails that land in the inbox rather than the spam folder are more likely to be opened and read.
If your emails are getting opened and not bouncing back, your IP reputation will improve, ensuring better deliverability in the future.
How to Warm Up an IP Address
Following best practices for the IP warmup process ensures your emails reach your recipients’ inboxes and maintain a good sender reputation. Here are some key strategies to follow:
Step 1: Start with a Clean Email List
Start with a clean email list to avoid sending emails to inactive or invalid addresses. Use email verification tools to remove these addresses, reducing the risk of bounces and spam complaints.
To clean your email list effectively, you can use TruLead by OptinMonster and cultivate a roster of qualified customers and leads.

Step 2: Segment Your Audience
For a new domain, you can start by sending emails to your most engaged subscribers, who are the people who open, click, and buy in the following buckets:
- Less than 30 days
- 30-60 days
- 60-90 days
- 90-180 days
- Over 180 days
Slowly include less engaged segments over time to build a positive sending history. Email service providers like Mailchimp and Drip allow users to create different audiences and segments.

Step 3: Create Engaging Content
Create valuable and interesting content for your emails. Personalized content that resonates with your audience can improve engagement rates.
Always include an easy way to unsubscribe to keep your list healthy and avoid anything that may seem like a spam trap.
Check out this guide from WPForms on leveraging AI in your email marketing campaigns to create engaging content and attention-grabbing subject lines.

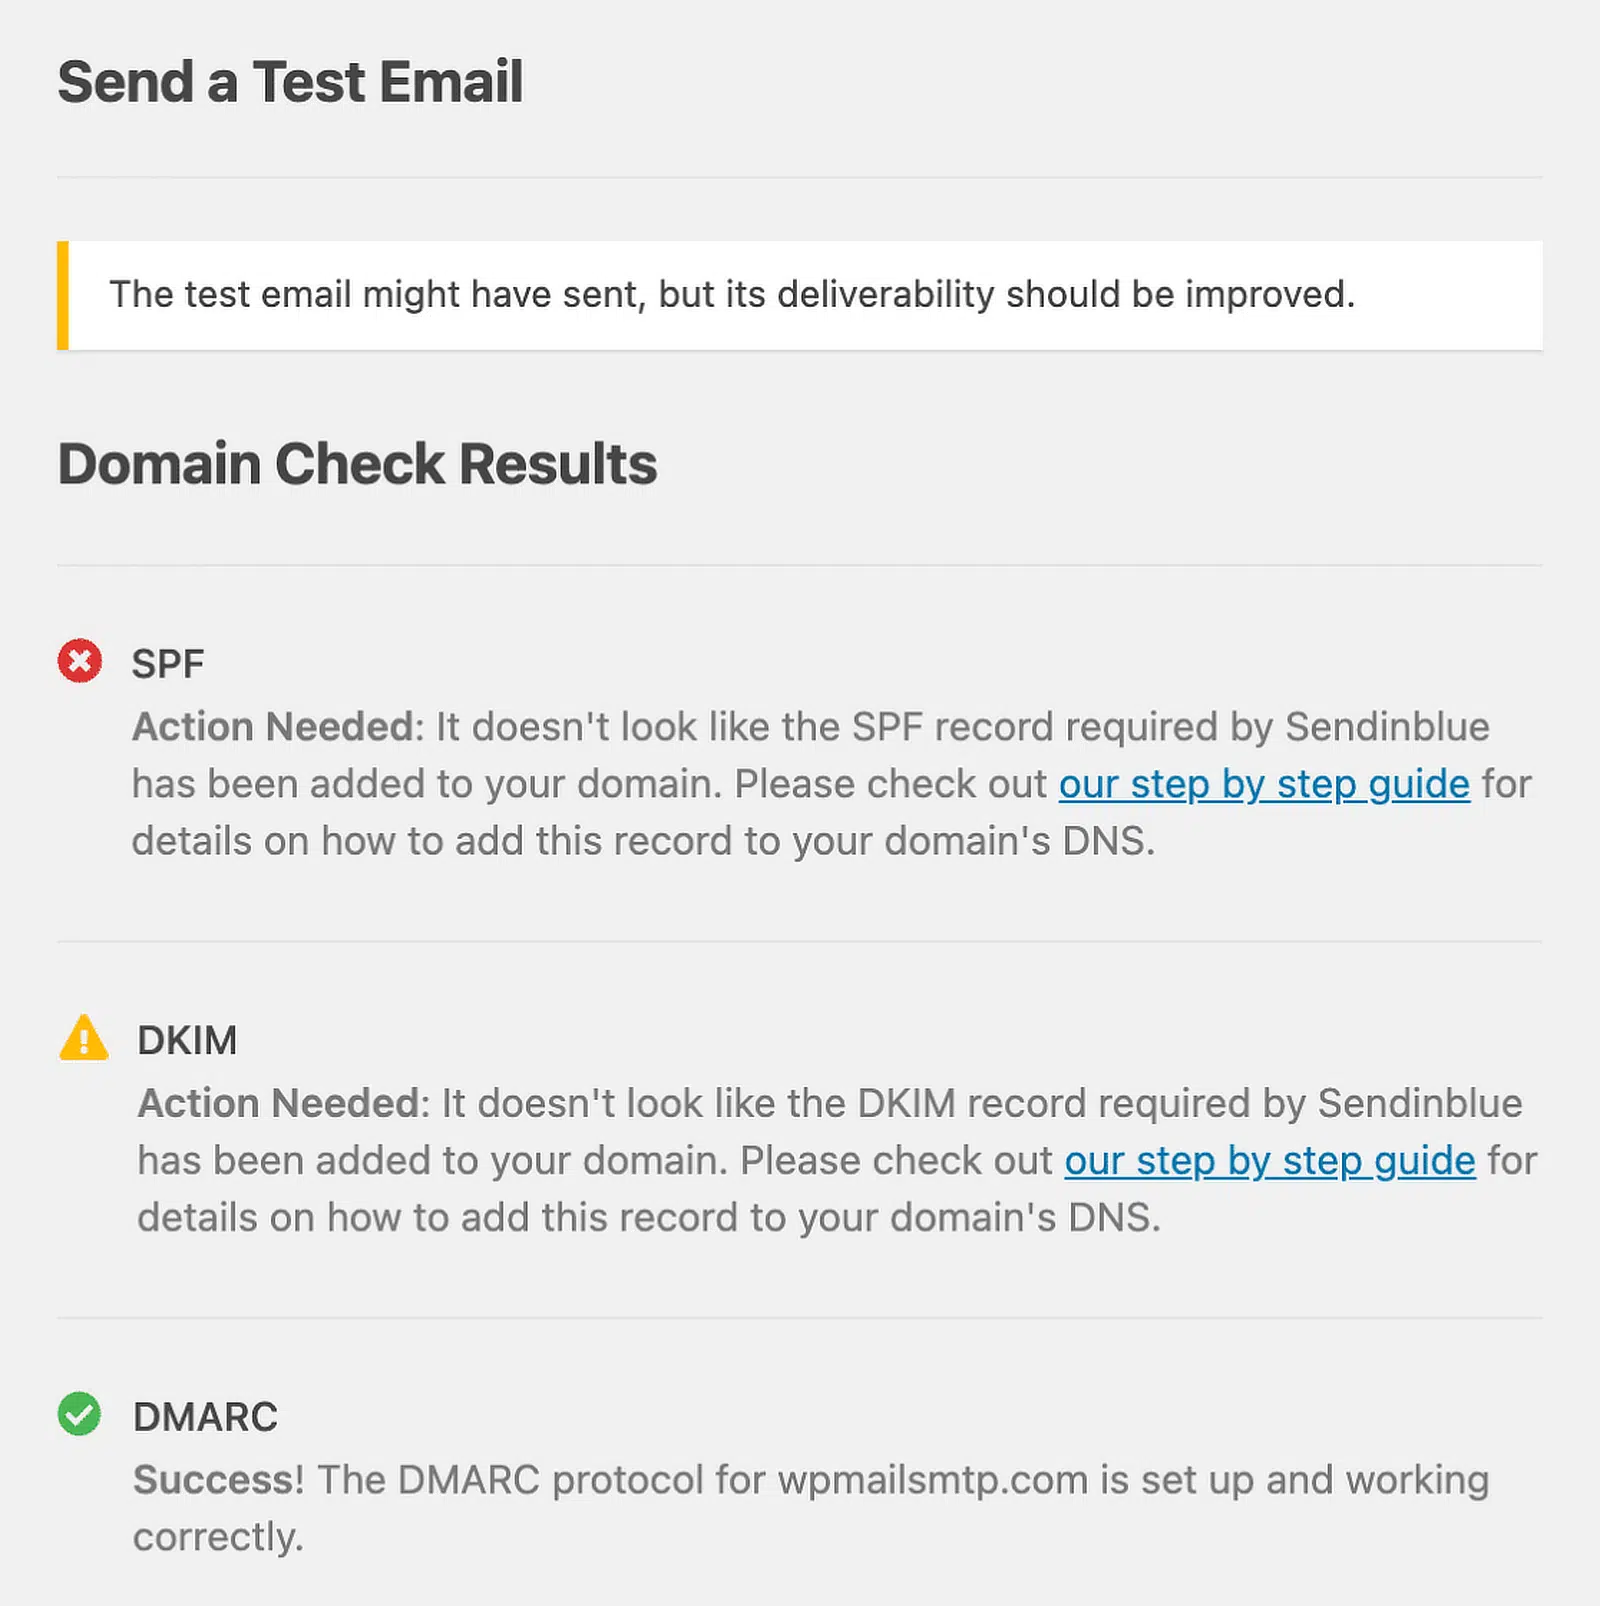
Step 4: Set Up Authentication Protocols
Ensure that your email domain is authenticated with SPF, DKIM, and DMARC. These protocols help ISPs verify your emails.
They ensure your emails are legitimate and not spoofed, improving your sender’s reputation. Check out this guide to learn more about SPF, DKIM, and DMARC.
Step 5: Gradually Increase Email Volume
Start with a small number of emails and ramp up the volume slowly. This slow build helps ISPs see that you are a legitimate sender.
Avoid sudden spikes in email volume, which can trigger spam filters. Also, ensure you follow a proper IP warmup schedule when sending emails. For instance:
- During the first two weeks, send emails to subscribers who have engaged with your emails within the last 30 days.
- In the third to fourth week, start including subscribers who interacted with your emails within the past 60 days.
- By the fifth to sixth week, you can begin targeting subscribers who have engaged with your emails in the last 90 days.
You can use WP Mail SMTP’s Rate Limiting feature to optimize sending times per minute, hour, day, week, and month.

With rate limiting, you can also resolve certain email delivery errors such as the error due to unsolicited or bulk email.
Step 6: Monitor Key Metrics
Keep an eye on your email performance metrics, such as delivery rates, open rates, and bounce rates. High engagement and low bounce rates indicate that your IP warm-up plan works well.
The Pro Version of WP Mail SMTP provides detailed insights into your email performance and deliverability rates. This guide provides more information on monitoring key metrics.

Example Email Schedules to Follow
This section provides detailed schedules to help you slowly increase your email volume while warming up your IP.
These schedules are divided into weekly plans and specific daily volumes to ensure a smooth and effective warming process.
Week 1-2: Engaged Subscribers (Past 30 Days)
Focus: Send opt-in emails to subscribers who have engaged in the last 30 days.
| Day | Emails Sent |
|---|---|
| 1 | 50 |
| 2 | 50 |
| 3 | 100 |
| 4 | 100 |
| 5 | 200 |
| 6 | 200 |
| 7 | 400 |
| 8 | 400 |
| 9 | 800 |
| 10 | 800 |
| 11 | 1,600 |
| 12 | 1,600 |
| 13 | 3,200 |
| 14 | 3,200 |
Week 3-4: Recently Engaged Subscribers (Past 60 Days)
Focus: Start including subscribers who have engaged in the last 60 days.
| Day | Emails Sent |
|---|---|
| 15 | 6,400 |
| 16 | 6,400 |
| 17 | 12,800 |
| 18 | 12,800 |
| 19 | 25,000 |
| 20 | 25,000 |
| 21 | 50,000 |
| 22 | 50,000 |
| 23 | 75,000 |
| 24 | 75,000 |
| 25 | 100,000 |
| 26 | 100,000 |
| 27 | 125,000 |
| 28 | 125,000 |
Week 5-6: Moderately Engaged Subscribers (Past 90 Days)
Focus: Include subscribers who have engaged in the last 90 days.
| Day | Emails Sent |
|---|---|
| 29 | 150,000 |
| 30 | 150,000 |
| 31 | 200,000 |
| 32 | 200,000 |
| 33 | 250,000 |
| 34 | 250,000 |
| 35 | 300,000 |
| 36 | 300,000 |
| 37 | 350,000 |
| 38 | 350,000 |
| 39 | 400,000 |
| 40 | 400,000 |
| 41 | 450,000 |
| 42 | 450,000 |
Considerations for IP Warming Schedules
If you send transactional emails, you don’t need a strict IP warming schedule since you can’t control when these emails are triggered.
For marketing emails, it’s important to follow an IP warming plan. This means slowly increasing your email volume each day on the new IP.
A slower warm-up is better because it allows you to identify and fix any issues early on, which will help with long-term deliverability.
WordPress Tools for IP Warming
WP Mail SMTP is a powerful SMTP tool for WordPress that helps fix email deliverability issues and sending limits.
It ensures all your emails are authenticated and sent via trusted APIs and mailers, which helps prevent them from being marked as spam.
| Mailers available in all versions | Mailers in WP Mail SMTP Pro |
|---|---|
| SendLayer | Amazon SES |
| SMTP.com | Microsoft 365 / Outlook.com |
| Brevo | Zoho Mail |
| Google Workspace / Gmail | |
| Mailgun | |
| Postmark | |
| SendGrid | |
| SparkPost | |
| Other SMTP |
Once you set it up, you can easily manage your site’s emails. Just go to WP Mail SMTP » Settings and click on the Misc tab to access extra email options.

Optimize Email Sending
By enabling the Optimize Email Sending feature in WP Mail SMTP, your emails are queued for asynchronous delivery.
This means users filling out forms, signing up for newsletters, or making purchases will immediately see a confirmation message.
Meanwhile, their emails are prepared and sent in the background, ensuring a smooth online experience.
While emails might be sent a minute or two later, this minor delay can improve page load times for email senders.

Email Rate Limiting
WP Mail SMTP Pro offers a feature called Email Rate Limiting to help with IP warming without exceeding your email server’s limits.
You can set how many emails your site should send in a given time frame, whether it’s per minute, hour, day, week, or month.
When the limit is reached, new emails wait in a queue to be sent later. This smart approach helps you manage email traffic efficiently and avoid extra costs for higher plans.
By using WP Mail SMTP, you can optimize your IP warming process and improve your email deliverability, ensuring your messages reach your audience effectively.
FAQs about IP Warming Email Examples
IP Warming is a popular topic of interest among our readers. Here are answers to some common questions about it:
What does IP warming do?
IP warming gradually increases the number of emails sent from a new IP address to build a positive sender reputation with ISPs. This process helps ensure that your emails are not marked as spam and improves overall email deliverability.
How long does IP warming take?
IP warming typically takes about 4 to 8 weeks. The exact duration depends on the volume of emails you need to send and the engagement of your recipients. Increasing the email volume gradually is essential to avoid triggering spam filters.
How to warm up an IP address for email?
To warm up an IP address, start by sending a small number of emails to your most engaged subscribers. Slowly increase the volume over several weeks. Monitor key metrics like open rates and bounce rates, and adjust your strategy as needed to ensure successful email delivery.
What is an example of IP warming?
An example of IP warming is starting with 50 emails on day one, then doubling the amount every few days. For instance, send 50 emails on day one, 100 emails on day three, 200 emails on day five, and continue increasing the volume until you reach your desired sending level.
Next, Learn How to Improve Email Deliverability
Do you want to understand what email deliverability really is and how you can improve it? Check out this guide for comprehensive information on email deliverability and proven tips to help you improve it.
Ready to fix your emails? Get started today with the best WordPress SMTP plugin. If you don’t have the time to fix your emails, you can get full White Glove Setup assistance as an extra purchase, and there’s a 14-day money-back guarantee for all paid plans.
If this article helped you out, please follow us on Facebook and Twitter for more WordPress tips and tutorials.