
AI Summary
To test email deliverability, you send a sample message through tools that score your spam risk, check your authentication, and report where your email lands.
This guide walks you through that process step by step, with examples for WordPress. After running these tests on dozens of sites, I’ll show you the fastest way to spot problems.
Most people only learn that their emails are failing when customers complain. By then, password resets and receipts had been missing for weeks. Testing first turns that guesswork into a clear score you can act on.
By the end, you’ll know how to run a spam test, confirm your SPF, DKIM, and DMARC records, and read inbox placement results. You’ll also know how to fix the most common issues.
What is email deliverability testing?
Email deliverability testing measures whether your emails reach the inbox instead of the spam folder or a block. It checks three things: your authentication, your content, and your sender reputation.
Those three areas map to the three test types you’ll use:
- Authentication testing: Confirms SPF, DKIM, and DMARC are set up right
- Content testing: Scans your message for spam triggers
- Seed or inbox placement testing: Sends to real addresses to see where mail lands
When should you test email deliverability?
Test your deliverability before any big send and any time your numbers drop. Catching problems early is far cheaper than recovering a damaged sender reputation.
Run a test in these situations:
- Before launching a new email campaign or sequence
- After changing DNS records, hosts, or email providers
- When open rates or reply rates fall suddenly
- When inbox placement drops below about 80%
- After setting up a new WordPress site that sends email
How do you test email deliverability?
You can test email deliverability in five steps: run a spam score test, check authentication, send a real test email, run an inbox placement test, and then review and fix issues. Here’s the full process.
What you’ll need (prerequisites)
Before you start, get these ready:
- A sending domain you control (not a free Gmail or Yahoo address)
- Access to your DNS settings, for checking authentication
- An email you actually send, like a receipt or newsletter
- A WordPress site with an SMTP plugin, if you’re testing WordPress mail
Step 1: Run a spam score test with mail-tester
Start with a free spam score test, because it’s the fastest signal. Go to mail-tester.com and copy the unique email address it shows you.
Send your real email to that address from your normal sending tool. Then click Check your score. You’ll get a score out of 10, plus a breakdown of what helped or hurt.

A score of 8 or higher is healthy. Anything lower flags specific issues, like a missing DKIM signature or spammy content, that you can fix.

Step 2: Check your email authentication (SPF, DKIM, DMARC)
Next, confirm your domain’s authentication records are valid. SPF, DKIM, and DMARC are DNS records that prove your emails are legitimate. Missing or broken records are the top cause of spam folder placement.
Use a free tool like MXToolbox or your provider’s dashboard to check each record:
- SPF: Lists the servers allowed to send for your domain
- DKIM: Adds a signature that proves the email wasn’t tampered with
- DMARC: Tells inboxes what to do when SPF or DKIM fails

If any record is missing, set it up before moving on. Our guides on SPF, DKIM, and DMARC walk through the exact records to add.
Step 3: Send a test email from WordPress
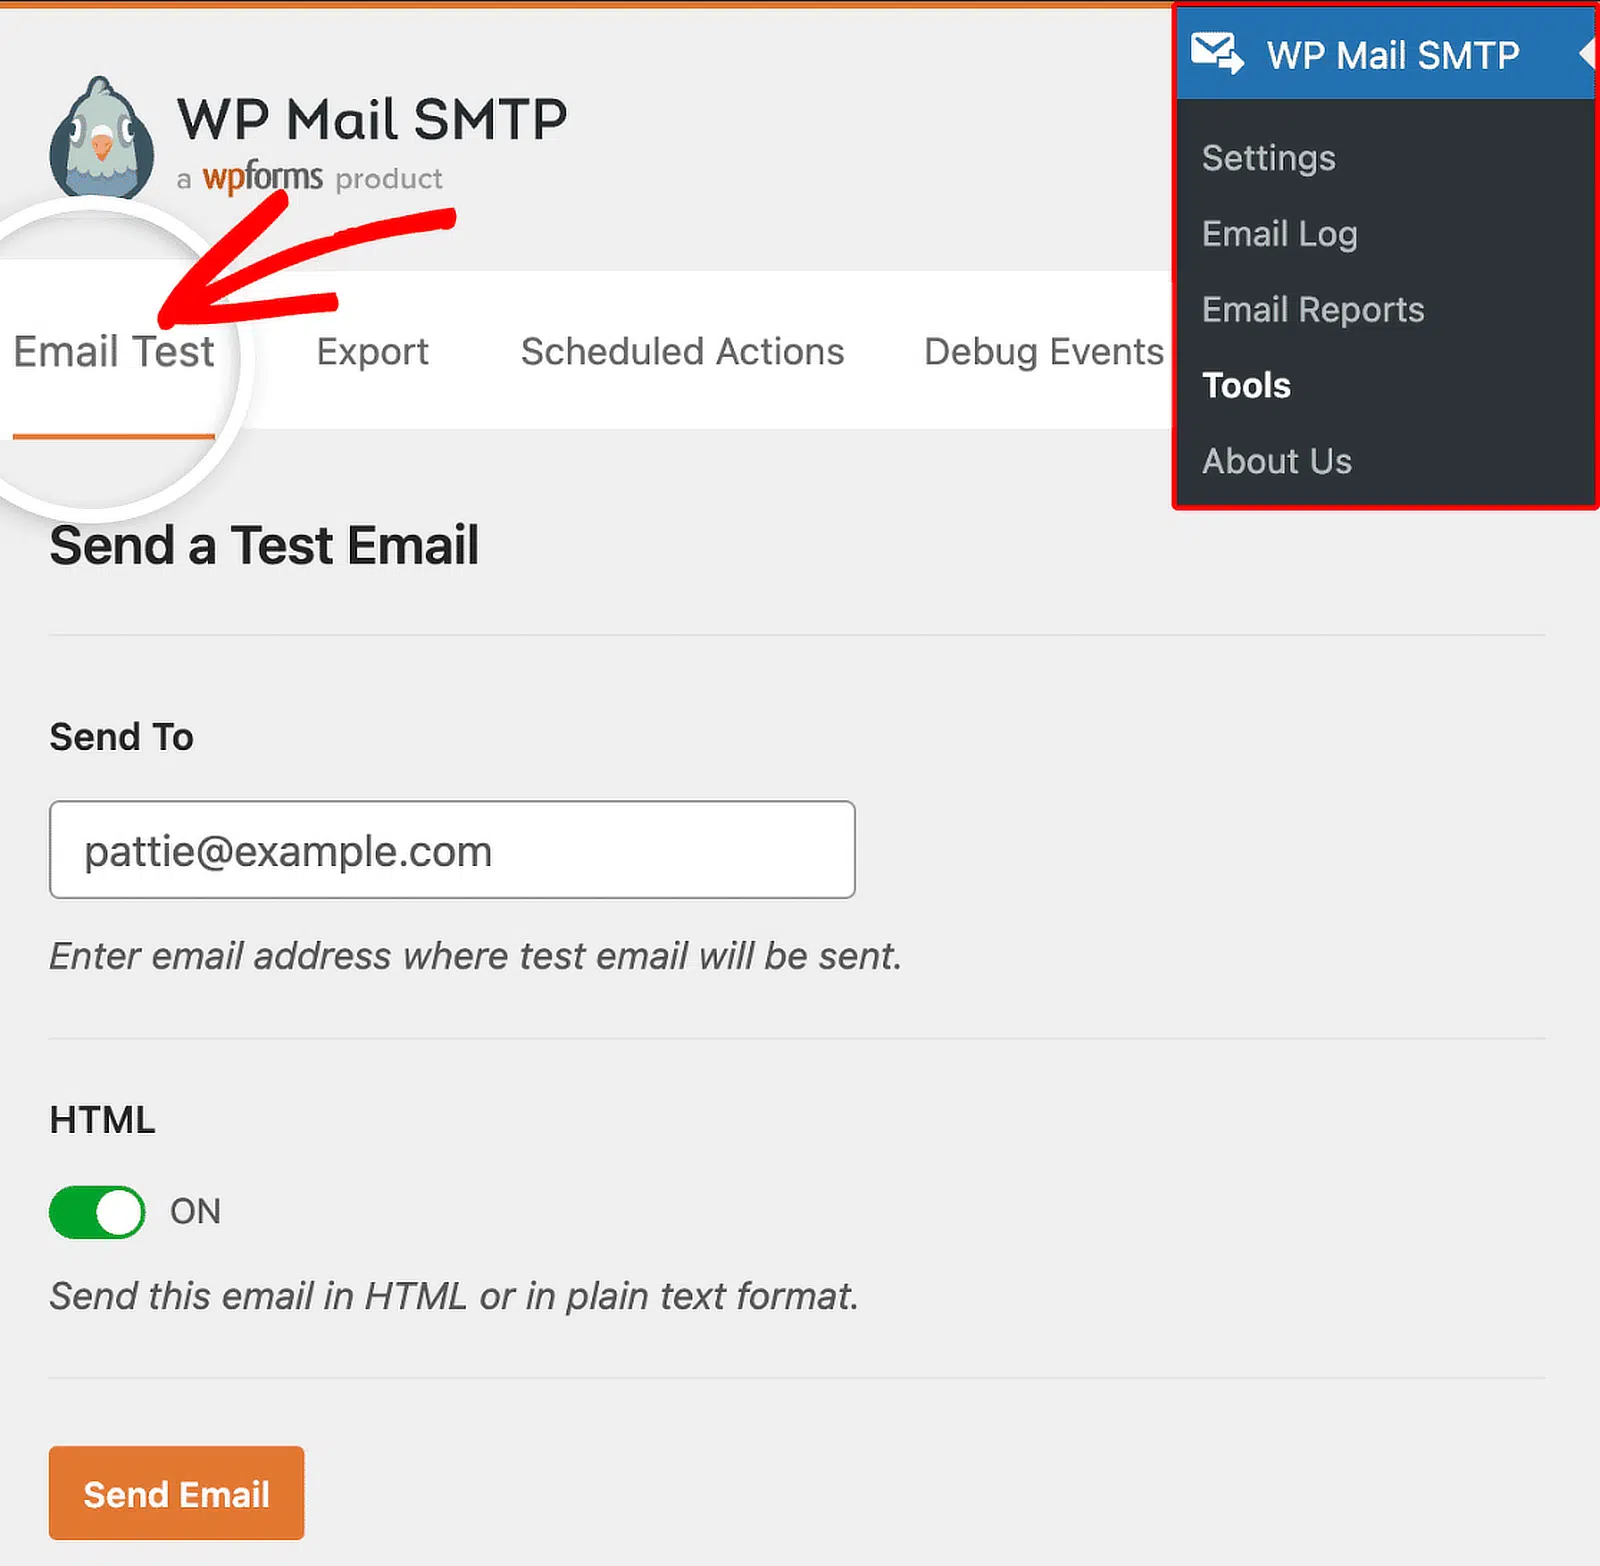
If you run WordPress, test the emails your site actually sends. WP Mail SMTP includes a built-in email test that confirms your site can send at all. Here’s how to send a test email:
- In WordPress, go to WP Mail SMTP » Tools » Email Test.
- Enter an address you can check, then click Send Email.
- Confirm the test email arrives, and note which folder it lands in.
If the test email fails or lands in spam, your WordPress mail has a deliverability problem. That’s your signal to route email through a proper SMTP provider. For the complete walkthrough, see the setting up WordPress email guide.
Step 4: Run an inbox placement test
Now check where your email lands across different providers. An inbox placement test, also called a seed test, sends your email to addresses at Gmail, Outlook, Yahoo, and others.
Tools like GlockApps or MailerCheck give you a seed list to send to. After you send, they report the percentage that hit the inbox, spam, or got blocked per provider.
This is the most realistic test. It shows you that your email reaches Gmail but lands in Outlook’s spam, for example, so you can target the fix.
Step 5: Review your results and fix issues
Finally, read your reports together and fix the weakest area first. Each test points to a different problem, so combine them for a full picture.
Match the symptom to the fix:
- Low spam score: clean up content, links, and image-to-text ratio
- Authentication failures: add or correct SPF, DKIM, and DMARC
- Poor inbox placement: warm up your sending and check your reputation
- WordPress test fails: connect a real SMTP provider
Re-run the tests after each fix. Deliverability improves in steps, not all at once.
What are the best email deliverability testing tools?
The best tool depends on which part of deliverability you’re testing. Most senders use two or three together. Here’s a quick comparison.
| Tool | Best for | Free option? |
|---|---|---|
| mail-tester.com | Quick spam score | Yes (limited) |
| MXToolbox | Authentication and blacklist checks | Yes |
| GlockApps | Inbox placement across providers | Limited trial |
| MailerCheck | Inbox insights and list cleaning | Paid |
| Postmark Spam Check | SpamAssassin content score | Yes |
For a deeper roundup, see our guide to the best email testing tools.
How do you fix poor email deliverability?
Fixing poor deliverability is a continuous process that involves working from authentication outward to content and reputation. Start with the issues that block the most email.
Here are the most common fixes, in order:
- Authenticate your domain: Add valid SPF, DKIM, and DMARC records.
- Use a real SMTP provider: Stop relying on default WordPress mail or shared host servers.
- Verify your sending domain: Don’t send from a free Gmail or Yahoo address.
- Clean your content: Cut spam trigger words, broken links, and heavy images.
- Check blacklists: Confirm your domain and IP aren’t listed.
- Warm up new senders. Ramp volume slowly so providers learn to trust you.
Frequently Asked Questions
Here are answers to the most common questions about testing email deliverability.
What is a good email deliverability score?
A good score is 8 out of 10 or higher on mail-tester, and 90% or more inbox placement on a seed test. Below 80% placement, you have a real problem worth fixing before your next send.
How do I test if my emails are going to spam?
Send a test email to a tool like mail-tester or to your own accounts at Gmail, Outlook, and Yahoo. Check which folder each one lands in. An inbox placement test shows this across many providers at once.
How often should I test email deliverability?
Test once a month as a routine, and always before a major campaign. Also test right after any DNS change or after switching email providers, since those often break authentication.
Why are my WordPress emails going to spam?
WordPress emails usually land in spam because of missing authentication or unreliable default mail. Routing your site through an SMTP provider with valid SPF and DKIM fixes most cases.
What’s the difference between email delivery and deliverability?
Delivery means the receiving server accepted your email. Deliverability means it reached the inbox. You can have high delivery and poor deliverability if your messages land in spam.
Next, keep an eye on your sending reputation
A deliverability test is a snapshot. Your reputation shifts over time, so checking once isn’t enough.
Read our guide to monitoring your email sending reputation to catch problems before they cost you.
Ready to fix your emails? Get started today with the best WordPress SMTP plugin. If you don’t have the time to fix your emails, you can get full White Glove Setup assistance as an extra purchase, and there’s a 14-day money-back guarantee for all paid plans.
If this article helped you out, please follow us on Facebook and Twitter for more WordPress tips and tutorials.