Do you want to learn how to create a custom WordPress sidebar without code?
A well-designed sidebar improves user experience and makes for better navigation for them. But customizing your sidebar using the default WordPress settings is not always very straightforward. And coding is even harder.
In this post, we’re going to show you how to add a sidebar in WordPress in a few simple steps.
Why You Should Add a Custom WordPress Sidebar
Sidebars provide a simple but effective way of displaying important information that you’d like visitors to see. In many WordPress sites, it’s common to dedicate sidebars to provide quick links to related posts, social media pages, and optin forms.
This helps you ensure the best user experience for your users and allows you to point visitors to areas of your site that you’d like them to see. As a result, sidebars enable you to boost page views, stay time, engagement, and conversions.
Even though many WordPress themes come with ready-made sidebars, they don’t provide the kind of easy visual customization that you get with some WordPress plugins.
SeedProd is the best WordPress plugin for creating sidebars with easy drag and drop functionality. Therefore, we’ll be using SeedProd to show you how to add a Sidebar in WordPress without any code.
How to Create a Custom WordPress Sidebar Without Code
To learn how to add a sidebar in WordPress, simply follow the steps below:
- Installing SeedProd
- Choosing a Theme Template
- Customizing Your WordPress Sidebar
- Saving Changes and Publishing the Sidebar
Let’s start.
1. Installing SeedProd
To start with, you need to have SeedProd installed on your site. If you don’t know how to install it, see this tutorial on how to install a WordPress plugin.
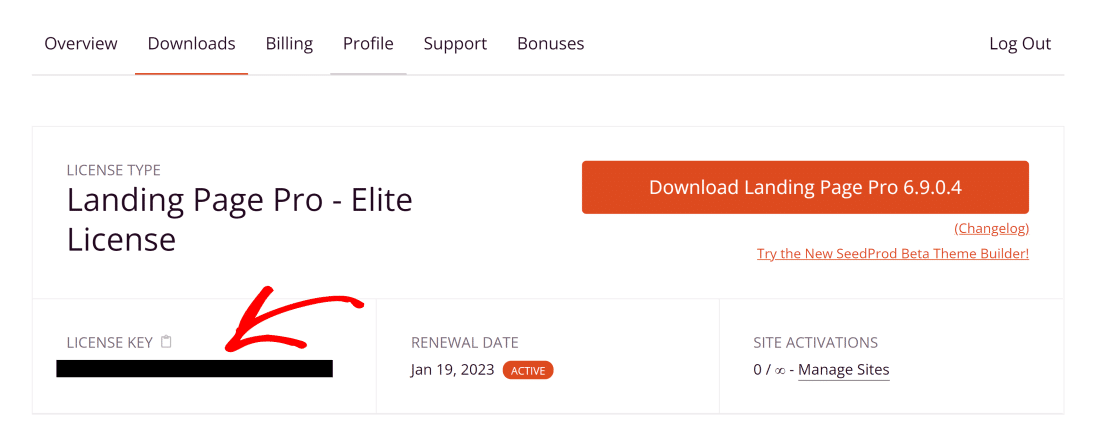
To access the WordPress theme builder feature of SeedProd (which you’ll need to create a sidebar), you’ll need to purchase the SeedProd Pro license. When you’ve made your purchase and created an account with SeedProd, log into your account area and navigate to the Downloads tab. Here, you’ll find your license key. Copy it (we’re going to need this later).
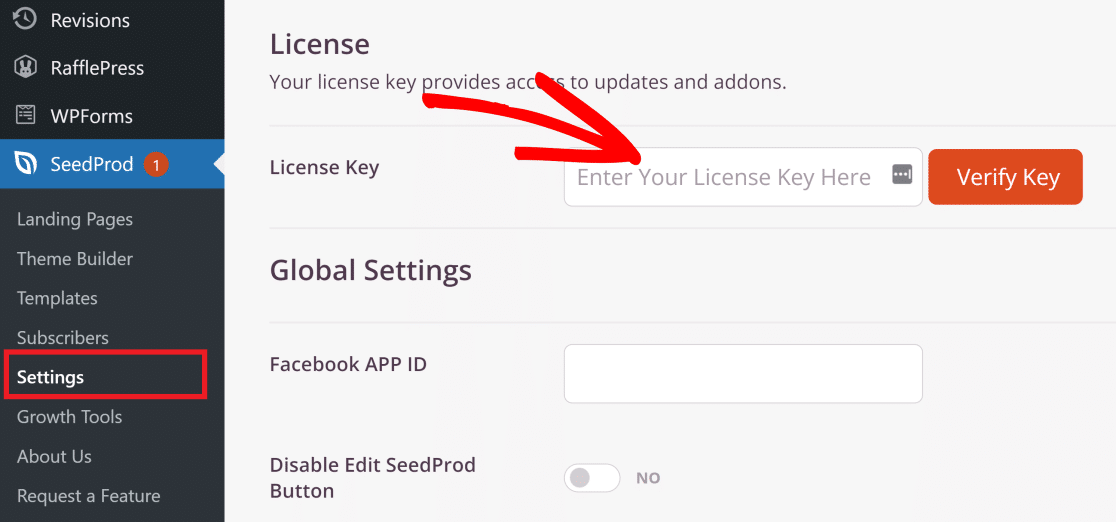
From your WordPress dashboard, navigate to SeedProd » Settings. On this screen, you should see your License Key field. Paste the license key here and click on the Verify button.
Now that SeedProd is set up on your site, let’s make use of some templates to make our sidebar creation task easier.
2. Choosing a Theme Template
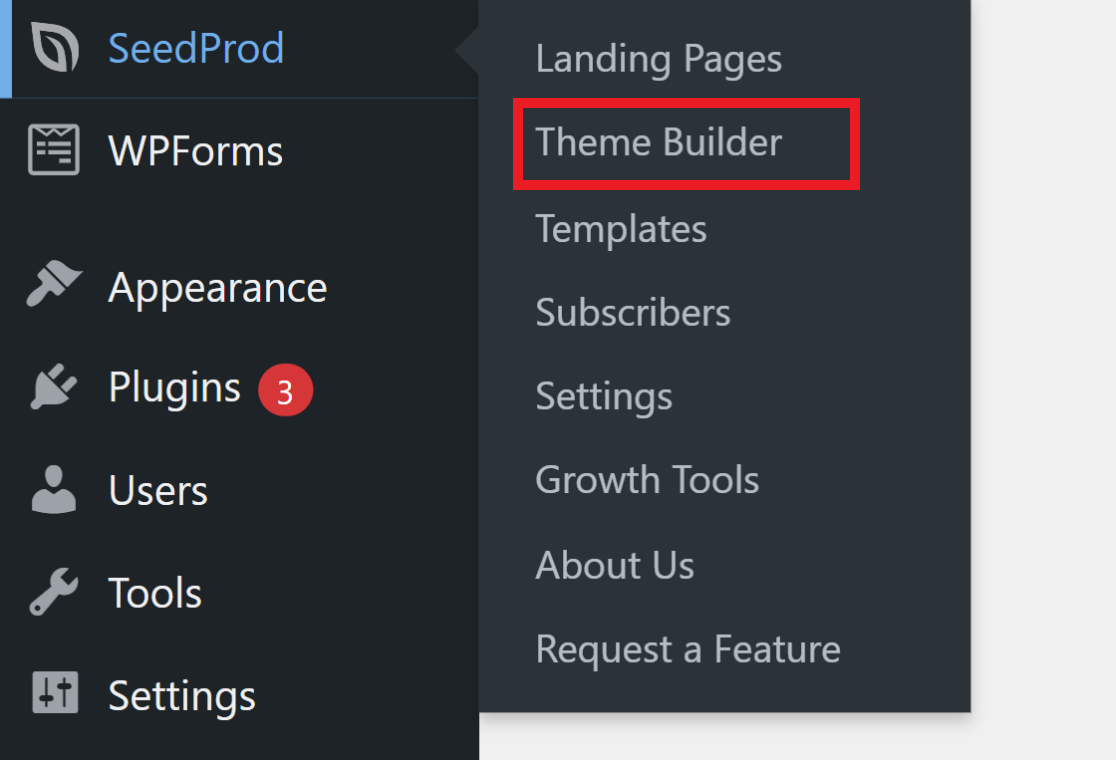
From your WordPress admin area, click on SeedProd » Theme Builder.
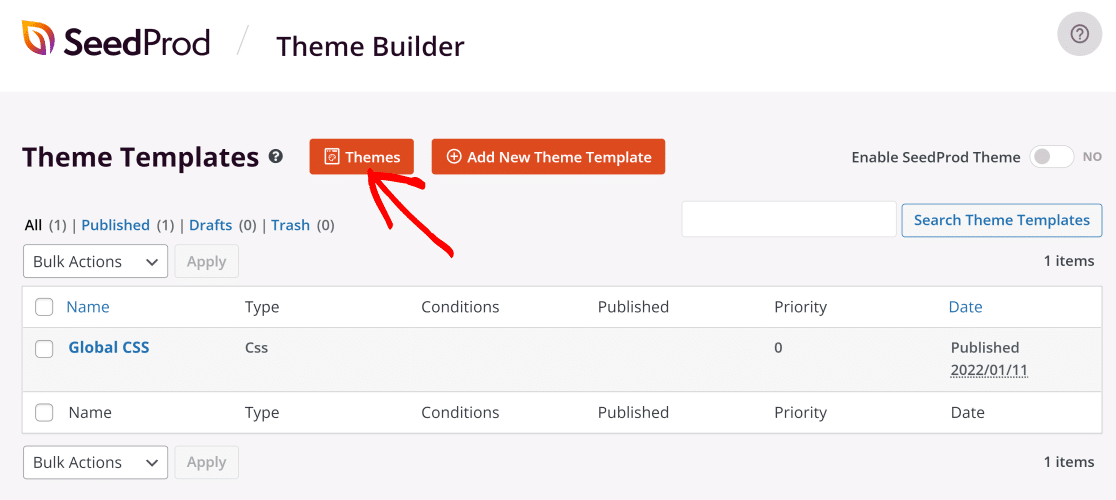
This is the main dashboard where you can control the settings for all of your different theme elements including the sidebar.
Now, click on the orange Themes button.
SeedProd has various themes for different kinds of businesses and organizations including marketing agencies, restaurants, mortgage brokers, and more. You can choose a theme that best suits your business and then customize the sidebar until it looks exactly the way you want.

For this example, we’re going to use the Starter theme, which works great for simple websites. When you select the theme, your theme builder area will now automatically populate with all the essential parts that make up the theme.
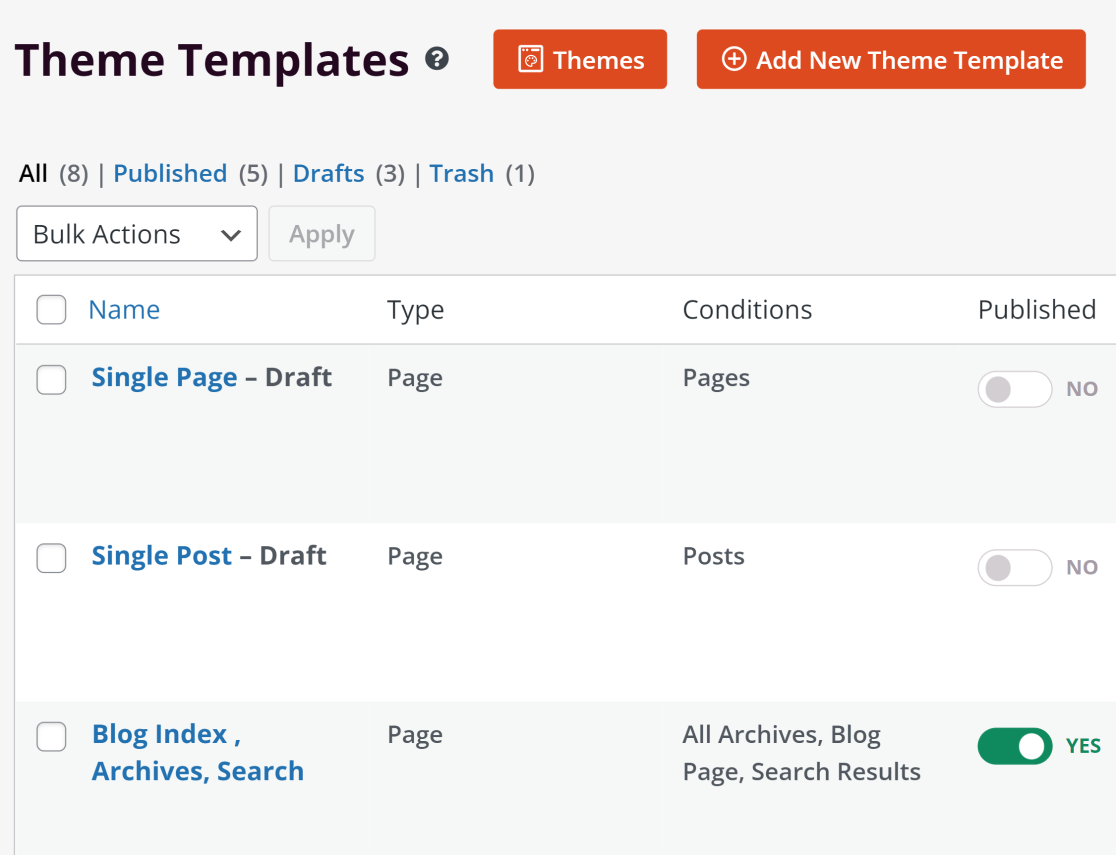
You can enable and disable each different part depending on your needs. Since we’re only going to use a sidebar for the blog page in our example, we’re only going to keep the Sidebar and Blog Index, Archives, Search, parts enabled.
Using the toggle buttons under the Published heading we disabled other parts of the theme and left the Sidebar to the YES status.

Now, we’re ready to start customizing the Sidebar.
3. Customizing Your WordPress Sidebar
To start customizing your WordPress sidebar, hover your cursor over the Sidebar option in the SeedProd theme builder dashboard and click on Edit Design.
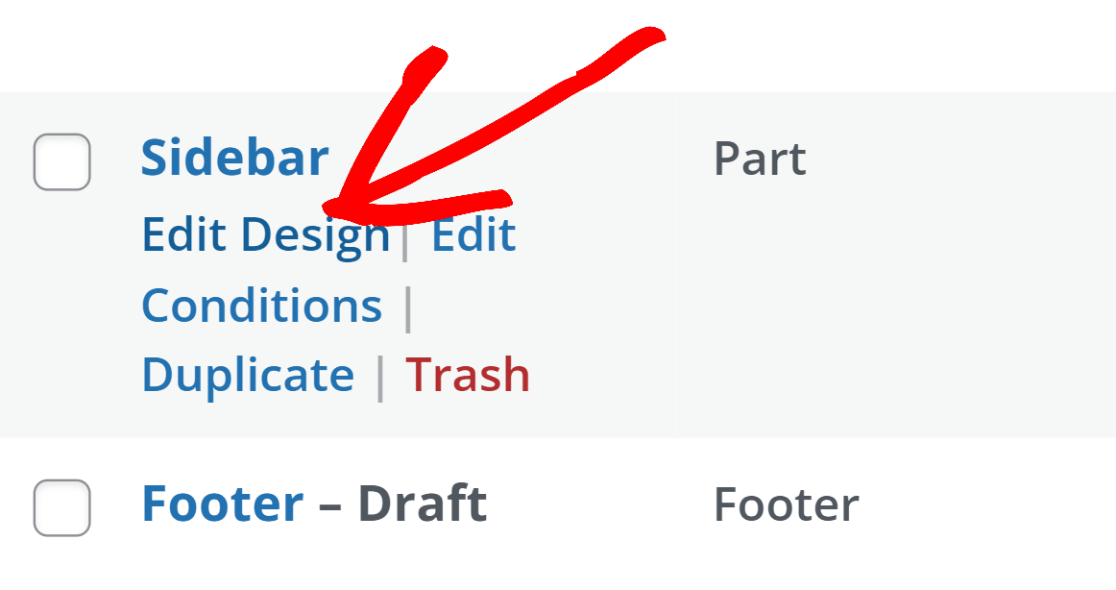
This will open the theme builder interface. The Starter theme sidebar has a search bar, categories, and social media icons enabled by default.
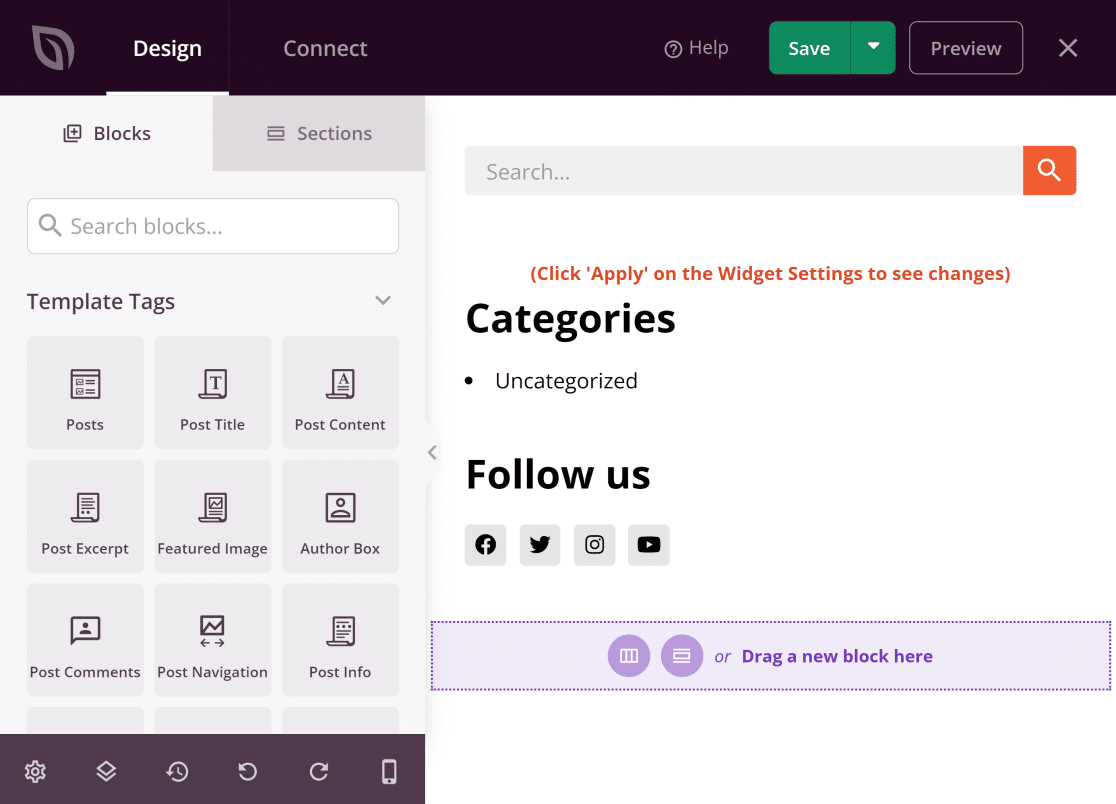
But you can add more elements to the sidebar or replace existing ones with something else. On the left-hand pane, you will find tons of blocks that you can drag and drop on the area on the right, which is a live preview of your sidebar.
Below, we’ll show you how to perform some common sidebar customizations, but these are all optional steps.
Adding a Contact Form Within the Sidebar
In this example, we’ll show you how to add a simple contact form to your sidebar. But first, make sure you have WPForms installed. If you need help with this, see this doc on installing WPForms.
WPForms automatically integrates with SeedProd. So, any forms that you’ve created with WPForms can be added as a block within your sidebar using SeedProd.
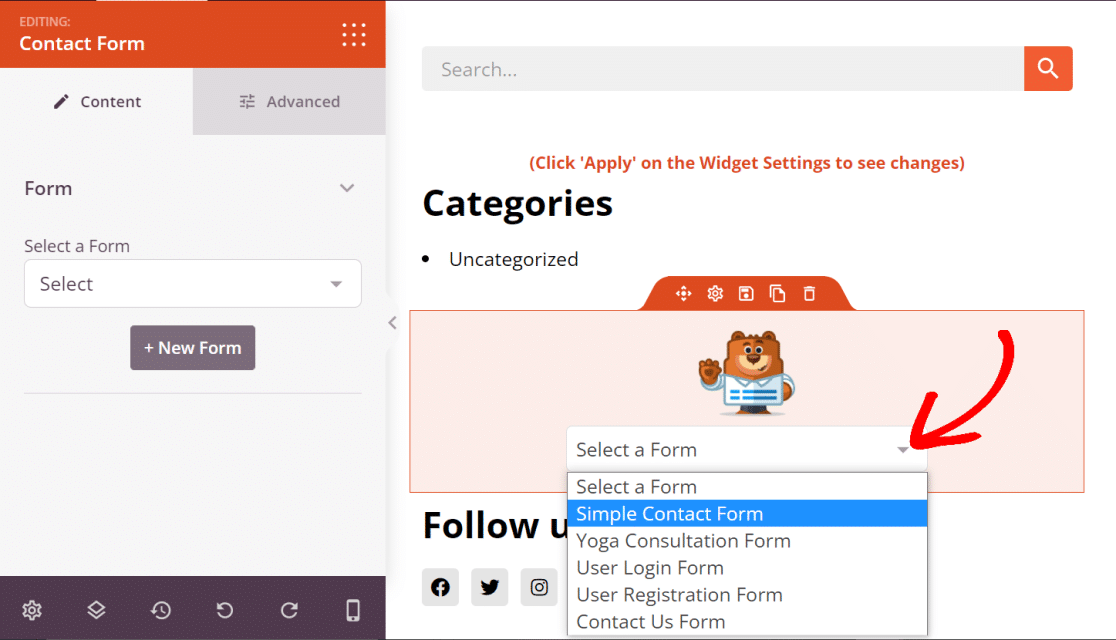
To do this, simply type in “contact form” in the search bar under the Blocks tab. Then, drag and drop the Contact Form block to where you want to place it on your sidebar.
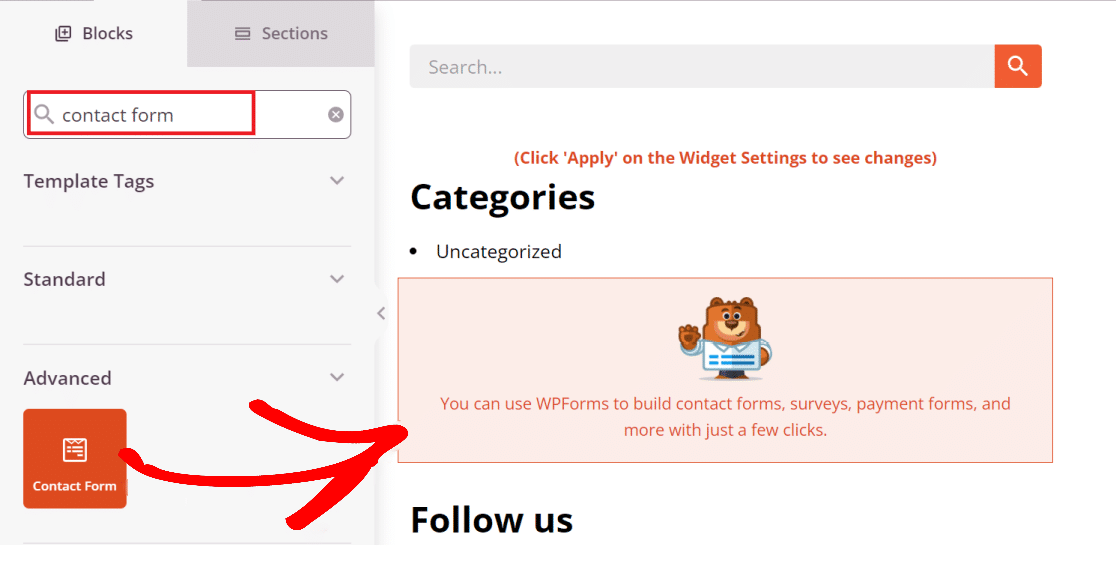
After placing the form on the sidebar, click on the WPForms block to open form options. From here, you can add an already created form or even create a new one by pressing the +New Form button.
We’re going to use a form we already created with WPForms by clicking on the Select a Form dropdown menu and picking one from the list.
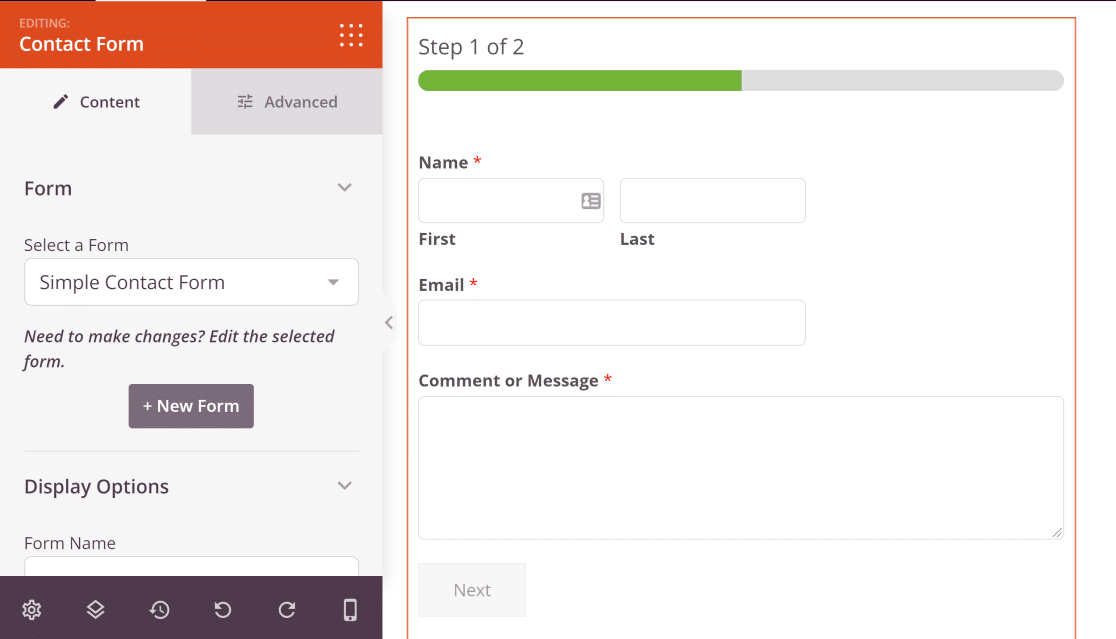
This is what the form looks like.
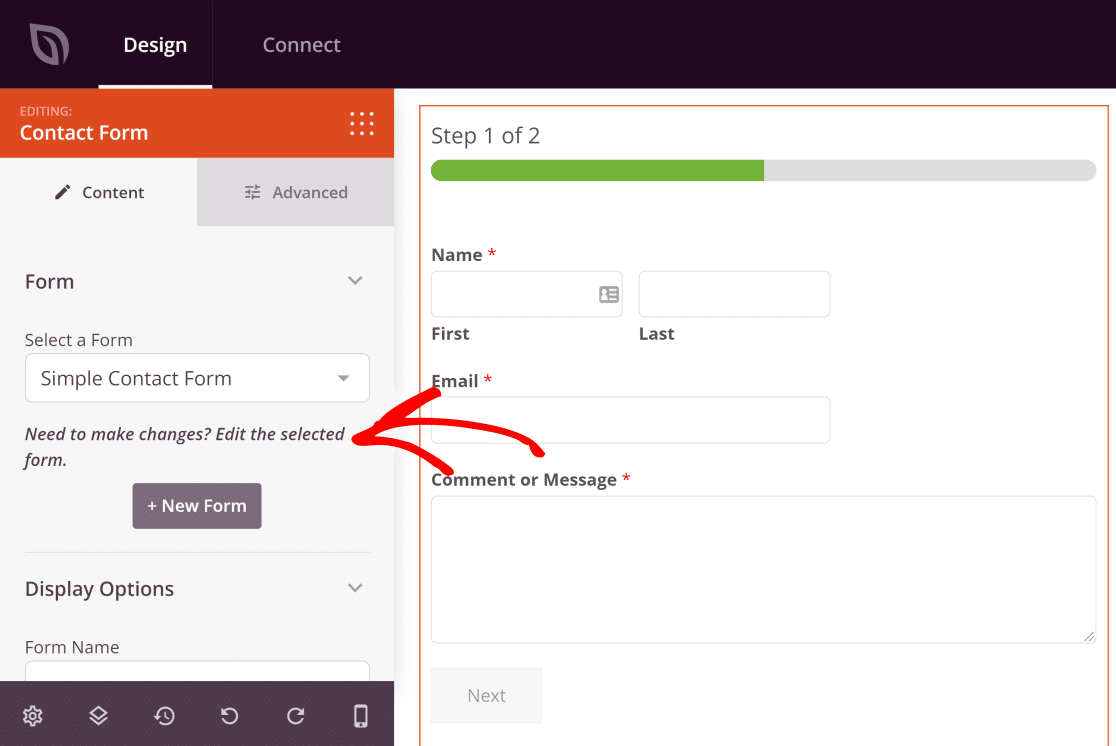
If you need to edit the form, click on the Edit the selected form. This will open the WPForms builder in the same window and you can make your desired changes without having to leave the theme builder screen.
Other than that, you can customize the design of the form by going to the Advanced tab. Here, SeedProd provides options for changing the style, attributes, spacing, and device visibility of the form.
For instance, if you want to hide the sidebar when your site is viewed on mobiles, simply click on the Device Visibility menu and then toggle on the Hide on Mobile button.

Next, we’re going to show you how to add Recent Posts within your blog’s sidebar.
Adding Recent Posts Within the WordPress Sidebar
Once again, use the search field under the Blocks tab of the theme builder and type in “recent posts”. Now, drag and drop the Recent Posts block to the area you want it displayed.
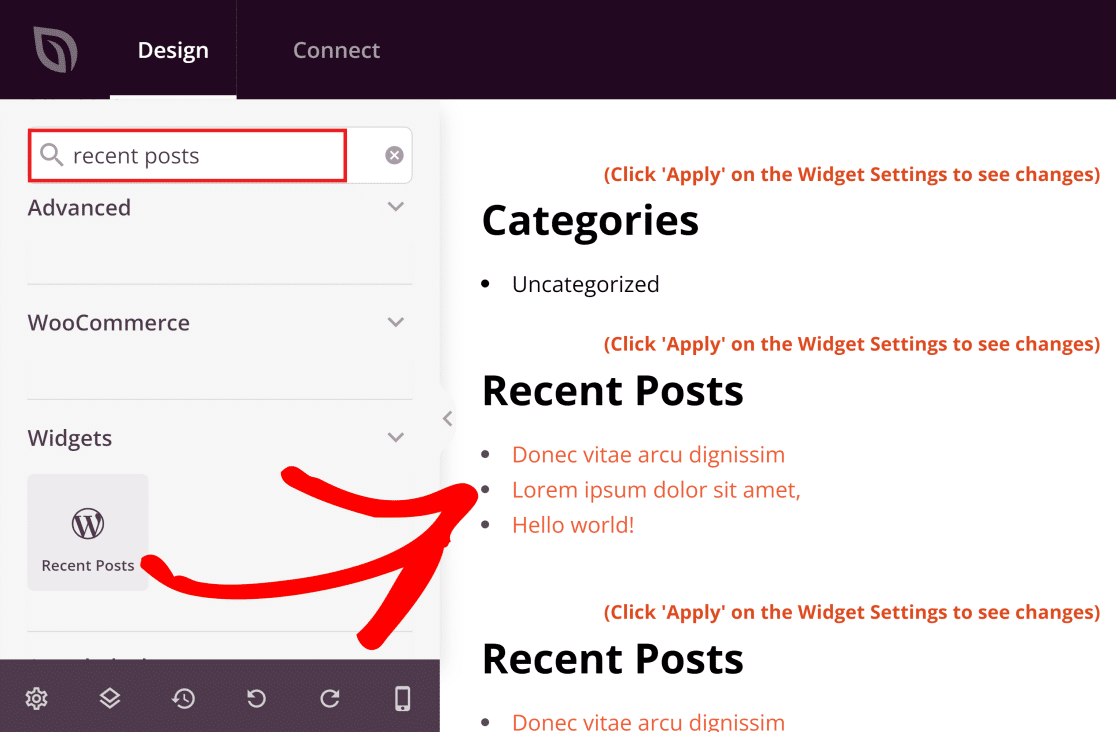
The Recent Posts widget automatically populates as new blog posts are published on your website.
If you click on the widget when it’s placed on the right-hand side of the builder, you can access settings like controlling the number of posts you’d like to be displayed.
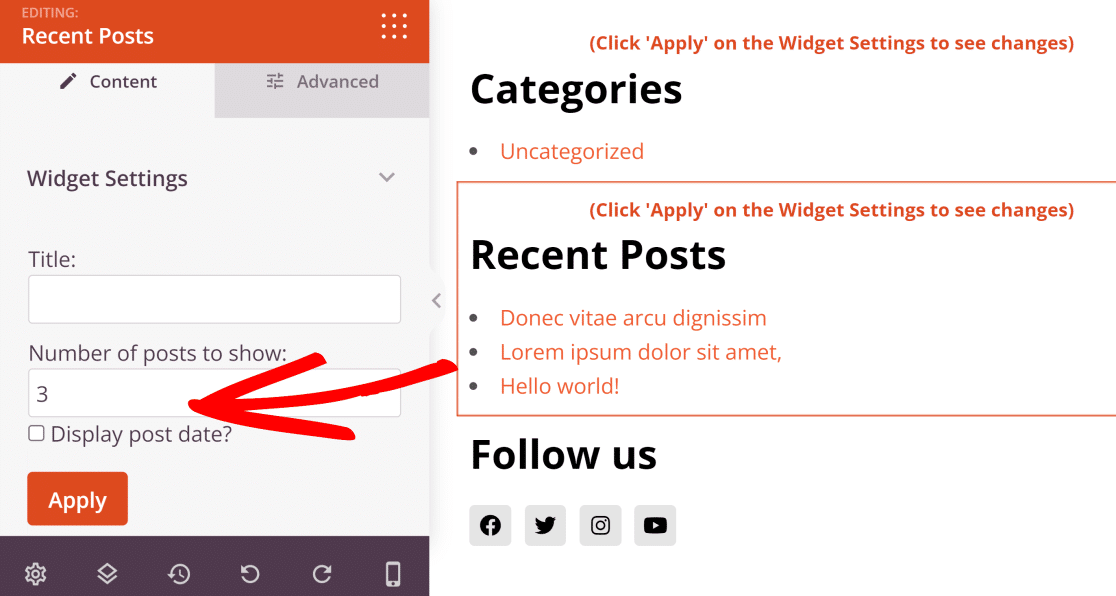
There are only 3 posts on our example test site. But it’s a good rule of thumb to include 5 recent posts to show on your sidebar.
Deleting Items From the Sidebar
With the SeedProd theme builder, deleting elements from the sidebar is just as easy as adding new items.
In our example, we’re going to remove the Search bar block from the sidebar. It is entirely up to you to decide which parts you’d like to remove from your sidebar. We’re only removing the Search bar for demonstration.
Normally, it is considered best practice to keep your sidebar simple and focused, so try not to include too many widgets in your sidebar.
To delete a block, hover your mouse until an orange outline appears around the block you want to delete and press the trash can icon.
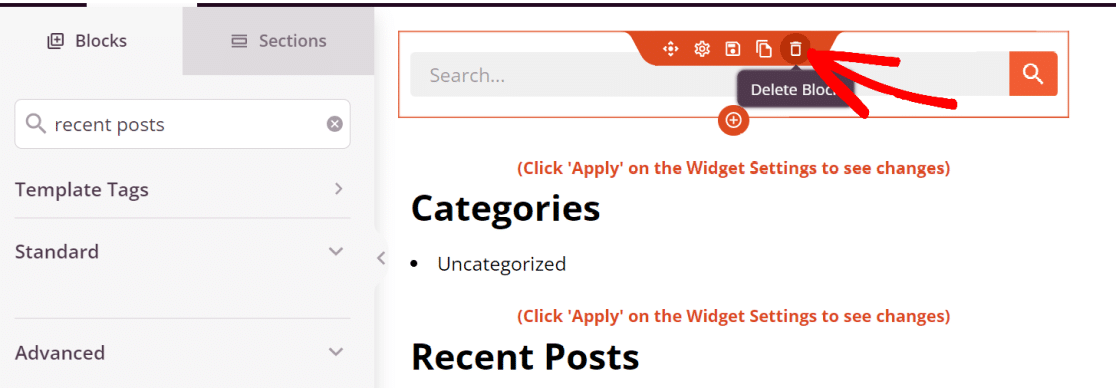
You’ll then see a prompt to confirm the delete action. Press Yes, delete it! button to go ahead.
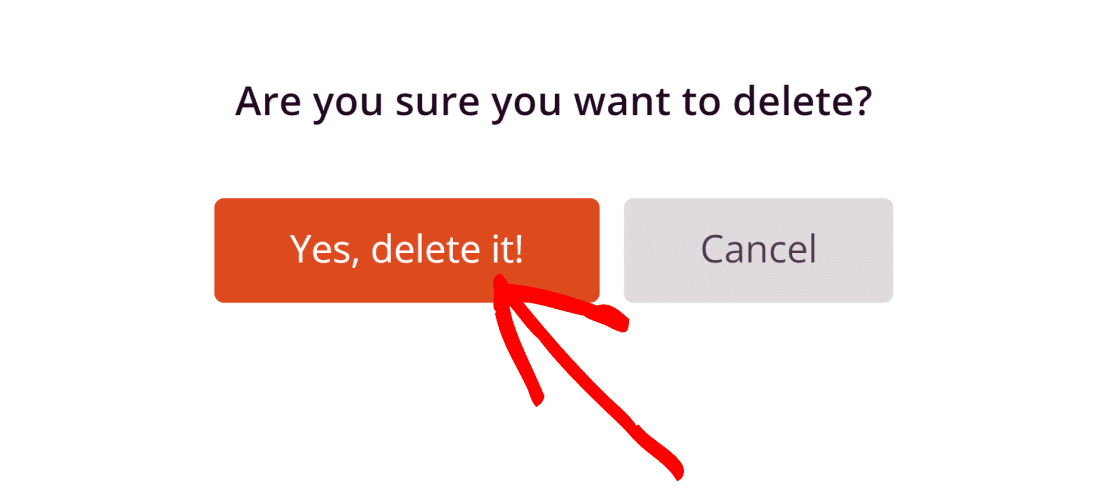
That’s all it takes to delete any block or element from your sidebar.
4. Saving Changes and Publishing the Sidebar
When you’re done customizing the sidebar to your liking, click on the Save button on the top right.

Now, click the cross button to exit the theme builder.

This action will add the sidebar to your blog page. Open your site’s blog page from the frontend to see your newly created WordPress sidebar. (In this example, we only have the social media icons and contact form enabled).
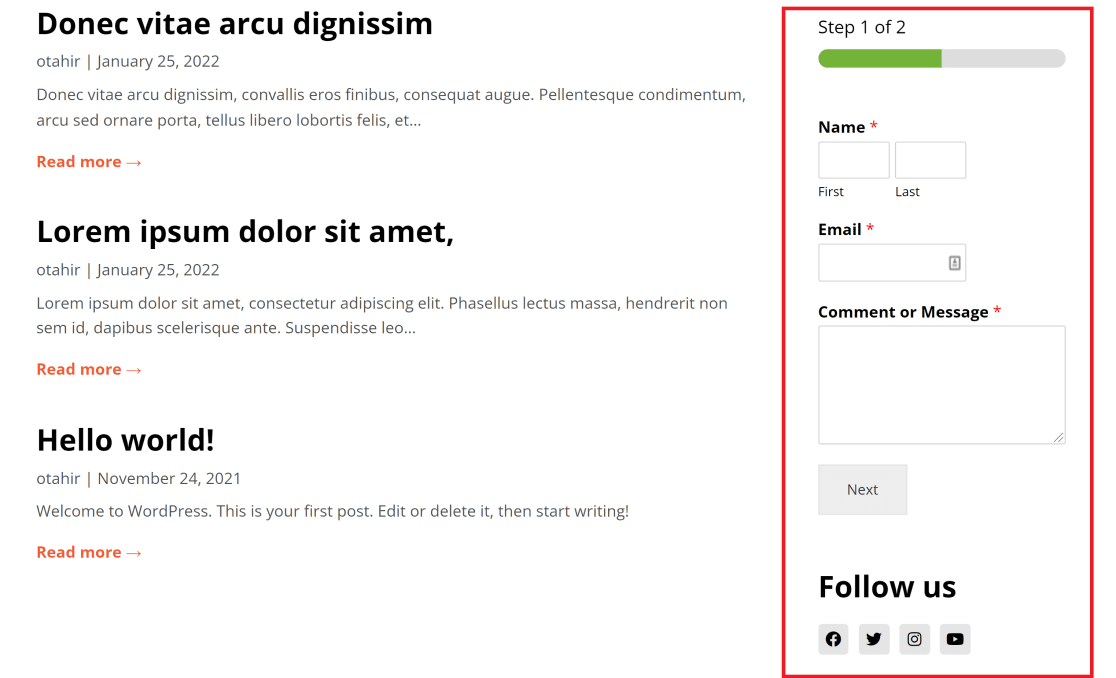
And that’s it! You now know how to add a sidebar in WordPress and customize it to look just the way you like it.
Next, Set Up an Email Subdomain
Do you want to maintain your email reputation and maintain high deliverability rates? You should consider setting up an email subdomain in that case. See our guide on email subdomains to learn how to better manage your email reputation and set up an email subdomain.
You might also want to learn about email deliverability and its importance. You can check our article on improving email deliverability for more details. Our guide on changing the WordPress notification email address is another that will help you implement email management best practices.
Ready to fix your emails? Get started today with the best WordPress SMTP plugin. If you don’t have the time to fix your emails, you can get full White Glove Setup assistance as an extra purchase, and there’s a 14-day money-back guarantee for all paid plans.
If this article helped you out, please follow us on Facebook and Twitter for more WordPress tips and tutorials.

