
AI Summary
Are your WordPress emails landing in spam instead of customer inboxes? This could be because they lack proper authentication, and DNS records are the key to fixing this.
Without SPF, DKIM, and DMARC records configured correctly, email providers like Gmail and Yahoo treat your messages as untrustworthy and either block them or send them straight to the junk folder.
WP Mail SMTP makes it easy to set up email authentication, but you need to add the right DNS records at your domain registrar or hosting provider to complete the process.
What Is DNS and Why Does It Matter for Email?
DNS (Domain Name System) is like a phone book for the internet. It translates your domain name into an IP address so computers can find your website and verify your emails.
When you send emails from WordPress, receiving servers check your DNS records to confirm you’re authorized to send from that domain.
Think of it as a security checkpoint: the receiving server looks up your domain to see if you’ve given permission for that particular mail server to send on your behalf.
Without proper DNS authentication records (SPF, DKIM, and DMARC), email providers assume your messages are spam or phishing attempts.
Gmail, Yahoo, and other major providers now require these records to accept your emails. If they’re missing, your messages will land in spam folders or get blocked entirely.

Understanding the Three Key DNS Records for Email
When you set up email authentication, you’ll work with three main DNS records. Each one plays a specific role in proving your emails are legitimate.
SPF (Sender Policy Framework)
SPF (Sender Policy Framework) is a TXT record that lists which mail servers are allowed to send email on behalf of your domain. It’s basically a whitelist that tells receiving servers, “Yes, this mail server is allowed to send email for me.”
Only the servers you specify are permitted to send emails using your domain name. If an email comes from a server not on your list, receiving mail servers can flag it as suspicious.
DKIM (DomainKeys Identified Mail)
DKIM (DomainKeys Identified Mail) adds an encrypted signature to your emails that proves they haven’t been tampered with during transit. It’s like a wax seal on an envelope.
When your email arrives, the receiving server checks this signature against a public key stored in your DNS records. If they match, the server knows the email content is exactly what you sent.
DMARC (Domain-based Message Authentication, Reporting and Conformance)
This record builds on SPF and DKIM by telling receiving servers how to handle emails that fail authentication checks.
You can instruct servers to quarantine suspicious emails, reject them outright, or just monitor what’s happening. DMARC also sends you reports so you can see if someone’s trying to spoof your domain.

How to Set Up DNS Records for WordPress SMTP
Do you need help adding DNS records to set up your WP Mail SMTP mailer? This is an important step for authenticating your domain to configure different mailers.
Here’s what you’ll need:
- Access to your domain registrar account (where you purchased your domain) or your hosting control panel like cPanel.
- The specific DNS record values from your email service provider (WP Mail SMTP will show you exactly what to add after you configure your mailer).
Get Your DNS Record Values from WP Mail SMTP
Before you can add DNS records to your hosting account or DNS provider, you need to know exactly what records to add. These values come from your email service provider (also called a “mailer”).
If you’re using WP Mail SMTP, you can check out our documentation for the location based on which mailer you’ve selected. Each email provider has slightly different requirements, but they all follow the same basic principle:
- SendLayer
- SMTP.com
- Brevo (Sendinblue)
- Amazon SES
- Mailgun
- Postmark
- SendGrid
- Elastic Email
- Resend
- MailerSend
- Mailjet
- Mandrill (Mailchimp transactional)
- SMTP2GO
When you locate your DNS records, you’ll typically see three pieces of information for each record:
- Record Type – This tells you what kind of DNS record to create (usually TXT, CNAME, or MX).
- Name/Host/Hostname – This is where the record should be added (often looks like _dkim.yourdomain.com or just @).
- Value/Data/Points To – This is the actual authentication string or destination (often a long string of characters).
Method 1: Adding DNS Records Using cPanel
Most shared hosting providers use cPanel, which includes a Zone Editor tool for managing DNS records. If you’re on Bluehost, SiteGround, HostGator, or similar hosts, this is usually the simplest way to add your authentication records.
This method works if your domain’s nameservers point to your hosting provider. Not sure if that’s the case? Just reach out to your host’s support team and they’ll confirm it for you in seconds.
First, you’ll need to access cPanel. Most hosts give you a direct link in your welcome email, but you can also find it by logging into your hosting account dashboard.

Once you’re inside cPanel, scroll down until you see the Domains section. After that, click on Zone Editor. Some hosts might label it as DNS Zone Editor or just DNS, but it’s the same tool.
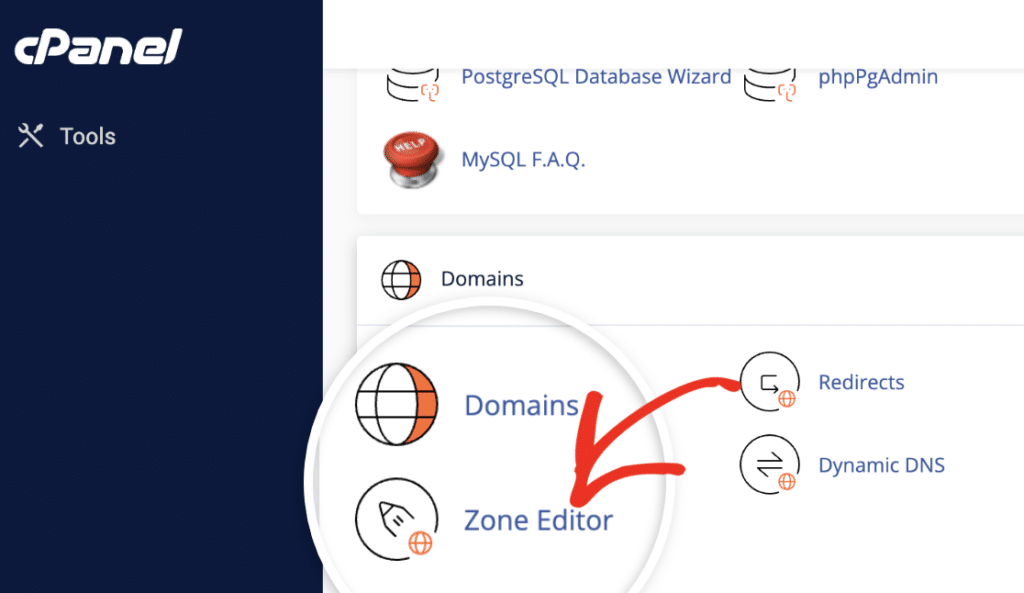
The Zone Editor will show a list of all domains connected to your hosting account. Find the domain you want to configure and click the Manage button next to it.
If you only have one domain, you’ll see it right away. If you manage multiple sites, double-check you’re selecting the right one before moving forward.
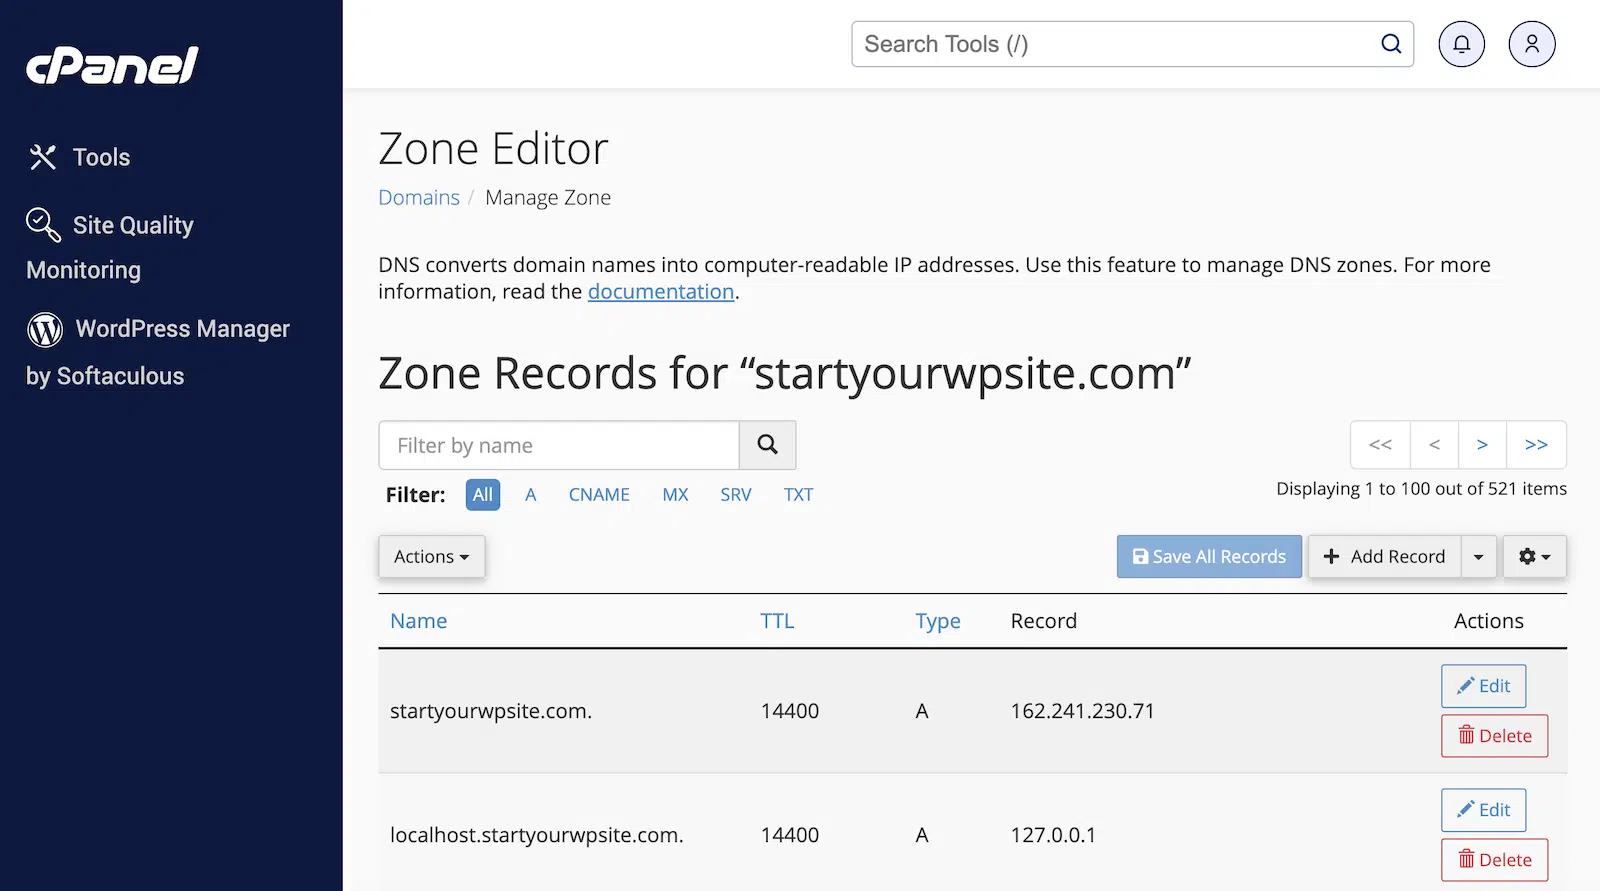
Now you’re in the DNS management screen for your domain. Look for a button that says Add Record or + Add Record (usually near the top right).
Click it to open the record creation form. This is where you’ll paste in your SPF, DKIM, or DMARC details from your email provider. Here’s what to fill in:
- Name: This is the hostname. For SPF and DMARC, you’ll usually enter `@` (which represents your root domain). For DKIM, you’ll enter a specific subdomain like `default._domainkey` (your mailer provides the exact text).
- Type: Choose TXT from the dropdown. All three authentication records (SPF, DKIM, DMARC) use TXT records.
- Record or Value: Paste the full record string provided by your email service. It’ll look something like `v=spf1 include:_spf.example.com ~all` for SPF, or a long encrypted string for DKIM.
- TTL: You can leave this at the default value (usually 14400 or 3600). This just controls how often DNS servers check for updates.

Double-check that you copied the entire record (no extra spaces or missing characters). Then click on Save Record. Now, repeat the process for other records.
In my experience, most changes show up within 15 to 30 minutes, but I always wait at least an hour before testing. You can use WP Mail SMTP’s built-in DNS checker (we’ll cover that later) to verify everything’s working.
That’s it for the cPanel method. Next, let’s look at how to handle DNS records if you’re using a third-party nameserver like Cloudflare.
Method 2: Adding DNS Records Using Third-Party DNS (Cloudflare)
If you use a third-party DNS like Cloudflare for DNS management, you’ll add records through their dashboard instead of your hosting control panel.
This method applies if you changed your domain’s nameservers to point to Cloudflare. You can check this in your domain registrar account (like GoDaddy, Namecheap, or wherever you bought your domain).
When your nameservers point to Cloudflare, your hosting provider’s DNS settings won’t be active anymore. All DNS changes need to happen in Cloudflare instead.
Head over to the Cloudflare dashboard and log in with your credentials. Once you’re in, you’ll see a list of all domains connected to your account. Click on the domain where you need to add DNS records for email authentication.
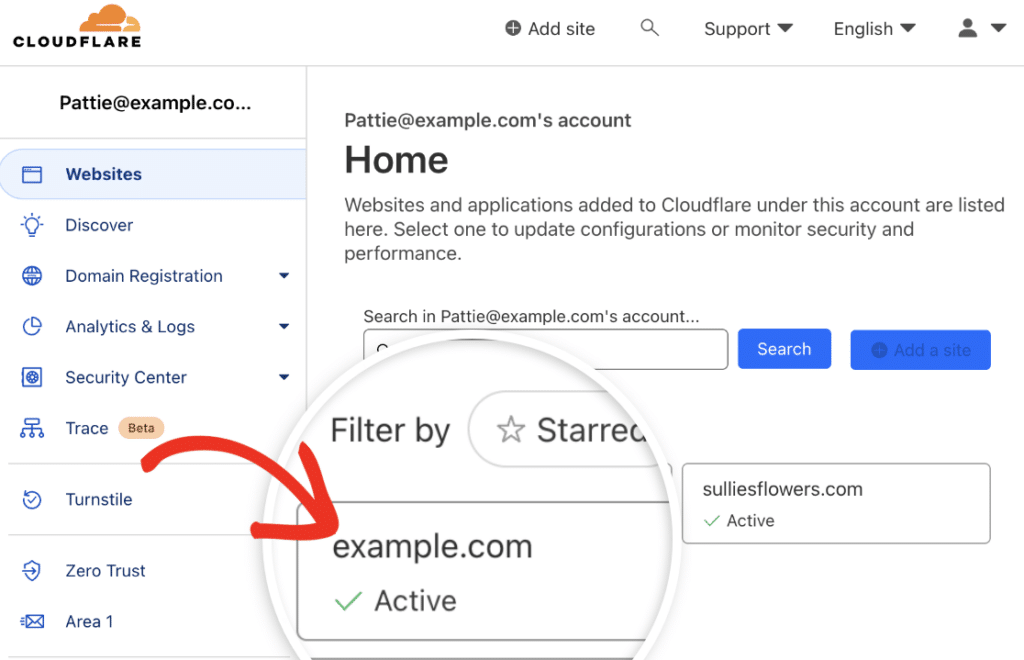
After selecting your domain, look for the DNS option in the left sidebar menu. Click on DNS to open the DNS management page.
Make sure you’re on the Records tab. This is where all your existing DNS records live, and where we’ll add new ones.

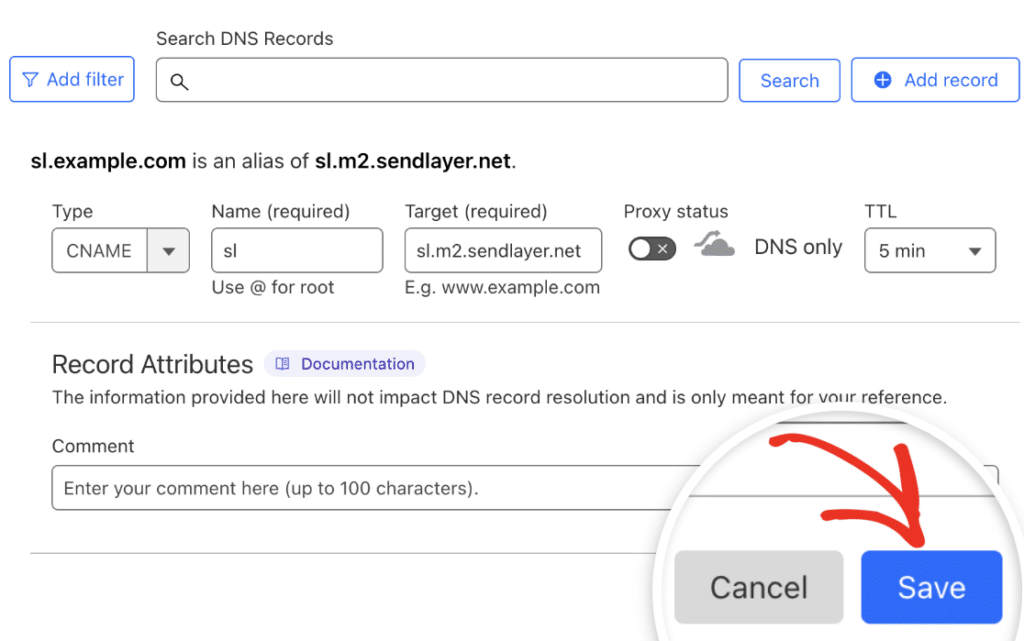
To add a new record, click the Add record button near the top of the page. A form will appear with several fields you need to fill out.
Under the Type dropdown, you’ll need to select the record type required by your chosen mailer. You already know what’s required to set up SPF, DKIM, DMARC.
However, at this point, it’s also a good idea to add the CNAME records SendLayer or other mailers provide when setting it up with WP Mail SMTP.
To proceed, select CNAME from the dropdown. After that, copy the values from your SendLayer account and paste it into the required fields on Cloudflare.
When you’re confident everything is correct, click the Save button.
Method 3: Adding DNS Records at Your Domain Registrar
If you’re not using cPanel or Cloudflare, you can add DNS records directly at your domain registrar. That’s the company where you purchased your domain name.
Common registrars include GoDaddy and Namecheap. Each one has a slightly different interface, but the core steps are the same.
First, head over to your domain registrar’s website and log in (GoDaddy). If you’re not sure who your registrar is, you can use a WHOIS lookup tool to find out.
Once you’ve logged in, click on Domain in the left side menu. Next, for the domain where you want to add the DNS records, click on the Manage DNS button.
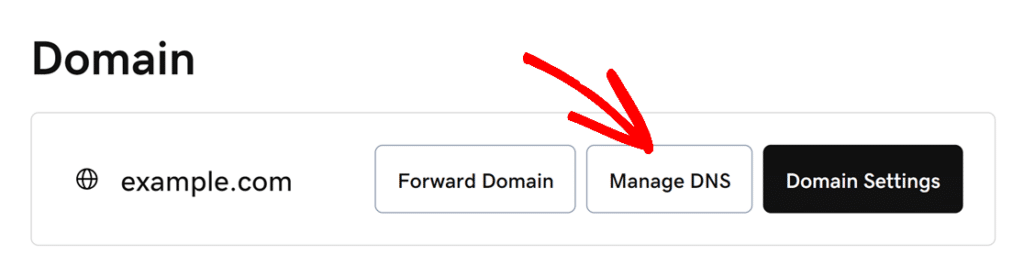
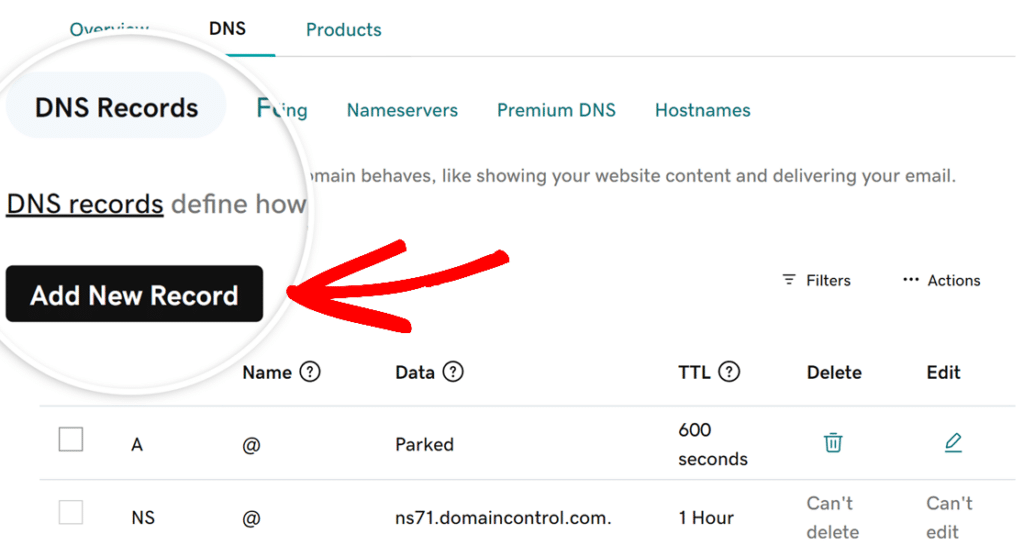
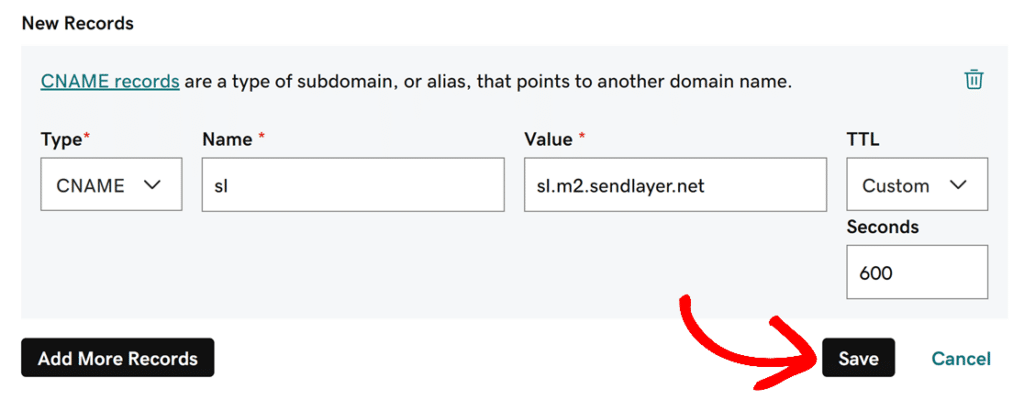
On the next page, you’ll see a list of your current DNS records. To add a new DNS record, click on the Add New Record button. As an example, I’ll add one of the CNAME records SendLayer provides.
Start by choosing the correct DNS record category from the Type menu. In this SendLayer demonstration, I’m selecting CNAME from the available Type options.
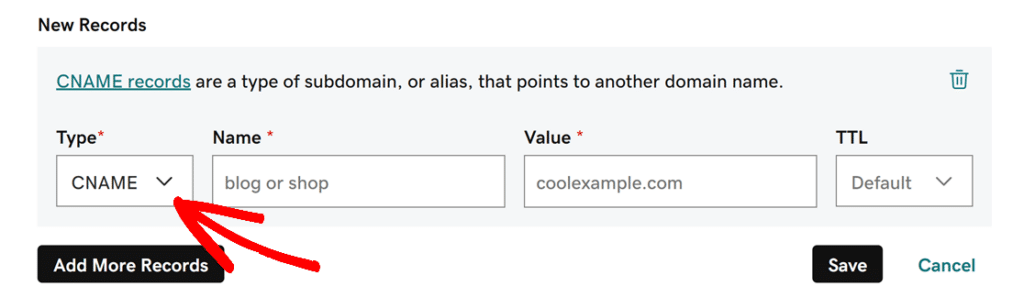
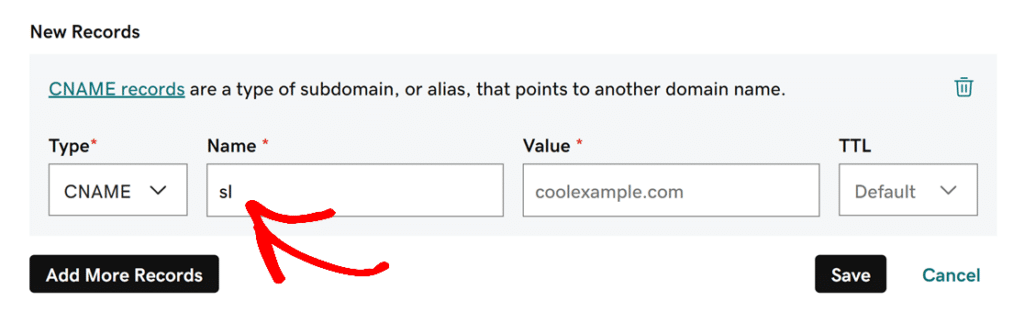
Next up is the Name field, where you’ll add the subdomain prefix or identifier your email provider gave you. Different services might label this as ‘Host’, ‘Hostname’, or ‘Name’.
Next, you’ll paste the the destination address provided by your email service in the Value/Target Field. This tells DNS servers where to route requests or how to process them.
After that, enter the TTL specified by your mailer. Once you’ve finished entering the values for the DNS record, go ahead and click the Save button.
How to Check if Your DNS Records are Active
After adding your DNS records, wait at least 15 to 30 minutes for the initial propagation. DNS changes don’t update instantly across the internet.
Your records need to spread through various DNS servers, and this can take anywhere from a few minutes to 48 hours depending on your provider.
I usually grab a coffee and check back in about 30 minutes. That’s typically enough time for the changes to start showing up.
Test Your DNS Configuration in WP Mail SMTP
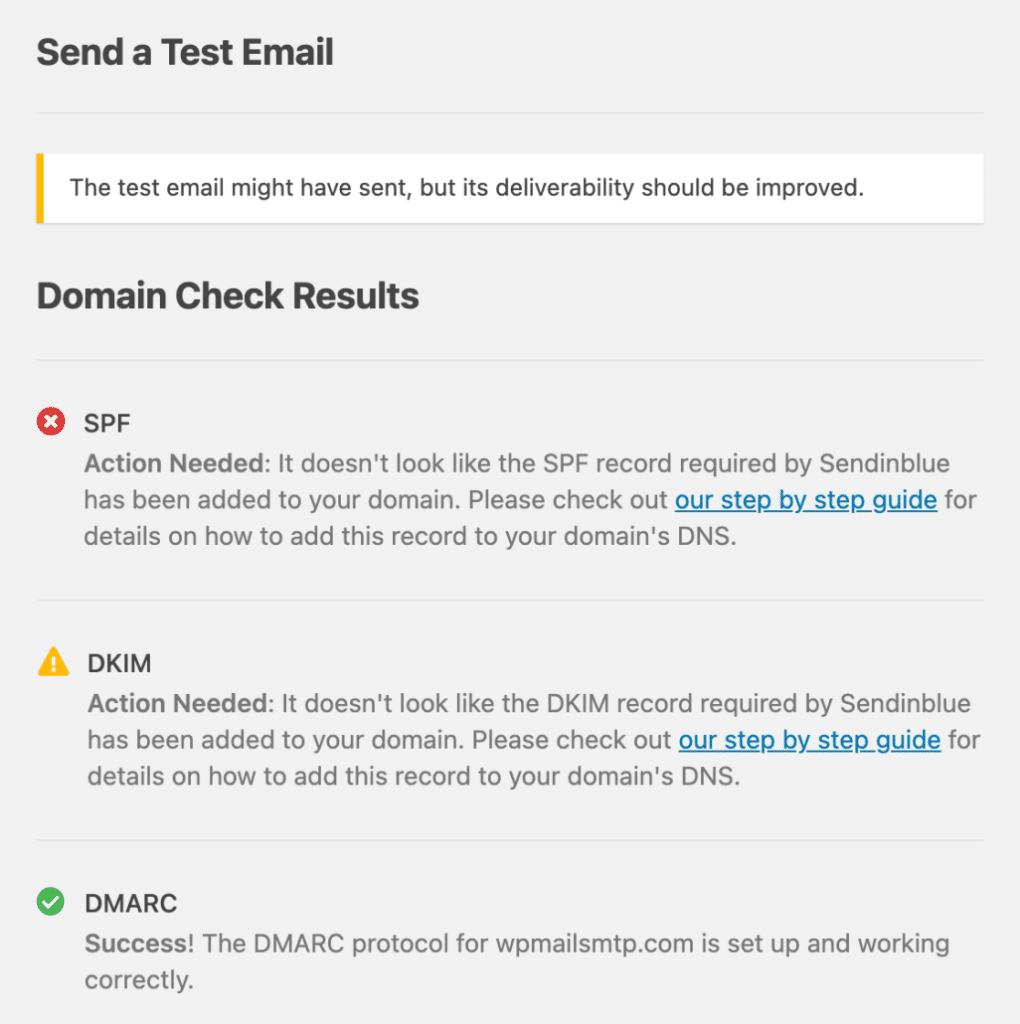
Once you’ve waited, head back to your WordPress dashboard. Navigate to WP Mail SMTP » Settings » Email Test. Send a test email to trigger the built-in DNS checker. This is the easiest way to confirm everything’s working.
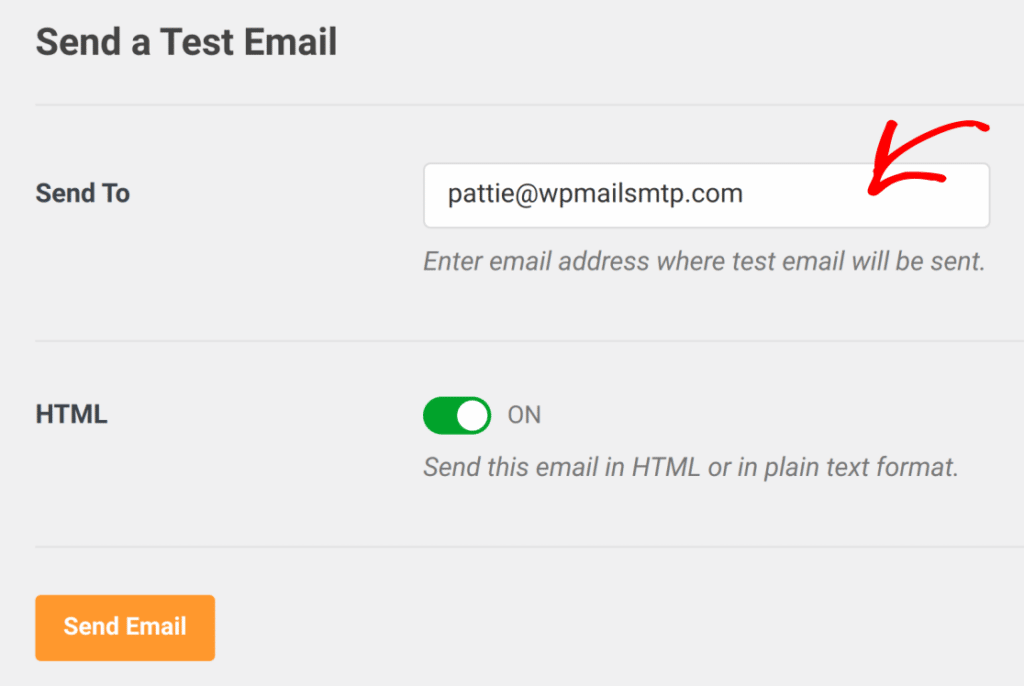
WP Mail SMTP will automatically scan your domain’s DNS records when it sends the test. If the plugin detects that any of your DNS records are missing or broken, it’ll let you know right away.
Send a Test Email to Gmail
If you don’t have access to WP Mail SMTP yet and want to manually test your DNS records, all you have to do is send a test email from your mailer to Gmail.
After that, check the message headers. You’ll have to click three dots and then on the Show original link. If you see the below lines, everything is good to go:
- SPF: PASS
- DKIM: PASS
- DMARC: PASS

Troubleshooting Common DNS Issues
Even when you follow the steps carefully, DNS email configuration can throw you a few curveballs. I’ve seen these issues pop up time and time again, so let’s walk through the most common problems and how to fix them.
Only One SPF Record Per Domain
If WP Mail SMTP shows an SPF warning after you’ve added your record, there’s a good chance you have multiple SPF records on your domain. This is a problem because email servers will reject all of them when they find duplicates.

Check your DNS zone for any existing SPF records before adding a new one. If you find one, you’ll need to merge them into a single record instead of creating a second one.
For example, if you already have `v=spf1 include:_spf.mailgun.com ~all` and need to add Zoho, combine them like this: `v=spf1 include:zoho.eu include:mailgun.org ~all
DKIM Selector and Key Mismatches
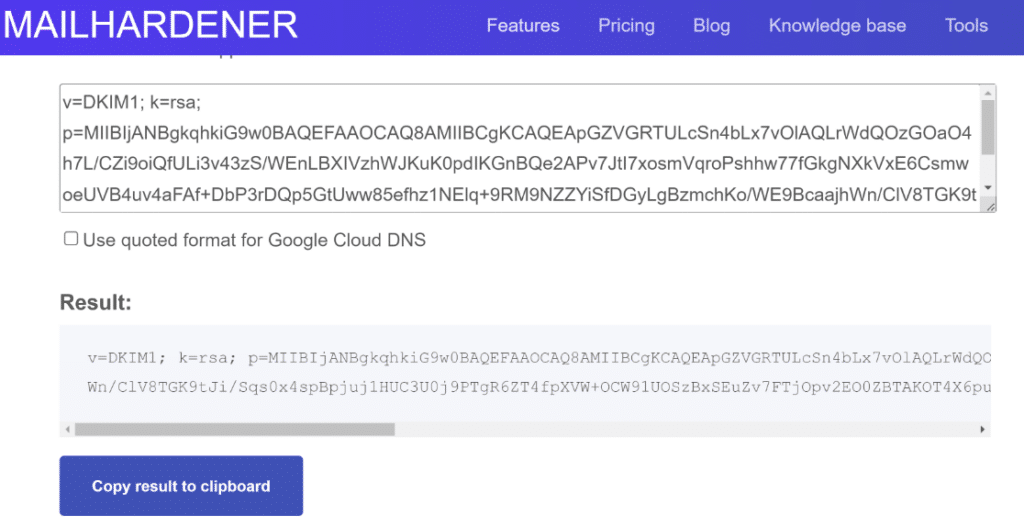
Most DNS providers set a maximum limit of 255 characters for their TXT record field. This isn’t a problem when you have a 1024-bit DKIM key since it can fit within the allowed character limit easily.
However, entering a DKIM value with a 2048-bit key can be a problem. That’s because a 2048-bit key contains more than 255 characters.
The easy workaround to this problem is to split your DKIM value into multiple chunks of 255 characters.
To make this easy, you can use this DNS record splitter tool. Open the tool and simply insert your DKIM value into the textbox. It will then split your record into two lines.
Can’t Access DNS Settings
Sometimes you’ll run into roadblocks when trying to update your DNS records. Maybe you’re locked out of your control panel, or you can’t find the DNS management section at all.
Contact Your Hosting Provider
The easiest solution? Ask your hosting provider or domain registrar to add the DNS records for you. Most support teams handle this request regularly, and they can usually add your records within a few minutes.
Some managed WordPress hosting providers (like WP Engine, Kinsta, or Flywheel) even include DNS configuration as part of their support package.
Use a WHOIS Lookup Tool
Can’t remember where you registered your domain? It happens more often than you’d think, especially if you’ve owned your site for years.
Use a WHOIS lookup tool to find out who manages your domain. Just search for “WHOIS lookup” in Google and enter your domain name.
The results will show your registrar’s name and contact information. From there, you can log in (or reset your password) and access your DNS settings.
FAQs About DNS Email Configuration
What happens if I don’t add DNS records for email authentication?
Your emails will likely end up in spam folders or get blocked entirely. Without SPF, DKIM, and DMARC records, receiving mail servers can’t verify that your domain actually sent the message.
I’ve seen this happen countless times: someone sets up WP Mail SMTP perfectly, but skips the DNS step. Their test emails work, but customer notifications vanish into spam.
How long does it take for DNS changes to take effect after I add them?
DNS changes usually propagate within 15 minutes to 2 hours, but they can take up to 48 hours in rare cases. Think of it like updating a phone book that’s distributed across thousands of locations.
Each server needs time to refresh its copy of your DNS information. You can send a test email through WP Mail SMTP after about 30 minutes to see if everything’s working.
Can I have multiple SPF records on the same domain?
No, you can only have one SPF record per domain. Having multiple SPF records will actually break email authentication entirely. If you need to authorize multiple mail servers, combine them into a single SPF record.
For example, if you’re using SendLayer and also need to authorize your host’s mail server, your SPF record might look like this: v=spf1 include:sendlayer.com include:yourhost.com ~all
Why does my DKIM record say it’s not found even though I added it?
This usually happens because of incorrect formatting or a missing period at the end of the record name. DKIM records need a specific selector prefix (like default._domainkey) before your domain name.
If your mailer tells you to add a record called default._domainkey, make sure you’re entering it exactly as shown. Some DNS managers want just the selector part, while others need the full hostname with your domain included.
Do I need to add DNS records for every email address on my domain?
No, DNS records apply to your entire domain, not individual email addresses. When you add an SPF record for example.com, it covers [email protected], [email protected], and any other address using that domain. You only need to set up SPF, DKIM, and DMARC once per domain.
What’s the difference between DNS records at my host versus my domain registrar?
Your DNS records are managed wherever your nameservers are pointed, not necessarily where you bought the domain.
Here’s what I mean: You might have bought your domain at GoDaddy (your registrar), but if your nameservers point to Bluehost or Cloudflare, that’s where you’ll manage DNS records. The registrar just owns the domain registration itself.
You can check your current nameservers in your domain registrar’s control panel or by using a tool like MXToolbox.
How do I know if my nameservers are pointed to my host or a third party like Cloudflare?
Log into your domain registrar and look for the nameservers section. The nameserver addresses will tell you where DNS is managed.
If you see nameservers like ns1.bluehost.com and ns2.bluehost.com, your host manages DNS. If you see ns1.cloudflare.com or similar, you’re using Cloudflare.
You can also check by going directly to your hosting control panel: if you can edit DNS records in cPanel, your host is managing them.
Next, What Is BIMI (Brand Indicators for Message Identification)?
Have you ever noticed brand logos appearing next to emails in your inbox? That’s BIMI (Brand Indicators for Message Identification) at work.
It’s a growing standard that helps businesses display their verified logos in supported email clients, making it easier for recipients to recognize real messages from trusted sources.
You might be thinking BIMI sounds complicated, but it’s actually quite simple once you know what to do. In this guide, I’ll walk you through everything about BIMI so you can decide if it makes sense for your emails, too.
Ready to fix your emails? Get started today with the best WordPress SMTP plugin. If you don’t have the time to fix your emails, you can get full White Glove Setup assistance as an extra purchase, and there’s a 14-day money-back guarantee for all paid plans.
If this article helped you out, please follow us on Facebook and Twitter for more WordPress tips and tutorials.