Looking for an easy solution on how to create a price calculator for your website to start selling items online?
To assist you in managing your eCommerce needs, all you require is an order form that is user-friendly and automatically calculates prices.
In this article, we’ll guide you through the process of setting up a simple order form with an automated price calculator for your website.
Why Use a Price Calculator for WordPress?
Are you still using simple order forms that don’t have price calculators or payment gateways for your website visitors?
If not, you’re missing out on a key advantage in today’s digital marketplace. Let’s talk about the reasons why:
- Real-Time Estimates: With an automated price calculator on landing pages, potential customers get instant quotes, enhancing their shopping experience.
- Improved Checkout: Integrating payment options helps with checkout optimization, increasing the likelihood of completed sales.
- Professional Appeal: Modern customers expect sophisticated tools. Offering dynamic pricing shows that your business is customer-centric.
- Reduces Cart Abandonment: A transparent pricing structure with easy payment methods helps reduce instances of cart abandonment.
- Saves Time: Automated calculations reduce manual interventions, allowing businesses to focus on core operations and customer service.
That said, let’s now dive into the step-by-step instructions on how you can create an order form with automated price calculation results using WPForms!
How to Create a Price Calculator for Your Website
Calculating the total price with a web calculator using WPForms is extremely simple. All you have to do is follow these simple steps below:
In This Article
Step 1: Install and Activate WPForms Pro
If you’re looking for a form builder plugin that allows you to create contact forms or order forms of all kinds, then look no further than WPForms.
It supports multiple payment gateways, has 2,000+ WordPress form templates, and many premium addons to increase the functionality of your website.
For the purposes of this tutorial, we’ll be using the WPForms Pro version to build a custom calculator and order form in the fastest way possible.
Once you’re ready to proceed, get the WPForms Pro subscription and install the plugin on your WordPress website.
Step 2: Connect WPForms with Stripe
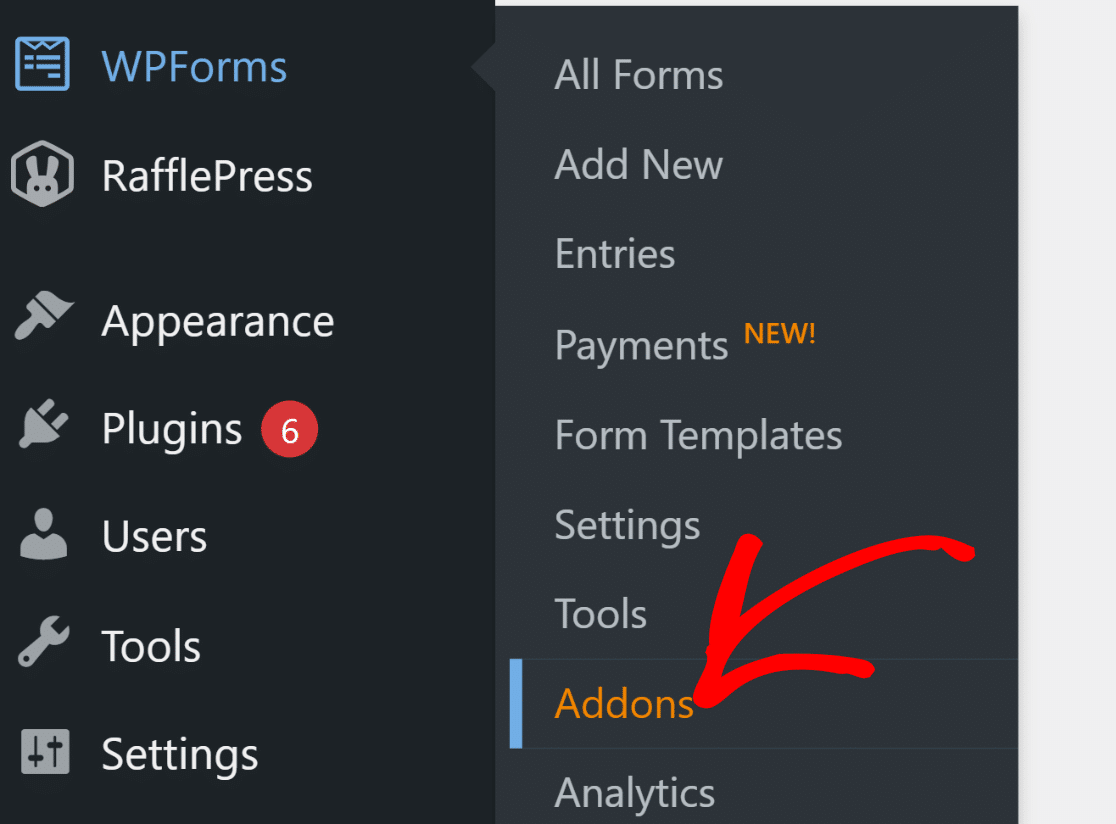
After installing WPForms, you’ll need to get the Stripe Pro addon. From the WordPress admin menu, select WPForms » Addons.
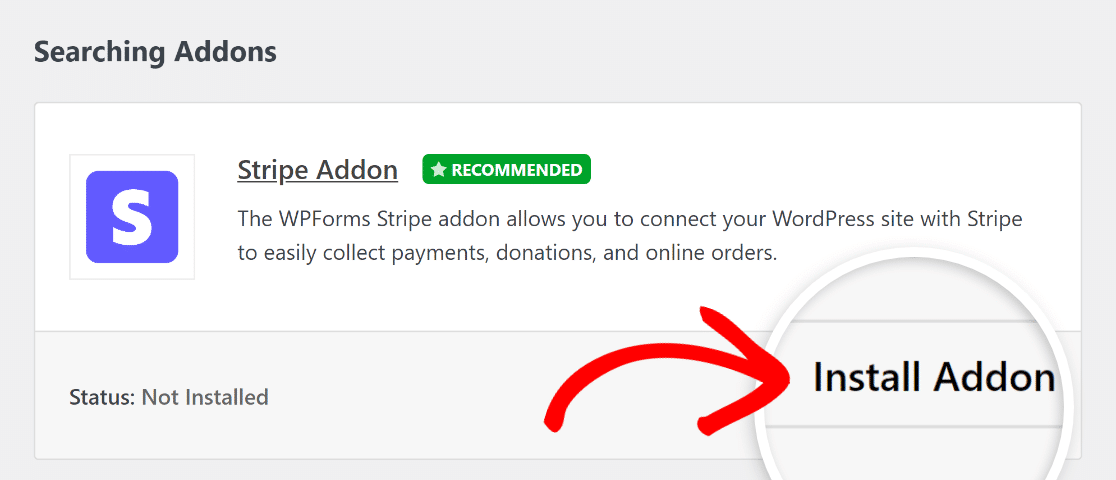
Next, to find the Stripe Pro Addon, simply enter its name in the Search Addons field. After that, click on Install Addon.
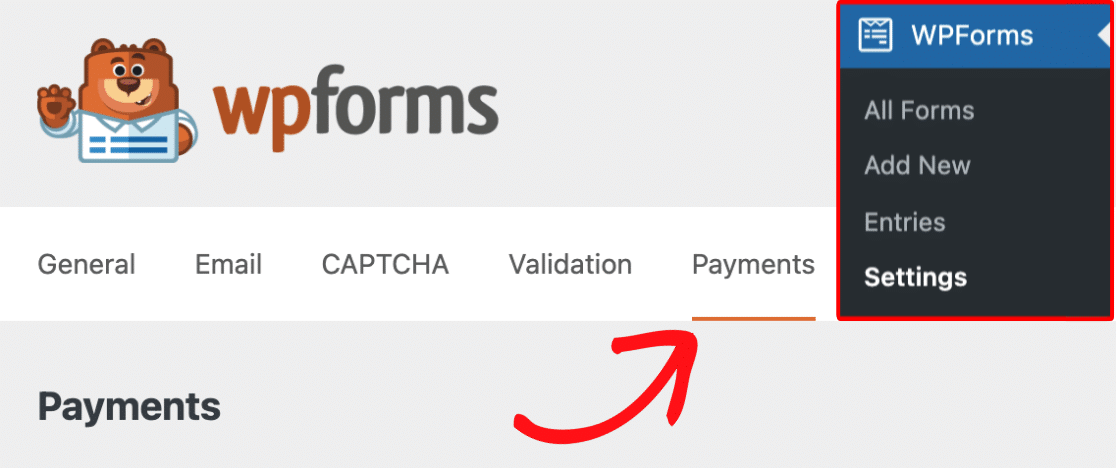
To configure your Stripe payment settings, now you’ll need to navigate to WPForms » Settings and then click on the Payments tab.
To change the currency used on your site, please select the desired currency from the drop-down menu before proceeding.

When you are ready to connect Stripe payments to your platform, simply scroll down and click on the blue Connect with Stripe button.

You’ll now be asked to enter your Stripe credentials to connect WPForms with your Stripe account. Don’t have an account? Create one now!

After finishing the Stripe Connect process, navigate to WPForms » Settings » Payments. You should see a green check mark next to Connection Status.

Excellent job! You’re now all set to create your order form and integrate it with Stripe to start accepting payments in no time.
Step 3: Select an Order Form Template
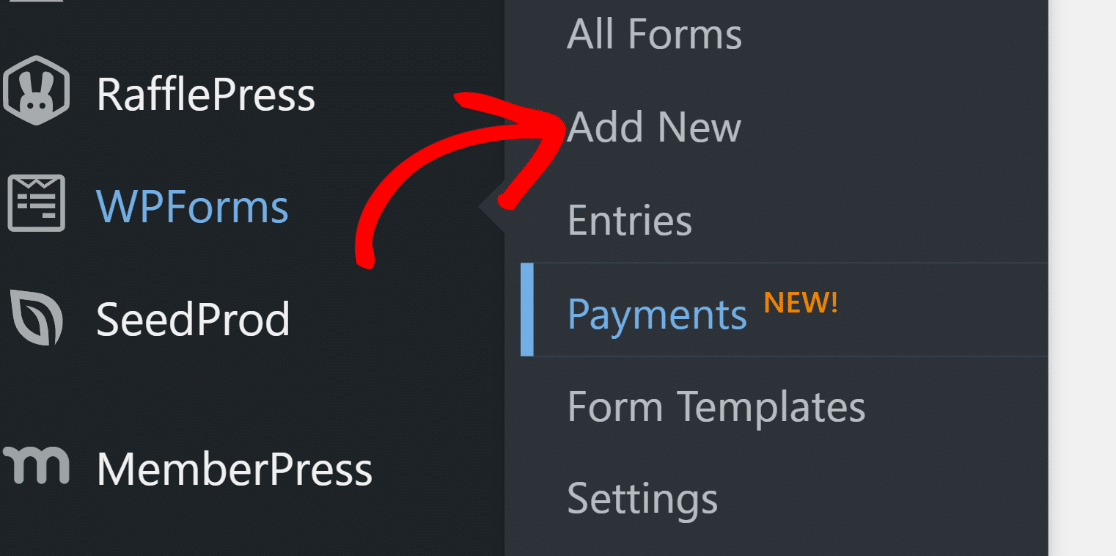
The time has come to create your order form. Click the Add New button after selecting WPForms from your WordPress dashboard.
This will bring you to the next screen. To start, please provide a name for your form and then select a template.
Once you find a suitable template, click the Use Template button. For this tutorial, we’ll select the Billing / Order Form.
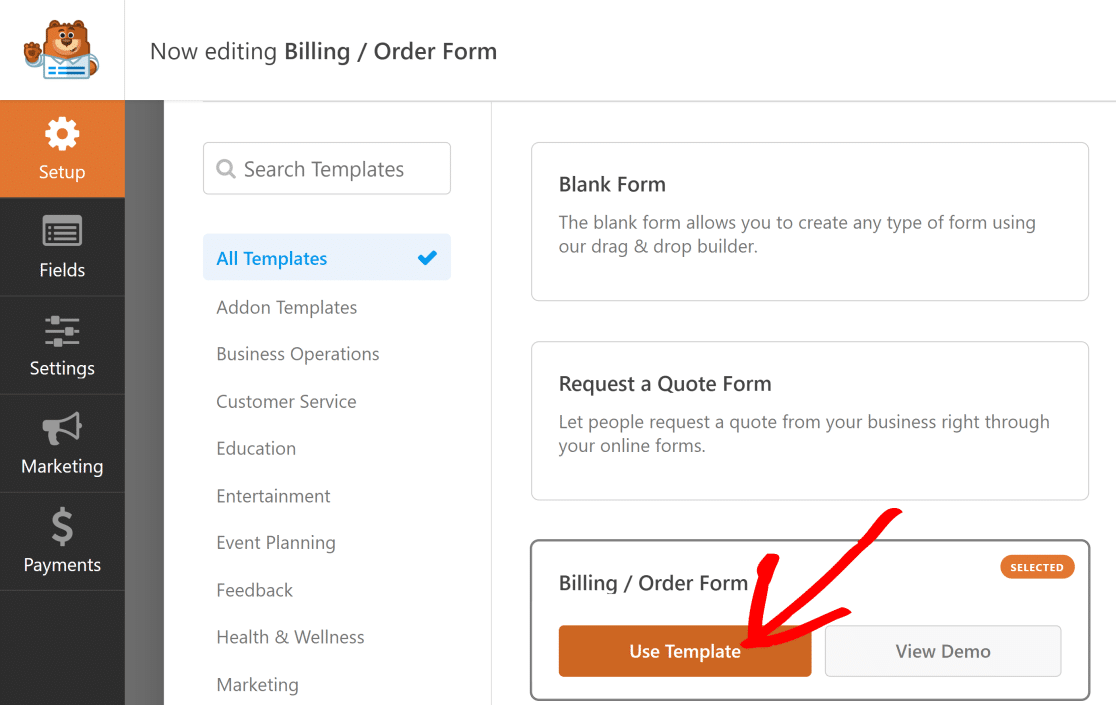
The template comes with a Multiple Items field and a Total field that can be used to figure out how much an order costs in WordPress.
You can modify the template to include different product option fields and incorporate calculations to update the Total Price field.
Customizing the Multiple Items Field
For this tutorial, we started with the standard Multiple Items field and modified it to include a few different kinds of shirts.
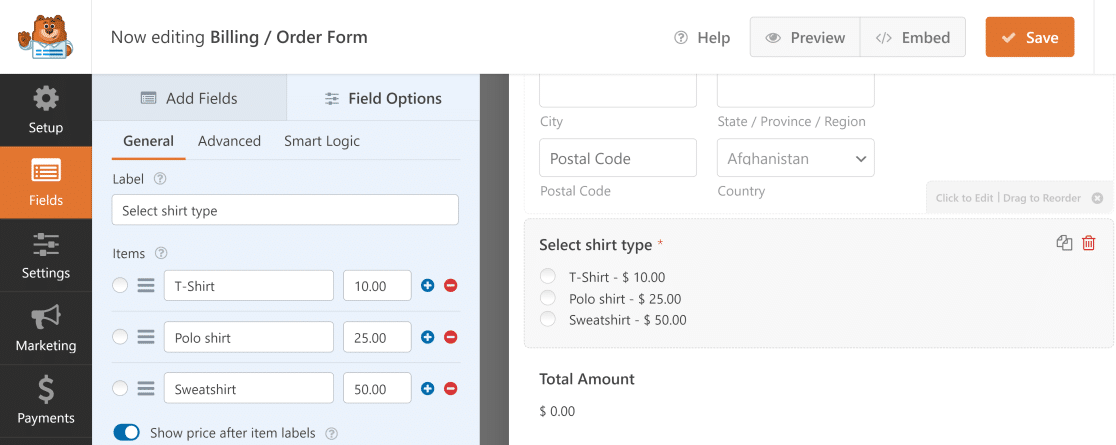
When you click on the Multiple Items field, you can modify its options, just like we did in this example. Here are some useful options:
- Label: This is where you can say what the choices below are about.
- Items: These are the different options and how much they cost.
- Show price after item labels: If you want to show the final price of each item separately, check this box.
Now, when a user chooses a product on this form, the Total Amount field calculation changes immediately to match the price of that item.

Supporting Multiple Product Selection
Let’s say instead of giving users the option to select only one product, you want them to select multiple products. That can be made possible too!
For example, if a user wishes to purchase a T-shirt and a sweatshirt, you can provide them with the option to order both items using a single form.
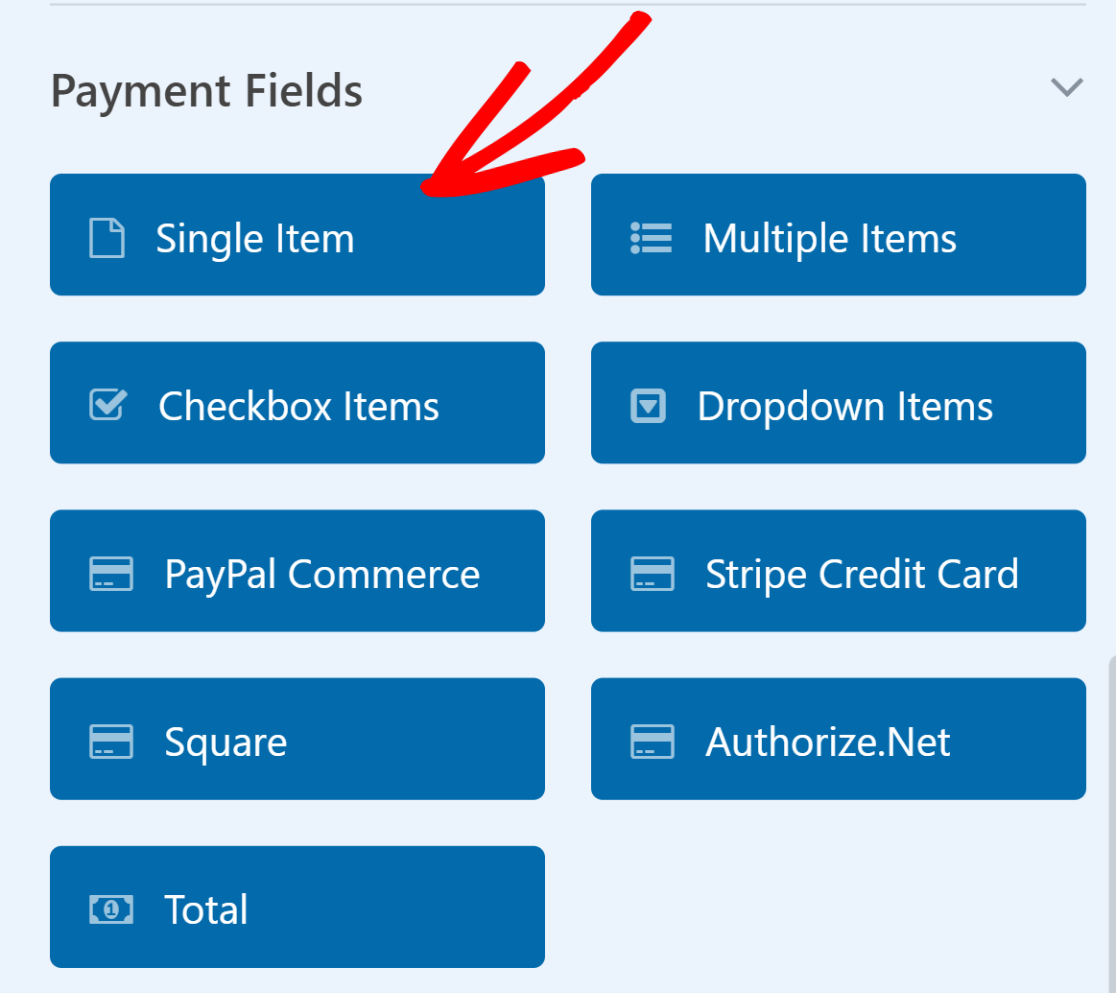
To do this, navigate to the Payment Fields menu and utilize the Checkbox Items field. Within this field, you can include your product options.
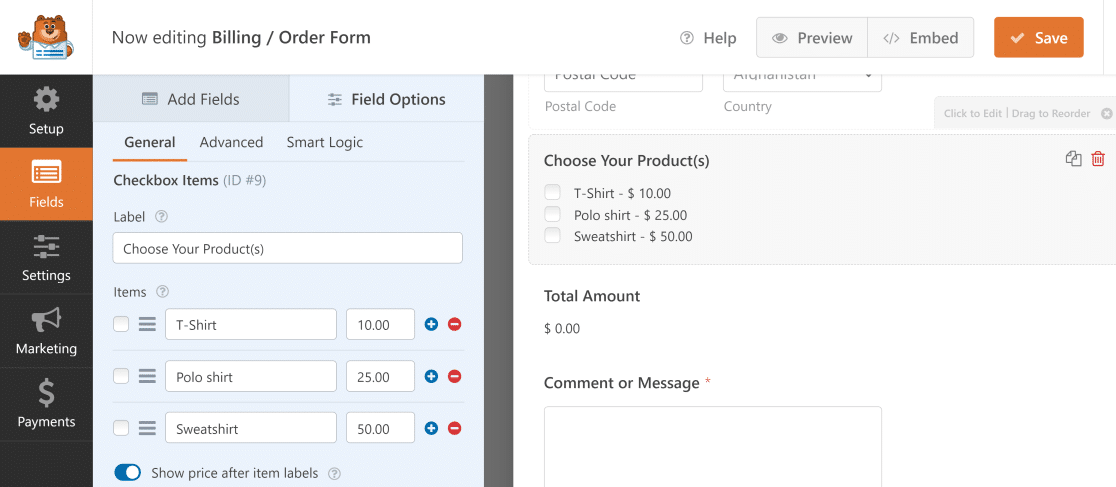
Now, if a user selects multiple products, the Total Amount field will automatically display the combined amount of the selected items.

Adding a Stripe Credit Card Field
The most important thing about an order form is to provide customers with an efficient and easy way to make payments online.
Previously, we enabled the Stripe Pro addon and connected Stripe with WPForms to start accepting payments.
To enable payments for your order form, under the Payment Fields, select the Stripe Credit Card field.
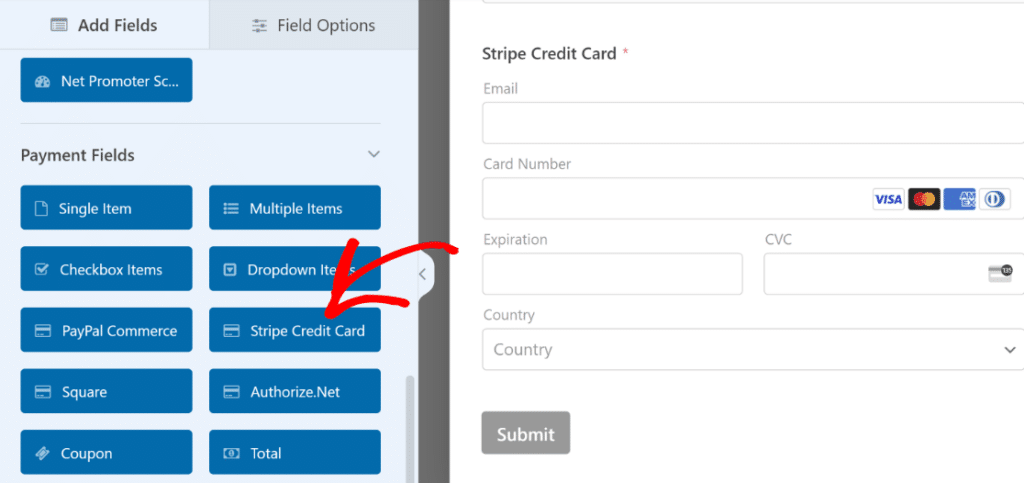
After that, go to the Payments tab and open up the Stripe settings. Then, toggle ON the Enable one-time payments option.
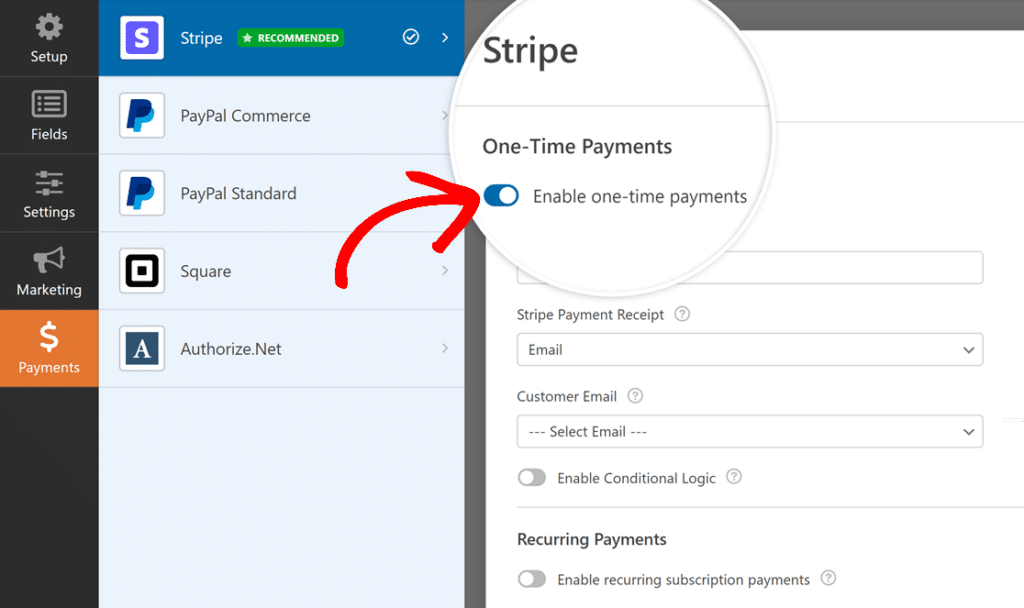
You’re all set now to let your customers buy different products, get the total price for their orders, and make payments through a single form!
Step 4: Use Calculations for Advanced Totals (Optional)
The Calculations Addon by WPForms can make things even more interesting by allowing you to change total price calculations.
It’s very easy to add the Calculations Addon to your WordPress site. From your WordPress dashboard, go to WPForms » Addons.

Enter “Calculations” in the Search Addons field. Then, click on the Install Addon button. After that, click on the Activate button.
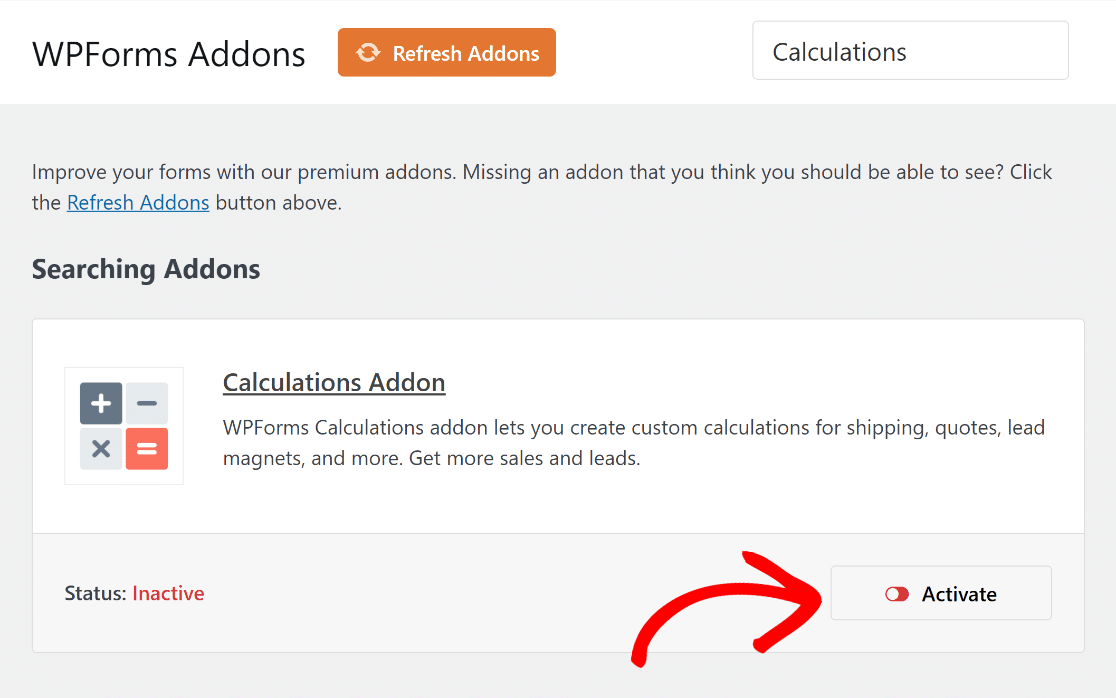
With the Calculations Addon installed and activated, you can now create more interactive, complex formulas to change the total price on your form.
For example, you can add a field for quantity or insert a standard tax deduction, depending on the type of calculator you need.
Adding a Quantity Field
To add a quantity field to your form, simply drag-and-drop a Dropdown field onto the form preview located on the right side.
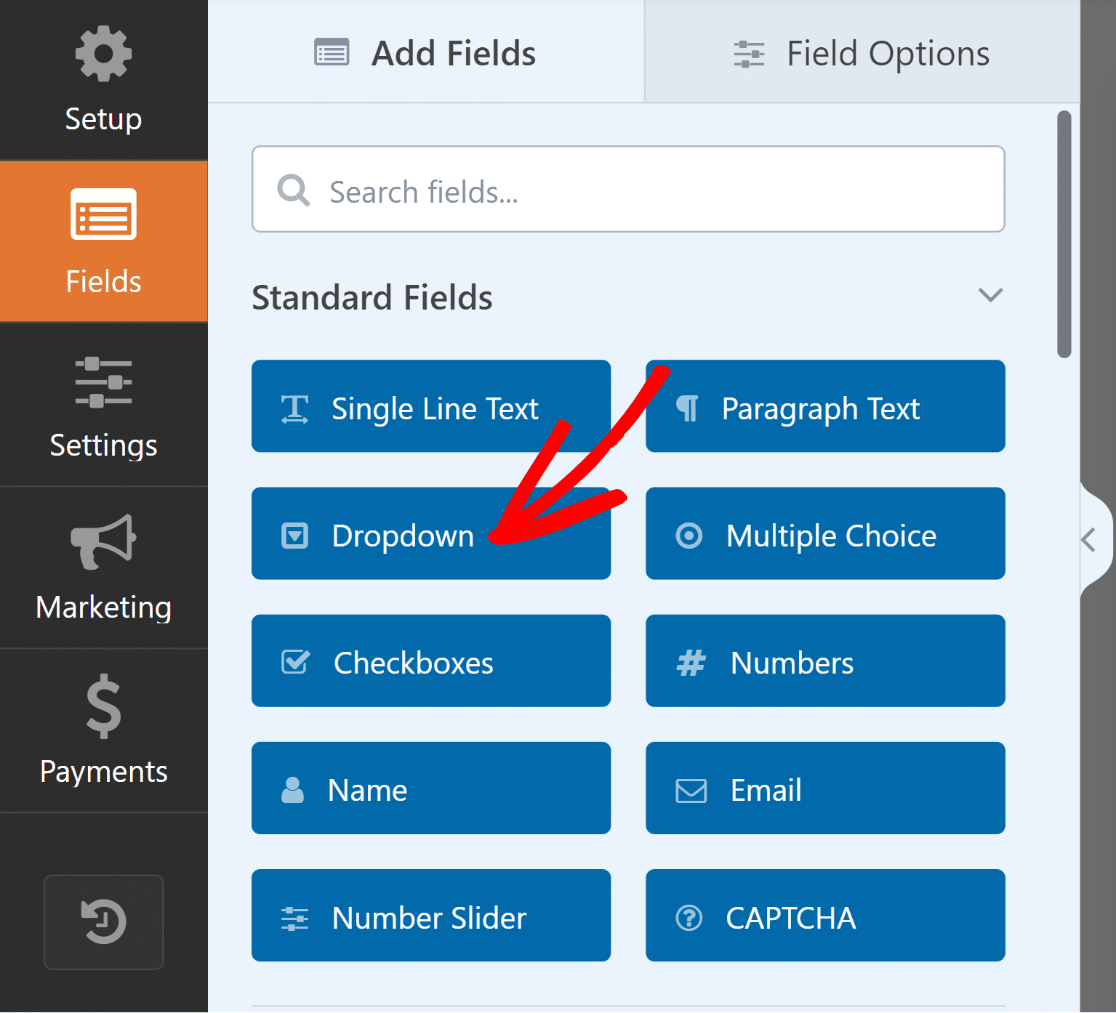
Now, navigate to the Field Options of the Dropdown field you just added and proceed to modify the Label to “Quantity.”
Then, input the available quantities into the Choices section and ensure that the field is marked as Required.
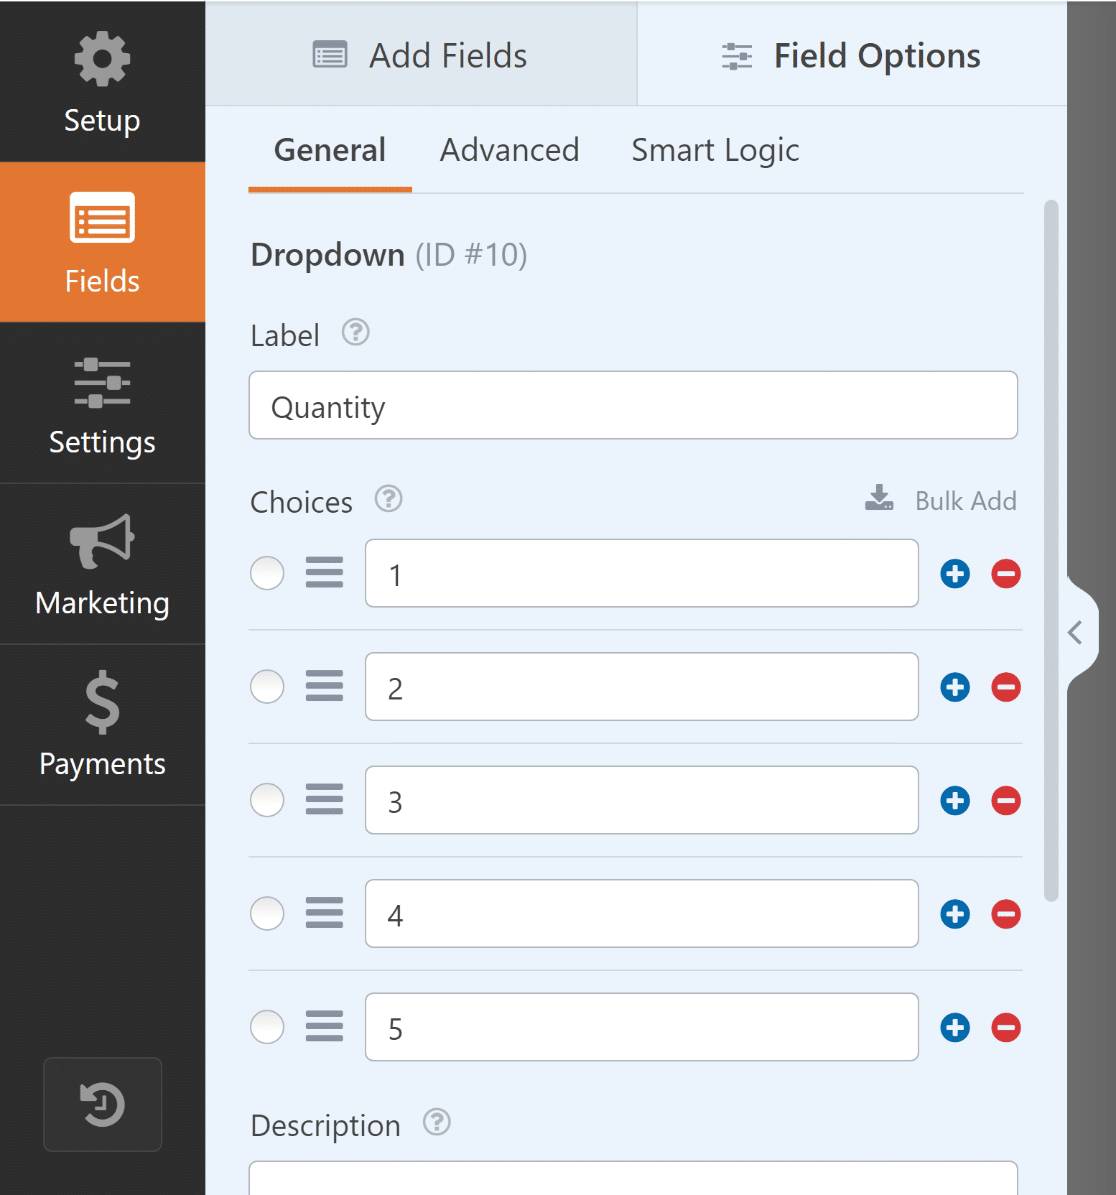
Once that’s done, choose the Single Item field and add it to your form either by dragging and dropping it or by clicking on it.
You can now change the Label for the Single Item box to something like “Total Price.” After that, go to the Advanced tab and turn on Enable Calculations.
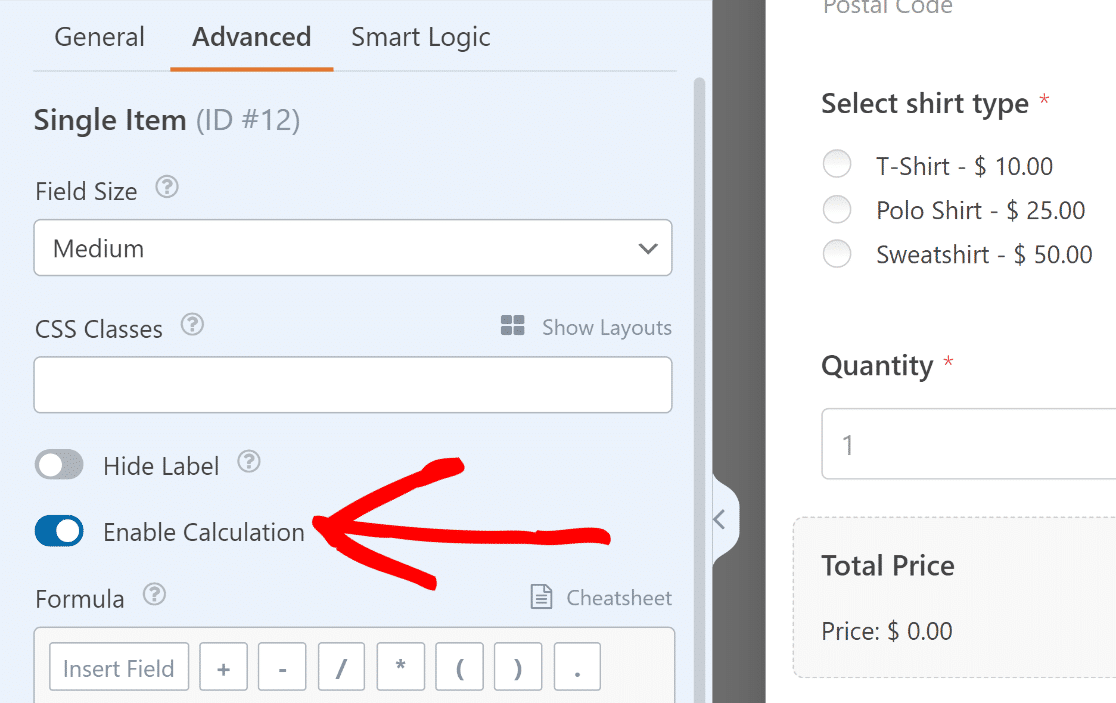
In the Formula box, you can easily connect the Multiple Items field to the quantity Dropdown field by using a simple multiplication.
$FX_amount * $FX
- $FX: Value of the field with ID #X (#1).
- $FX_amount: The amount value of the payment field with ID #X.
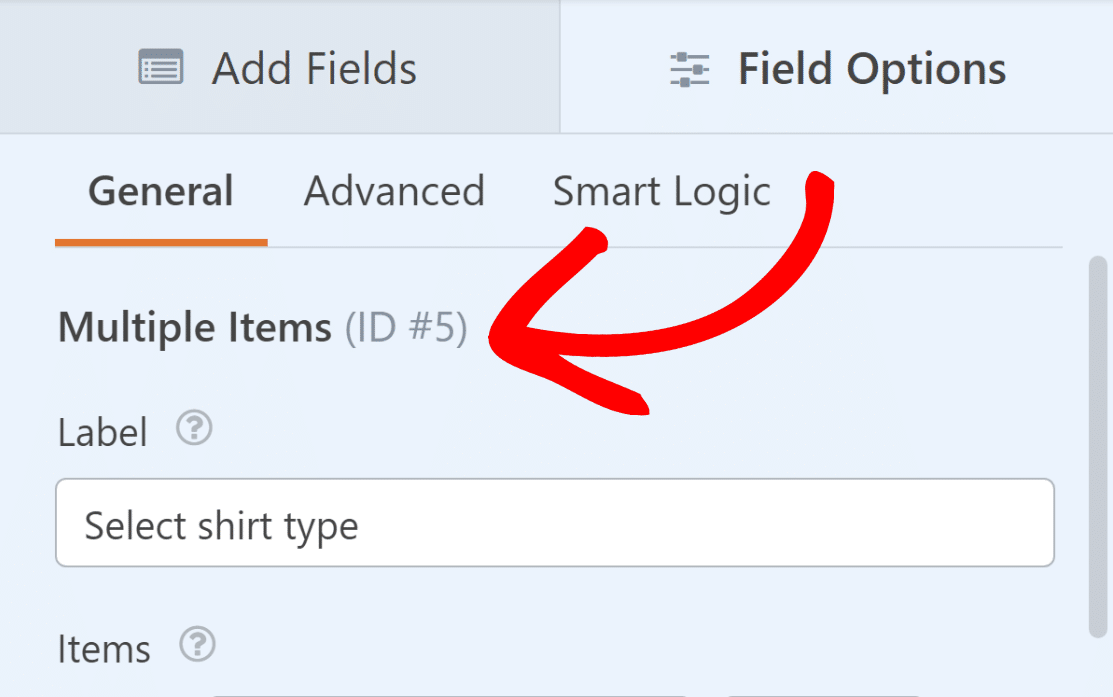
Now open the Multiple Items field and write down the Field ID. This can be found in their Field Options, right below the General tab.
Following this, repeat the same process for the Dropdown field labeled as “Quantity”. This step is crucial for the next part.
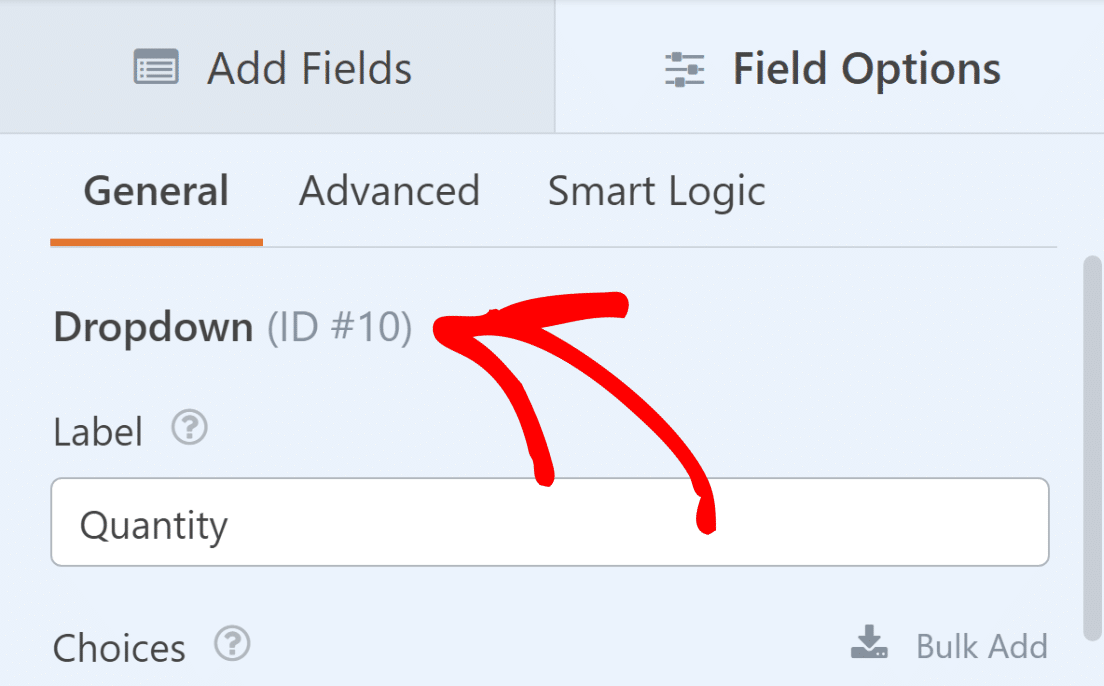
Now, we will combine the IDs and add them to our (product price times quantity) formula. $FX_amount * $FX formula will now become $F5_amount * $F10
You’re now ready to enter the calculation $F5_amount * $F10 into the Formula box of the Single Item “Total Price” field. Once done, click on Validate Formula.
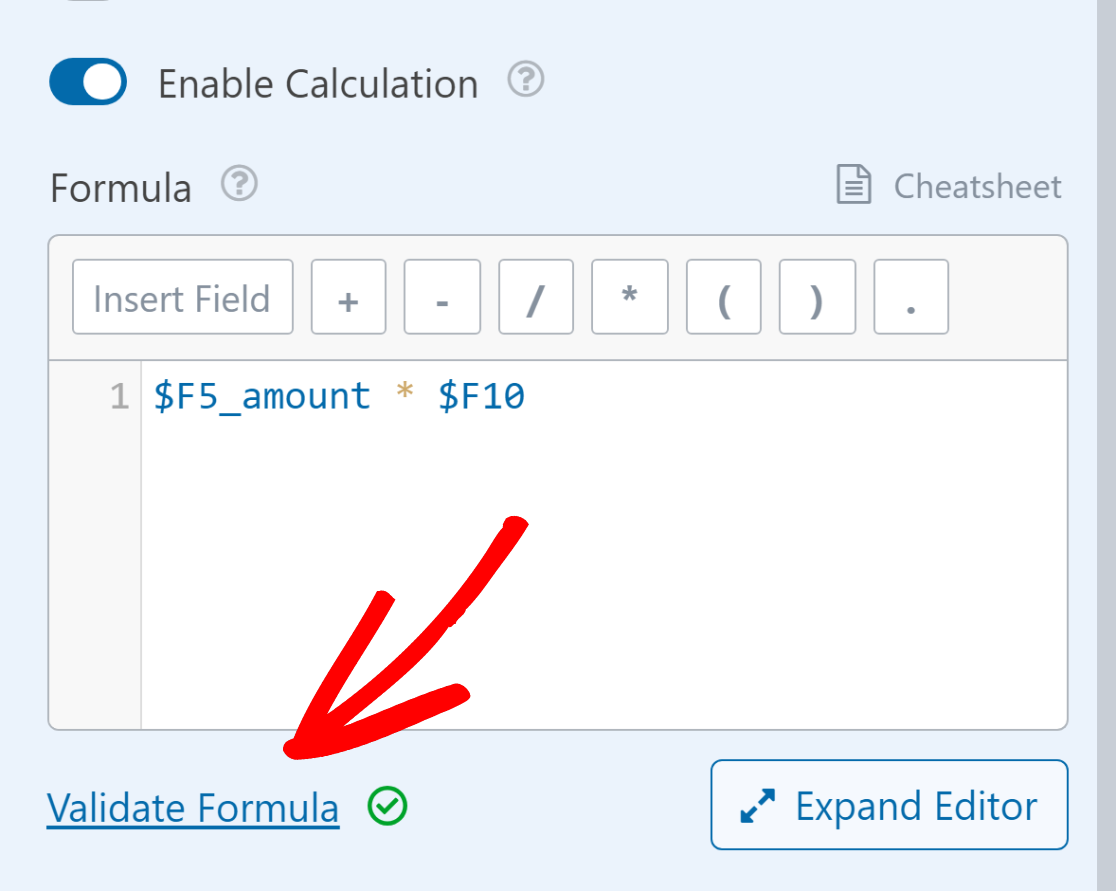
Now, whenever a user chooses a product and adds a quantity, the Total Price will be automatically calculated.

Adding a Standard Tax Deduction
When considering taxes, you usually calculate them by multiplying the subtotal (product price multiplied by quantity) with the applicable tax rate.
As mentioned earlier, the formula for calculating the subtotal in our use case is the product price multiplied by the quantity.
$F5_amount * $F10
Let’s assume that the tax amount is calculated as 10% of the subtotal. The formula for calculating a standard tax is as follows:
0.10 * ($F5_amount * $F10)
To calculate the grand total, which includes the tax, you need to add the subtotal and the tax together. The equation will appear as follows:
($F5_amount * $F10) + (0.10 * ($F5_amount * $F10))
You can add this wherever you choose to display the final total. For example, we’ll use the formula on the Single Item field we’ve labeled “Total Price + Tax.”
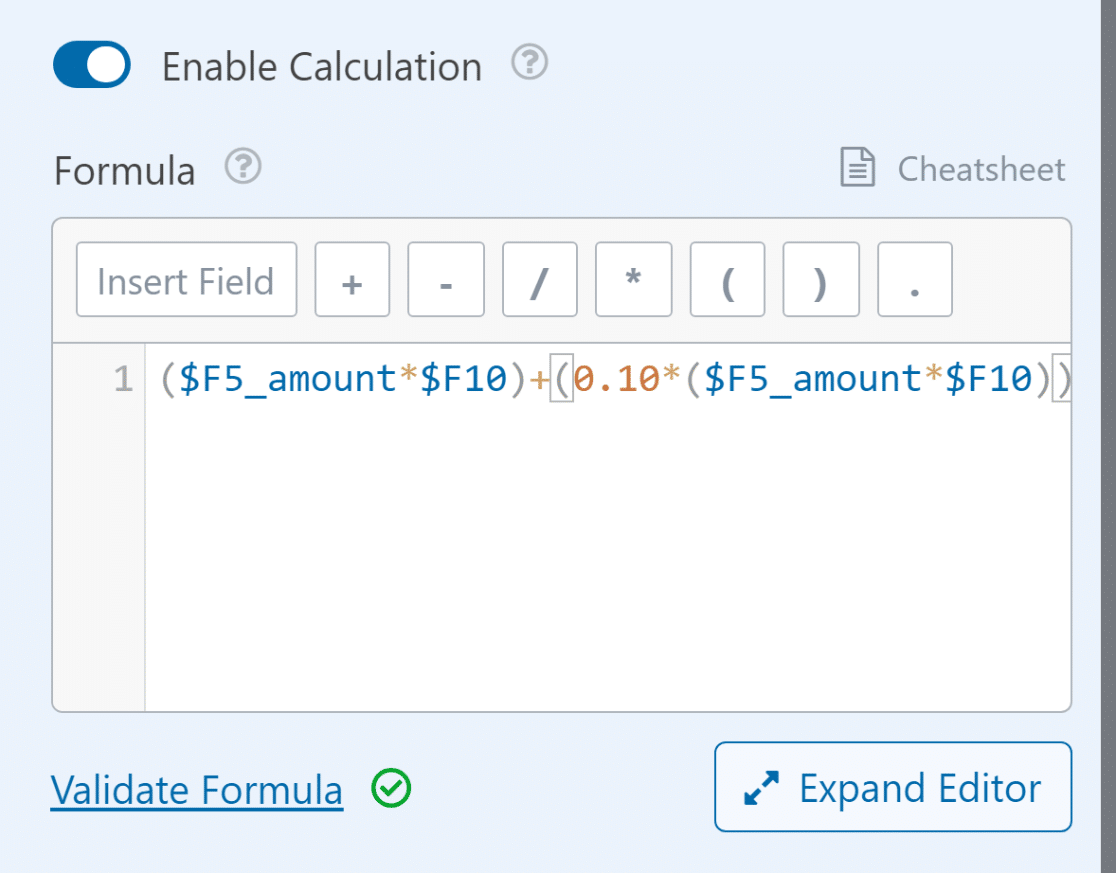
It is important to remember that when adding a formula, you must insert the correct Field ID in order for the calculations to work accurately.
Step 5: Publish Your Billing / Order Form
One of the best features of WPForms is the ability to easily embed your form onto a new page without the need to modify any code.
After you have customized your order form to include various product options and automatic amount calculation, click on the Save button.
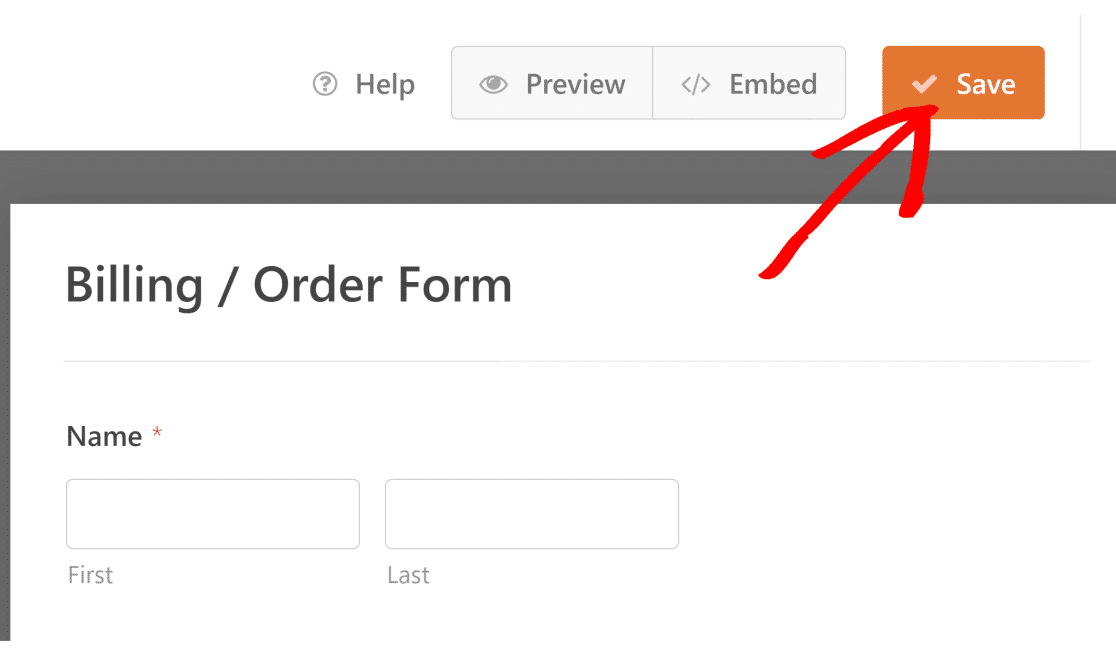
To proceed, please click on the Embed button located next to the Save option. You can now choose to Create New Page or Select Existing Page.

Afterward, you will be prompted to provide a name for your page. Once you have finished, please click on the Let’s Go button.

Now, WPForms will automatically take you to the WordPress editor, where you will find your form already embedded within the new page.
To make your order form and online calculator with the WPForms calculations live, simply click on the Publish button. You’re all set now!
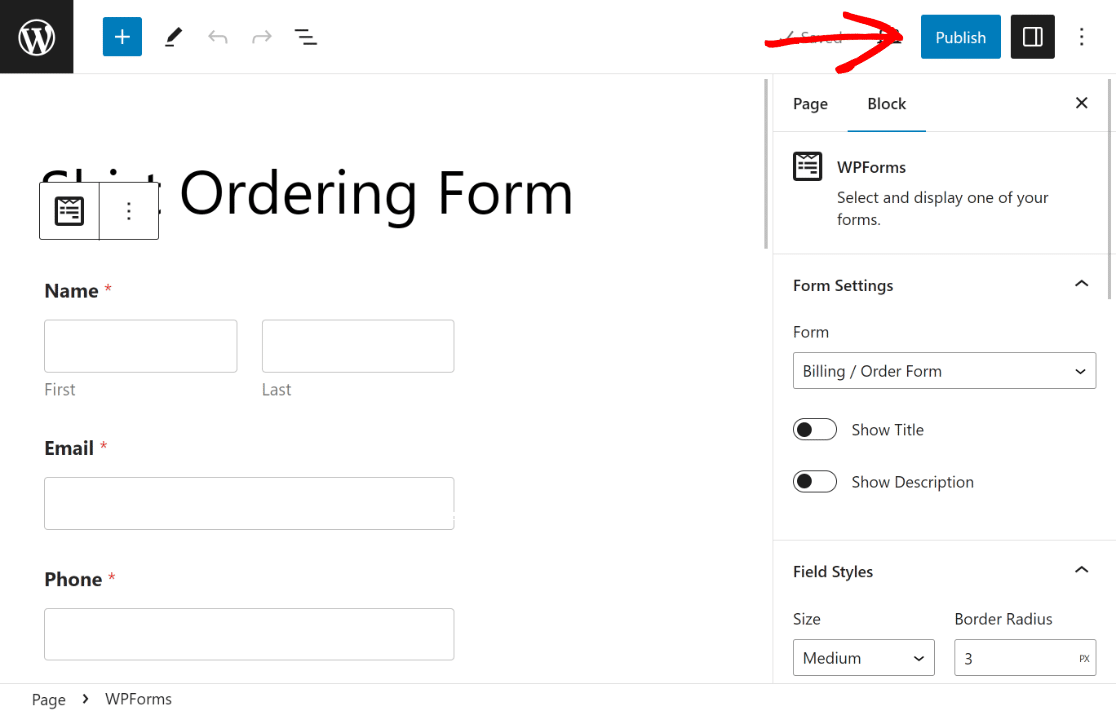
To ensure there are no issues, it is important to test the embedded form after publishing and confirm that it functions as intended.

FAQs about Creating a Price Calculator for Your Website
Calculation forms are a popular topic among our readers. Here are answers to several frequently asked questions about it to increase your know how:
How do I make a calculator for my website?
To create a simple price calculator for your site, opt for WordPress plugins or online tools tailored for this purpose. WPForms Pro with the Calculations Addon is a great option, as it facilitates a ton of advanced formulas and comes with a huge list of pre-made calculation templates as well!
How do I create a price calculator in WordPress?
Creating a price calculator in WordPress is straightforward with the right tools. The WPForms Pro is a calculator builder and form plugin that lets you generate dynamic price calculators effortlessly. Just install, set up your fields, and activate calculations by checking out this Calculation Formula Cheatsheet.
How do you create a price formula?
A price formula is used for a total cost calculator. Typically, it accounts for the base price, added value, standard tax, and potential discounts or markups. With WPForms Pro and its Calculations Addon, you can input number sliders, custom formulas, and more ensuring accurate and real-time price calculations for users.
Next, Choose the Right SMTP Plugin to Improve Email Deliverability for Your Website
After users purchase a product by filling out your order form, it’s also important to send them a confirmation email for lead generation. To do this, it’s vital you choose the right SMTP plugin. So, check out this comparison of WP Mail SMTP Lite vs Pro.
Ready to fix your emails? Get started today with the best WordPress SMTP plugin. If you don’t have the time to fix your emails, you can get full White Glove Setup assistance as an extra purchase, and there’s a 14-day money-back guarantee for all paid plans.
If this article helped you out, please follow us on Facebook and Twitter for more WordPress tips and tutorials.


