
AI Summary
WP Mail SMTP lets you send WordPress emails from a Gmail alias. This is useful if you want different plugins to send from different addresses, or if you’d rather keep your main Gmail address out of your outgoing notifications.
Sending from a Gmail alias works as an alternative to setting up a separate transactional email service like Outlook or Mailgun.
With WP Mail SMTP, you can send emails from:
- Google Workspace (G-Suite) aliases
- Regular Gmail addresses (
@gmail.comor@googlemail.com) - Gmail aliases at a custom domain name
The steps below walk through each part of the setup.
How to Send Emails From a Gmail Alias in WP Mail SMTP
Step 1: Install the WP Mail SMTP Plugin
First, let’s install WP Mail SMTP.
Head to your WP Mail SMTP account and open up the Downloads tab. Click the orange button to download the zip file.

Now you’ll want to upload the plugin to your WordPress website.

Need help? Check out this guide on how to install a plugin in WordPress.
When you Activate the plugin, the Setup Wizard will open in your browser. Pause the setup process here and open up a new tab to continue setting up your Gmail or Google Workspace alias.
Step 2: Create a New Email Alias (Google Workspace Only)
If you want to send WordPress emails from Gmail or a Google Workspace alias, we’ll show you how to set it up now. If you’re using regular Gmail, you can skip this section and move on to Step 3.
To complete this section, you’ll need to be a Google Workspace administrator for your Google Workspace organization.
Start by opening up the Google Workspace Admin console. It’s easiest to do this from the Gmail interface for your ‘main’ Google Workspace email address: look to the toolbar across the top and click the gear icon.

Next, click Manage this organization.

You’ll see the Google Admin console open up.
Find the Users section here: it’s usually right on the homepage, but if it’s not, you can use the search bar to find it.
Click Create an alternative email address (email alias) to make your new alias.

Next, you’ll be prompted to type in the username for the Google Workspace account you want to add the alias to.

When you’ve selected the account, click Proceed. You’ll be asked to type in the first part of the email and select the domain.

Once you’ve completed the setup steps, your new alias will be confirmed. You can use the pencil icon to tweak the settings here if you need to.

Now we’re done, you can close the Google Workspace Admin console.
Next, we need to add your alias as a From address in Gmail.
Step 3: Add Your New Alias as a From Address in Gmail SMTP
Next, we’re going to set up your Gmail alias as a From address in Gmail.
It’s important to complete this step so that WP Mail SMTP can ‘see’ the alias in WordPress.
To start, you’ll want to log in to your Gmail account for the main Gmail or Google Workspace account you’re using. Use your web browser so you can access all of the settings.
Then click the gear icon to open up the Quick settings panel.
From the panel, click the See all settings button.

Next, from the tabs across the top, click the Accounts tab. In Gmail, this is labeled Accounts and import.

Scroll down to the Send mail as section. You should see your primary address here.
Let’s click Add another email address.

A popup will open up so you can type in the From Name and email address that you want to add. If you just created a Google Workspace alias, type in the details here.
Take note of the Treat as an alias checkbox – it should be already checked.
Then click Next Step to continue setting up your Gmail SMTP.

If you’re adding a custom domain address (like [email protected]), you’ll be asked for SMTP credentials next. These are your mail host’s SMTP server details, separate from your WP Mail SMTP plugin settings. You won’t see this prompt for a Google Workspace or standard Gmail address.

Next, Google will ask you to verify your email address for Gmail SMTP configuration.
When you click the Send Verification button, Google will send a confirmation email to the new From address.

Follow the steps in that email to confirm you want to use the address as an alternate From address.
Once that’s done, you’ll see your new From address in your Gmail settings.

Now you have 2 different From addresses in Gmail, and you can use both of them in WP Mail SMTP.
If you have multiple aliases, repeat these steps for each one.
Let’s switch over to your WordPress site to complete the setup.
Step 4: Select Your New Alias in WP Mail SMTP
Now you’ve added your new alias as a From address in Gmail, it’ll appear in WP Mail SMTP automatically.
If you’re new to WP Mail SMTP, let’s first look at how to select an alias in the Setup Wizard. Then, we’ll show you how to change this setting if Gmail is already set up on your website.
Setting Up WP Mail SMTP With the Wizard
If you haven’t run the setup wizard yet, you can go ahead and pick that up now. You’ll want to follow our documentation on how to set up the Gmail mailer in WP Mail SMTP.
You can can now choose either your primary address or your alias as the primary From Email in the WP Mail SMTP plugin settings.
The primary From address will be used for all outgoing email if you check the Force From Email setting.
Complete the Wizard and send a test email to confirm your alias is working.
Changing Your Existing Gmail Settings
If you’ve already set up WP Mail SMTP in WordPress, you can easily change the primary From Address to your new Gmail alias.
You’ll find the setting on the plugin Settings page.

Scroll down to the Mail section and enter your primary alias as the From Email.
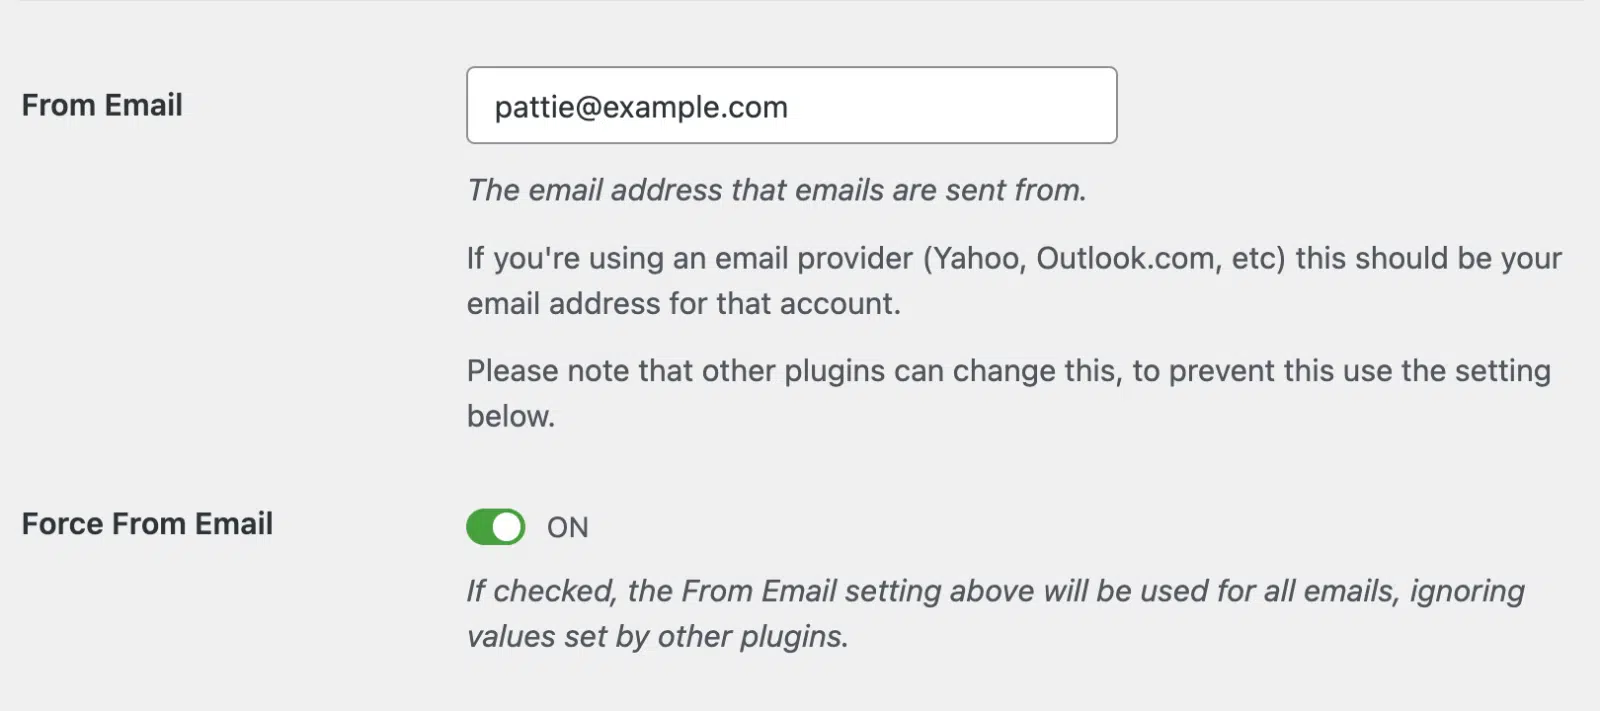
As we said before, the email you select here will be the primary From address. If you check the Force From Email setting, all of the plugins on your site will use it.
And that’s it! Now you’ve added your aliases in WP Mail SMTP.
Step 5: Using Multiple Aliases With Different Plugins
WP Mail SMTP lets you use different Gmail or Google Workspace aliases on different parts of your site.
For example, you might want to send your contact form notifications with a From Address of [email protected], and your WooCommerce emails with a From Address of [email protected].
This is a practical way to match each plugin or contact form to a specific mailbox in your Google Workspace account.
To use more than 1 alias, you’ll want to make sure that the Force From Email checkbox is deselected in your WP Mail SMTP settings.
Now you can use any of your aliases in WordPress and your emails will always be authenticated.
FAQ About Gmail Aliases in WordPress
Here are some of the common questions we get about using Gmail aliases in WordPress.
How Do I Link My WordPress Email to Gmail SMTP Server?
You can send WordPress emails from Gmail or Google Workspace with WP Mail SMTP.
When you set up a WordPress website, most of the emails it generates are sent via your web hosting server. This method doesn’t add any authentication, so the mail servers receiving those emails often discard them or file them in the Junk Mail folder.
To fix this, WP Mail SMTP lets you set up a Google email alias in WordPress, so you can send messages from your Google account.
WP Mail SMTP also lets you use more than 1 Gmail alias in WordPress. So you can:
- Send emails from an alias instead of your primary Gmail or Google Workspace address.
- Use different aliases for different WordPress plugins or contact forms.
Can I Use a Domain Alias as a From Address?
Yes, you can.
A domain alias is a secondary domain that’s added to your Google Workspace. When you add the secondary domain, all of the email addresses at the primary domain get created at the domain alias as well. So there’s no need to go through Step 2 of this tutorial.
Instead, start at Step 3 to add your domain alias email address as a From address in the Gmail web interface. You’ll then be able to select it as a From address in WP Mail SMTP.
Why Is WP Mail SMTP Using the Wrong Gmail Alias?
The email address in WP Mail SMTP must exactly match the alias as it appears in Gmail’s Send mail as settings. If there’s a mismatch, WP Mail SMTP falls back to your primary Gmail address.
This is Gmail’s behavior, not a WP Mail SMTP bug. Go to Gmail Settings > Accounts and import > Send mail as and confirm the alias is listed and verified. Then make sure the From Email field in WP Mail SMTP uses the identical address.
Do I Need to Change My DNS Records?
Yes, if you’re sending from a custom domain through Google Workspace or Gmail, you need SPF, DKIM, and DMARC records in place.
SPF tells receiving mail servers that Google is authorized to send mail from your domain. DKIM adds a cryptographic signature to each outgoing message. DMARC tells receiving servers what to do if a message fails SPF or DKIM checks.
If you’re using Google Workspace, Google generates your DKIM key automatically. You activate it in the Google Admin console under Gmail settings, then add the record to your DNS.
Getting these records right has become more important. Since November 2025, Gmail permanently rejects unauthenticated mail from bulk senders with a 550 error, rather than temporarily deferring it. Proper authentication protects your deliverability even if you’re not sending in volume.
If you’re sending from an address ending in @gmail.com, you don’t need to change any DNS records. You can ignore the warnings in WP Mail SMTP.
Why Are My WordPress Emails Not Going to Gmail Alias?
Gmail doesn’t route messages sent from your primary account to your own alias inbox. This is a Gmail-side limitation, not a plugin issue. The message is delivered normally, but you’ll find it in the Sent folder of your primary Gmail account rather than in the alias inbox.
Next, Fix Gmail Warning Messages On Your Emails
Are you seeing warning messages in Gmail when you receive emails from WordPress?

These warnings aren’t usually serious, but they can be worrying for you and your visitors. Check out this guide to fixing ‘be careful with this message’ warnings in Gmail.
Ready to fix your emails? Get started today with the best WordPress SMTP plugin. If you don’t have the time to fix your emails, you can get full White Glove Setup assistance as an extra purchase, and there’s a 14-day money-back guarantee for all paid plans.
If this article helped you out, please follow us on Facebook and Twitter for more WordPress tips and tutorials.