
AI Summary
Wondering if your SMTP connection is actually working? Many WordPress users struggle with email delivery issues and need a reliable way to verify their setup.
Without proper testing, you might think your emails are sending fine when they’re actually failing silently. This can lead to missed notifications, lost sales, and frustrated users.
The good news is that testing your SMTP connection is straightforward with the right tools. WP Mail SMTP includes a built-in Email Test tool, but this guide explains how to use alternatives too.
Test Your SMTP Connection Now!
Method 1: Use WP Mail SMTP’s Built-In Tool (Recommended)
I always recommend starting with WP Mail SMTP’s built-in test tool because it makes things very simple. You don’t need to mess with command lines or install extra software.
To get started, navigate to WP Mail SMTP » Tools in your WordPress dashboard. You’ll see several tabs at the top of the page. Click on the Email Test tab.
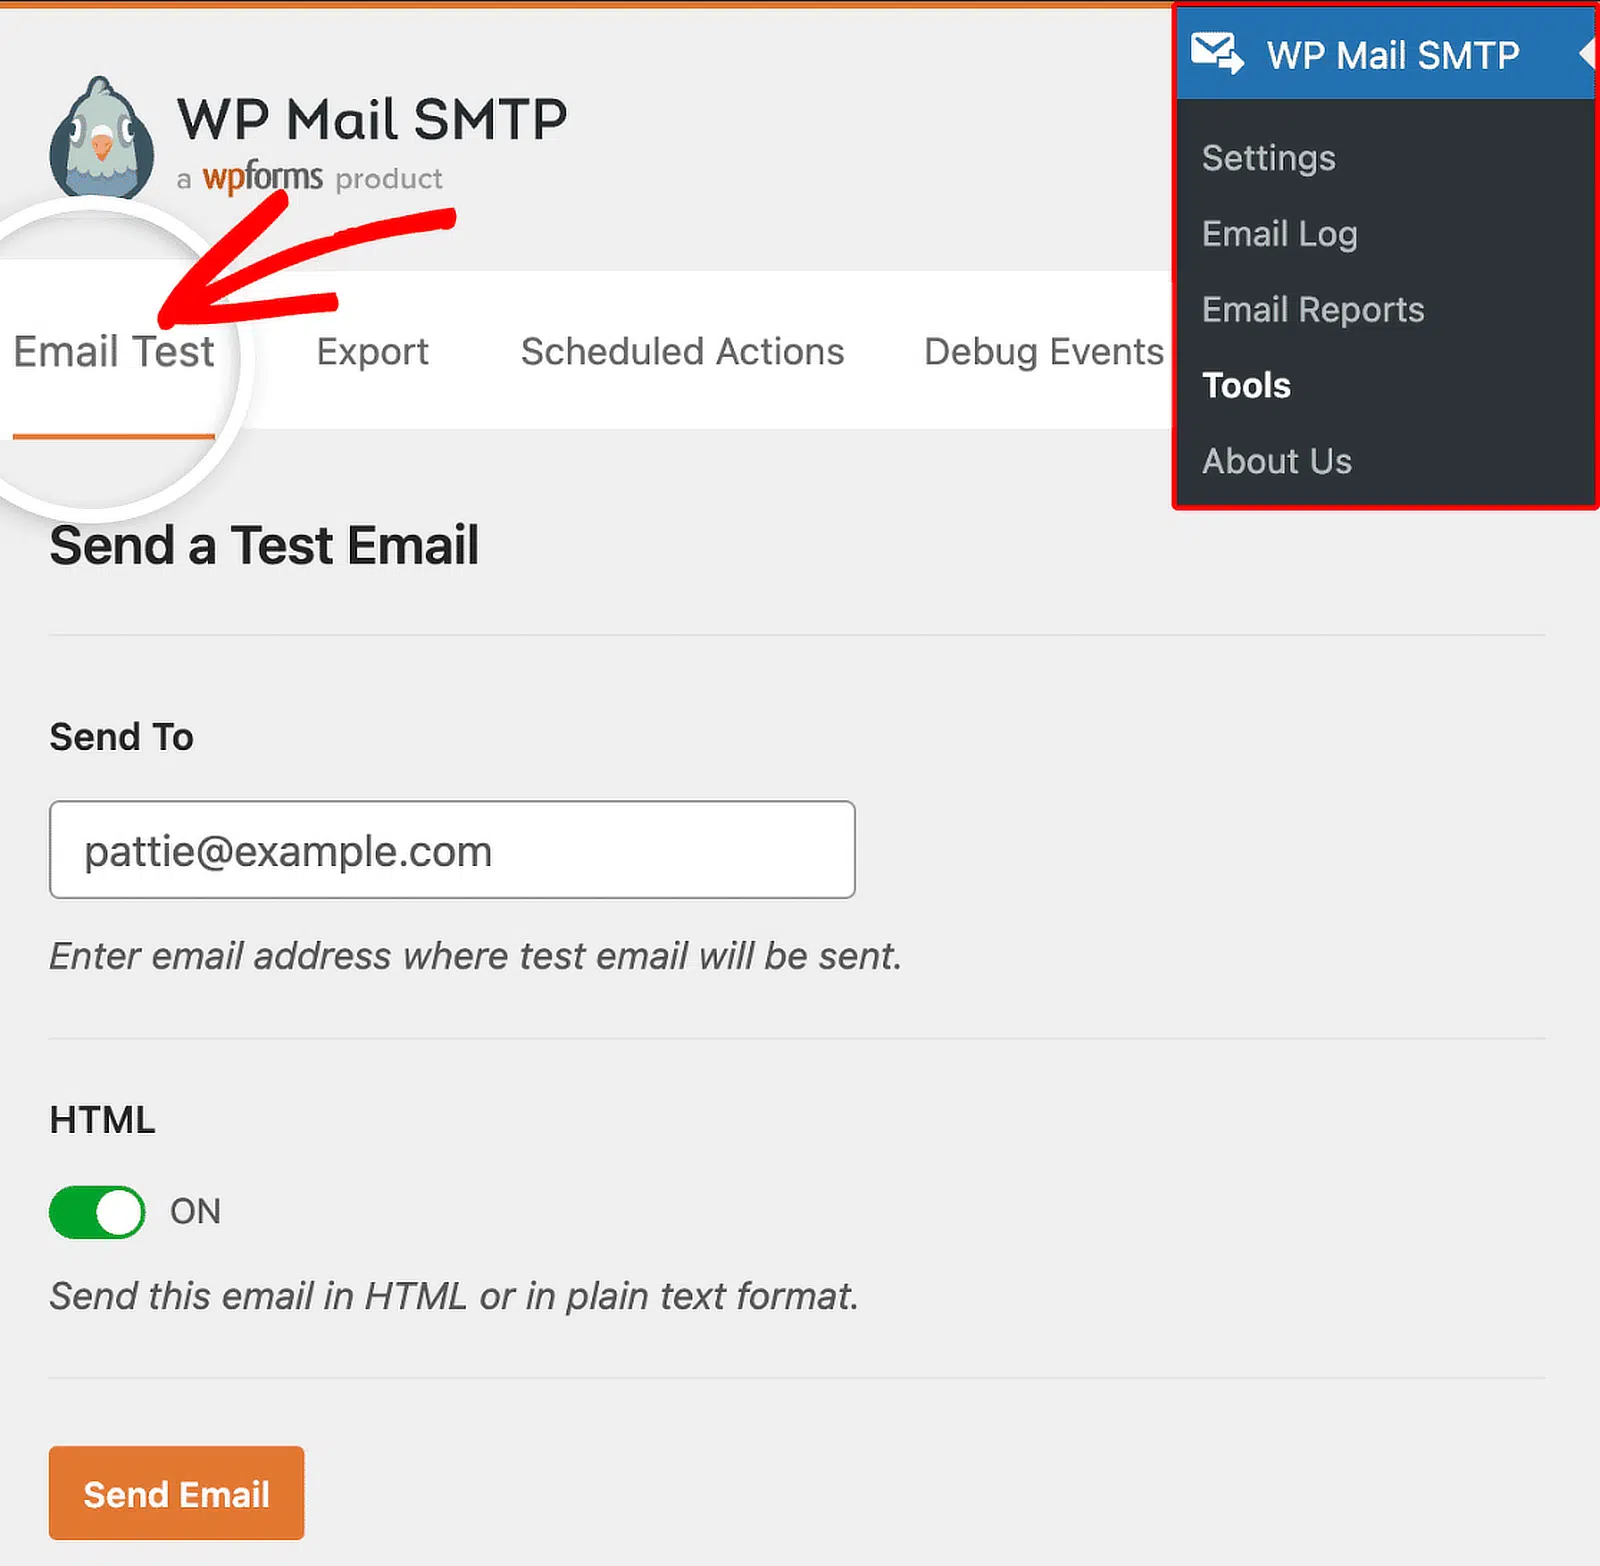
This is where you’ll send your test email. Look for the Send To field and enter an email address you have access to. I typically use my own work email so I can check the results immediately.
You’ll notice an HTML toggle switch below the email field. Keep this set to ON (it should be enabled by default). Most email clients today expect HTML-formatted emails, so testing with HTML gives you the most realistic results.
You’d only want to turn this off if you’re specifically troubleshooting plain text email delivery. Now click the Send Email button. WP Mail SMTP will attempt to send the test message through your configured SMTP connection.

You’ll see one of two outcomes. If everything worked, you’ll get a success message “Test HTML email was sent successfully! Please check your inbox to make sure it was delivered.”
To confirm that your test email was delivered successfully, be sure to check your inbox for an email similar to the example below:

If something went wrong, you’ll see a detailed error message explaining what failed. These error messages are actually helpful because they tell you exactly what needs fixing.
Go ahead and follow the recommended steps outlined in the error message. If the issue still isn’t resolved after following these steps, be sure to reach out to the WP Mail SMTP support team.

But wait, there’s more. After you send the test email, scroll down a bit. You’ll see a Domain Check Results section that appears automatically. This is one of my favorite features because it saves you from having to manually check your DNS records.
This scanner examines your domain’s SPF, DKIM, and DMARC records. These authentication records are crucial for email deliverability. If any of these show warnings or errors, your emails might still send but could end up in spam folders.
- A green checkmark means that record is configured correctly.
- A yellow warning or red error means you need to add or fix that DNS record.
The scanner usually includes specific instructions on what to add, so you can copy those details and send them to your hosting provider or add them yourself if you manage your own DNS.

This one-click test gives you confirmation that emails are sending and a health check on your email authentication as well. That’s why I always start here before trying any other testing method.
Method 2: Test SMTP Connection Using Telnet (Manual Method)
If you want to verify your SMTP server is reachable without going through WordPress or WP Mail SMTP, Telnet gives you a direct way to test the connection.
I use this method when I need to rule out plugin issues and confirm the mail server itself is responding. Think of Telnet as having a direct conversation with your email server.
You’ll connect to it, send some basic commands, and see if it responds the way it should. First, you need to open the command line tool on your computer.
- On Windows, press the Windows key, type cmd or Command Prompt, and hit Enter.
- On Mac, open Spotlight (Cmd + Space), type Terminal, and press Enter.
Before you can test anything, you need to make sure Telnet is available on your system. Type telnet and press Enter. If Telnet is installed, you’ll see a blank screen or a Telnet prompt. That means you’re good to go.

If you see an error like “command not found” or “‘telnet’ is not recognized as an internal or external command,” you’ll need to enable it first.
You’ll need two pieces of information: your SMTP server address and the port number. You can find these in your email provider’s documentation or in WP Mail SMTP » Settings under your mailer configuration.
Type this command, replacing the server and port with your actual details:
telnet smtp.gmail.com 587Once connected, type this and press Enter:
EHLO yourdomain.com(Replace yourdomain.com with your actual domain)
Successful response:
250-smtp.gmail.com at your service
250-SIZE 35882577
250-8BITMIME
250-STARTTLS
250 ENHANCEDSTATUSCODES
Those “250” codes mean the server accepted your command. The list shows you what the server can do (like authentication methods and maximum message size).

If you see error codes instead (like “500” or “550”), the server didn’t understand your command or doesn’t accept connections from your domain.
You’re done testing, so close the connection cleanly by typing “QUIT” and press Enter. The server will respond with something like “221 Goodbye” and disconnect you.
Keep in mind that Telnet only tests basic connectivity. It doesn’t test authentication, so even if this works, you might still have issues if your SPF/DKIM/DMARC are not set up correctly.
Method 3: Test SMTP with PowerShell (Windows Alternative)
If you’re on Windows and want a simpler way to test your SMTP connection, PowerShell is your friend. It’s easier than Telnet and gives you clearer feedback when something goes wrong.
I’ve used this method countless times when troubleshooting email issues, and it’s especially helpful when you need to test SMTP servers that require authentication.
First, you’ll need to open PowerShell with admin privileges. Click the Start menu and type “PowerShell” in the search box. Right-click on Windows PowerShell and select Run as administrator.

PowerShell uses a cmdlet called Send-MailMessage to send test emails through your SMTP server. Here’s the basic format you’ll use:
Send-MailMessage -SmtpServer smtp.example.com -Port 587 -From [email protected] -To [email protected] -Subject "Test" -Body "Test message" -UseSsl
Let me break down what each part does:
- SmtpServer smtp.example.com: Replace this with your SMTP server address (like smtp.sendlayer.com).
- Port 587: The SMTP port you’re using (common ports are 587, 465, or 25).
- From [email protected]: The email address you’re sending from.
- To [email protected]: Where you want the test email delivered.
- Subject “Test”: The subject line of your test email.
- Body “Test message”: The actual message content.
- UseSsl: Tells PowerShell to use SSL/TLS encryption (required by most modern SMTP servers).
Execute the PowerShell script. If it is successful, you should get a test email. However, most SMTP servers will require you to authenticate with a username and password.
PowerShell makes this easy with the -Credential parameter. Add this to your command to pop up a credential dialog box to enter your SMTP username (usually your email address) and password:
Send-MailMessage -SmtpServer smtp.example.com -Port 587 -From [email protected] -To [email protected] -Subject "Test" -Body "Test message" -UseSsl -Credential (Get-Credential)When your test succeeds, PowerShell simply returns to the command prompt without any output. No error message means everything worked.
Method 4: Use Online SMTP Testing Tools like GMass
If you prefer not to mess with command line tools, online SMTP testing services offer a much easier way to verify your connection. These browser-based tools let you test your SMTP server without installing anything on your computer.
I’ve found these particularly helpful when troubleshooting issues from different locations or when I need to quickly verify settings. There are several reliable online services you can use:
- GMass SMTP Test Tool is straightforward and shows detailed SMTP conversations.
- MXToolbox’s Test Email Server provides comprehensive diagnostics along with your test results.
- DNS Checker’s SMTP Test Tool offers a clean interface and works well for quick checks.
All three tools work similarly, so pick whichever one feels most comfortable to you. For this tutorial, I’ll walk through the general process that applies to any of them.
Enter Your SMTP Server Details
Once you’ve opened your chosen testing tool, you’ll need to fill in your SMTP server information. Start with the SMTP Server or Hostname field. Enter your mail server address (like smtp.gmail.com or smtp.sendgrid.net).
Next, enter the Port Number. This should match what you configured in WP Mail SMTP:
- Port 25 for standard SMTP (rarely used now)
- Port 465 for SSL encryption
- Port 587 for TLS encryption (most common)
Then add your Username and Password. These are the same credentials you used when setting up WP Mail SMTP.
Configure Security Settings
Most online testing tools have a dropdown or radio buttons for encryption settings.
Select the security type that matches your port number:
- None for port 25 (not recommended for most servers)
- SSL for port 465
- TLS or STARTTLS for port 587
If you’re not sure which encryption type to use, check your email provider’s documentation. When in doubt, try Auto if the tool offers it (this automatically detects the correct encryption).

Getting this setting wrong is a common reason tests fail, so double-check it matches your server requirements.
Add Email Addresses
You’ll need to provide two email addresses for the test.
The From Address can be any properly formatted email (like [email protected]). It doesn’t need to be a real mailbox, just a valid format.
The To Address should be an email you can actually check. Use your personal email or a test account where you can verify the message arrived.
Some tools also let you add a subject line or message body. These are optional, but they can help you confirm the test email when it arrives.
Run the Test
Once all your details are entered, click the Test, Send, or Check button (the label varies by tool).
The tool will attempt to connect to your SMTP server and send a test email. This usually takes just a few seconds.
You’ll see a detailed output showing the entire SMTP conversation. This is the back-and-forth communication between the testing tool and your mail server.

How to Troubleshoot Common SMTP Test Failures
After running your test email, you might encounter error messages that prevent delivery. These issues are common and usually straightforward to fix. The table below outlines the most frequent SMTP errors and their solutions.
| Error | What It Means | How to Fix It |
|---|---|---|
| Authentication Failed (Error 535) | Username or password is incorrect | Double-check credentials in WP Mail SMTP » Settings. For Gmail/Google Workspace, use an app-specific password. Remove any extra spaces from copy-paste errors. |
| Connection Timeout | WordPress can’t reach the SMTP server | Verify the SMTP host is correct. Try different ports: 587 (TLS), 465 (SSL), or 25. Contact your host if all ports fail—they may need to unblock SMTP ports. |
| TLS/SSL Certificate Error | Server doesn’t trust the SMTP security certificate | Toggle between TLS and SSL encryption in WP Mail SMTP » Settings. Try TLS on port 587 or SSL on port 465. Contact your host to update SSL certificates if needed. |
| Relay Access Denied (Error 550) | SMTP server won’t accept mail from your IP | Add your server’s IP address to your email provider’s relay allowlist or authorized IPs. Find your IP in your hosting dashboard or ask support. |
| Sender Address Rejected | From Email doesn’t match your authenticated domain | Change your From Email in WP Mail SMTP » Settings to use your verified domain (e.g., [email protected], not [email protected]). |
| DNS Authentication Warnings | Missing SPF, DKIM, or DMARC records | Add the required DNS records to your domain registrar. Follow your mailer’s DNS setup guide or wait 24-48 hours for records to propagate after adding them. |
Still stuck? If you’ve tried these solutions and errors persist, reach out to your hosting provider’s support team or contact your email service provider directly.
WP Mail SMTP license holders can also use avail our White Glove Setup service to have our team handle configuration for you.
FAQs on How To Test Your SMTP Connection
What is SMTP and why do I need to test it?
SMTP stands for Simple Mail Transfer Protocol. It’s the system that sends emails from your WordPress site to your recipients’ inboxes.
By default, WordPress uses a basic PHP mail function that often gets flagged as spam or fails completely. Testing your SMTP connection helps you verify that your email server is configured correctly and can actually deliver messages.
I always test SMTP after setting up a new site or switching email providers. It saves me from discovering delivery problems when a customer complains they never got their order confirmation.
How do I know if my SMTP connection test was successful?
When you use WP Mail SMTP » Tools » Email Test, you’ll see a green success message that says “Email was sent successfully!”
You should also receive the actual test email in your inbox within a few minutes. Check your spam folder if you don’t see it right away.
If the test fails, WP Mail SMTP will show you specific error messages with troubleshooting tips. These messages tell you exactly what went wrong.
What ports should I use for SMTP testing?
Most modern SMTP servers use port 587 with STARTTLS encryption. This is what I recommend testing first because it’s the industry standard for secure email submission.
Port 465 uses SSL encryption from the start and is a good alternative if 587 doesn’t work. Port 25 is the original SMTP port, but many hosting providers block it to prevent spam.
When you set up WP Mail SMTP, the plugin automatically selects the right port based on your chosen mailer. But if you’re testing manually with Telnet or PowerShell, start with 587.
Can I test SMTP without installing WP Mail SMTP?
Yes, you can use command line tools like Telnet or PowerShell, or browser-based tools like GMass SMTP Tester and MXToolbox.
These methods let you verify that your SMTP server is responding and accepting connections. However, they won’t tell you if WordPress is configured correctly to use that server.
If you’re troubleshooting WordPress-specific email issues, I strongly recommend using WP Mail SMTP’s built-in tool. It checks your entire email pipeline, including DNS authentication and WordPress configuration.
What does “Connection Timeout” mean when testing SMTP?
A connection timeout means your testing tool tried to reach the SMTP server but never got a response.
This usually happens because your hosting provider or firewall is blocking outbound connections on the SMTP port you’re trying to use. Some shared hosts block ports 25, 587, and 465 by default to prevent spam.
Contact your hosting support and ask if they allow outbound SMTP connections. You might need to switch to a different port or use a different SMTP provider that works with your host’s restrictions.
What’s the difference between testing on port 587 vs 465?
Port 587 is designed for email submission with STARTTLS encryption. The connection starts unencrypted, then upgrades to secure. This is the modern standard and what most SMTP services expect you to use.
Port 465 uses implicit SSL/TLS, meaning the entire connection is encrypted from the beginning. Some providers prefer this, but 587 is more widely supported. If one doesn’t work, try the other.
Next, A Beginner’s Guide to DNS Email Configuration
Are your WordPress emails landing in spam instead of customer inboxes? This could be because they lack proper authentication, and DNS records are the key to fixing this.
Without SPF, DKIM, and DMARC records configured correctly, email providers like Gmail and Yahoo treat your messages as untrustworthy and either block them or send them straight to the junk folder.
WP Mail SMTP makes it easy to set up email authentication, but you need to add the right DNS records at your domain registrar or hosting provider to complete the process.
Ready to fix your emails? Get started today with the best WordPress SMTP plugin. If you don’t have the time to fix your emails, you can get full White Glove Setup assistance as an extra purchase, and there’s a 14-day money-back guarantee for all paid plans.
If this article helped you out, please follow us on Facebook and Twitter for more WordPress tips and tutorials.