
AI Summary
So you’ve set up WP Mail SMTP and are ready to send emails from your WordPress site. That’s great! You’re well on your way to improved email delivery.
But how can you be sure that your emails are sending properly through the SMTP configuration you’ve set up? By testing them out, of course.
In this blog post, I’ll show you how to do it. Plus, I’ll cover additional tips and tools you can use to get the most out of all of your SMTP functionality.
Testing Your WP Mail SMTP Setup: Ensuring Your Emails are Sending Properly
Testing Emails
If you’re reading this article, you’ve likely already installed and activated the WP Mail SMTP plugin. But if you haven’t, take a look at our full tutorial on how to get yourself all set up.
Configure Settings
Once you’ve installed the plugin, navigate to WP Mail SMTP » Tools and open up the Email Test tab. From here, you can adjust the settings before sending out your test email.

First, you’ll configure the Send To setting. This is the email address you want your test email to be sent to.
By default, this address is set to match the current user account email. But you can type in any email address you’d like to send the test email to.

Keep in mind though, that you’ll want to check your inbox for the test email, so be sure to use an email address you can easily access.
Then come the HTML settings.
We recommend keeping the HTML setting toggled to ON. However, if you want to send a plain text email, you can change this setting to OFF.

When you’re happy with these settings, go ahead and click the Send Email button.

Your test email is now on its way to your inbox. 😎
Test Your WordPress Emails Now
Successfully Sent
Woohoo! Your test email was successfully sent.
You’ll know if you get an onscreen message that says, “Test HTML email was sent successfully! Please check your inbox to make sure it was delivered.”

Now, go ahead and check your inbox as the message suggests. You should see an email similar to this:

This means your SMTP port and configurations are all set correctly and you’re ready to start sending your WordPress emails.
Unsuccessfully Sent
If your test email doesn’t go through, you’ll get an error message with more details on what went wrong, along with recommendations for what to do next.

Follow the steps recommended in the error message, and send another test email. If the issue still isn’t resolved, reach out to our support team.
For users with an active license, be sure to utilize your access to email support. For Lite users, head over to our WordPress.org support forum to post your question and receive assistance there.
Error Logs
If you do have an issue successfully sending emails, then the problem will be logged.
These error logs are designed to help you troubleshoot issues related to your email delivery. This can include issues like incorrect SMTP settings, problems with authentication, server connectivity issues, or blocked email addresses.
To access the error log, go to WP Mail SMTP » Tools and click on the Debug Events tab.

Then, scroll down and locate the error you’re getting. Click on the Event # to expand the details about the error.
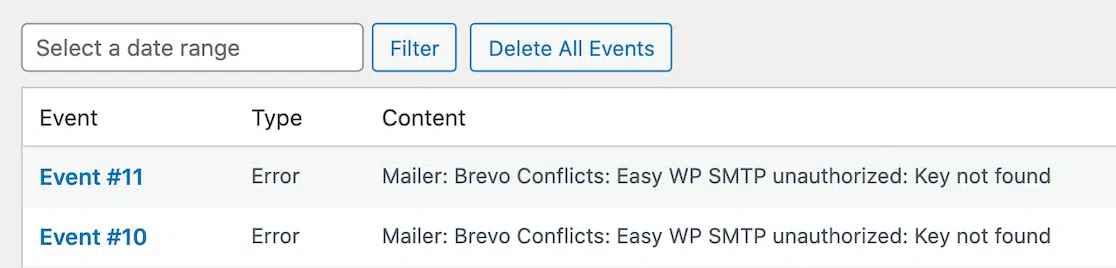
Now that you’re informed, you can decide what sort of action to take. For example, an error message might indicate that your SMTP credentials are incorrect, that your host is blocking the email, or that a third-party spam filter rejected the message.
Then, once you’ve reviewed or fixed the issue, you can clear the error logs if you’d like.
Email Logs
Since WP Mail SMTP email logs track all the emails sent from your WordPress site, you have a detailed record of your email activity. Checking these logs is another way you can verify your email delivery.
To start logging emails, you’ll need to enable the email logging feature. Go to WP Mail SMTP » Settings » Email Log.

From here, you can toggle the options for which emails to log, including all email messages sent from your WordPress site.

Once email logging is activated, you can take a look at your logs by navigating to WP Mail SMTP » Email Log in your WordPress dashboard.

Here, you’ll be able to see the delivery status (whether it was sent successfully or failed) of each email, along other details like:
- Date and time the email was sent
- The recipient’s email address
- Subject line
- Mailer used (e.g., SendLayer, SMTP.com, etc.)
Then, by clicking on a specific log entry, you can view more detailed information about each email.
One of the many great things about this feature of WP Mail SMTP is the ability to resend emails directly from the log. If a message failed to send or didn’t reach the recipient, you can simply click the Resend button from the log to try again.
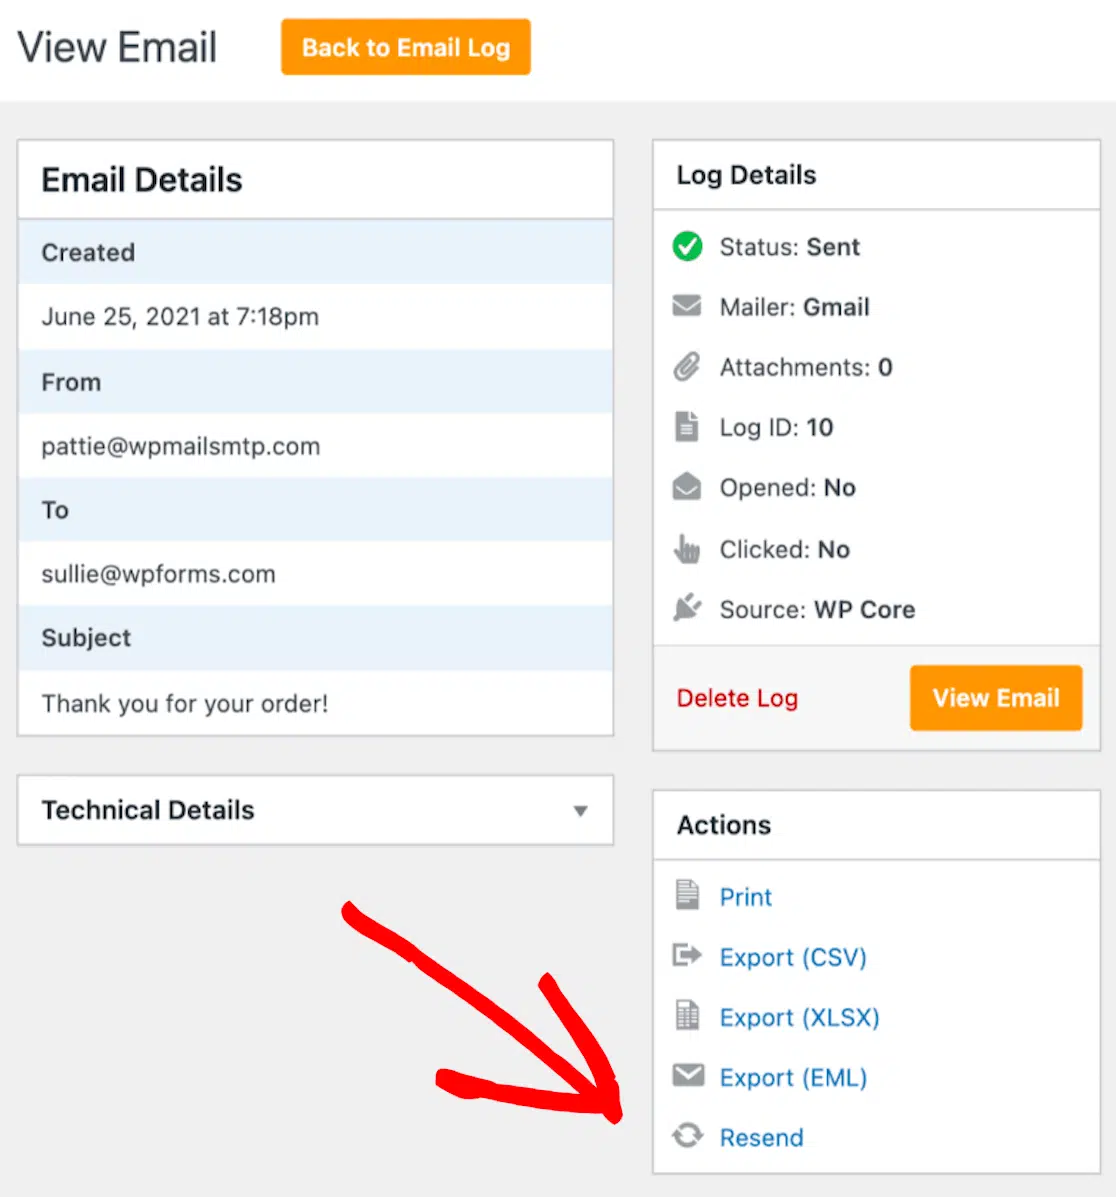
No need to recreate the email from scratch!
Overall, email logs are a standout tool for diagnosing delivery issues. If an email fails to send, the log will include an error message that explains why. So, if it’s something like SMTP connection problems, invalid recipient addresses, or server errors, you’ll know what to do.
Email Reports
Finally, rather than manually going through the logs, you can choose to have the details sent to you with email reports.
Email reports provide a comprehensive overview of your email performance, helping you track delivery success, diagnose issues, and optimize your email strategy.
To start receiving email reports, go to WP Mail SMTP » Settings » Email Reports in your WordPress dashboard and enable the reporting feature.

Not only will these reports provide you with numbers outlining your total emails sent, but they’ll also tell you the percentage of successfully delivered emails and the number of emails that were not delivered.
And that’s it! You now have multiple ways to test, troubleshoot, and verify the emails being sent from your WordPress website. Also, check out this guide for information on what to do if your SMTP server goes down.
Test Your WordPress Emails Now
FAQ About Testing Emails
As the most reliable WordPress email deliverability plugin, we get a lot of questions about testing emails and making sure they’re sent how they should be. Here are a few of our most popular questions:
How can I verify if WP Mail SMTP is working correctly?
You can send a test email using the Email Test feature in WP Mail SMTP. This helps confirm that your SMTP settings are configured properly and your emails are being delivered successfully.
What should I do if my test email doesn’t send?
If your test email fails, you’ll receive an error message explaining what went wrong. Follow the recommended steps or check the error logs for more detailed information to resolve the issue.
Can I resend an email if it didn’t go through the first time?
Yes! WP Mail SMTP allows you to resend emails directly from the email log. Simply click the Resend button next to the email entry that failed to send.
Next, Discover What You Can Do with Pro
I mentioned earlier that WP Mail SMTP users with the Pro license can see which of their sent emails were opened by their recipients. But that’s just scratching the surface in terms of all of the incredible features offered with Pro!
Be sure to check out our article on all the ways users are getting the most out of WP Mail SMTP Pro to learn more about how an upgraded plan can benefit you.
Ready to fix your emails? Get started today with the best WordPress SMTP plugin. If you don’t have the time to fix your emails, you can get full White Glove Setup assistance as an extra purchase, and there’s a 14-day money-back guarantee for all paid plans.