AI Summary
Are you sending transactional emails from your WordPress website and looking for the right email deliverability plugin?
Transactional emails are the automated messages that your site users receive after completing an action like submitting a form. There are several different SMTP WordPress plugins you can use to help make sure they end up in users’ inboxes and not their spam folders, including WP Mail SMTP and Site Mailer by Elementor.
So, what’s the difference? And does it matter? Let’s find out! Read on to discover more about WP Mail SMTP compared to Site Mailer so you can decide which plugin is right for you.
WP Mail vs Site Mailer
Setup
First, we’ll compare the process required to set up either service. Both Site Mailer and WP Mail SMTP are WordPress plugins that will need to be installed and activated on your WordPress dashboard.
Let’s take a look at how it works for both.
Setting Up Site Mailer
Site Mailer is a product of Elementor, the theme-building plugin, so it can be installed through the Elementor plugin dashboard and website. Or, you can find Site Mailer in your WordPress dashboard plugin page or the WordPress plugin directory.
1. Set Up Connection
Once Site Mailer is installed on your site, you’ll access it from the Settings tab in your WordPress dashboard.
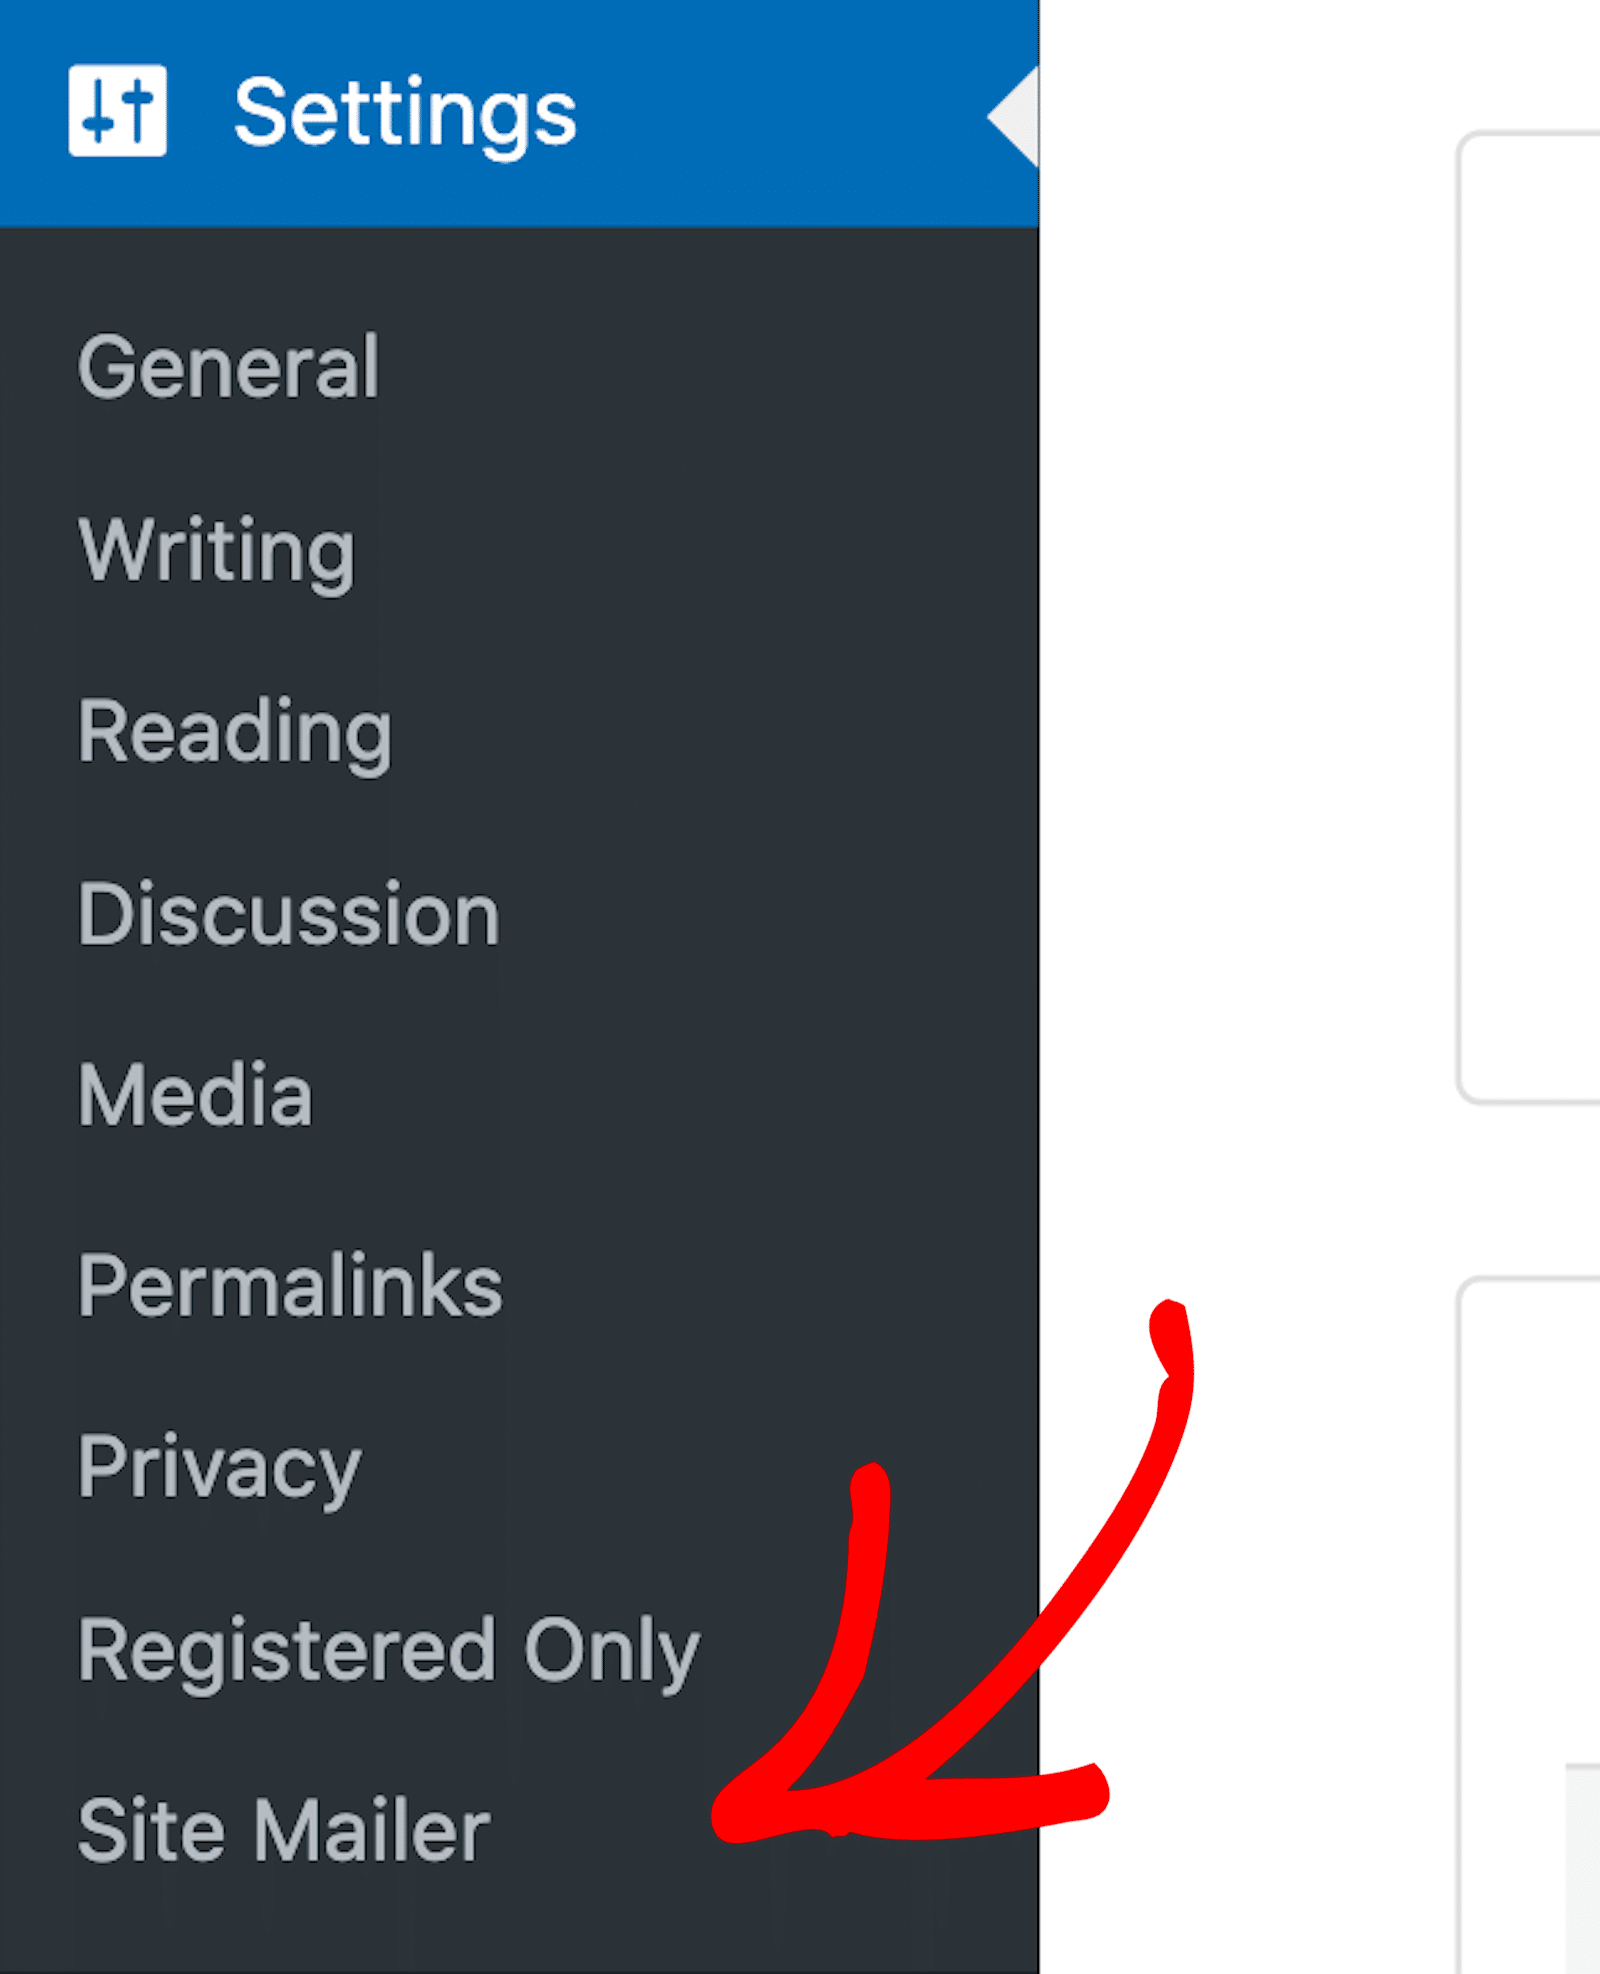
Because I couldn’t see the plugin without expanding the Settings menu, and I sometimes found myself looking around for it before I remembered where it is. But that’s just my personal preference.
From here, you’ll connect the plugin to your Elementor account. If it’s your first time using Elementor or Site Mailer, a setup wizard will help you start your account.
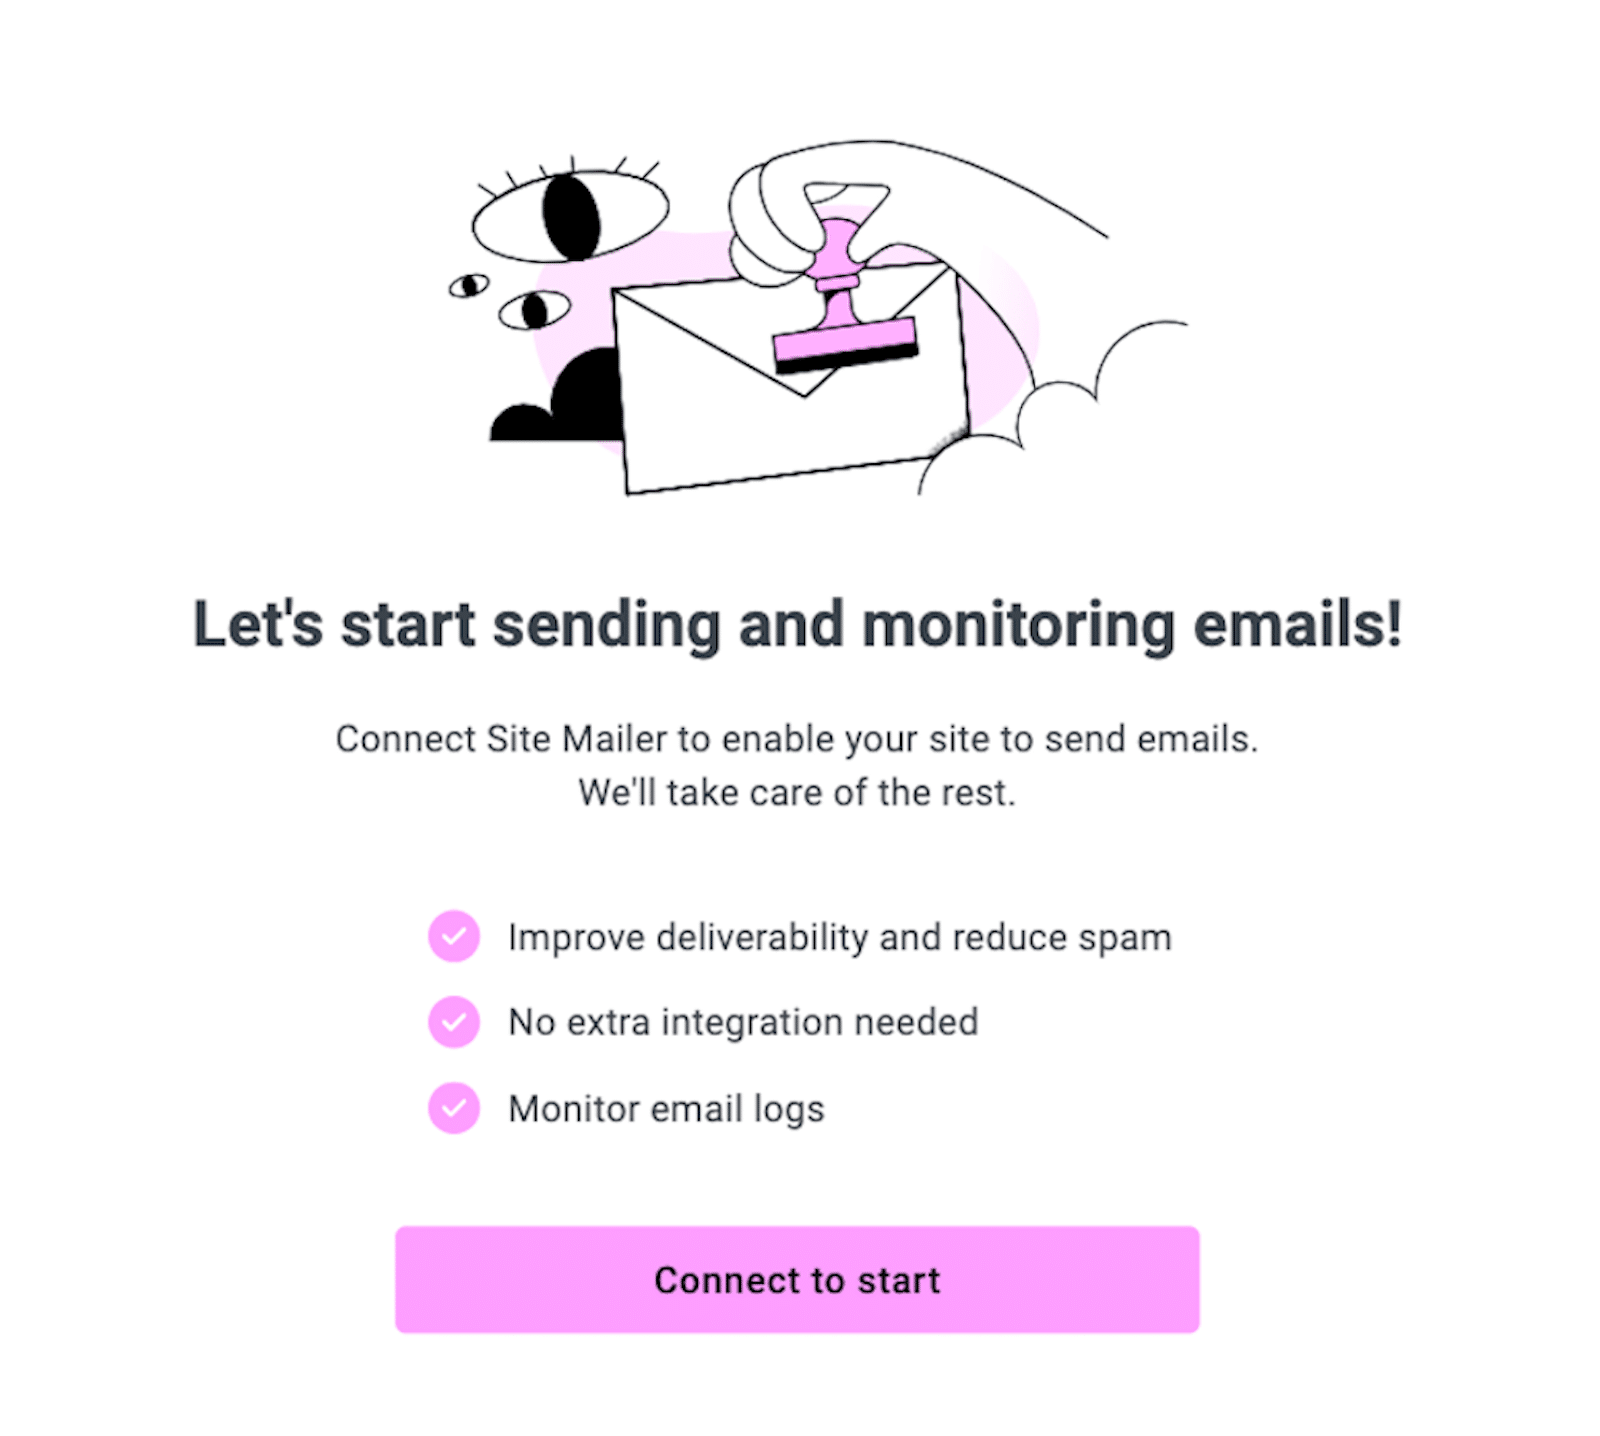
Or, you can connect Site Mailer directly from the Plugins tab in your WordPress dashboard.

Before setting up the plugin, you’ll see an option to Connect in purple text. After connecting, the purple text link will prompt you to Upgrade.
2. Confirm Details
Next, you’ll need to make sure that you’re connecting to the correct account. If your preferred account doesn’t appear onscreen, click Switch User to change the connection.
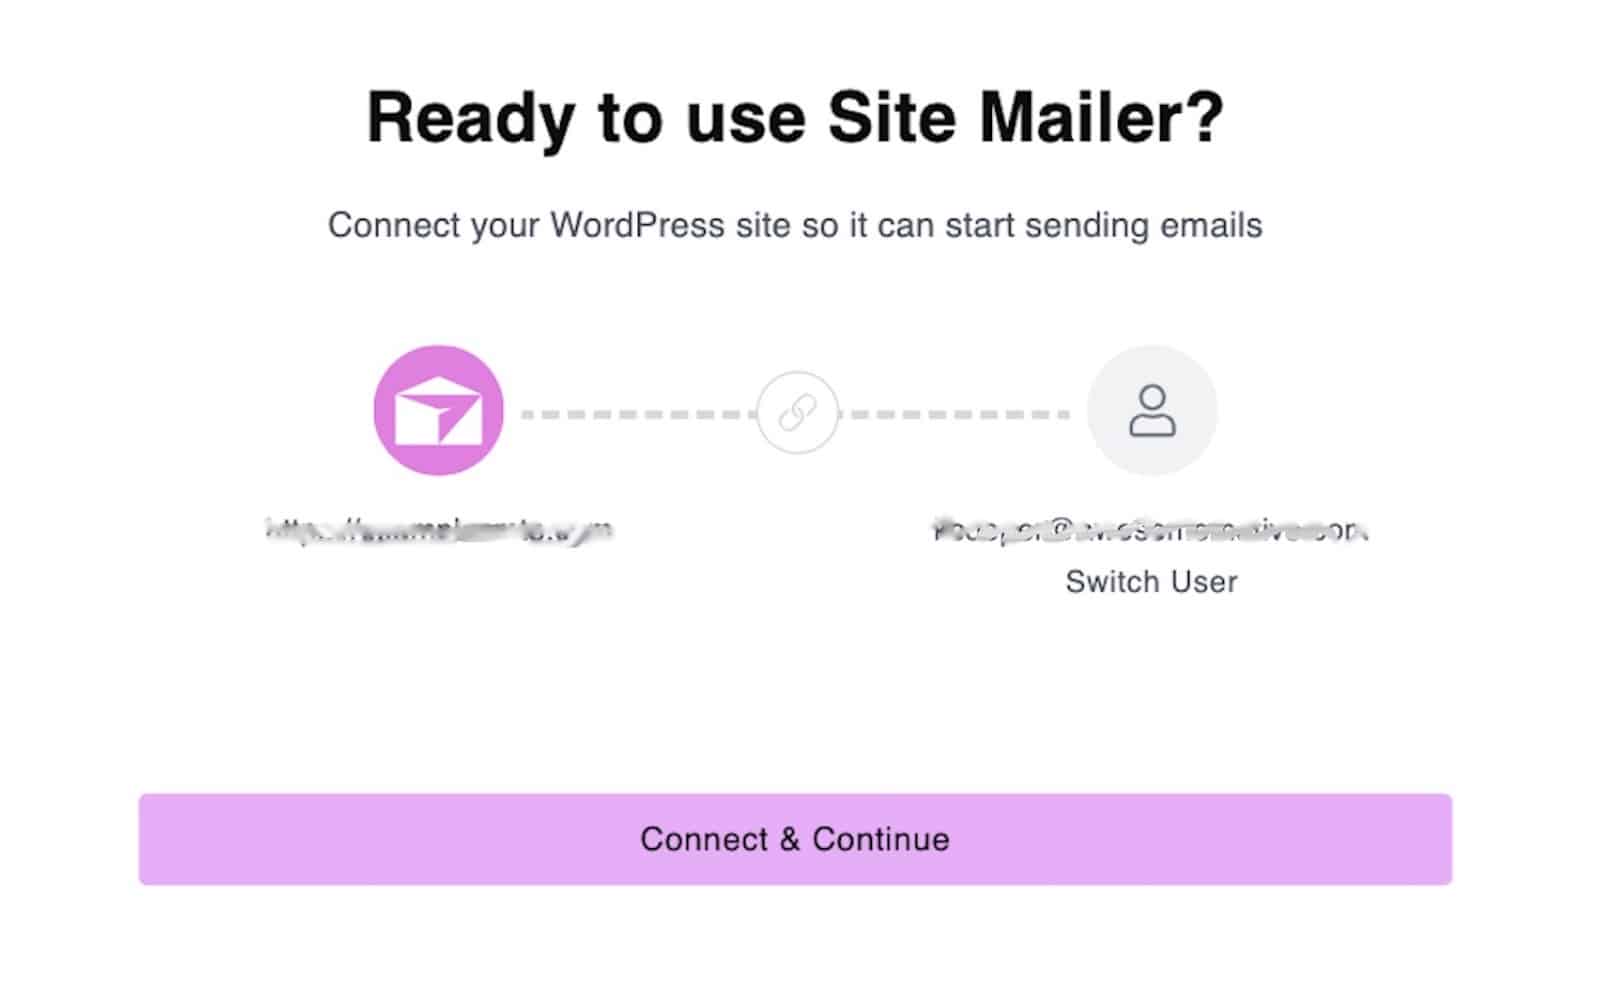
With everything finalized, you’ll receive confirmation that your site is ready to send emails.
The following screen displays the details of the service, including the temporary email address that Site Mailer is currently utilizing.
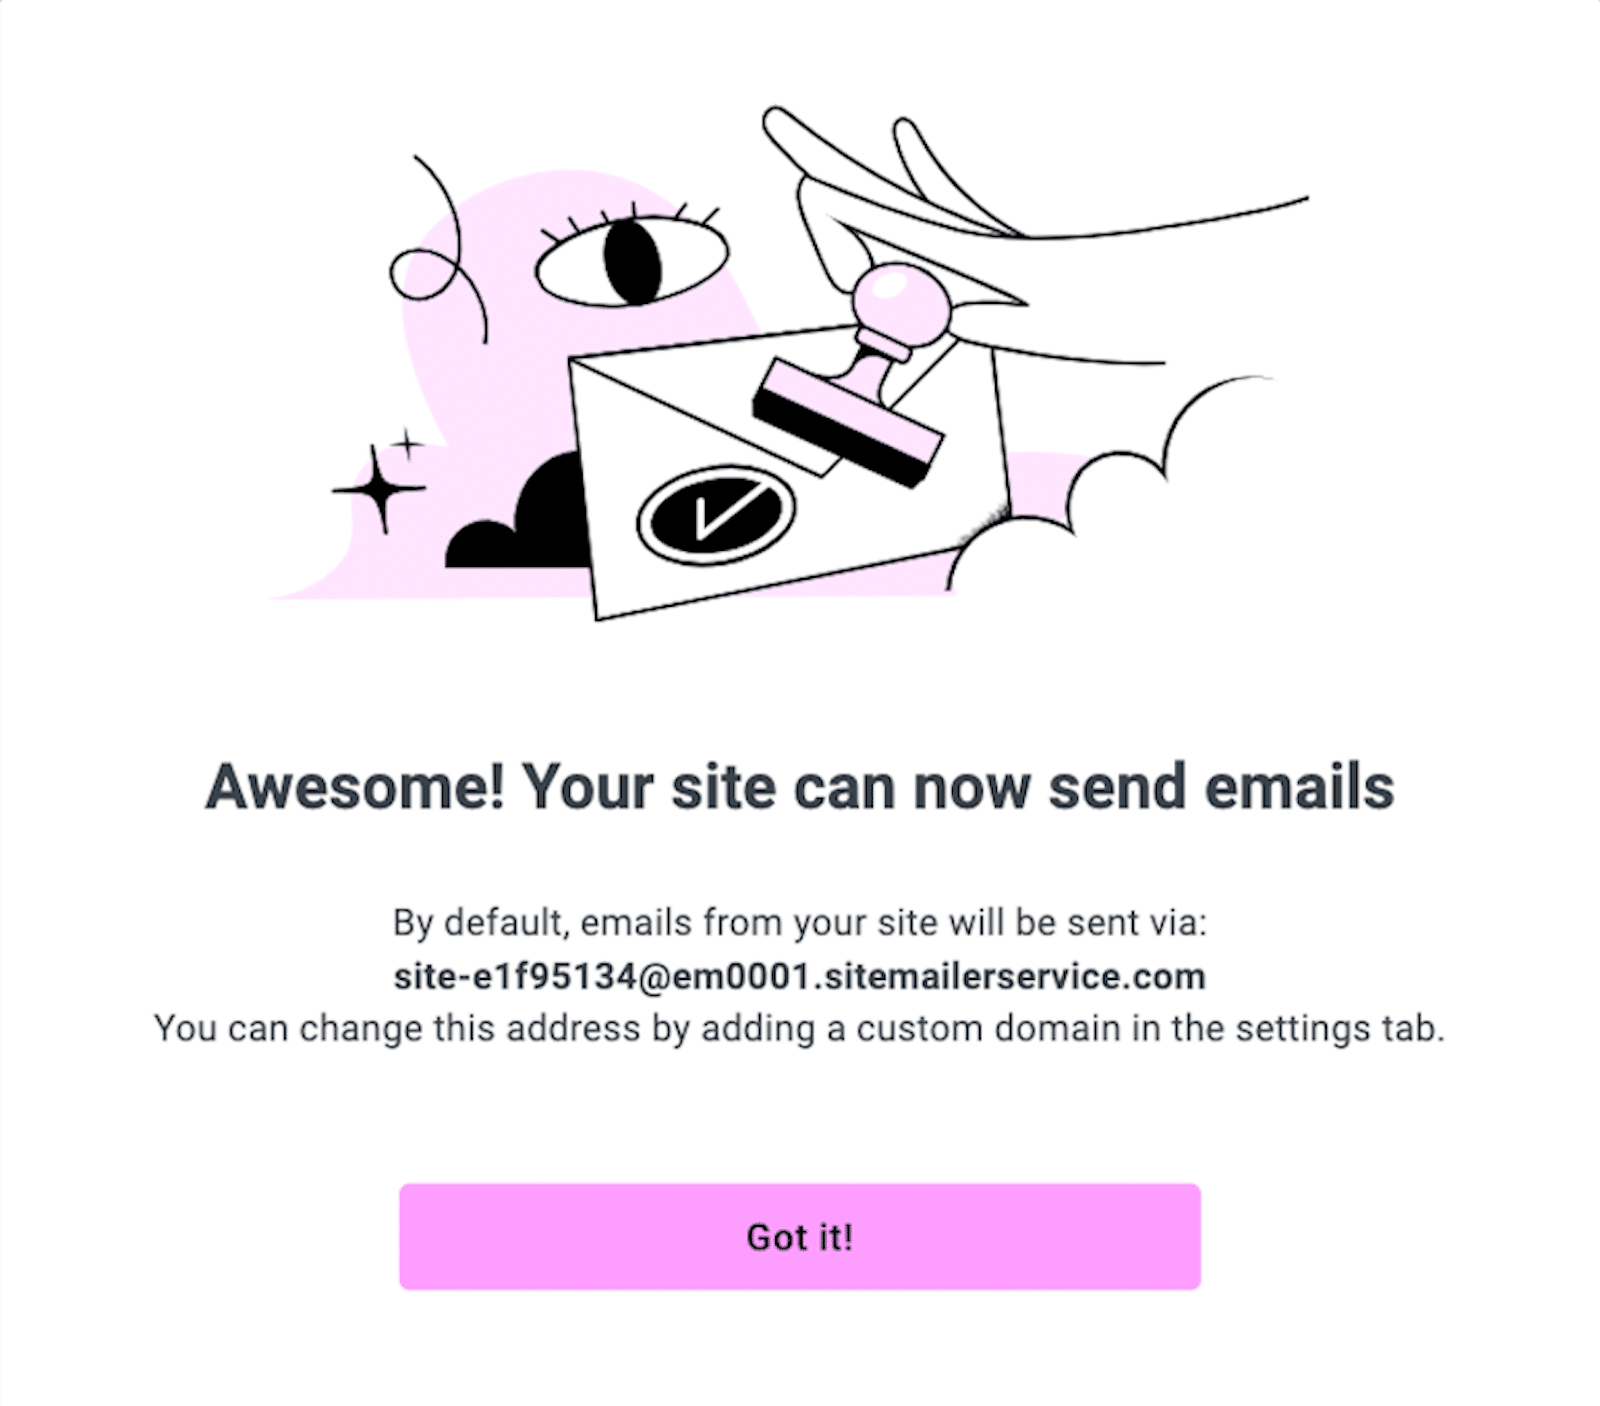
Once you click the purple bar, you have access to your Site Mailer dashboard.
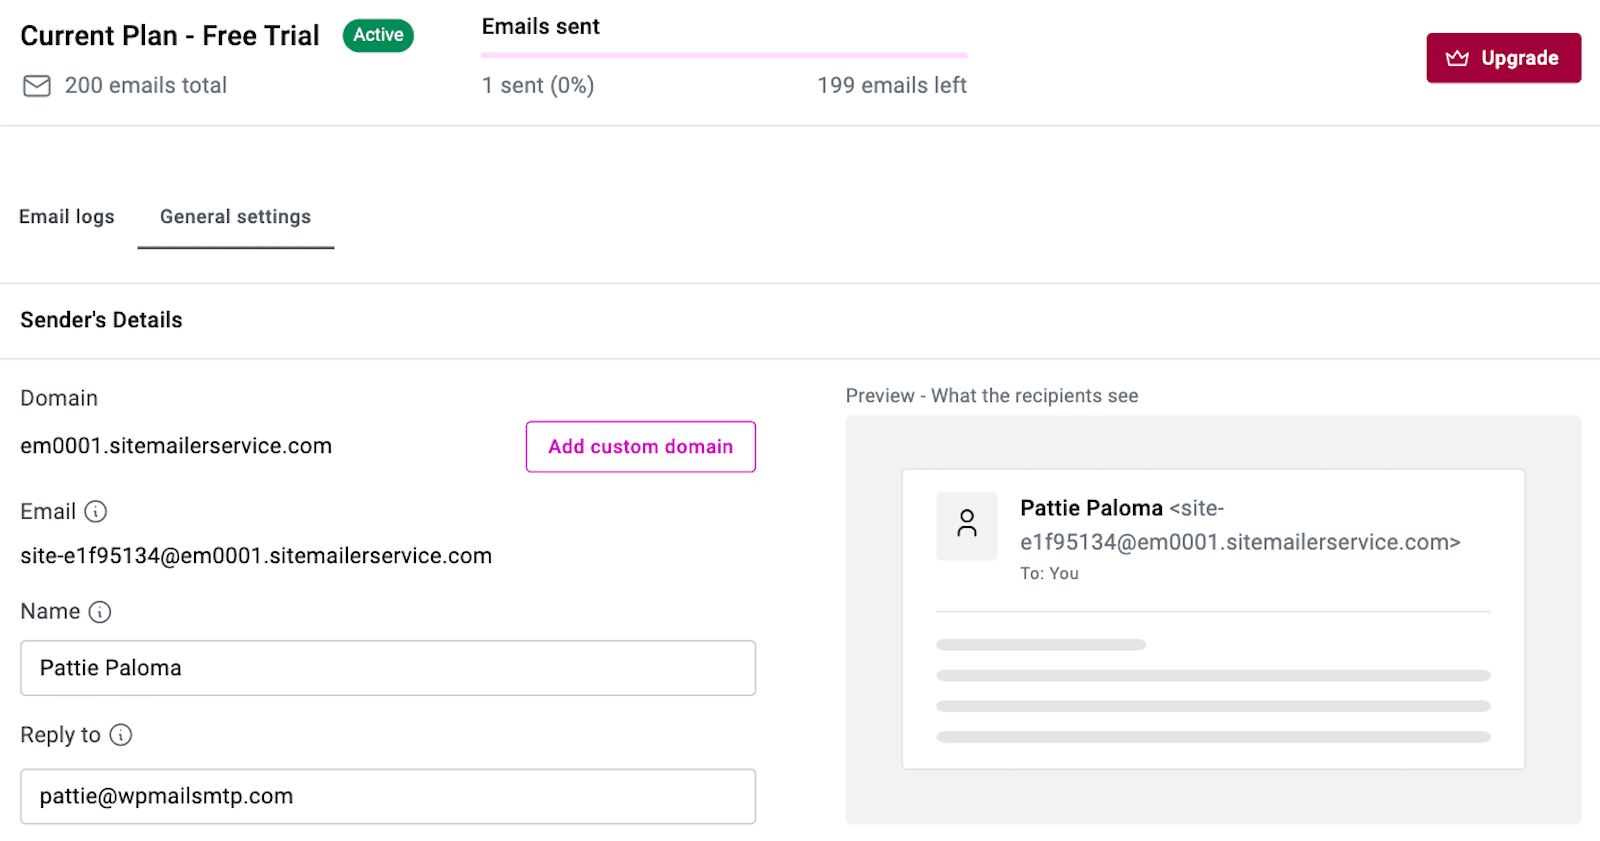
The dashboard is organized into 2 screens: General settings and Email logs. I’ll describe the options and functionality of each when we cover Site Mailer’s features later in this post.
4. Custom Domain
As the confirmation screen in step 3 says, you can find the option to set up a custom domain to send your emails.
The button is in the General settings tab seen above, and clicking it prompts a new screen to appear that begins the process.
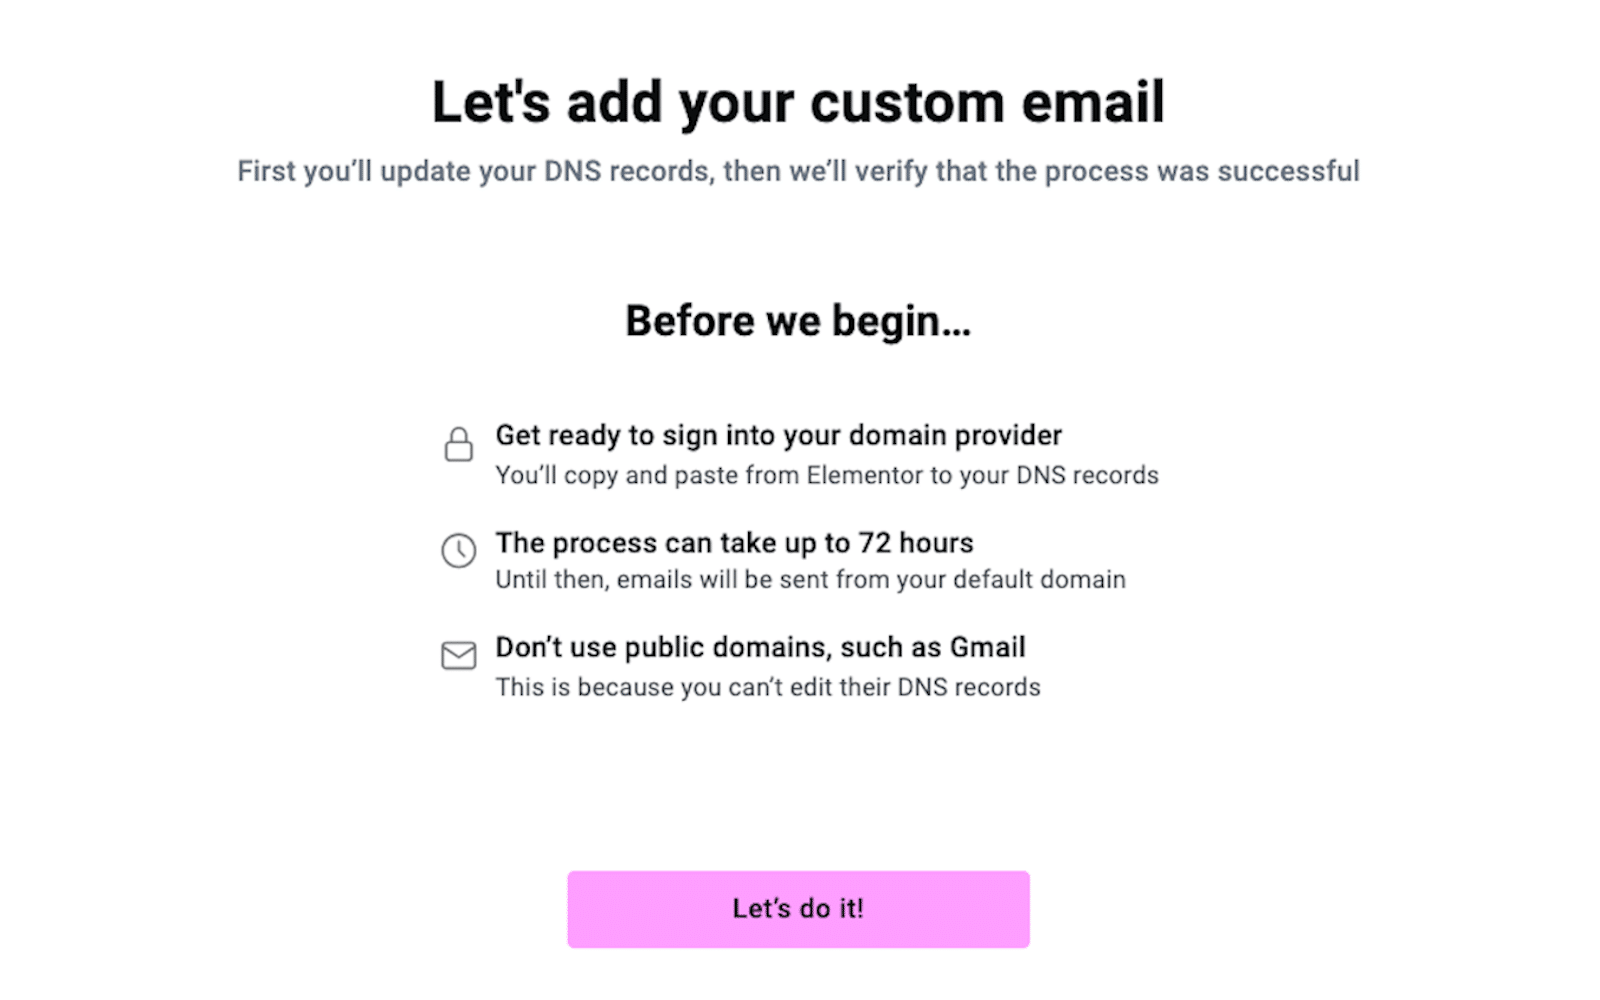
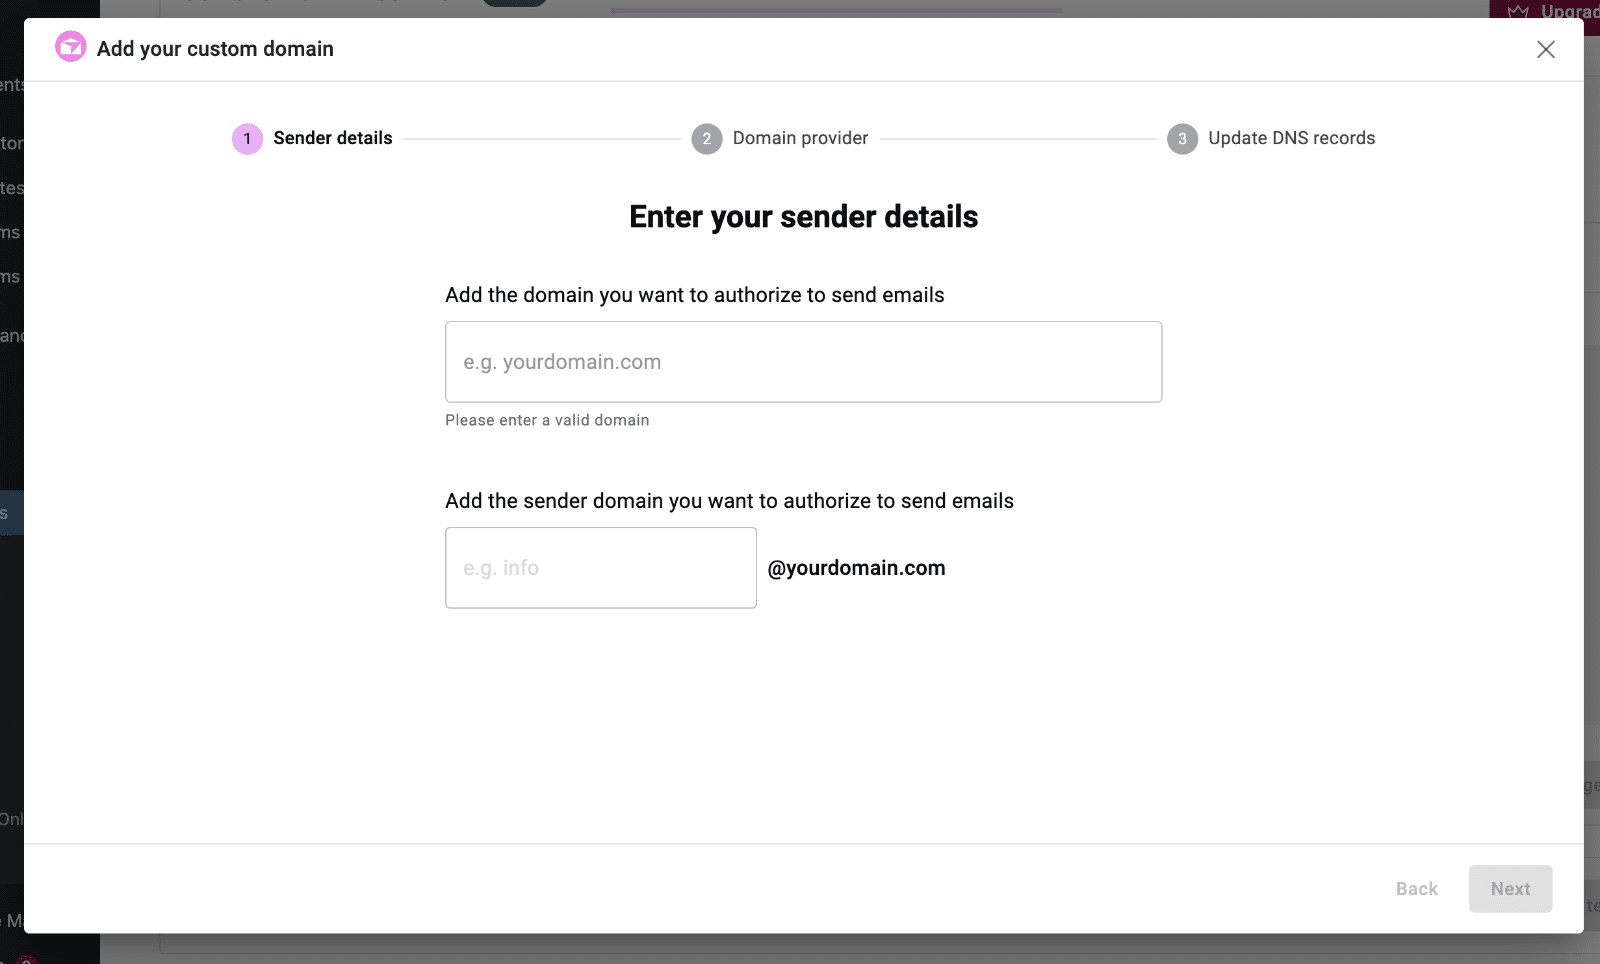
Click Let’s do it! To get started. Then, Site Mailer will prompt you to enter your website’s domain name and the email address you want to use to send emails from your WordPress site.
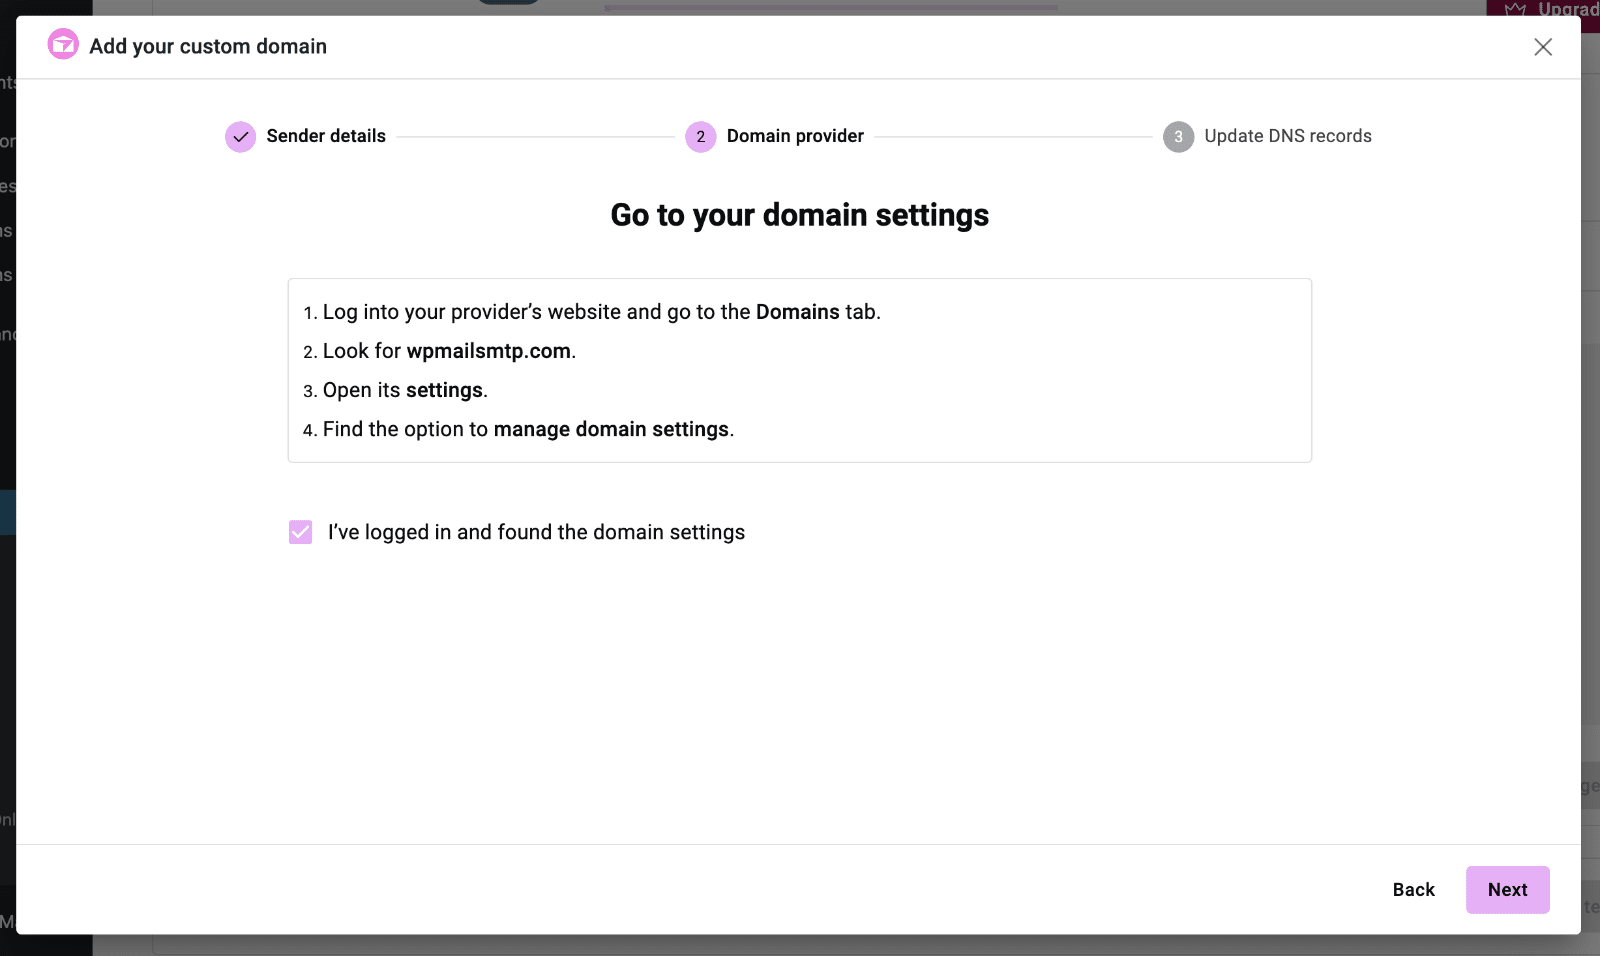
The next step simply provides some instructions. You’ll need to log in to your domain provider account (usually wherever you purchased your domain) and access your domain settings.
Check the box to say you’ve found your domain settings, then move to the next step.
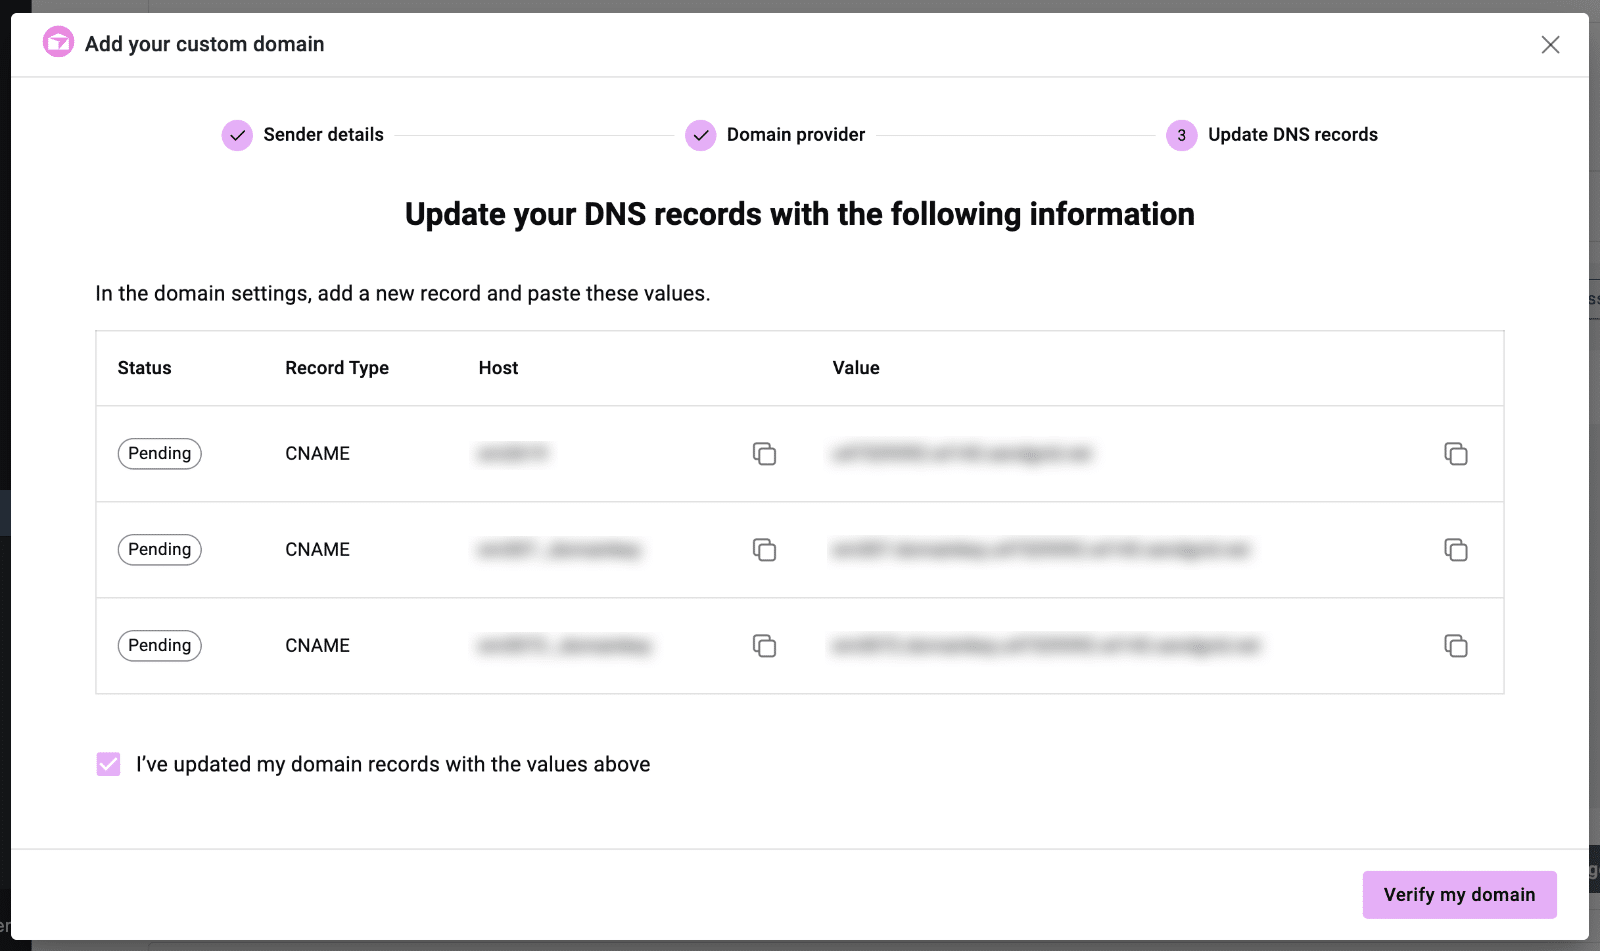
Site Mailer will show you some DNS records that you need to add to your domain settings. The exact steps for this can vary depending on your provider. Once you’ve finished adding the records, click Verify my domain.
If everything is set up properly, your new domain information will appear in the General settings tab.
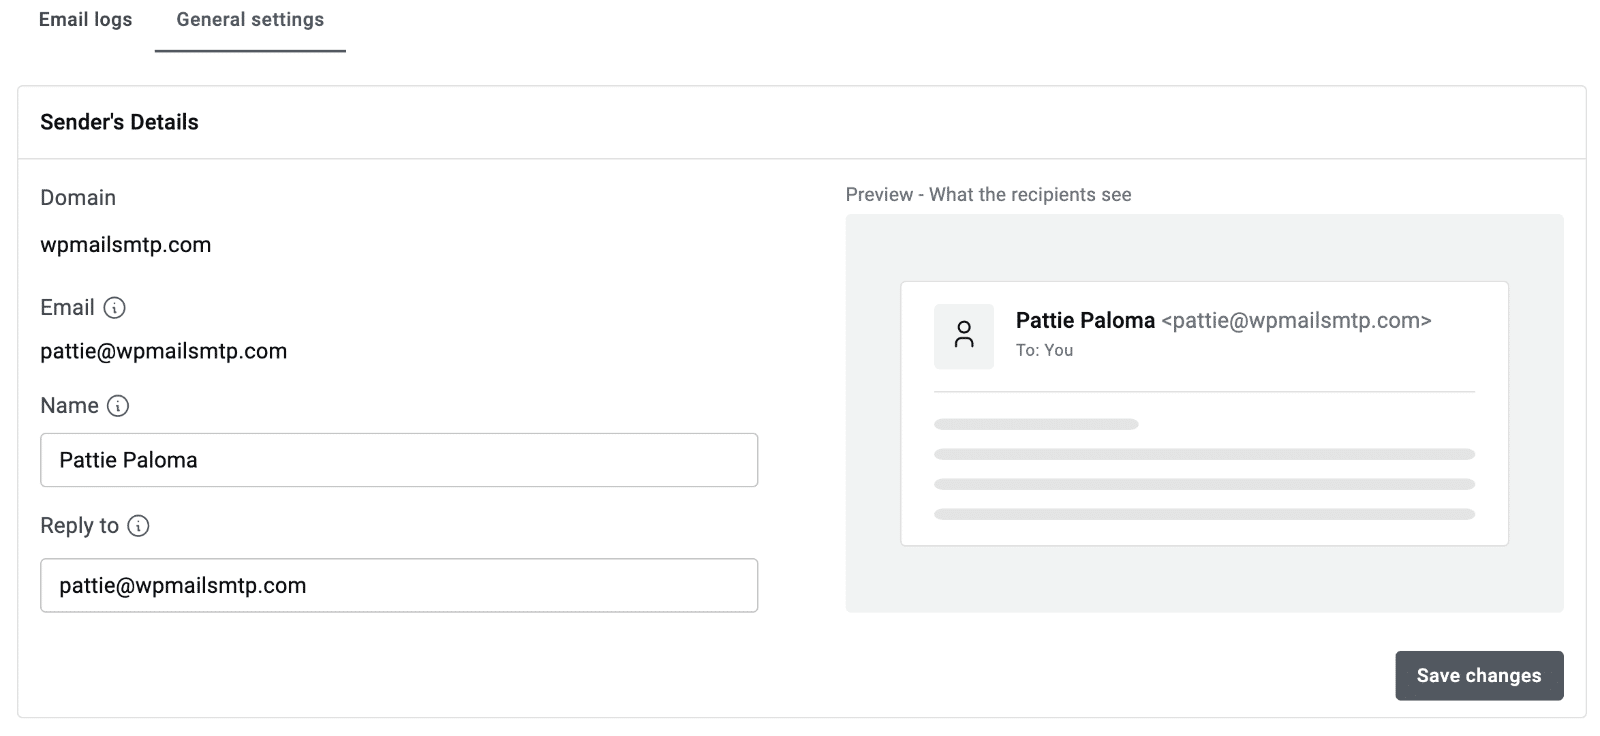
Using a custom domain looks a lot more professional than using Site Mailer’s default sender details, so I highly recommend completing this step.
Setting Up WP Mail SMTP
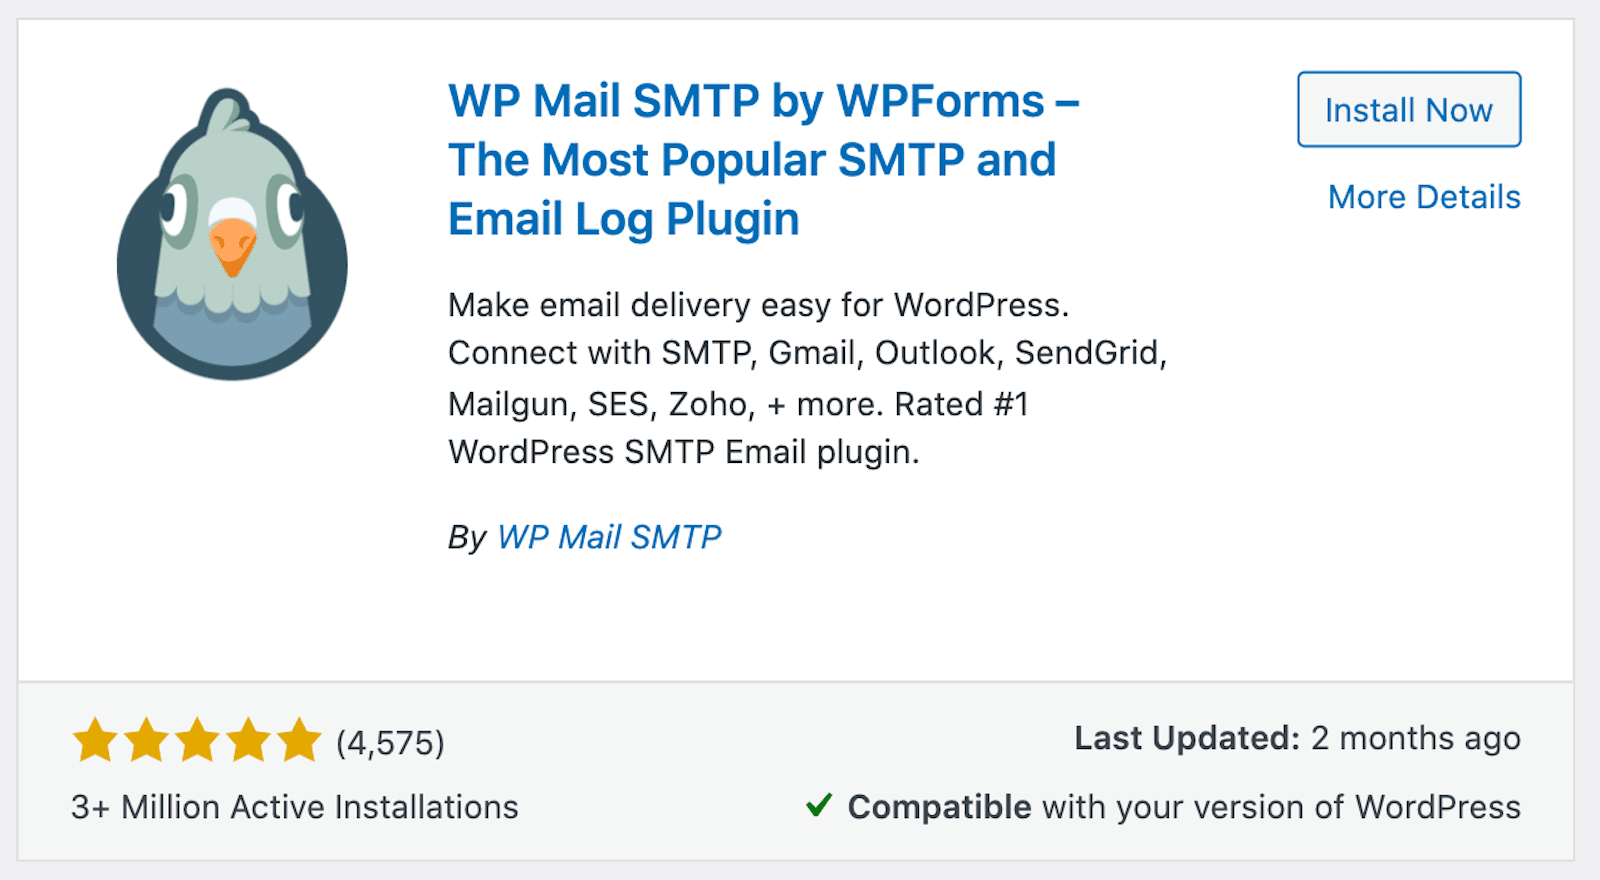
Like Site Mailer, you can install WP Mail SMTP by downloading it from the website, searching for it on the Plugins page of your WordPress dashboard, or finding it in the WordPress plugin directory.
Then, you have a few different avenues for getting set up.
1. Setup Wizard
Activating the WP Mail SMTP plugin will launch the Setup Wizard in your browser.
With the Setup Wizard, you can connect your website to an SMTP mailer service of your choice. Connecting to a separate mailer is the main part of the process that Site Mailer doesn’t include.
We recommend SendLayer, SMTP.com, or Brevo for general usage of transactional emails. The Gmail mailer is also fantastic if you already have a Google Workspace account. With it, you can send emails from any Gmail alias in WordPress.
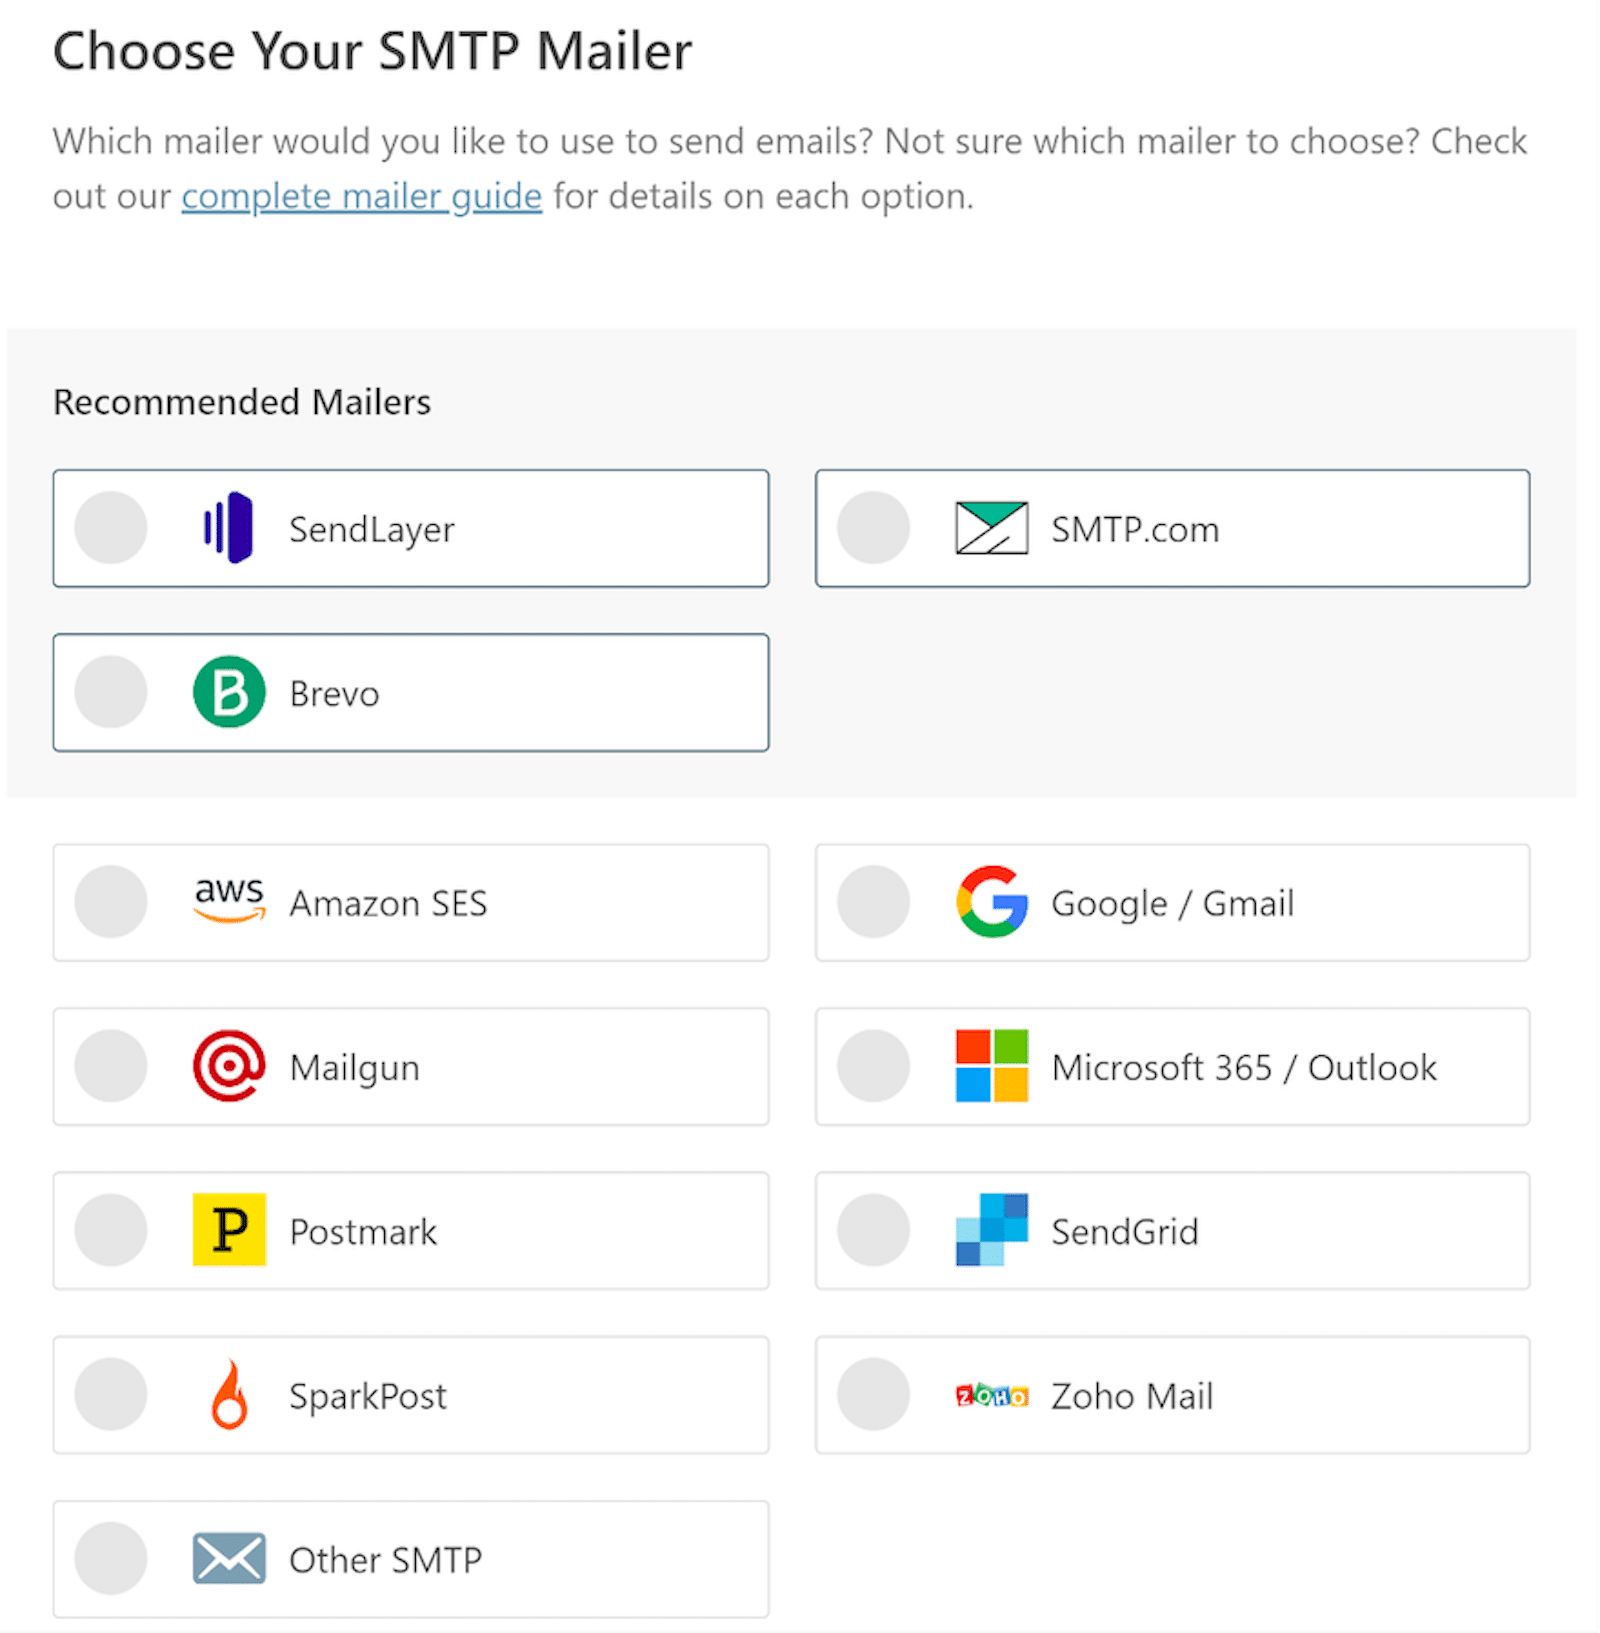
Then, if you don’t already have an account with your preferred mailer, you’ll create it now and connect it to your WordPress site.
The steps vary a little bit depending on which SMTP provider you choose, but WP Mail SMTP tells you exactly what information you need. For some of them, you will need to add DNS records to your domain settings, much like I described for Site Mailer.
After your mailer is connected, WP Mail SMTP will ask you which additional features you’d like to enable.
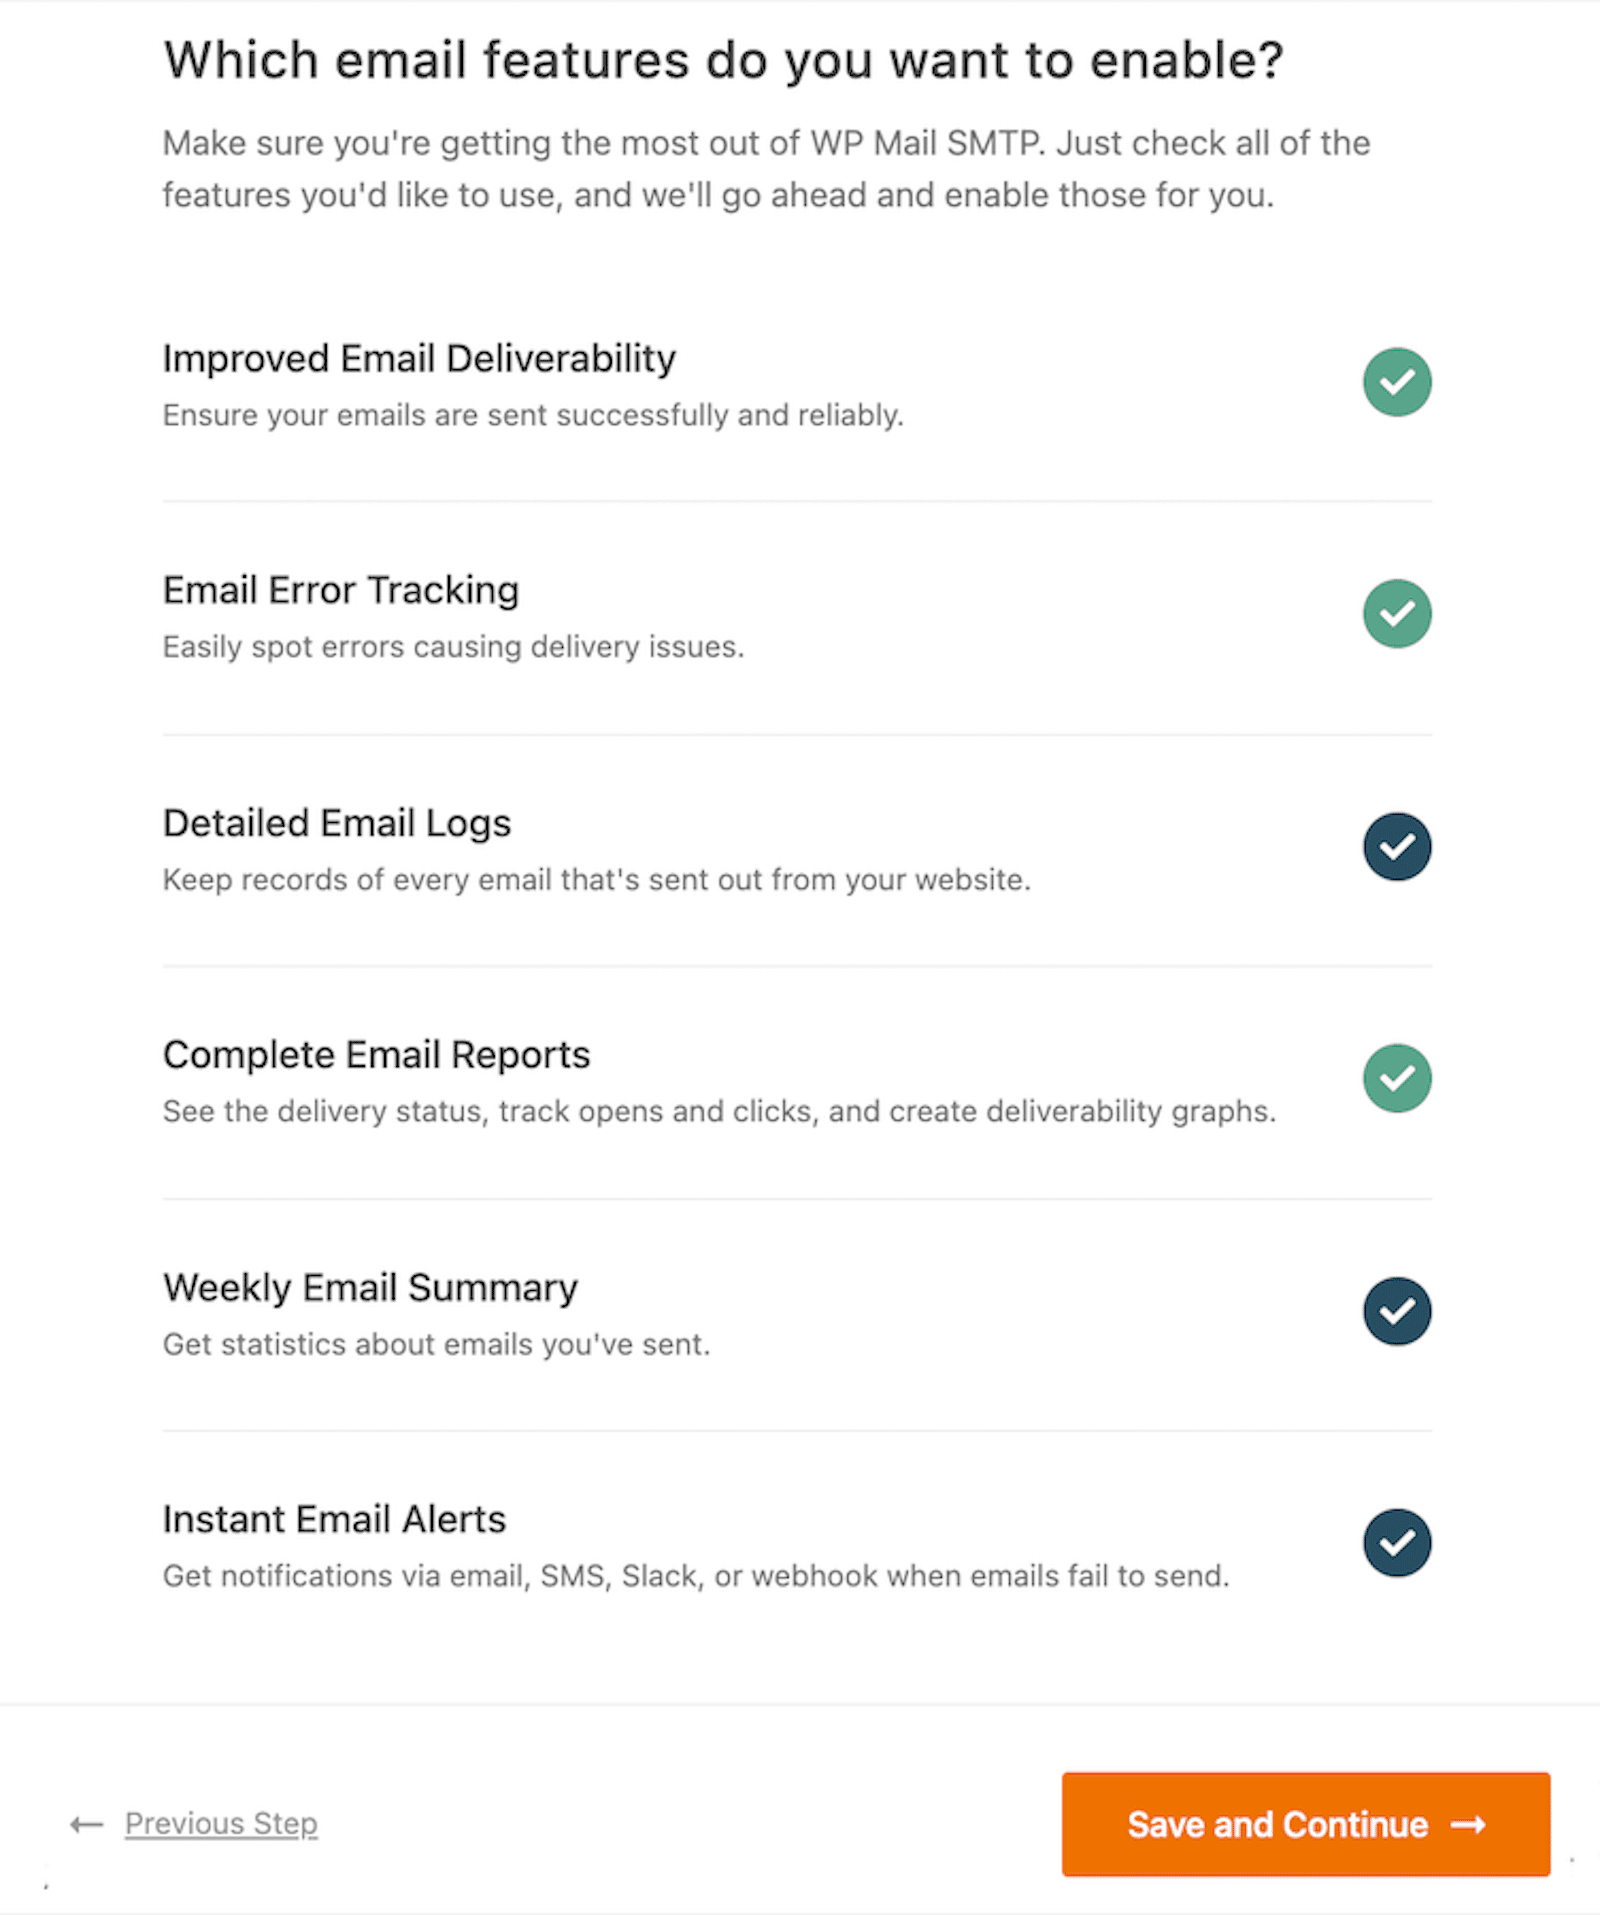
Take a look at the 3rd checkmark — Detailed Email Logs.
If you enable this setting, the next step in the Setup Wizard will offer some additional options related to this feature.
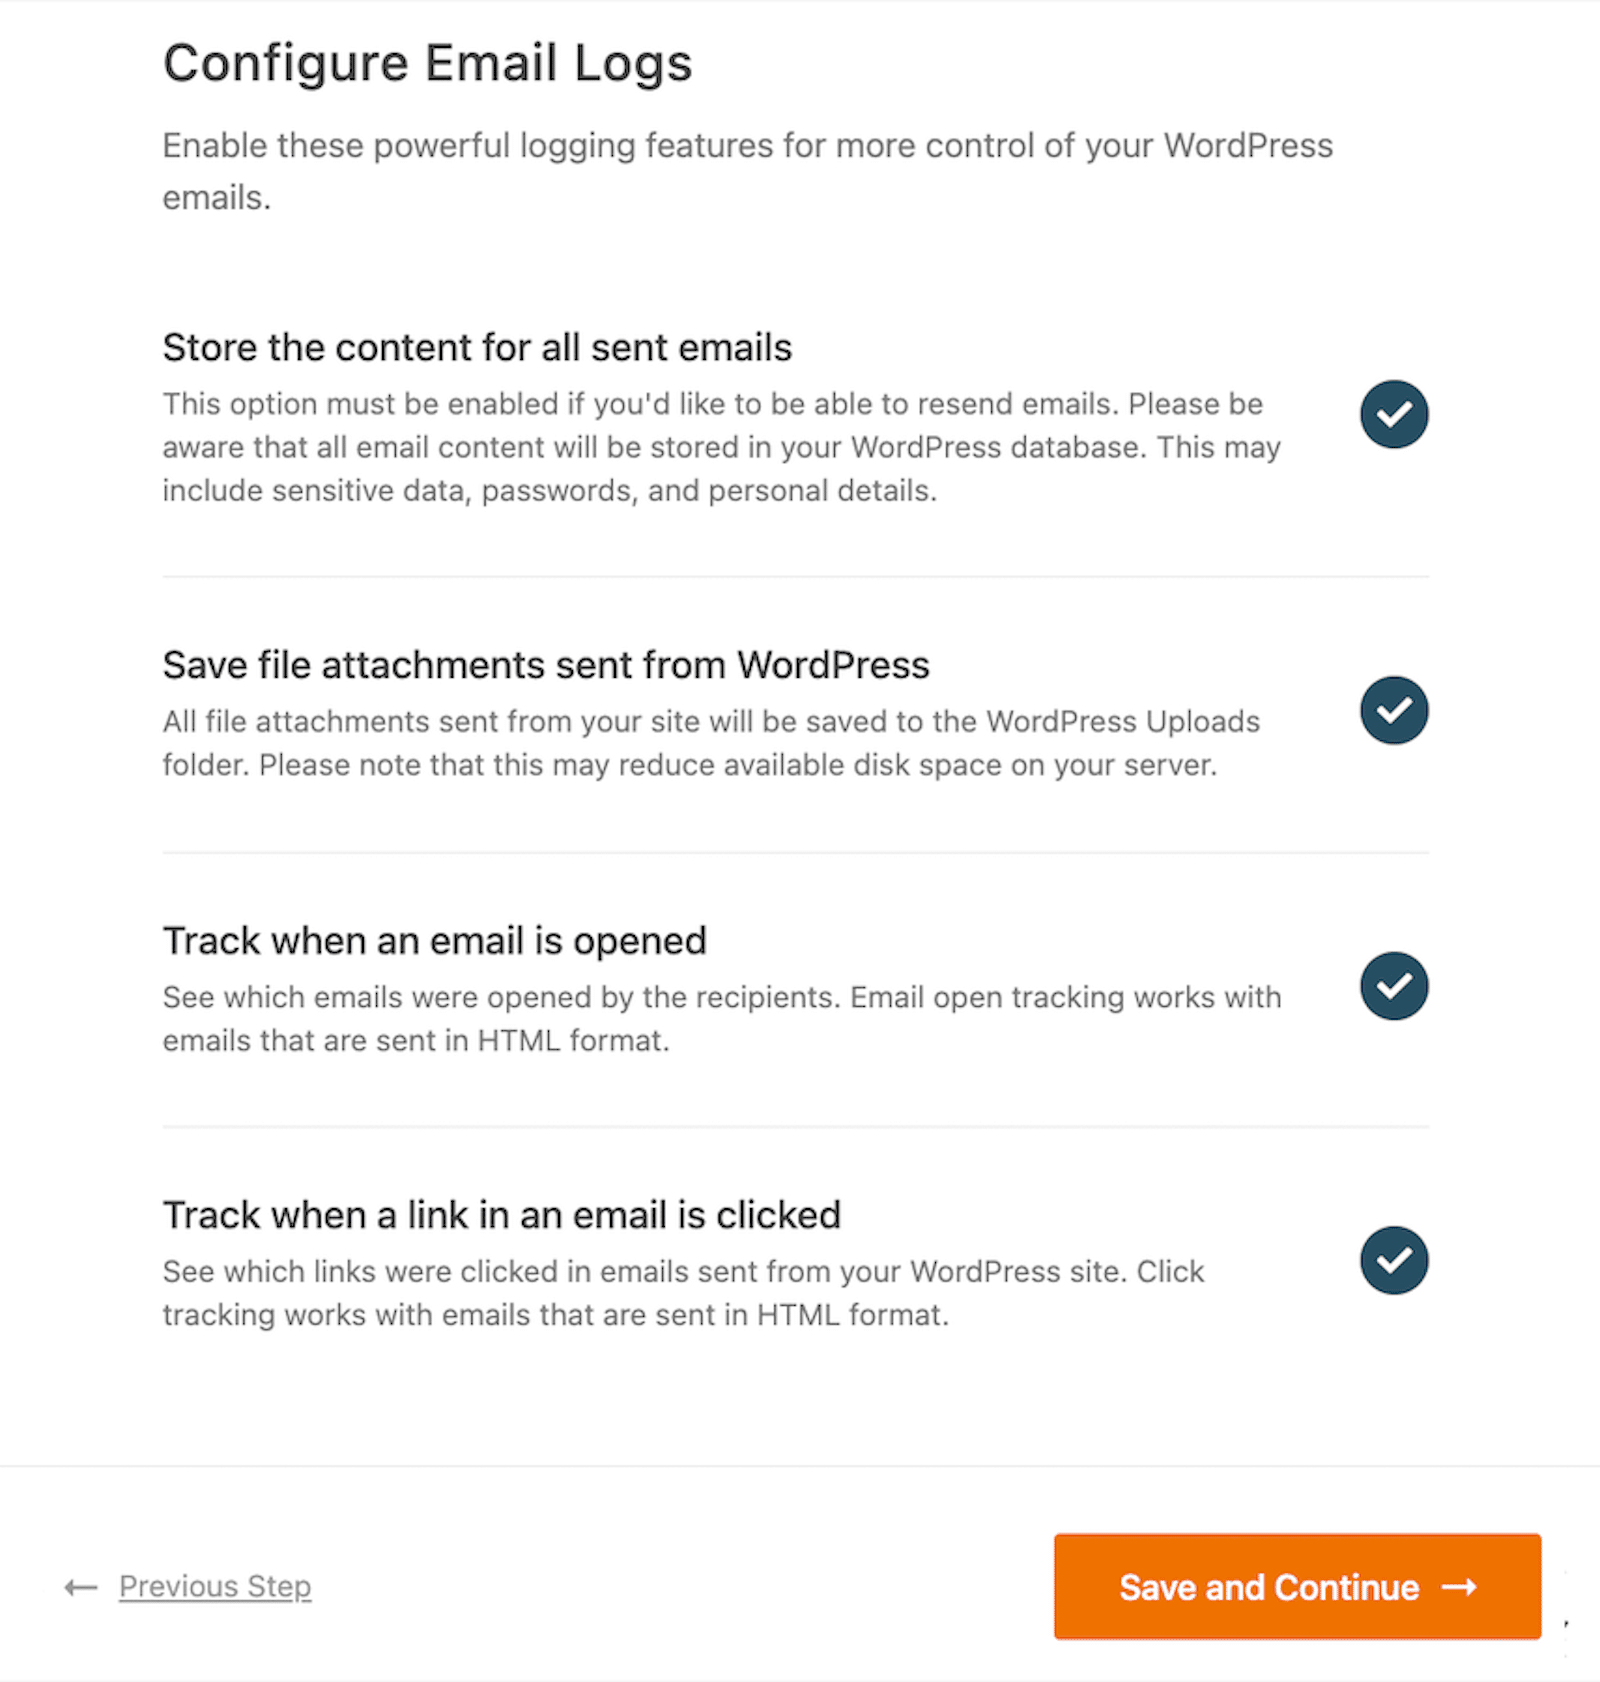
You can choose exactly which details you want to save for each email, including the content, attachments, and open and click through rates.
Then, if you have a Pro license or higher, you’ll copy the license key from your WP Mail SMTP account and paste it into the box for the final step of the Setup Wizard.
This way, you have access to all the additional features and updates that come with your plan.
2. White Glove Setup
Another way to get started with WP Mail SMTP is by taking advantage of our White Glove Setup.
You can request this service when purchasing a new license, or any time you want. But if are buying a new license, simply click on the Yes! I Need White Glove Setup checkbox on the checkout page.

Our White Glove Setup service comes with complete configuration and testing for your SendLayer, SMTP.com, or Brevo using your verified email account. In a nutshell, our professionals will:
- Add your preferred From Name and From Address
- Set up all of the required DNS records with your hosting providers
- Test mailer so you know your WordPress emails are delivering properly.
To learn more about using this service and what it can do for you, see how to request White Glove Setup.
3. One-Click Gmail Setup
If you choose Google/Gmail as your mailer in the WP Mail SMTP settings, you’ll see an option for One-Click Setup.

Then, after toggling ON, you just click the button to sign into your Google account and give WP Mail SMTP access to send email on your behalf.
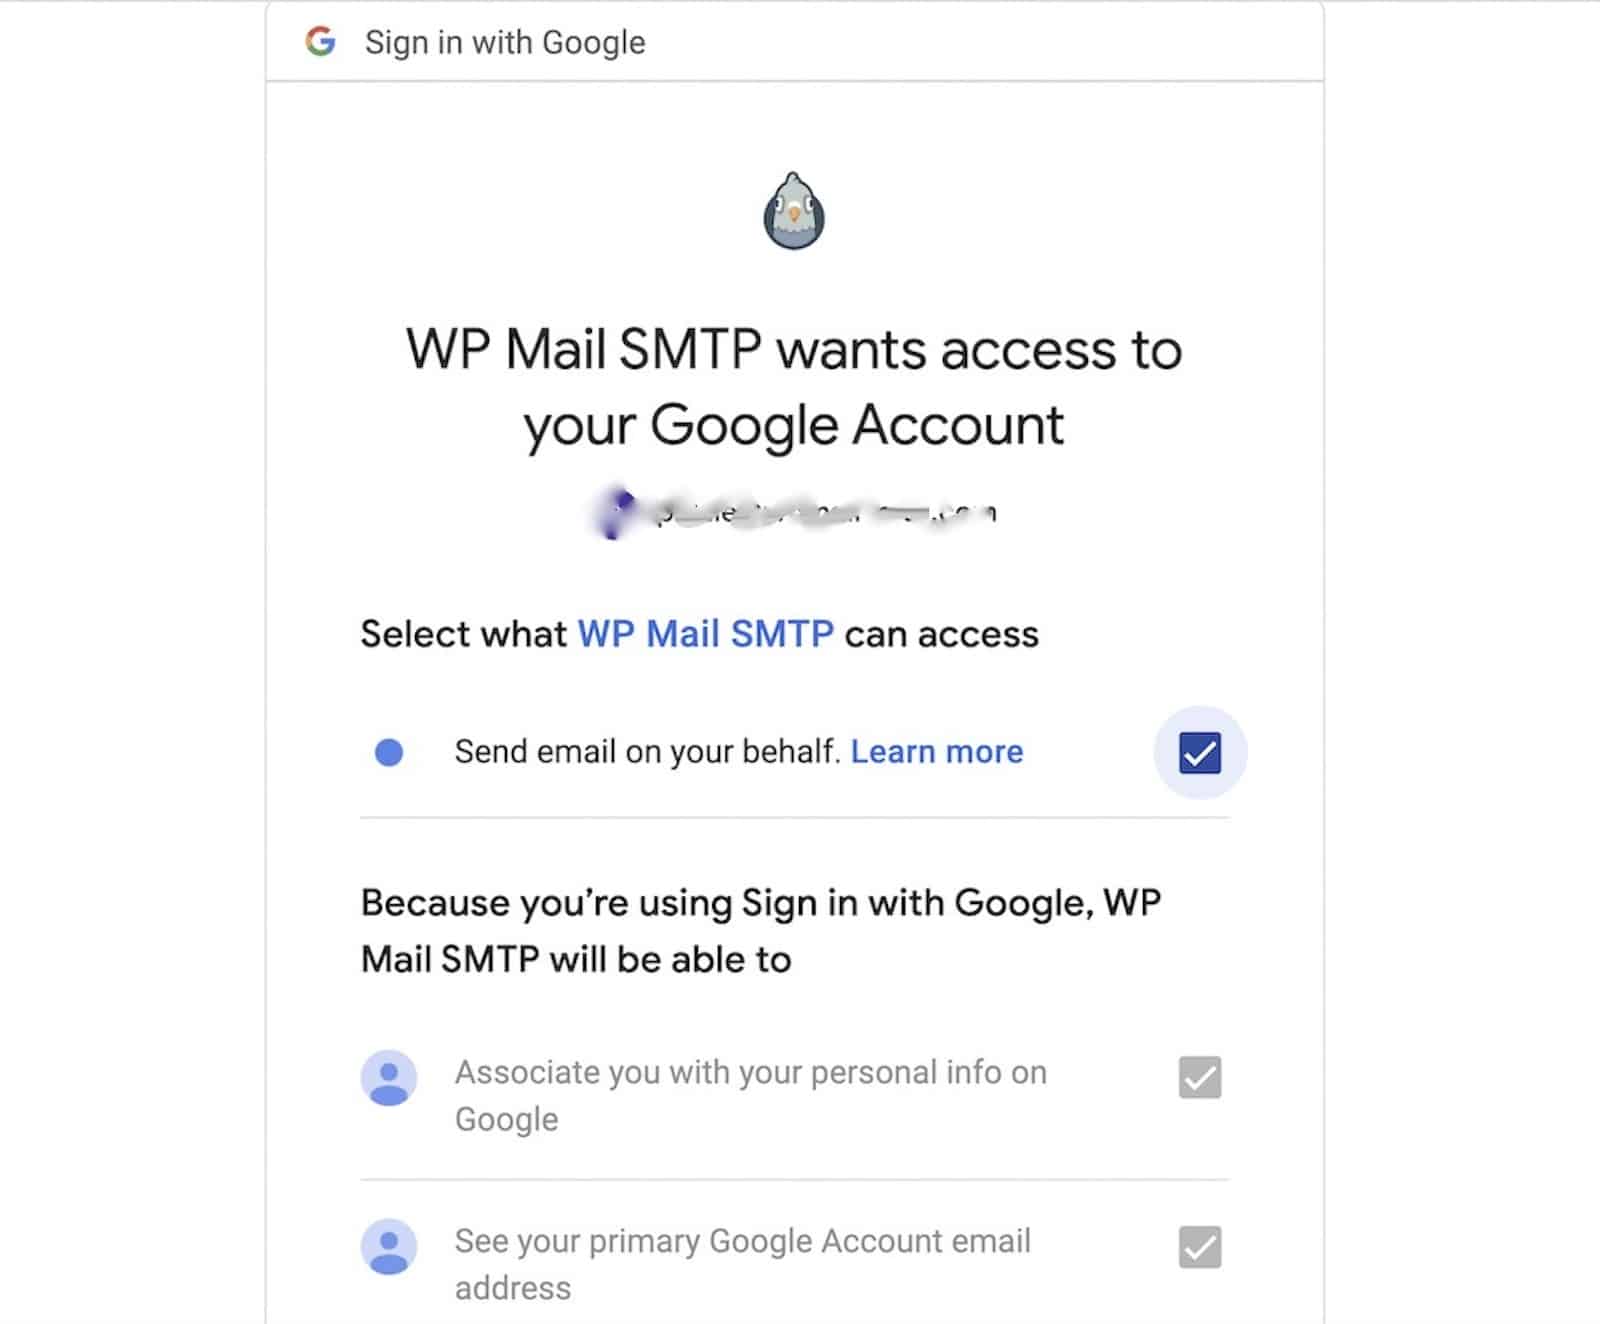
Once you’ve connected your site to your Gmail account, WP Mail SMTP will start using it to send your email.
So, that’s 3 simple ways to set up WP Mail SMTP on your WordPress site!
Features
Now let’s take a closer look at all of the features offered by Site Mailer and WP Mail SMTP.
Site Mailer Features
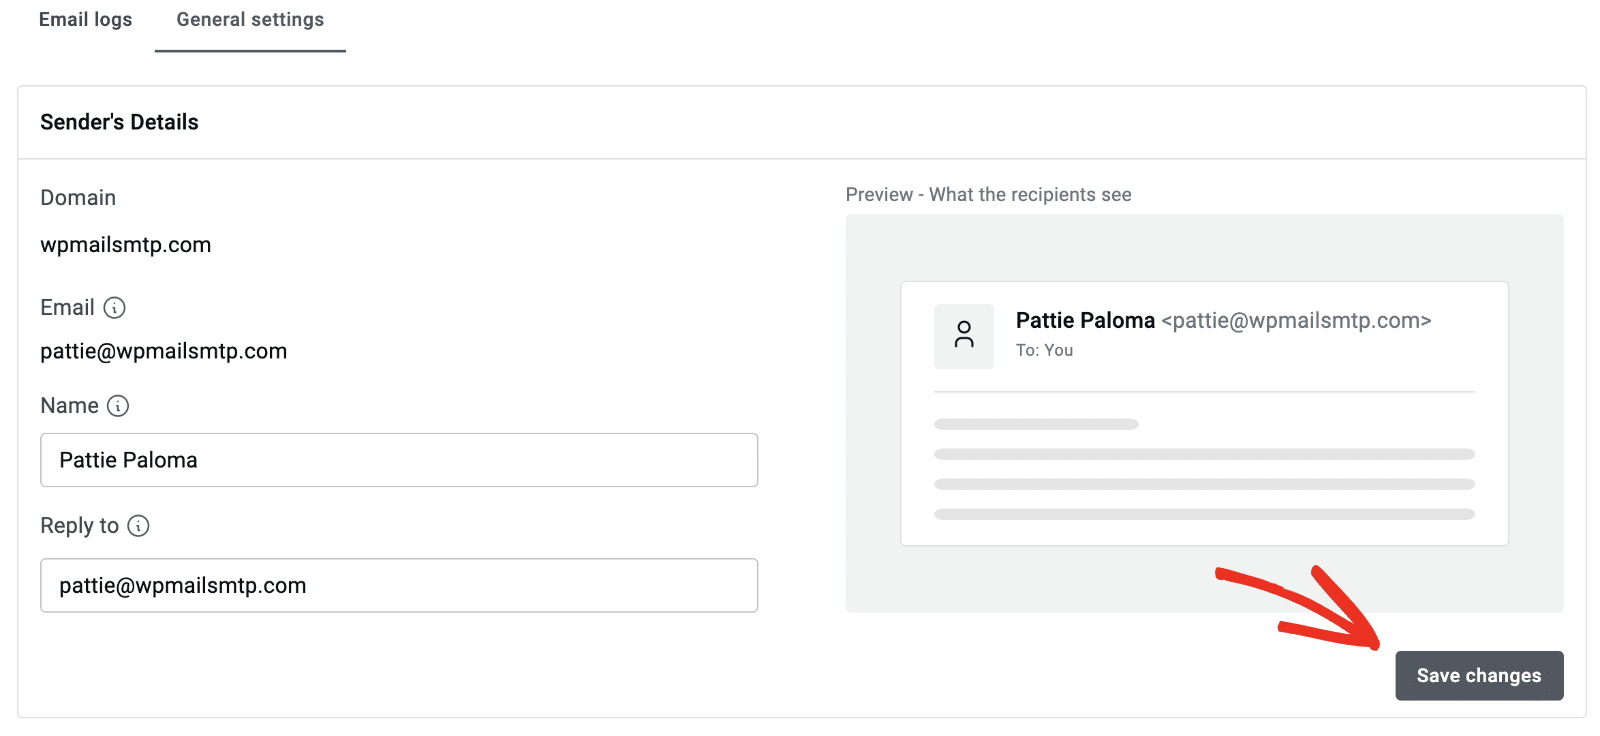
I briefly showed you the General settings tab earlier while setting up Site Mailer. This is where you customize the sender’s details for each email that will be sent from your site, along with a few additional features.
Sender’s Details
You can change the website domain, email address, sender name, and reply-to address, all while previewing how these details will appear to your recipients.
Test Emails
This tab is also where you send test emails to an address of your choice.
Here, you can also toggle on an option to save the email content of the test email you’re sending, so you can send the email again at a later time. You’re able to change the account that’s connected to Site Mailer in this tab, too.
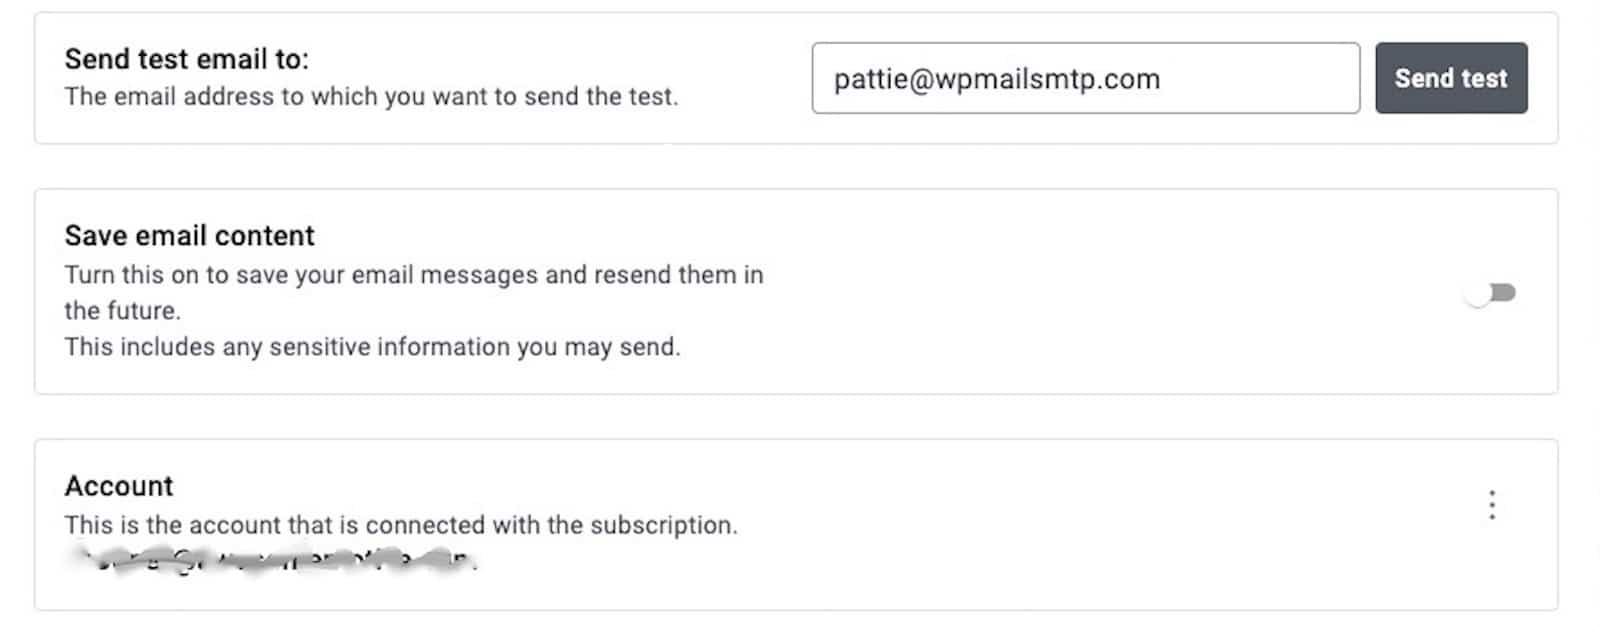
I successfully sent a test email when setting up the Site Mailer plugin and the message landed in my inbox as intended.
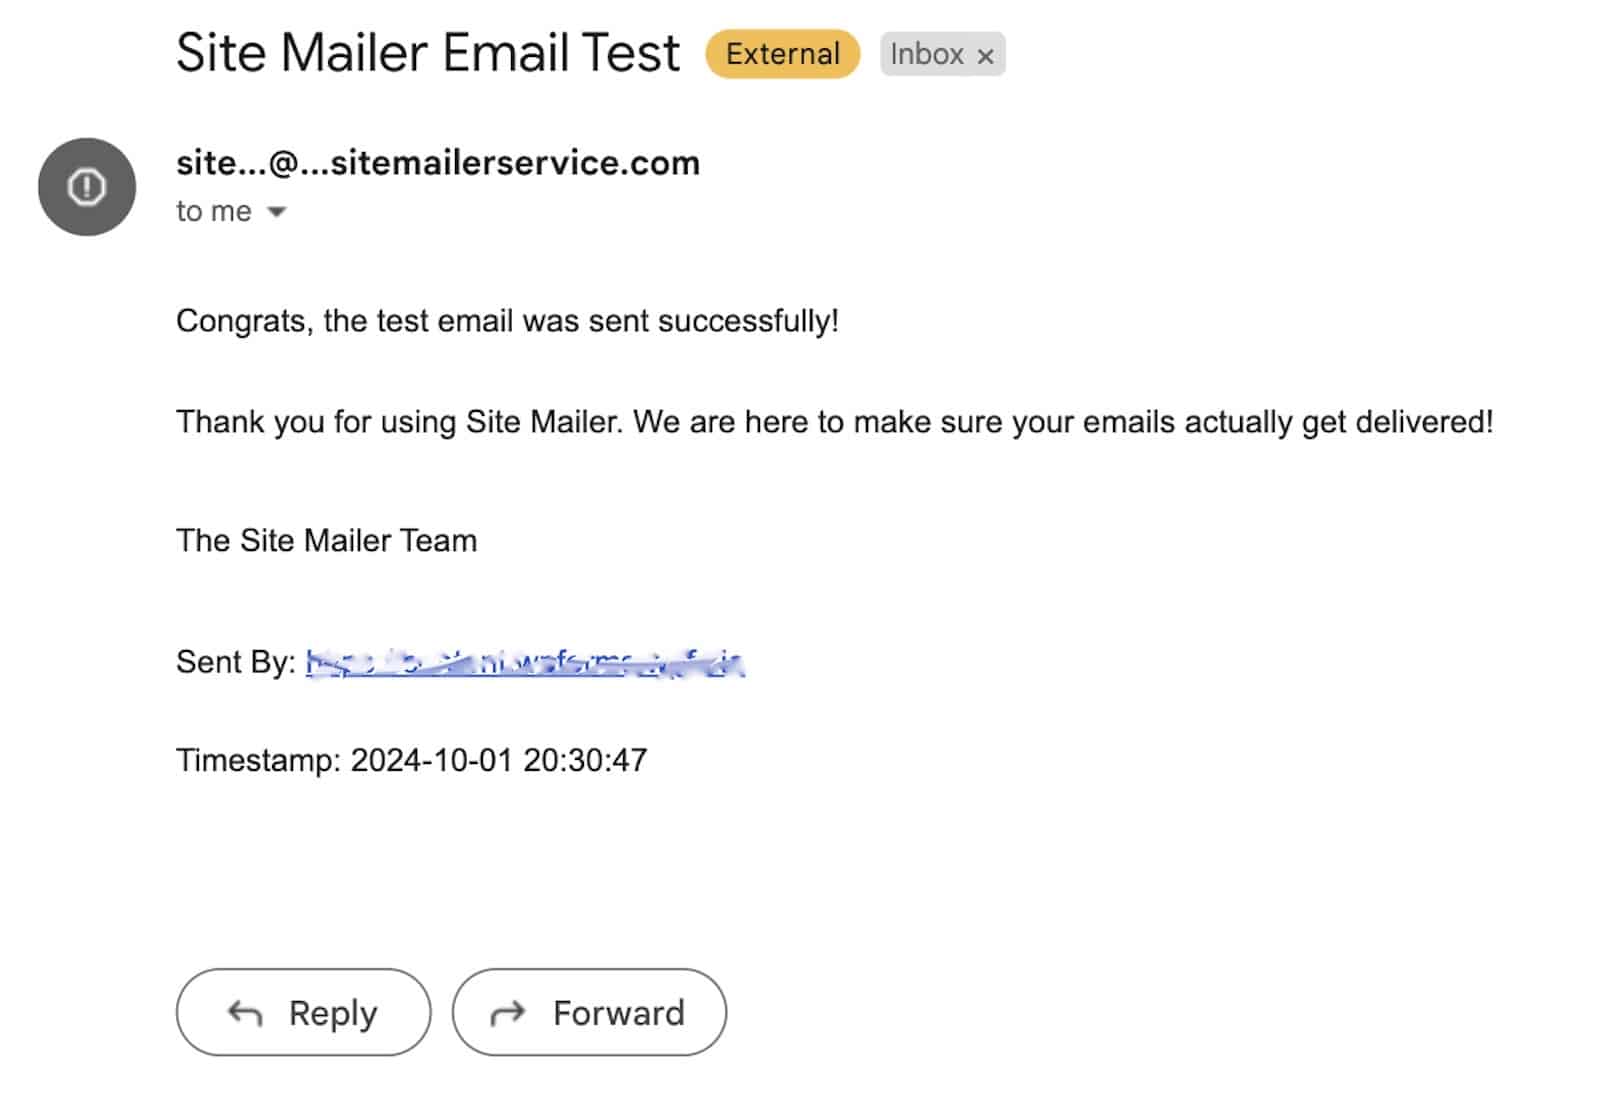
The message itself also includes helpful details like which website sent the test email and when it was sent.
Email Logs
The 2nd screen in the dashboard is the Email logs tab. This is where you see your total number of emails, along with those delivered, opened, and failed.
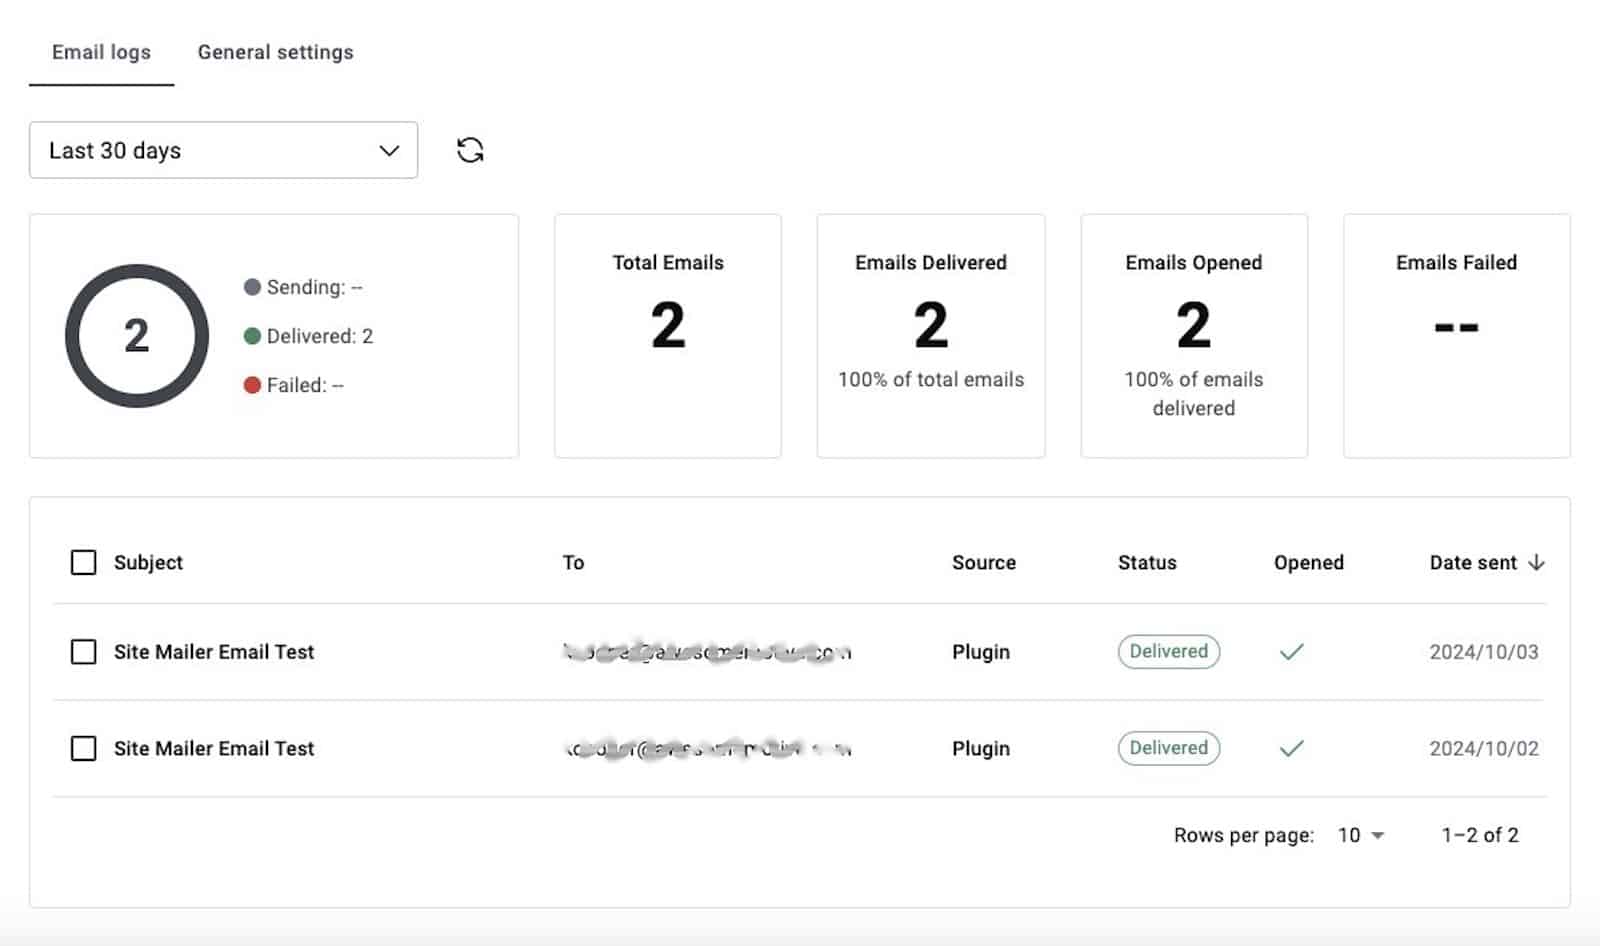
Each individual entry shows the email subject, the address(es) it was sent to, the source of the email, the status of the email, if it was opened, and the date it was sent.
As you can see, I sent 2 emails to myself to test it out, and the results are displayed in the log.
The Email logs also put all of the data into an infographic on the screen, where you can view stats for the current day, the previous day, the entire week, or the previous month.
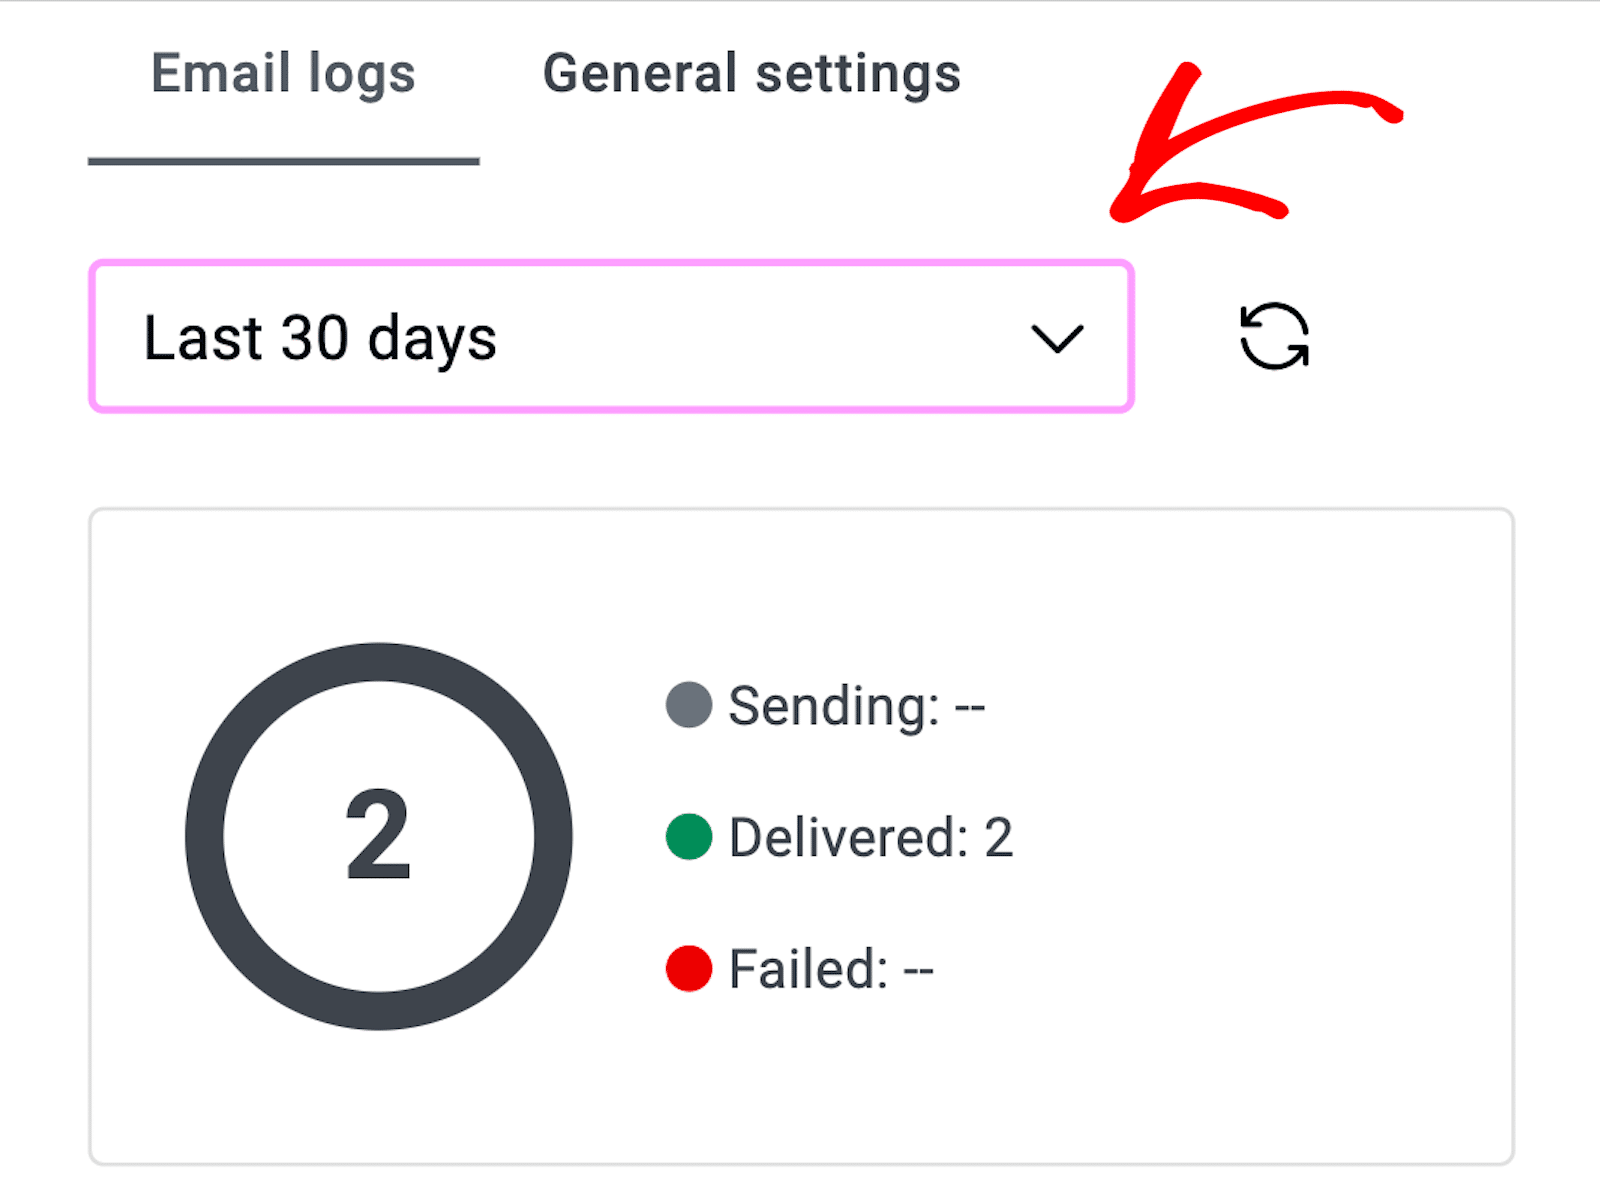
The Emails log page in the Site Miler dashboard gives a helpful and quick overview of what you’re sending from your site.
Each email is automatically recorded here, and this is where you can resend any that have failed.
WP Mail SMTP Features
Now, let’s consider WP Mail SMTP’s features.
Since WP Mail SMTP offers an extensive suite of tools, I’m simply summarizing each one below (rather than walking you through using it like I did with Site Mailer, above). Take a look at the provided links to learn more about each feature.
Email Logs
Like Site Mailer, WP Mail SMTP also allows users to view all their sent emails.
These email logs track important metrics like delivery status, opens, and clicks. Email logs are stored in the dashboard for easy access and can be filtered by date or email status.
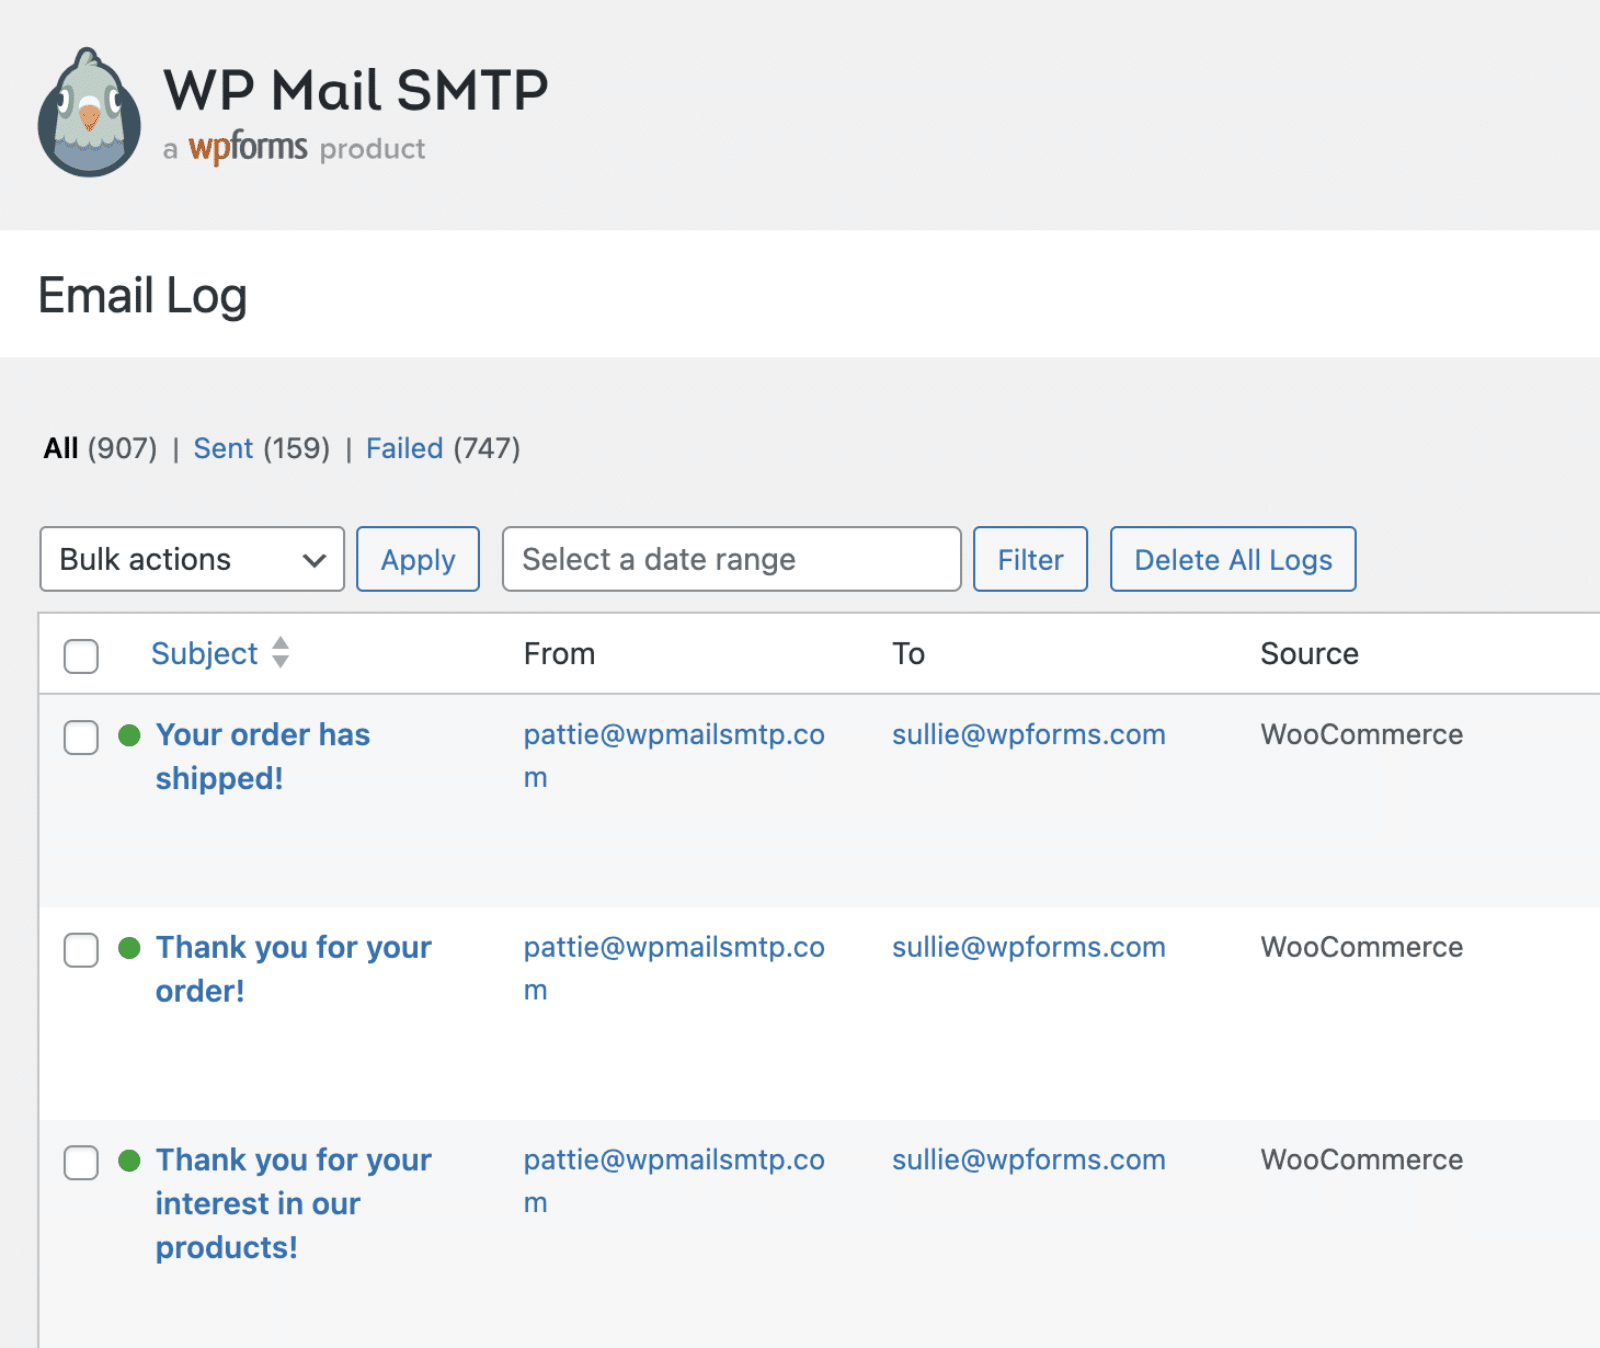
But, as I showed you earlier, there’s so much more you can do with your email logs. You can click each entry to open its details, retrieve any attachments, and even resend the email.
Email Reports + Summary
Another key feature of WP Mail SMTP is the Email Reports dashboard.
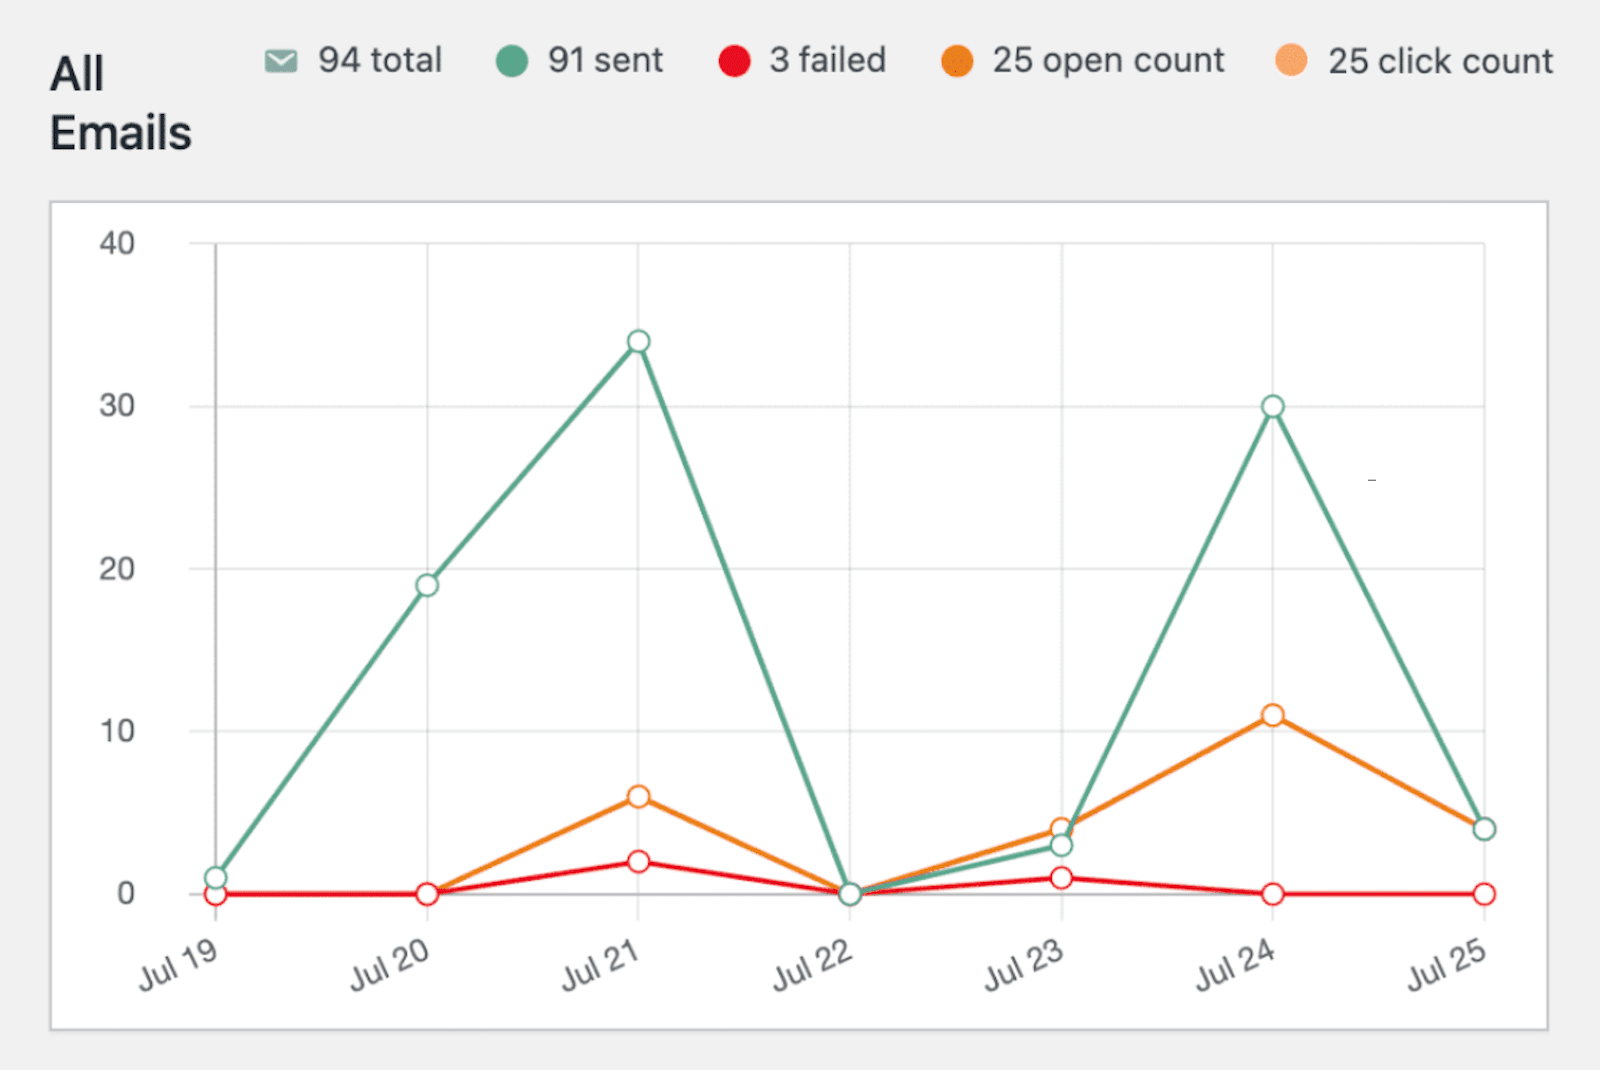
This is where you can access high-level performance summaries and graphs showing your email trends.
The reports give an overview of deliverability, open rates, and click rates. So, with all of the visual information, you can optimize your future campaigns.
Open and Click Tracking
With WP Mail SMTP, you can track whether your recipients open emails and click on any embedded links.
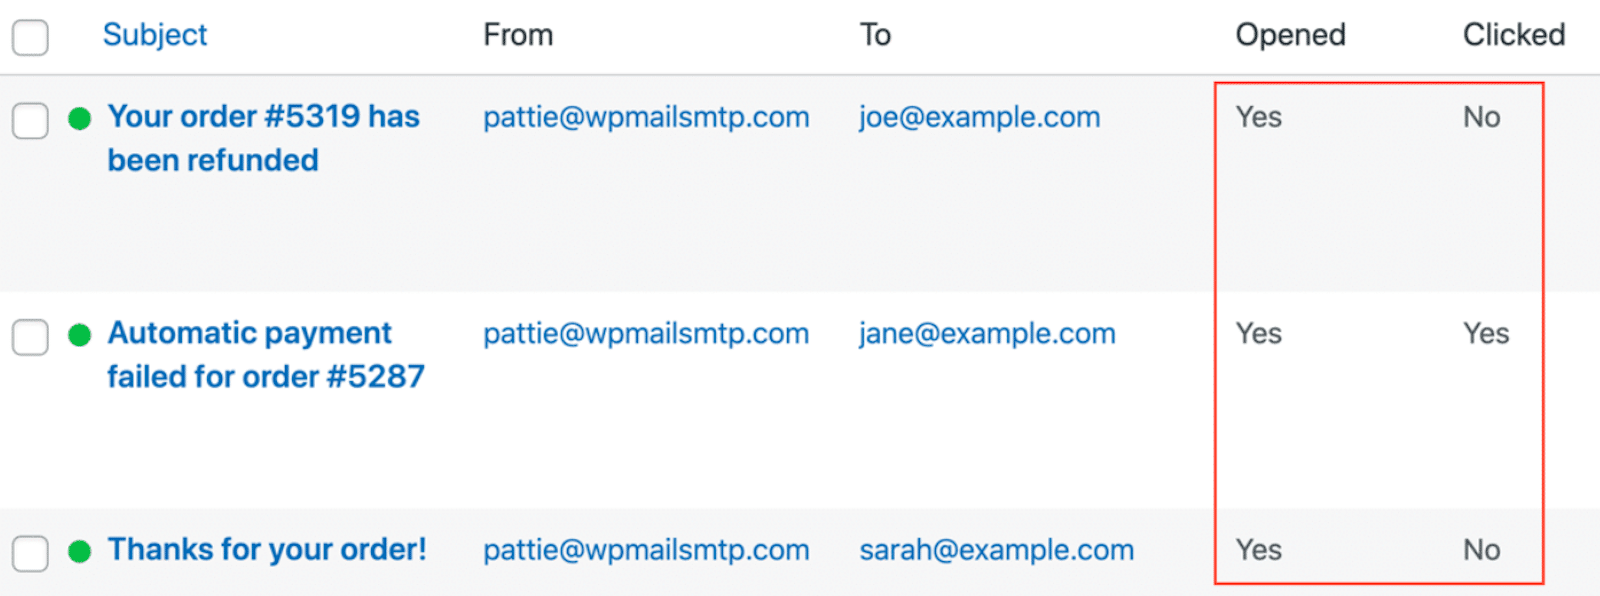
This is one of the features you can enable with a simple toggle of your computer mouse when setting up your email logs.
Open-and-click tracking is incredibly useful for monitoring user engagement with important transactional emails like purchase confirmations or form submissions.
Integrations
Unlike Site Mailer, WP Mail SMTP supports multiple third-party mailers.
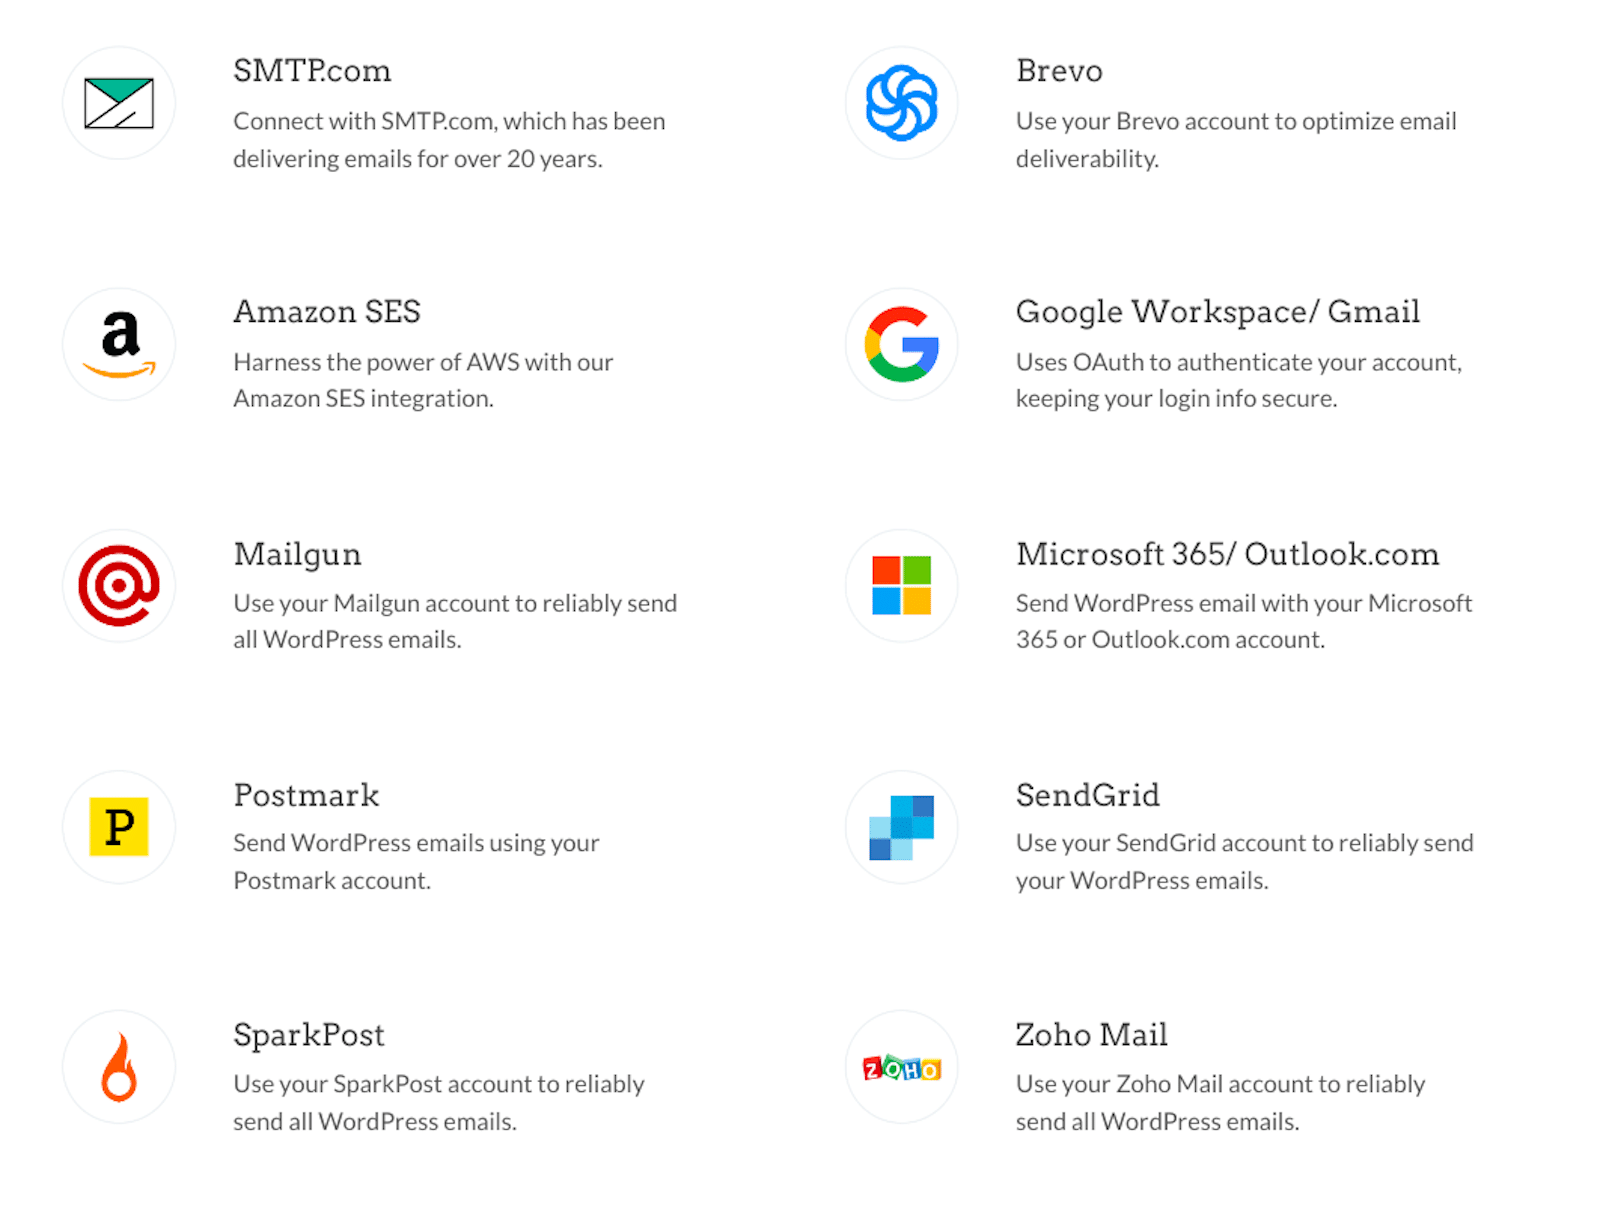
This means that your emails are sent through trusted services, which improves deliverability and reliability.
There are quite a few more customization options you have when integrating with third-party mailers, too. More on that, next.
Third-Party Mailers
Third-party mailers are a major point of comparison between Site Mailer and WP Mail SMTP. But, what difference does it make? Let’s find out.
Site Mailer – Doesn’t Use Third-Party Mailers
Site Mailer boasts that with the plugin, you can enjoy high email deliverability for transactional emails without using any third-party integration or SMTP plugin.
Everything happens through your WordPress dashboard with this plugin only.

So, this appears great at first glance in terms of being quick and easy. Site Mailer claims that SMTP plugins come with complex setups and integration with an external mail server. Which, to be fair, is halfway true — plugins like WP Mail SMTP integrate with an external mail server.
But really, that’s the beauty of WP Mail SMTP! And while it might seem complex, I’ve shown you that it doesn’t have to be complicated. Let’s consider what an SMTP plugin like ours can do with third-party mailers.
WP Mail SMTP – Uses Third-Party Mailers
With WP Mail SMTP, you can connect your site to not just 1 third-party mailer, but to multiple third-party mailers.
This optional setting is found in the Additional Connections settings where you chose your SMTP mailer earlier.
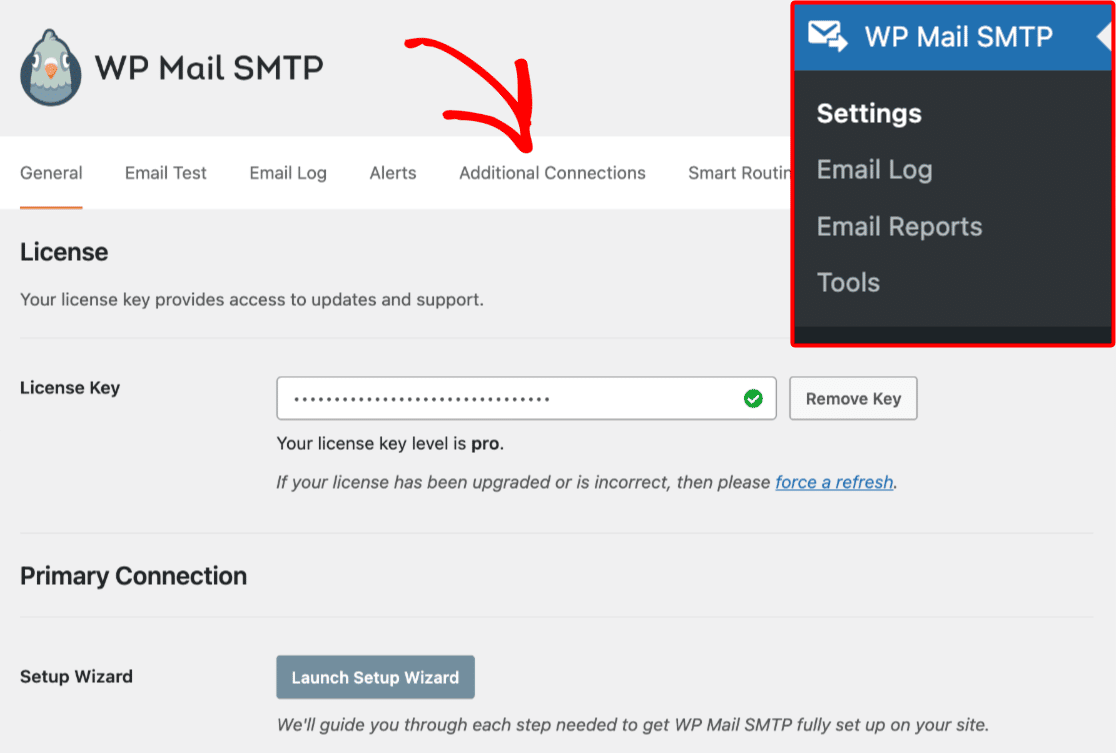
So, you might choose one of our recommended mailers like SendLayer, and then also set up an additional connection with the Brevo mailer. Countless benefits come with connecting to multiple mailers, like having backups in the case of email failure and using smart routing for even more customization.
For example, if an email fails to send using your Primary Connection — the first mailer you set up — then WP Mail SMTP will automatically try to send it again using your Backup Connection.
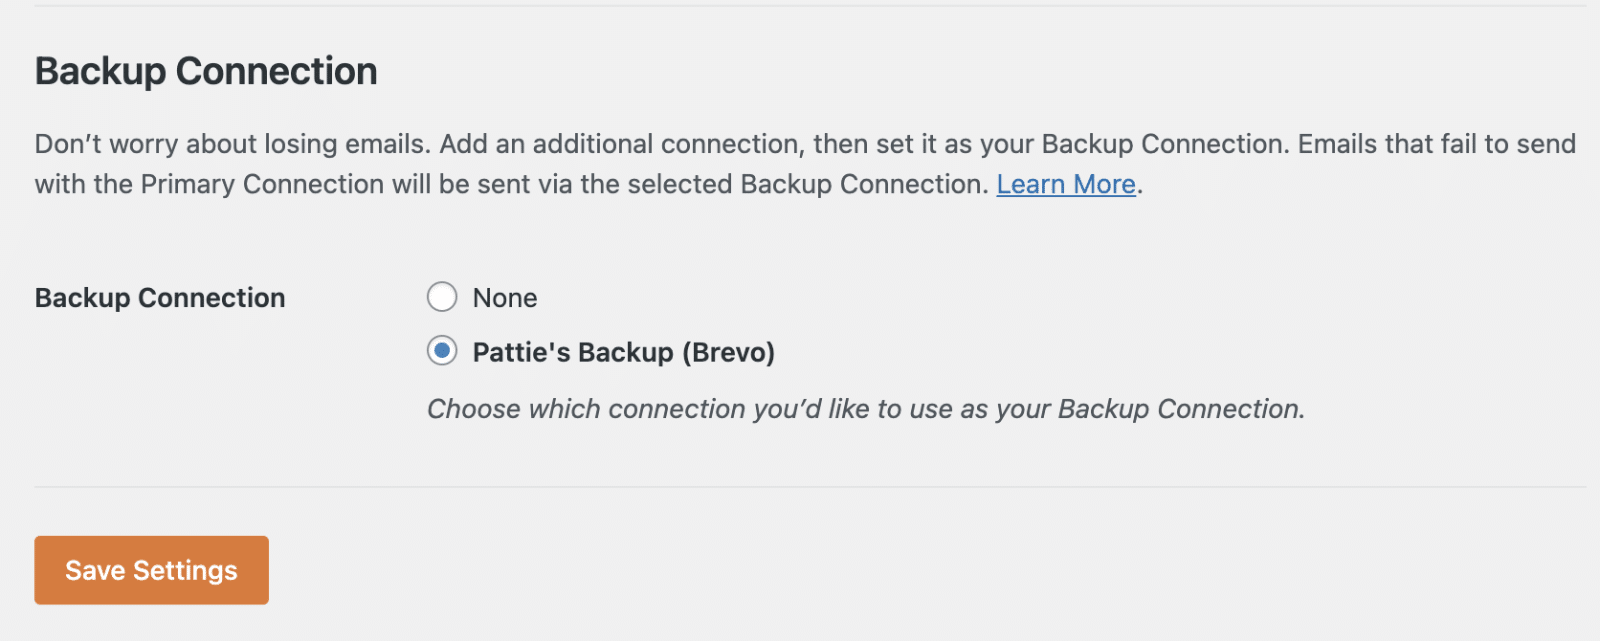
And, with the Smart Routing that I just mentioned, you can set up conditional logic to route your emails through different mailers based on custom rules.
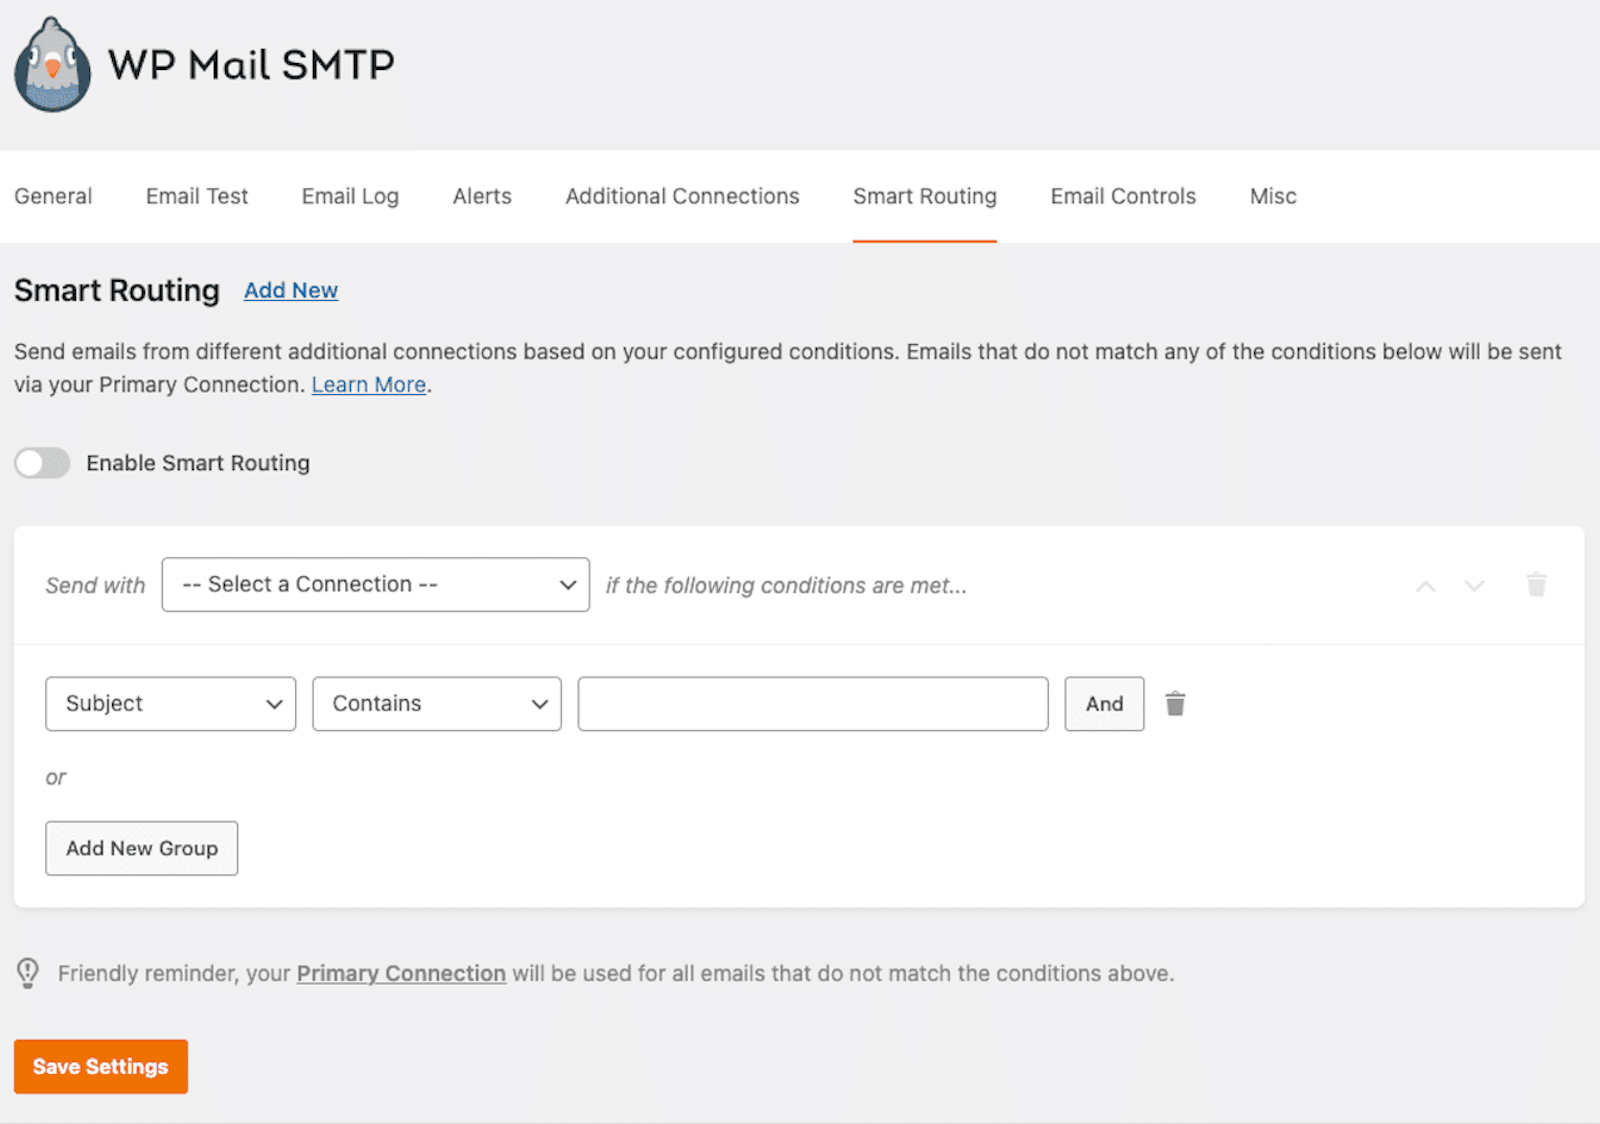
Smart Routing is particularly helpful if you’re sending different types of emails and want to use the best mailer for each one. You might use a transactional mailer for your eCommerce order notifications and a different mailer for your WordPress admin notifications.
Since Site Mailer doesn’t integrate with third-party mailers, you don’t have options like these.
Support
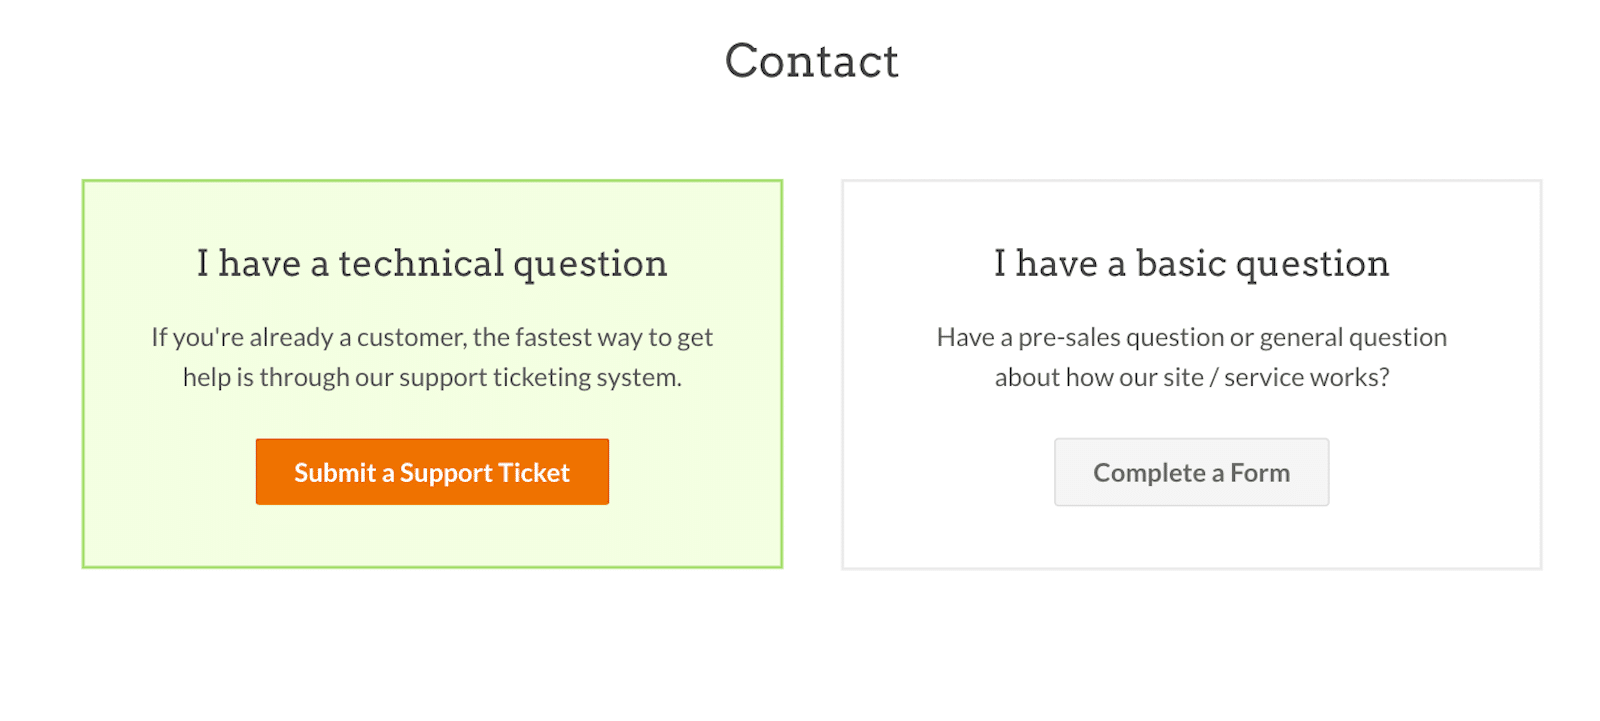
When it comes to customer support, both plugins offer solid assistance, though with a few differences.
Support with Site Mailer
Being part of the Elementor ecosystem, Site Mailer offers a variety of support options.

Users have access to the Elementor Help Center, live chat, comprehensive documentation, and direct contact for technical help.
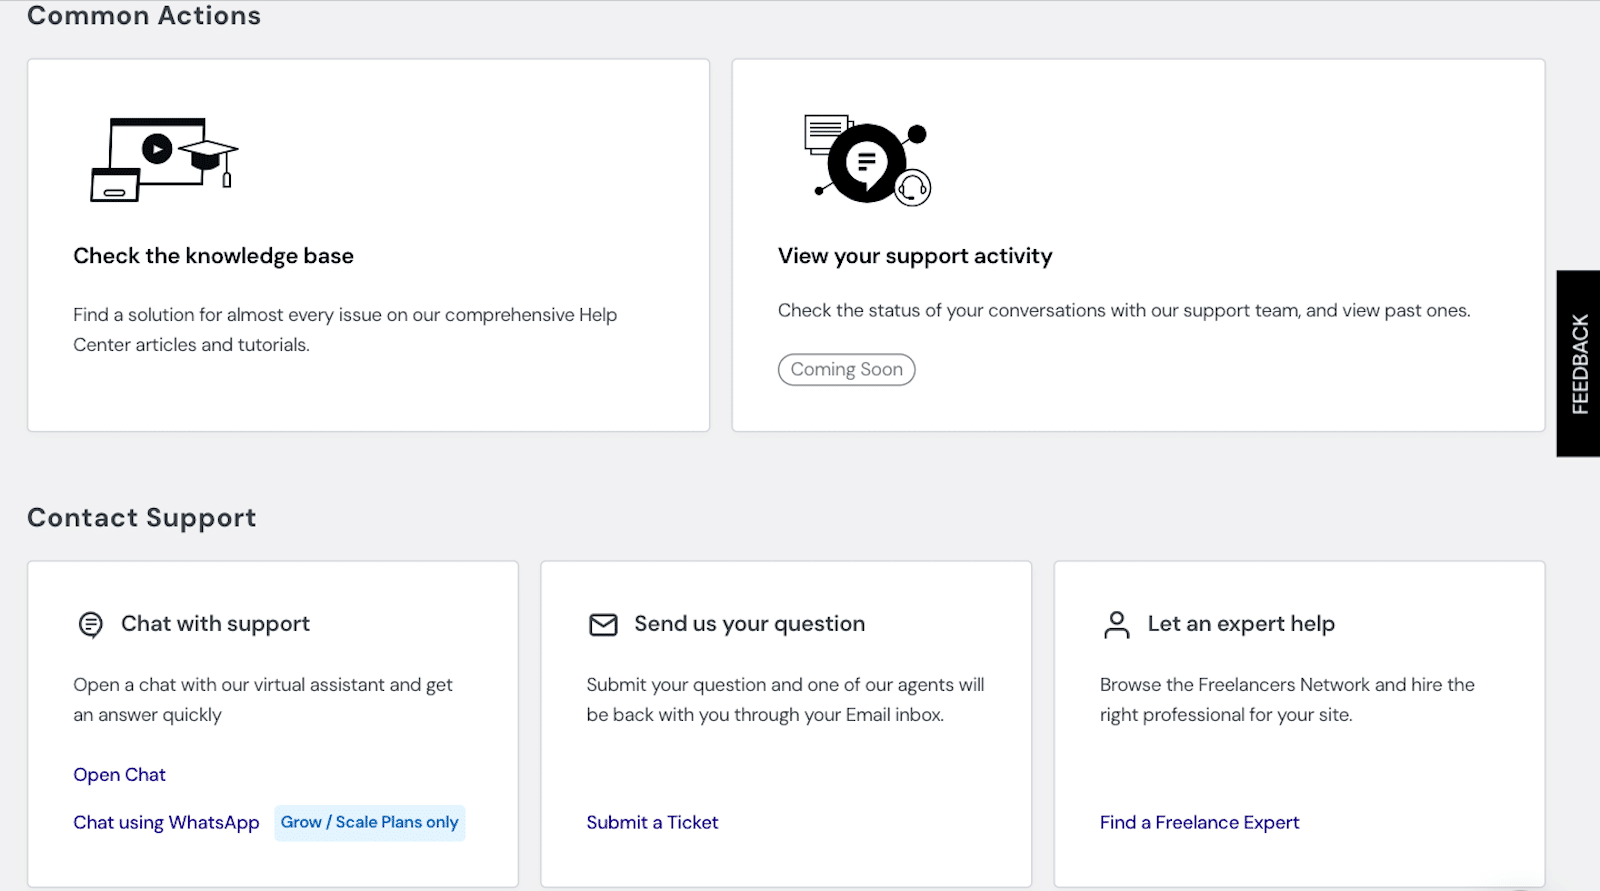
However, support quality may vary depending on the plan.
Support with WP Mail SMTP
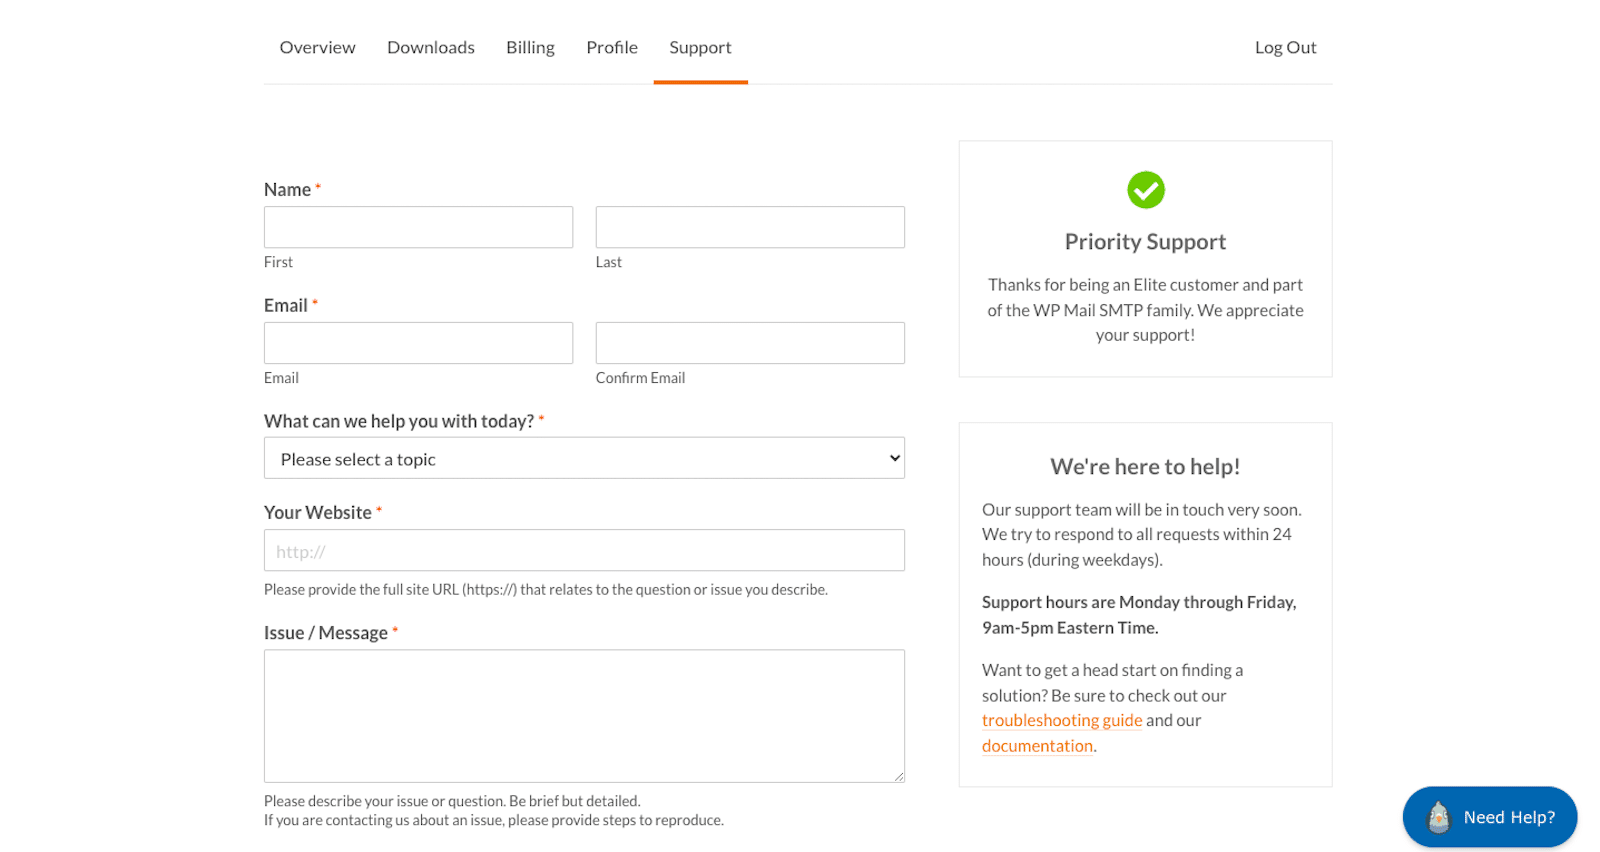
WP Mail SMTP also provides extensive support that includes detailed documentation, customer support chat, and direct contact for troubleshooting.
For paid users, there is priority support as well as additional White Glove Setup that I mentioned earlier, which helps take care of the entire configuration process.
Pricing
Finally, let’s compare the pricing structure of both plugins.
Site Mailer Pricing
Site Mailer offers a free trial to get started, although there’s no completely free tier.
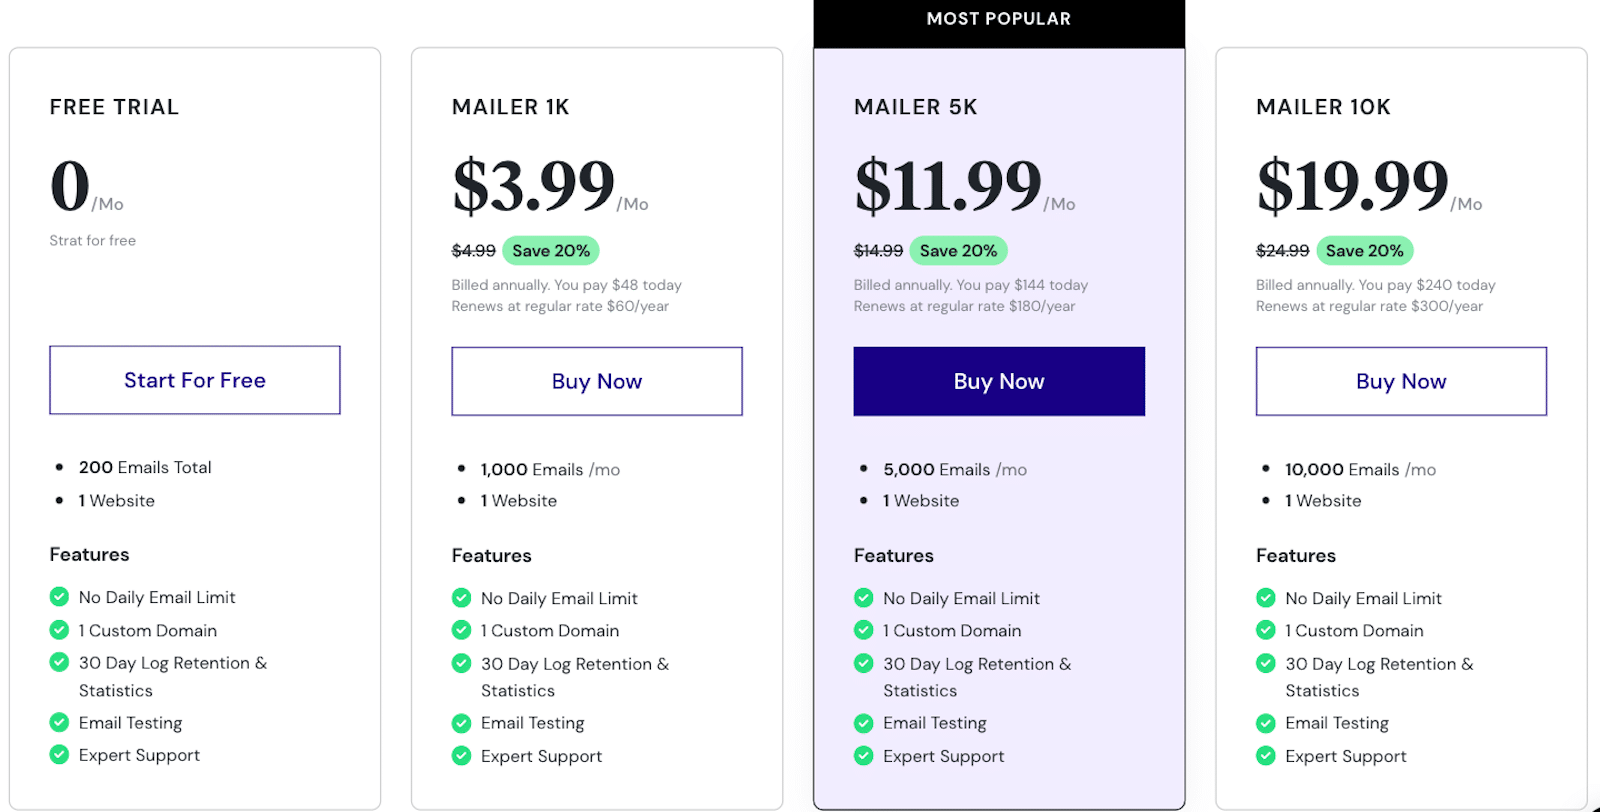
After the trial, users can select a paid plan based on the email volume they need.
WP Mail SMTP Pricing
On the other hand, WP Mail SMTP offers a free version (Lite) that provides essential features for many users.

For those needing more advanced functionality, such as email logs, one-click tracking, reports, and multiple connections, WP Mail SMTP has multiple paid plans ranging from Pro to Agency.
Paid plans also unlock access to the premium features I mentioned earlier like White Glove Setup and priority support.
On the subject of pricing, I’d like to point out that although I compared the features offered in a Site Mailer free trial with the features included in a WP Mail SMTP paid plan, the comparison is fair.
While a paid plan increases the volume of emails you get with Site Mailer, it does not offer any features that are additional to those that I covered with a free trial.
Also Read: SendLayer vs Brevo
So, Which Service Wins?
Sure, it’s easier to set up and use Site Mailer when you simply leave some things out — like not configuring a third-party mailer.
And keep in mind that you will still have to set up a custom domain if you want your send details to appear professional, which requires accessing your domain settings.
On the other hand, WP Mail SMTP provides multiple user-friendly setup options. You can connect it to multiple third-party SMTP providers to take advantage of features like backup connections and smart routing.
So, for the third-party mailer options and additional features provided by the plugin, WP Mail SMTP remains the superior choice.
FAQ
As the most reliable email delivery plugin for WordPress, we get a lot of questions about all things SMTP. Here are a few you might be interested in:
Can I use both Site Mailer and WP Mail SMTP on the same site?
No, using both plugins at the same time might lead to conflicts, as they both manage email deliverability but use different methods.
What’s the best mailer to use with WP Mail SMTP?
Popular options include SendLayer, SMTP.com, and Brevo, but WP Mail SMTP supports a wide variety of third-party mailers.
You have the freedom to choose what works best for your site’s email needs.
How does email tracking work in WP Mail SMTP?
With the Pro plan or higher, you get access to Email Logs and Open & Click Tracking.
You can view the status of sent emails, check which recipients opened your emails, and track which links they clicked.
Next, Test Your Setup
In this comparison, I showed you how to send a test email with Site Mailer. And while this is one of the many features offered by WP Mail SMTP, I didn’t fully cover it here.
So if you’ve decided to go with WP Mail SMTP over Site Mailer, it’s time to test your SMTP setup! Take a look at our easy-to-follow tutorial to do it.
Ready to fix your emails? Get started today with the best WordPress SMTP plugin. If you don’t have the time to fix your emails, you can get full White Glove Setup assistance as an extra purchase, and there’s a 14-day money-back guarantee for all paid plans.
