AI Summary
Have you ever wondered how to save emails from your WordPress contact forms into your site’s database?
If you’re using WordPress, the information entered into a contact form doesn’t have to be lost when hitting the submit button. By saving this data, you can have a historical record of communication that can be accessed at any time.
Save Contact Form Emails in WordPress
This tutorial shows you how to improve your form and email management by utilizing WP Mail SMTP for email logging and the premium version of WPForms for entry storage.
In This Article
Why Save Contact Form Emails in the WordPress Database?
Emails submitted using a contact form should be saved in your WordPress database for easy access. The importance of this strategy is highlighted by a few important reasons, such as:
- Data Security — You may avoid losing important information by storing your emails in WordPress’s database. Emails sent via the contact form will be saved in case they are lost in transit or deleted inadvertently.
- Business Continuity — Contact form emails often contain crucial client requests or consumer feedback; keeping these in a database helps keep business running smoothly. In the event of email service disruptions, this data archive is invaluable.
- Email Analytics — You may find a treasure trove of information about your customers’ communication habits within the stored emails in your WordPress database. Based on customer responses and questions, you can adjust your business tactics accordingly.
- Communication Management — Keeping a log of contact form emails allows for more organized communication management by facilitating tracking, searching, and sorting. When dealing with a large amount of mail, this is invaluable.
- Resending Failed Emails — You may effortlessly resend any emails returned as undelivered with WP Mail SMTP’s built-in resending capability. This will improve your customer service by ensuring that critical communications are never lost in transit.
Contact form emails can be stored in the WordPress database, but this is just the beginning of their usefulness. The next step is understanding how to do it effectively.
How to Save Contact Form Emails in WordPress Database
There are 2 simple ways to save contact form emails in your WordPress database: with and email logging plugin, or using your form builder plugin.
Here’s how to use both methods to keep track of all your contact form emails.
Method 1: Store Contact Form Emails in Email Logs With WP Mail SMTP
You must have the WP Mail SMTP Pro license or higher to enable complete email logging on your WordPress website. Follow the steps below to get started.
1. Install and Activate WP Mail SMTP
To log your WordPress emails, we will install the WP Mail SMTP plugin. Over 3 million WordPress users rely on WP Mail SMTP to increase email delivery and tracking.
You can get the .zip file for installing the WordPress plugin from your WP Mail SMTP account. It’s available in the Downloads tab.
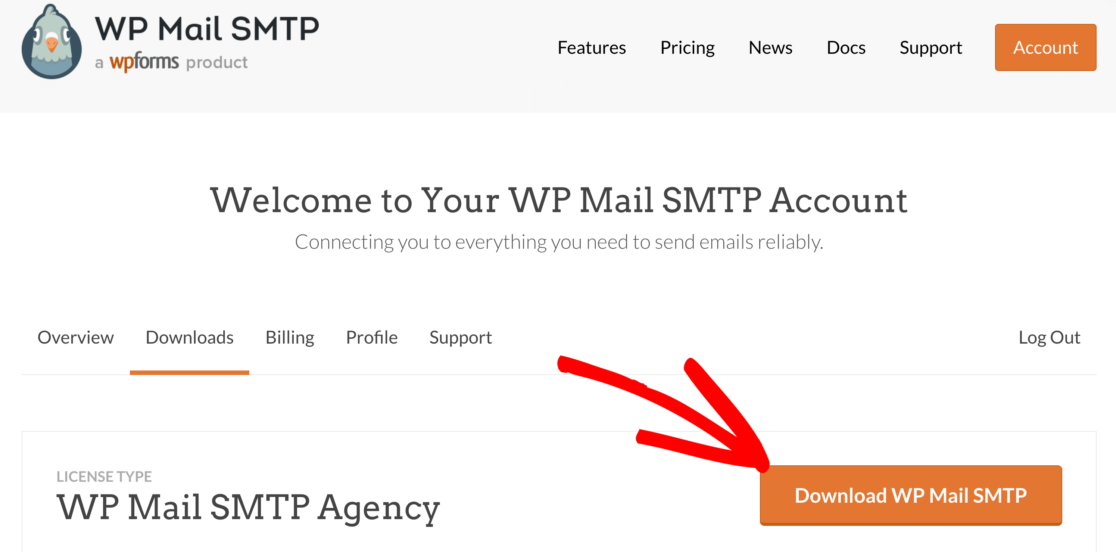
The next step is to log in to WordPress and upload the .zip file to the Plugins page. If you need assistance, check out how to install a plugin in WordPress.

The WP Mail SMTP Setup Wizard will launch as soon as the plugin is activated on your WordPress site.
2. Choose Your Email Service Provider
We may now use the Setup Wizard to configure your preferred SMTP service. Click the Let’s Get Started button to begin.

WP Mail SMTP works with various paid and free email providers. To select a mailer, click its name on the following screen.
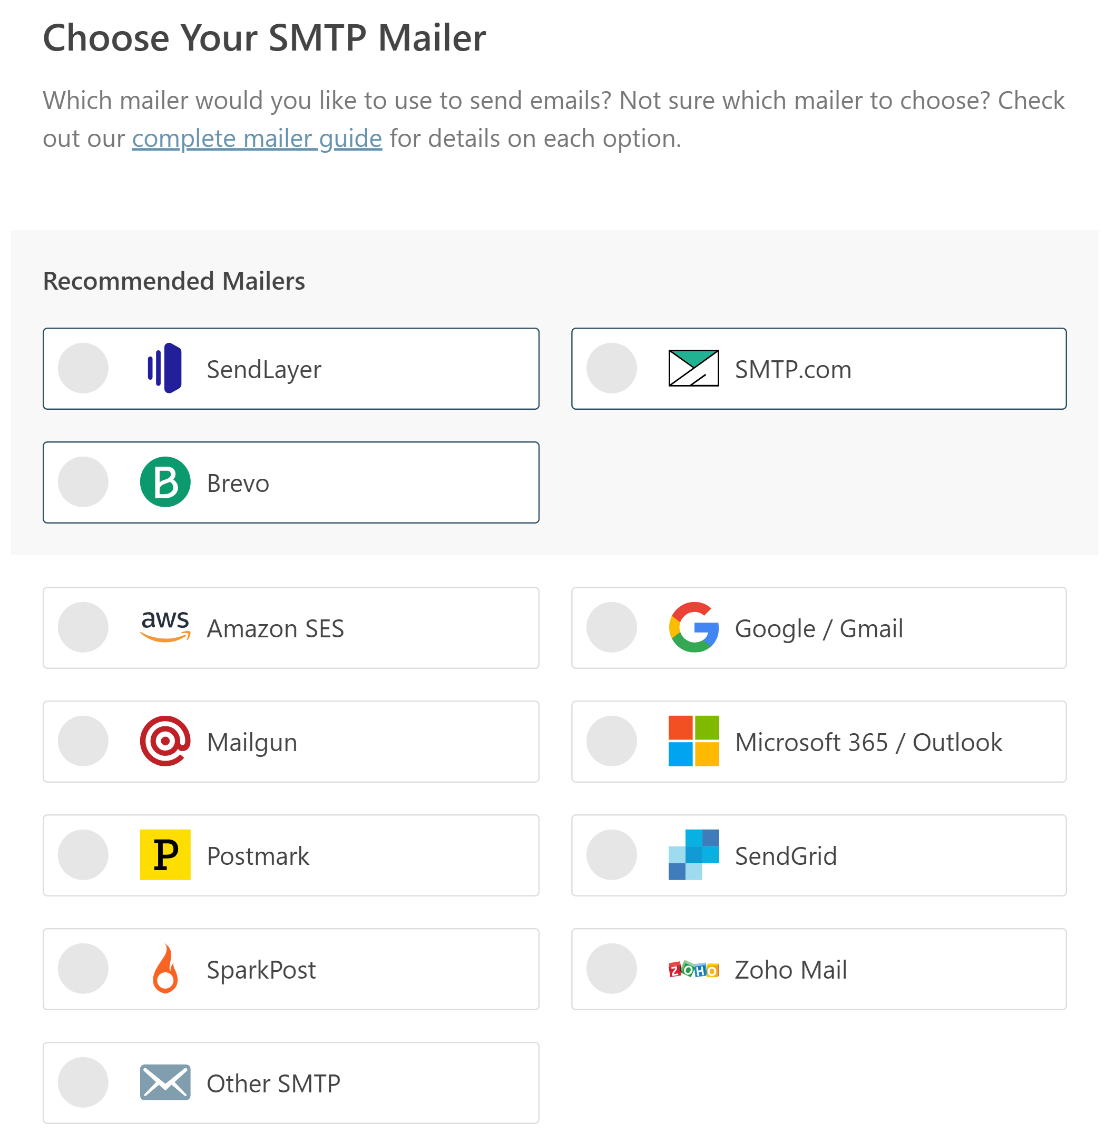
Once you’ve decided on a mail provider, you can proceed with the setup by visiting our documentation in the table below.
| Mailers available in all versions | Mailers in WP Mail SMTP Pro |
|---|---|
| SendLayer | Amazon SES |
| SMTP.com | Microsoft 365 / Outlook.com |
| Brevo | Zoho Mail |
| Google Workspace / Gmail | |
| Mailgun | |
| Postmark | |
| SendGrid | |
| SparkPost | |
| Other SMTP |
When an email is sent, most logging plugins will record it as either Sent or Failed. However, they can’t give you any information about what happened after that.
If you use WP Mail SMTP for logging WordPress emails, you will have more visibility into the delivery status of your messages.
With WP Mail SMTP, you can unlock two additional status reports: Unconfirmed (Waiting) and Confirmed (Delivered), that inform you of the following things:
- Sent — This indicates that WordPress generated and sent the email successfully.
- Failed — If an email status is “failed,” it was never sent. This can appear if your SMTP server is down or if there is a problem with your server’s setup.
- Confirmed — When an email is confirmed, it means that it was successfully sent and delivered to the receiver’s inbox.
- Unconfirmed — Unconfirmed indicates that the email was successfully delivered but that WP Mail SMTP is still awaiting the status.
Unconfirmed and Confirmed email services are supported by the following email providers. Here’s a chart to show each status and the mailers that support them:
| Email Service | Failed | Sent | Waiting / Unconfirmed | Delivered / Confirmed |
|---|---|---|---|---|
| SendLayer | ✓ | ✓ | ✓ | ✓ |
| SMTP.com | ✓ | ✓ | ✓ | ✓ |
| Brevo (formerly Sendinblue) | ✓ | ✓ | ✓ | ✓ |
| Amazon SES | ✓ | ✓ | ||
| Google Workspace / Gmail | ✓ | ✓ | ||
| Mailgun | ✓ | ✓ | ✓ | ✓ |
| Microsoft 365 / Outlook.com | ✓ | ✓ | ||
| Postmark | ✓ | ✓ | ✓ | ✓ |
| SendGrid | ✓ | ✓ | ||
| SparkPost | ✓ | ✓ | ✓ | ✓ |
| Zoho Mail | ✓ | ✓ | ||
| Other SMTP | ✓ | ✓ |
We advise using WP Mail SMTP with a transactional mailer such as SendLayer, Brevo, SMTP.com, Mailgun, Postmark, or SparkPost for optimal email tracking.
Need a hand?
You can purchase White Glove Setup as an additional service with any of our WP Mail SMTP licenses and have our customer support team set up WP Mail SMTP for you.
3. Use the Setup Wizard to Log All Email Content
In Step 2 of the Setup Wizard, you will have the opportunity to select the mailer of your choice and configure its settings.
In Step 3, you can enable email features. Your 4 options are Improved Email Deliverability, Email Error Tracking, Detailed Email Logs, and Instant Email Alerts.
Click on Detailed Email Logs to enable it and automatically add options for Complete Email Reports and Weekly Email Summary (optional).
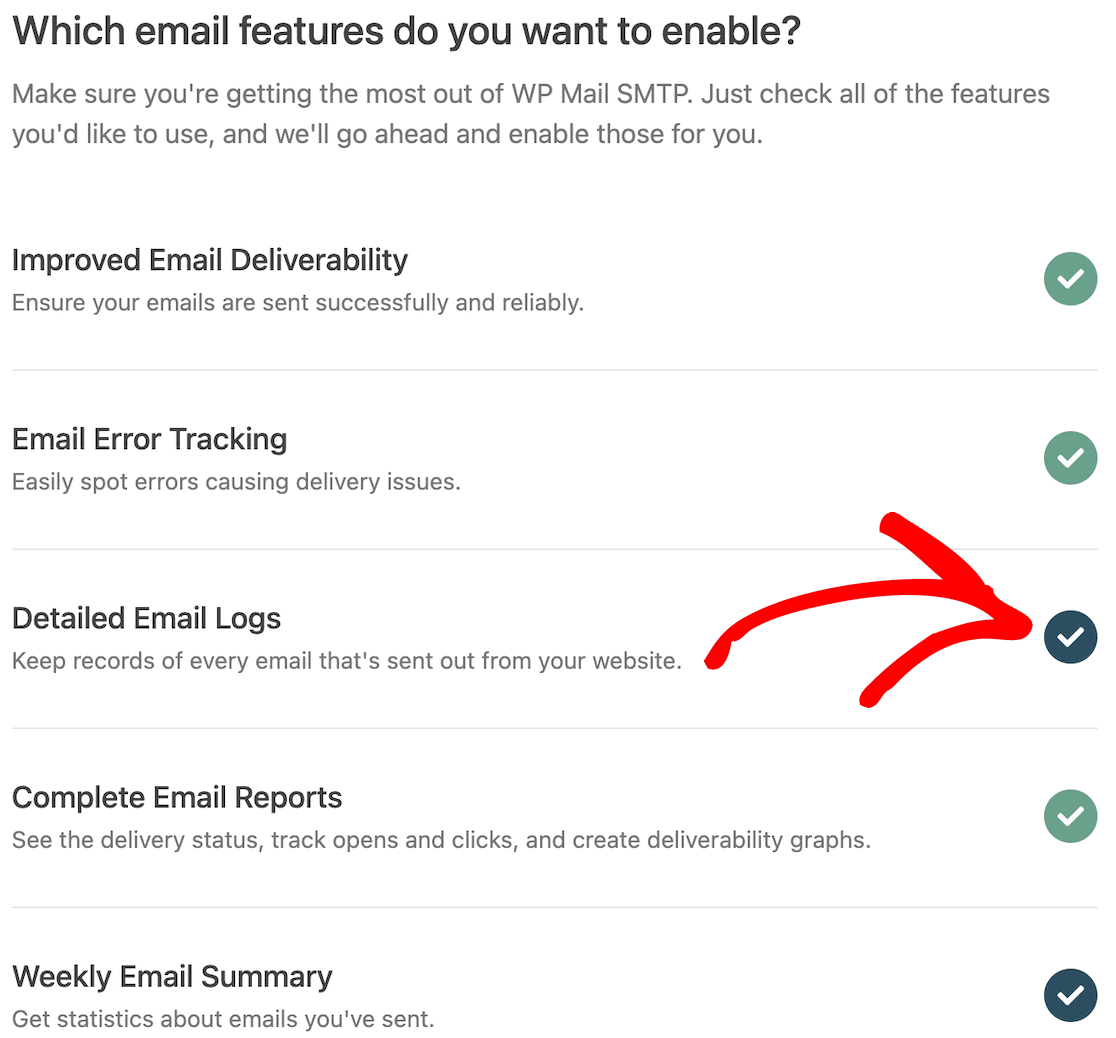
For the most accurate results possible, we strongly suggest that you also log the content of any emails that you send out.
On the next screen, you will be able to do this. You will want to check the option: Store the content for all sent emails.
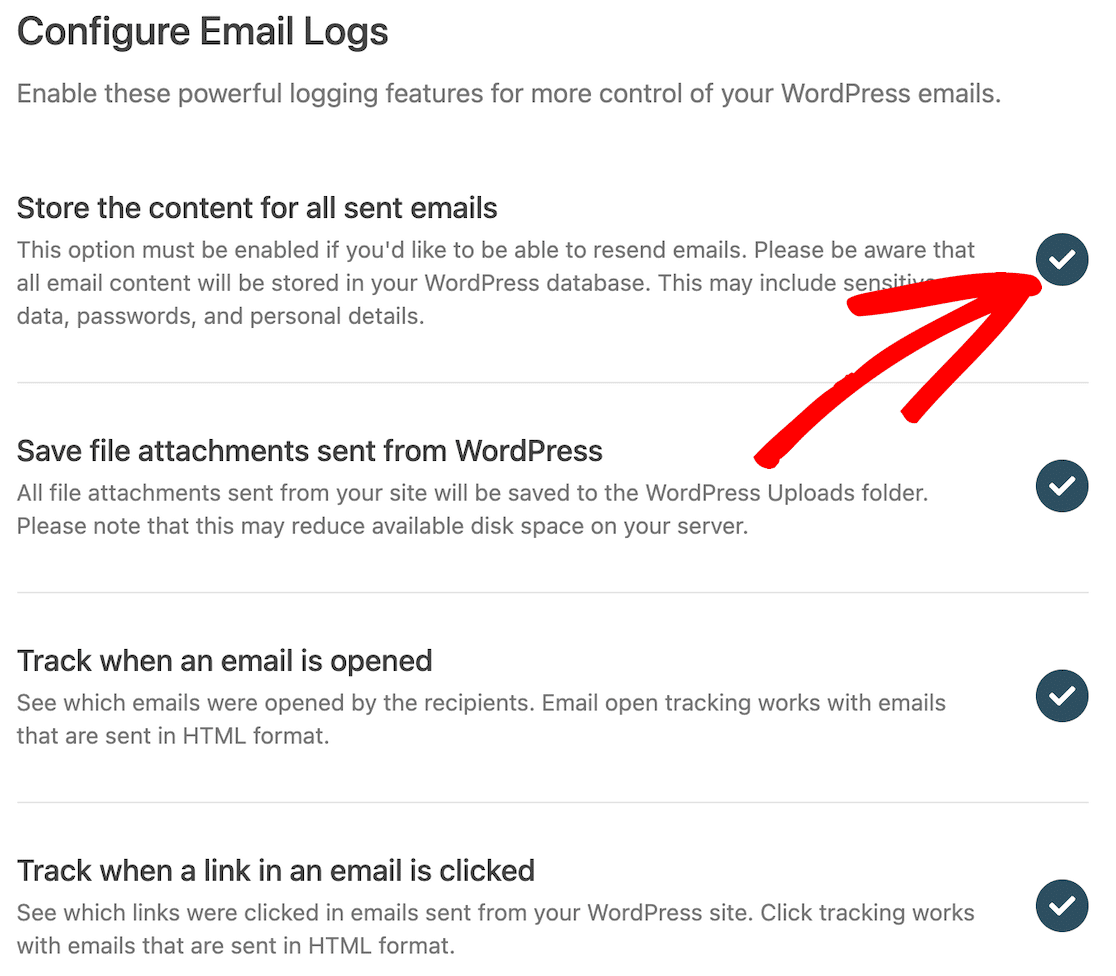
You must do this if you wish to send any of your emails again or save any emails generated by your contact form plugin, such as submission notifications.
Take into account, though, that this will involve storing all email content. This might include data, passwords, and personal details.
On this screen, you may also choose to save email attachments in your WordPress uploads folder, track when an email is opened, and track when a link in an email is clicked by enabling the relevant options.
After you have completed this step, the Setup Wizard will conduct a test of your connection and inform you if there are any problems. If all goes smoothly, you will get the below success message.
While most of the configuration may be done with the Setup Wizard, in order to modify the webhook and log retention settings, you will need to navigate to WP Mail SMTP » Settings » Email Log.

Every email that is sent using the wp_mail() function will now be logged, as you have just finished configuring the email logs for WordPress.
4. View WordPress Email Logs
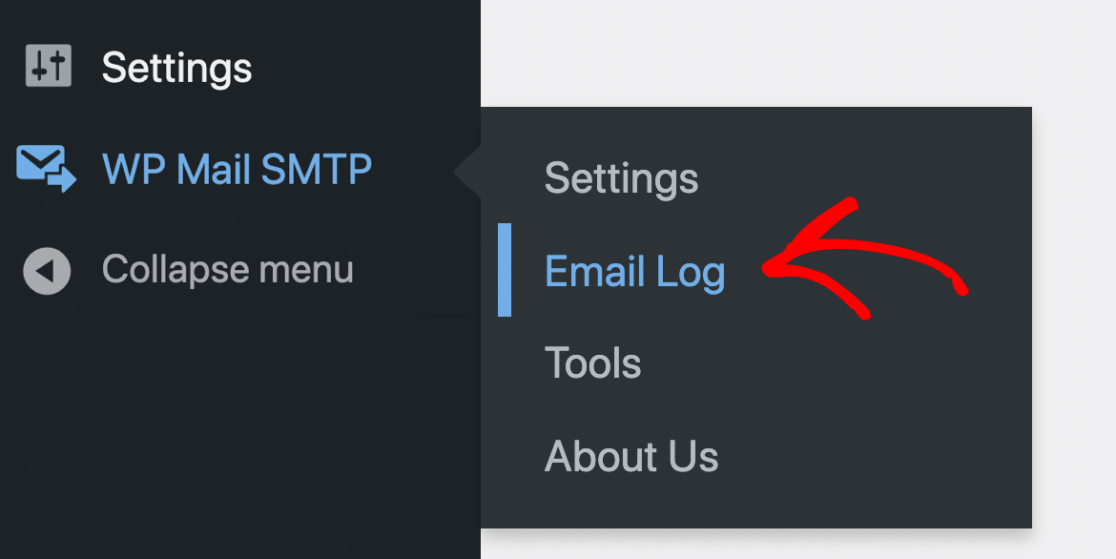
Let’s check the email logs now. To view the email log for WordPress, go to WP Mail SMTP » Email Log from your dashboard.
You might not have a lot of logs to look at just yet because your installation is new. We will demonstrate what it will appear like when some time has passed.
Let’s begin by sorting the log according to the date. In this example, we’re looking for any emails that failed to deliver on April 20.
You may quickly and easily view the log files for a certain date or range of dates by using the datepicker at the top of the WP Mail SMTP email log.
See how we put it to use in the image below, where we’re trying to find messages posted to our WordPress blog between April 14 and April 21.
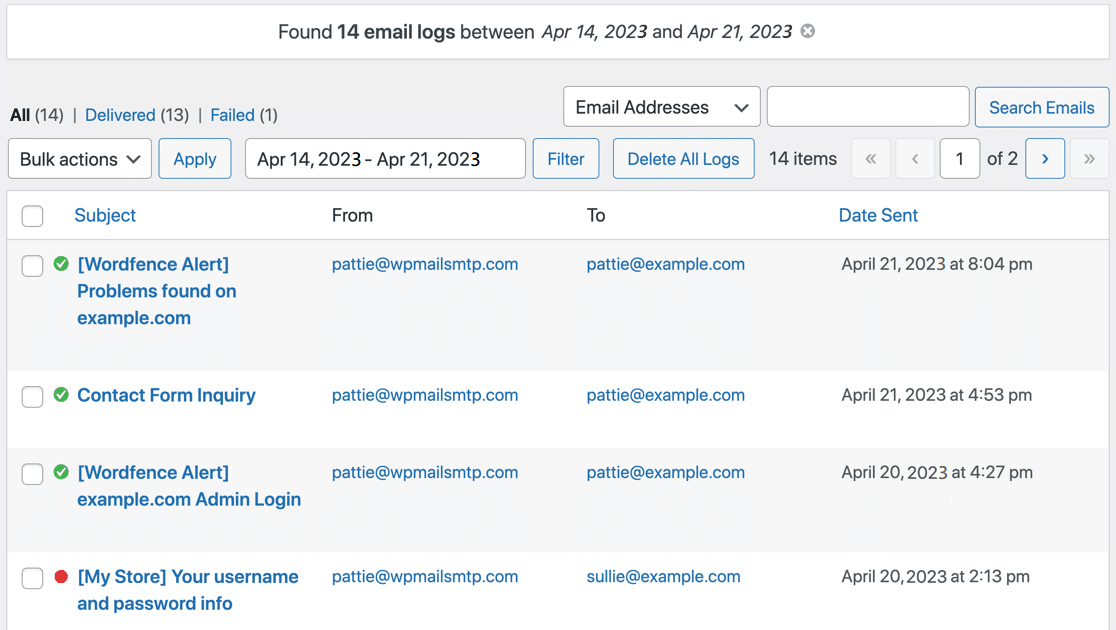
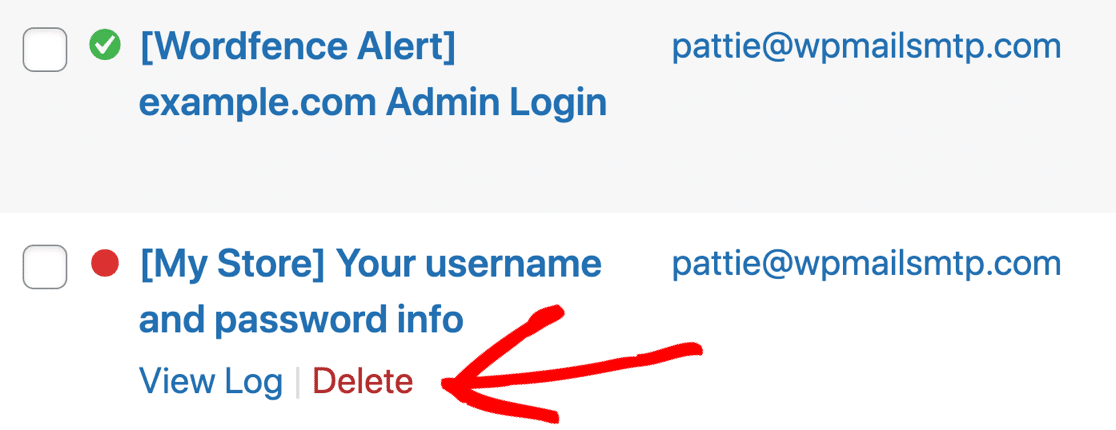
We know the first three emails were successfully delivered because our transactional mailer indicates they are Delivered with a green circle and checkmark.
A red dot next to one email indicates that it Failed. The View Log and Delete buttons appear when we move the mouse pointer over that line.
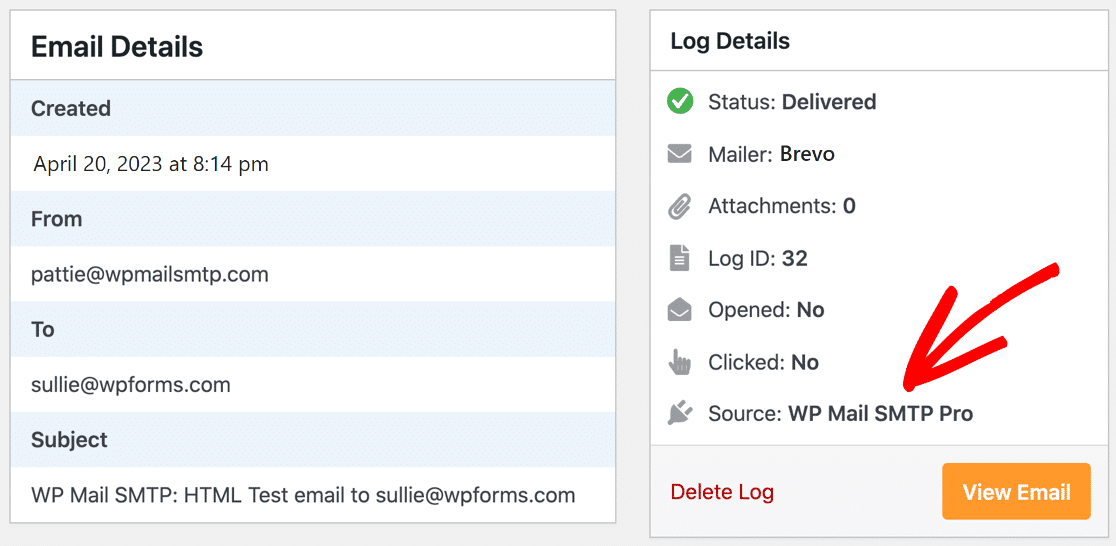
Let’s check out the email’s log by clicking the View Log button. Each individual log page allows us to:
- Print the email log, or save it as a PDF
- Export this log as a CSV, EML, or Excel file.
The email log also tells you which plugin generated the email.
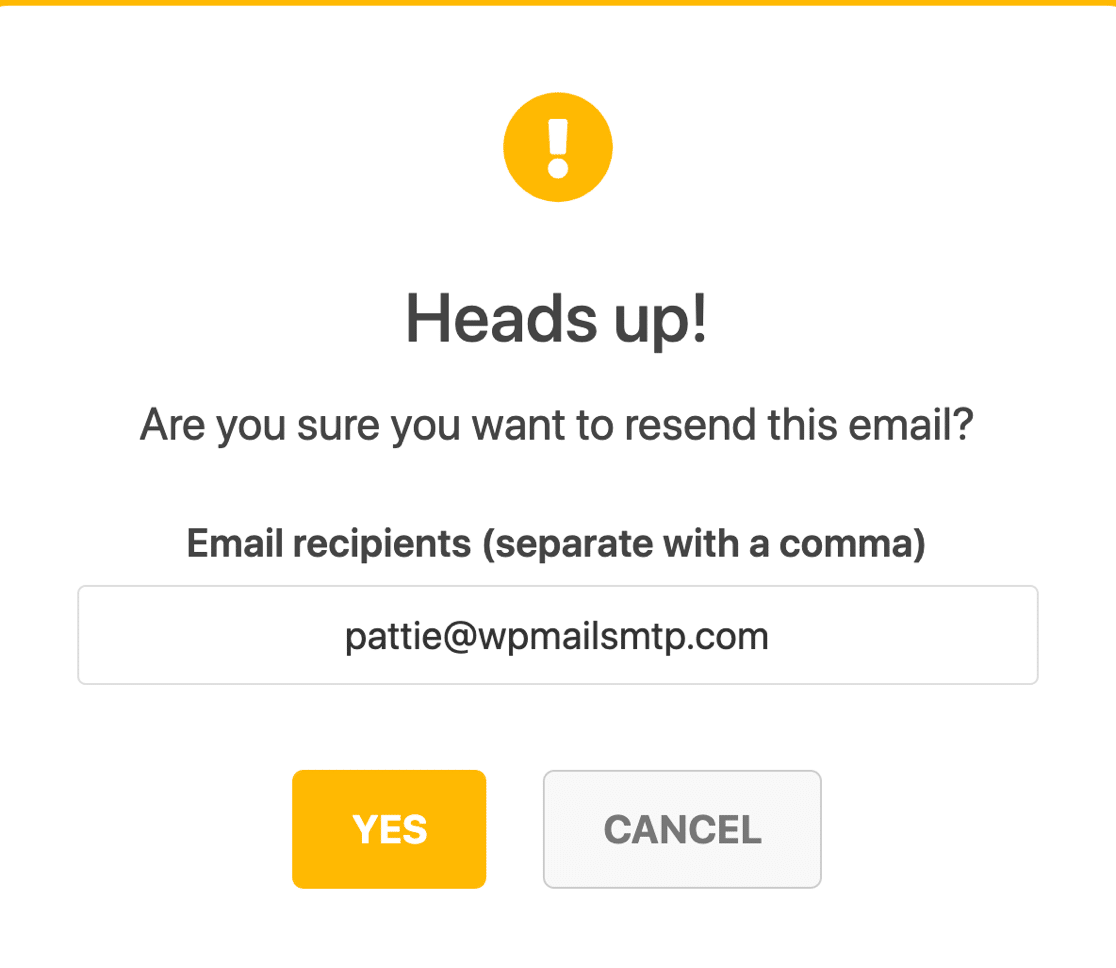
You can change the recipient address and send the email again by selecting Resend. This can be used to resend new user activation and password reset emails.
The log’s complete headers can be viewed by selecting the Technical Details dropdown at the bottom of the window for more detailed troubleshooting.

The recipient in question has reached the Gmail limit for the number of messages they can receive at once. That way, we know it wasn’t an issue with our email service or configuration.
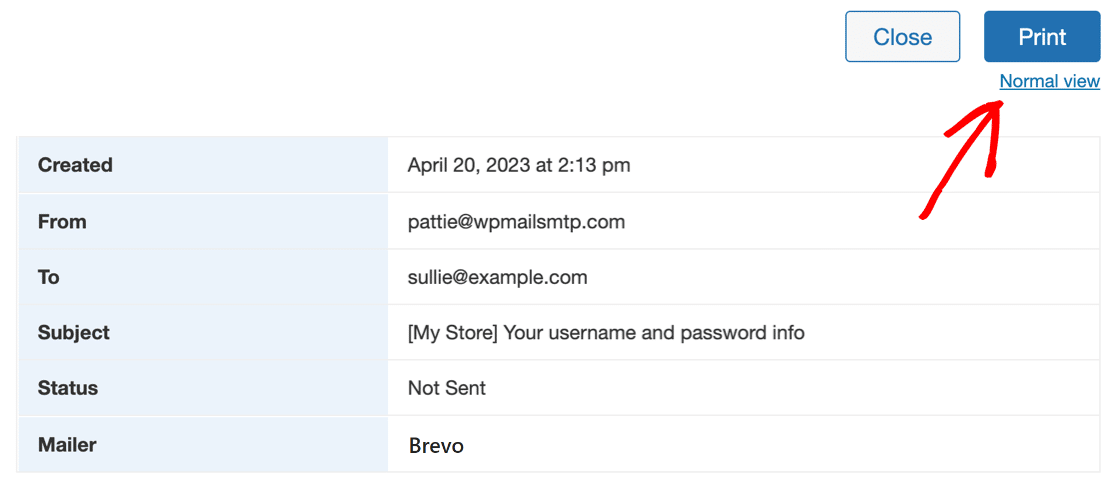
Logs can be printed in either the Normal or Compact format directly from the log file details page. If you need to save paper or reduce the size of the PDF yet have a substantial log file, the Compact View is a good option.
Let’s return to the main log panel and examine the alternative ways by which we can control WordPress’s email logs.
The email logs can be filtered using the search bar. The list can be further narrowed down by applying more search parameters until the desired result is found.
We have previously applied date filters. The next step is to look at the Subject and Headers to check whether any failed login credentials were sent that week.
These search and filtering features make it simple to locate any email and learn whether or not it was sent and delivered.

You can even check out your Email Reports for details about your email open and clickthrough rates using the WP Mail SMTP plugin.
To access it, navigate to the WP Mail SMTP » Email Reports menu. You can now check how your emails are doing regarding deliverability within the WordPress dashboard.
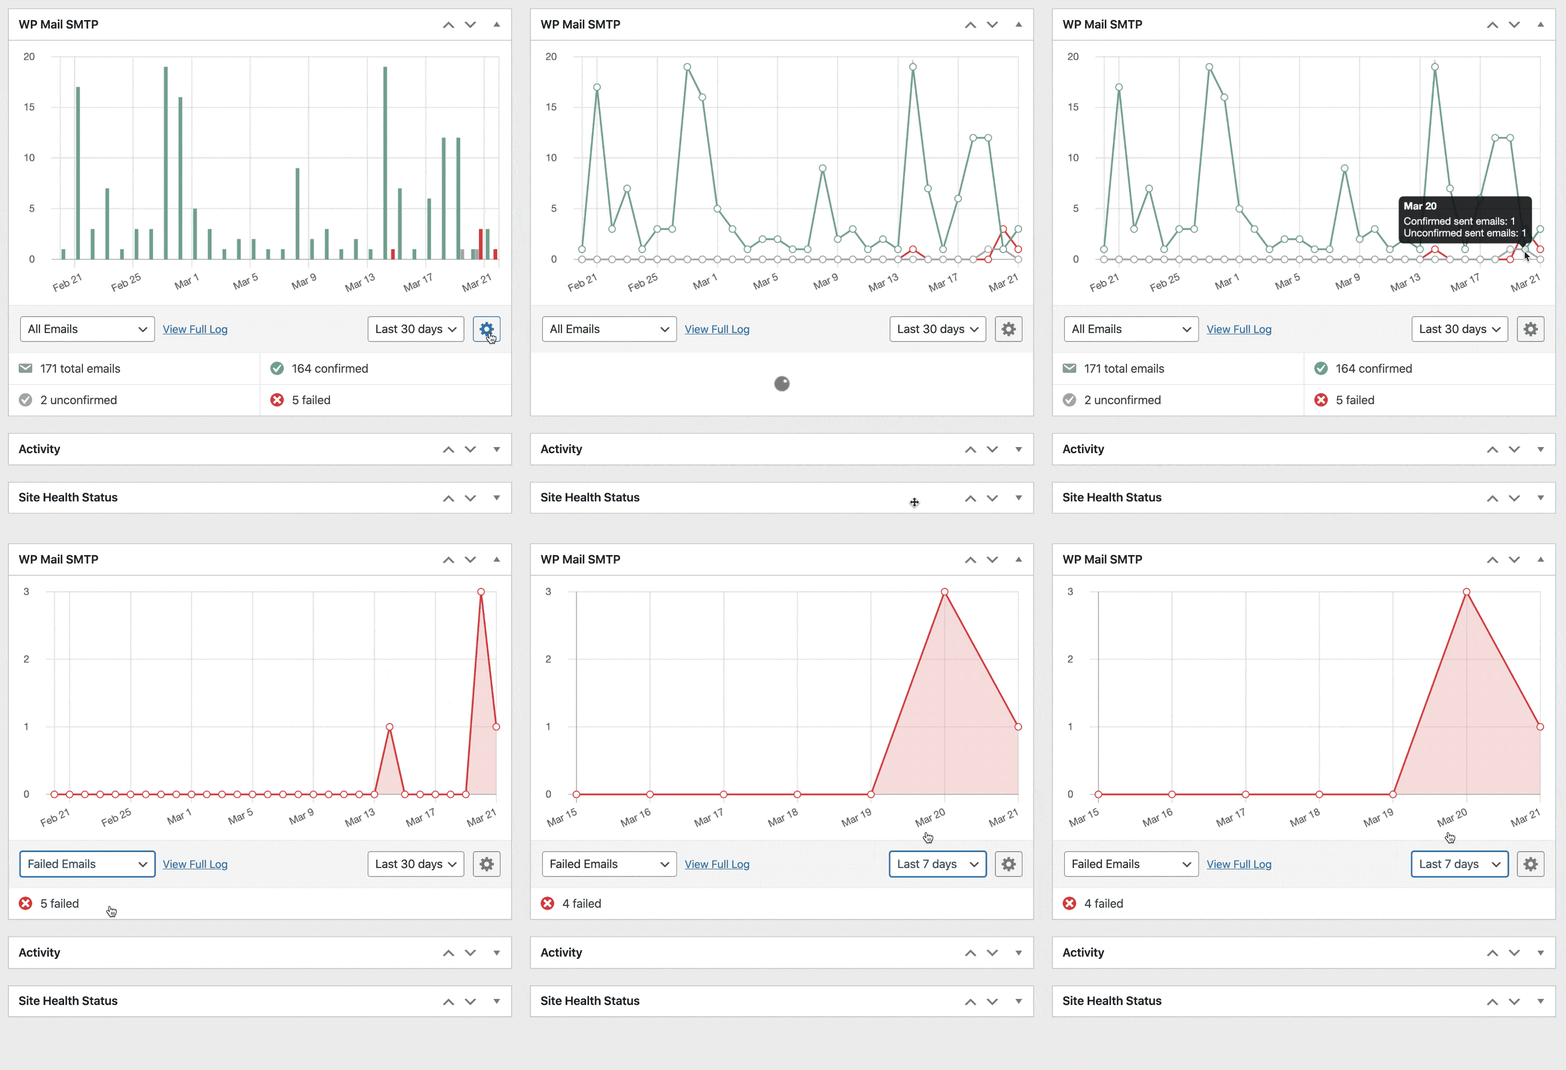
This makes WP Mail SMTP a valuable tool for keeping track of users, so you can measure their engagement with emails.
Since you may not want to log in to WordPress every day to ensure that your user activation emails are being sent, WP Mail SMTP offers a solution for that as well.
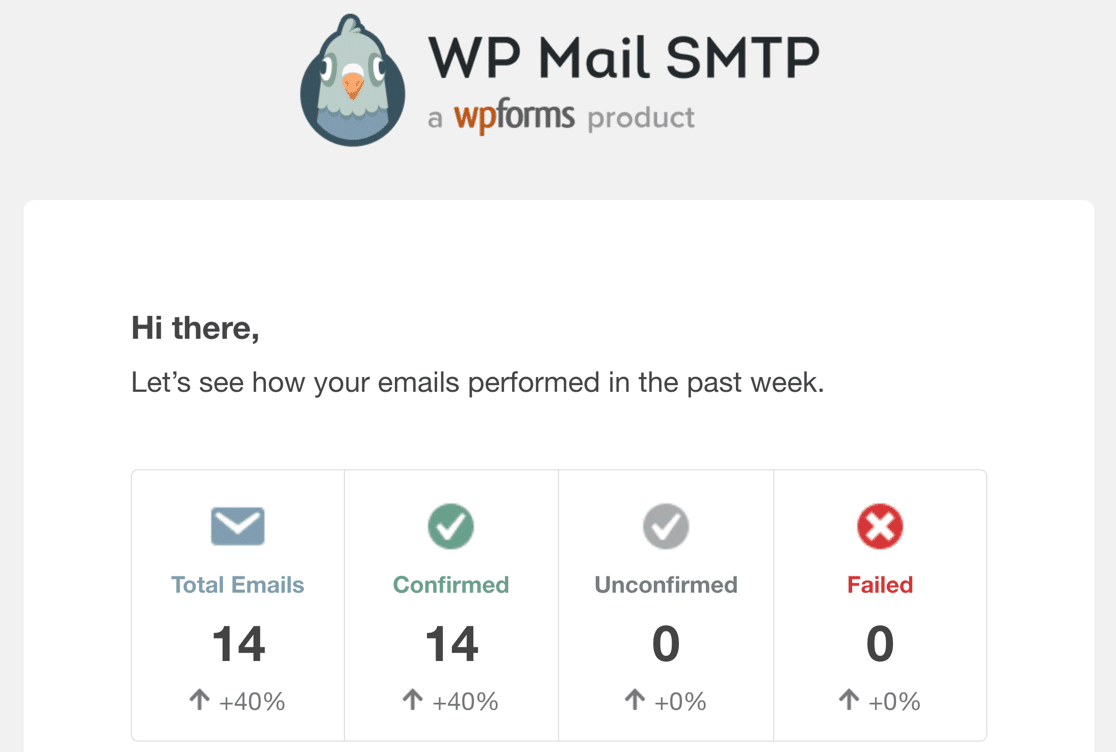
WP Mail SMTP sends out a weekly email summary every Monday, so you can keep an eye out for the success of your email campaigns without accessing WordPress.
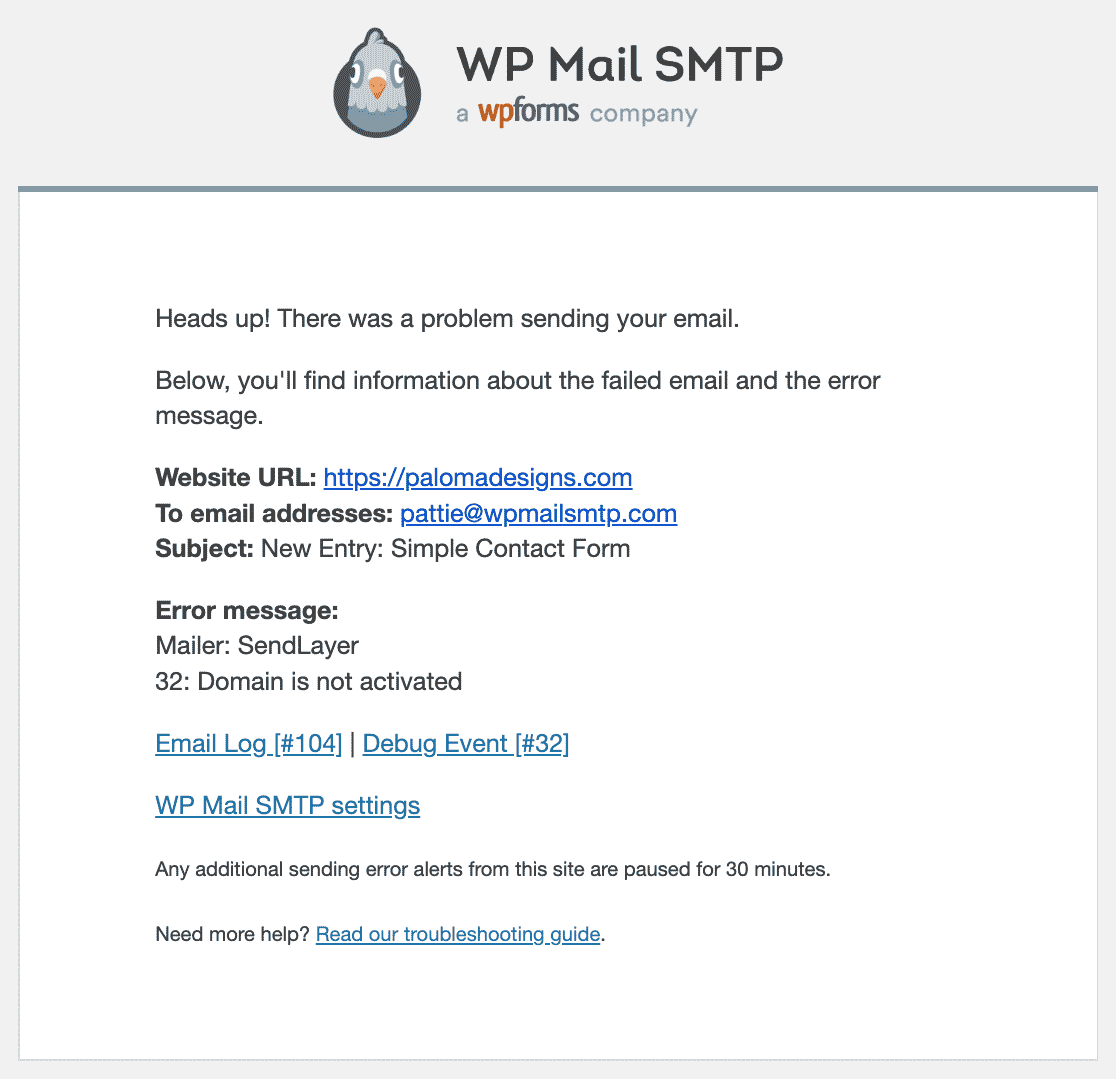
You can also use Instant Email Alerts that lets you know right away if your website fails to send an email so you can fix the issue.
5. Track Email Opens and Clicks
Now that you know your emails are reaching their intended recipients, you should verify whether or not they are being opened and read.
In addition to helping you keep track of WordPress emails, WP Mail SMTP Pro also keeps tabs on how often your HTML emails are opened and clicked on.
If you sell online courses or send newsletters through WordPress, you will find the email tracking feature to be extremely helpful.
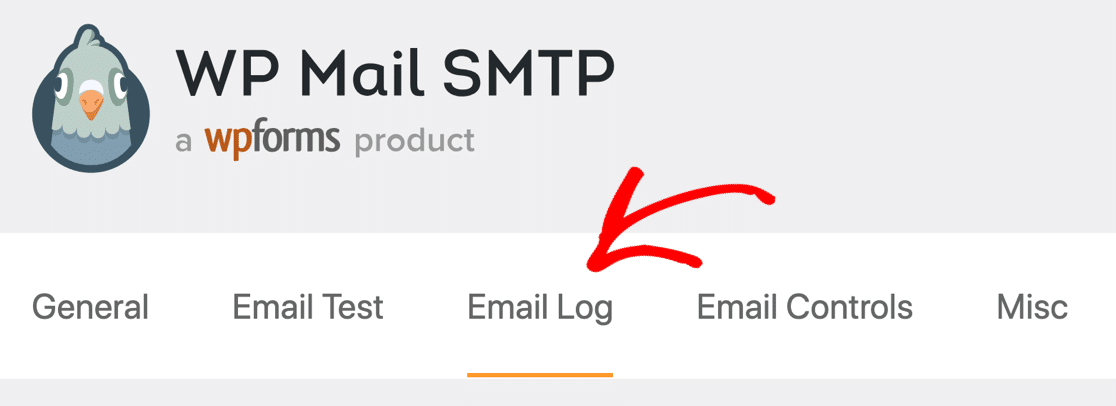
This is easy to do! Just head to WP Mail SMTP » Settings. To access your WordPress email log settings, select Email Log from the menu.
Next, scroll down and turn on these two options:
- Open Email Tracking
- Click Link Tracking
![]()
Open and click tracking data will now be shown next to each individual email log for your viewing convenience.
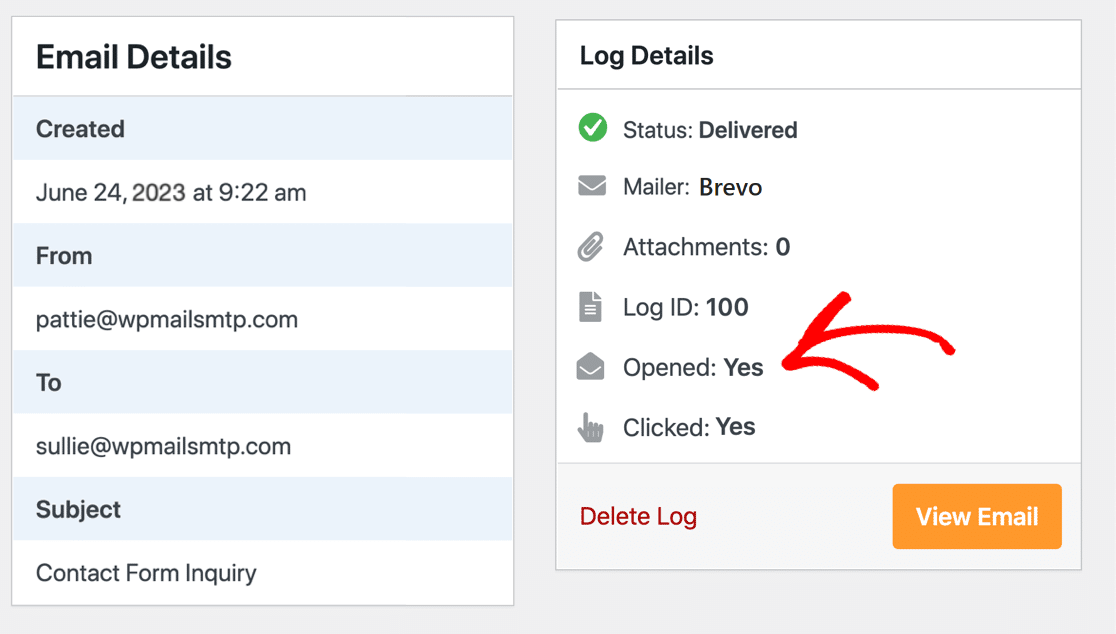
You will also be able to view complete open rates and click-through rates in your Email Report if you’re a WP Mail SMTP Pro customer.
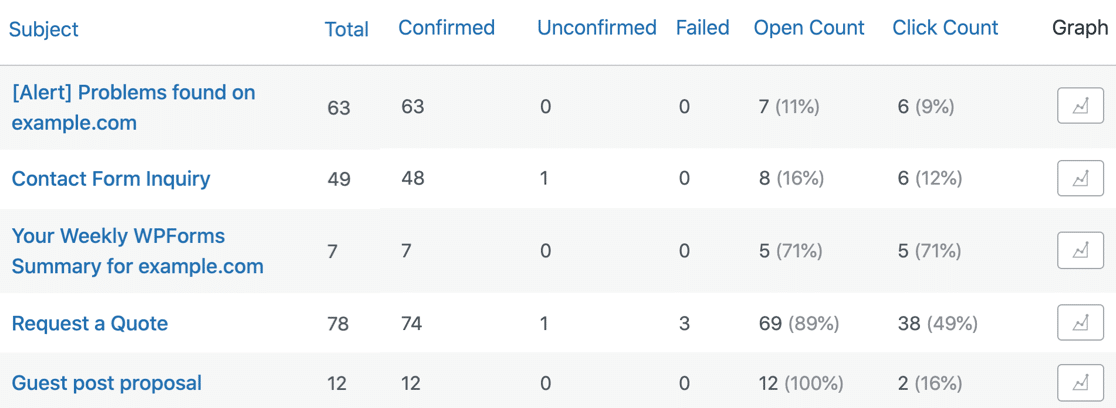
And that’s it! Now you know how to log your contact form emails.
But what about capturing and storing contact form data in WordPress? You may want to consider using WPForms with WP Mail SMTP.
In this combination, WP Mail SMTP takes charge of ensuring your emails are properly logged and sent, even offering the capability to resend failed emails.
On the other hand, the form builder plugin, WPForms, excels in capturing and storing form data right in your WordPress backend.
This optimizes the saving of contact form emails in WordPress, creating a well-rounded and reliable system for your business communication needs.
Method 2: Save Contact Form Entries in WPForms
WPForms enables you to save form entries in your WordPress database. This will also enable you to resend email notifications from your admin dashboard.
You will need a paid WPForms license to access your form entries and resend notifications.
1. Use WPForms to Save Form Entries Data
Storing and retrieving form data from the WordPress database is extremely user-friendly with the premium version of WPForms.
Once you’ve installed and activated the form plugin, you can create a simple contact form and take advantage of WPForms’ entry storage feature.
While you are working within the drag-and-drop WPForms builder for your contact form, switch to the Settings » General menu in the contact form plugin.
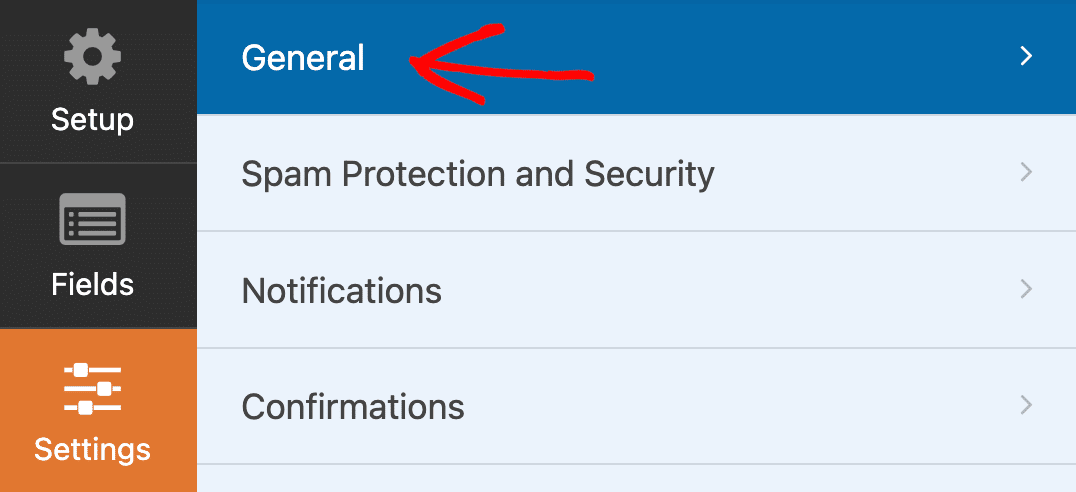
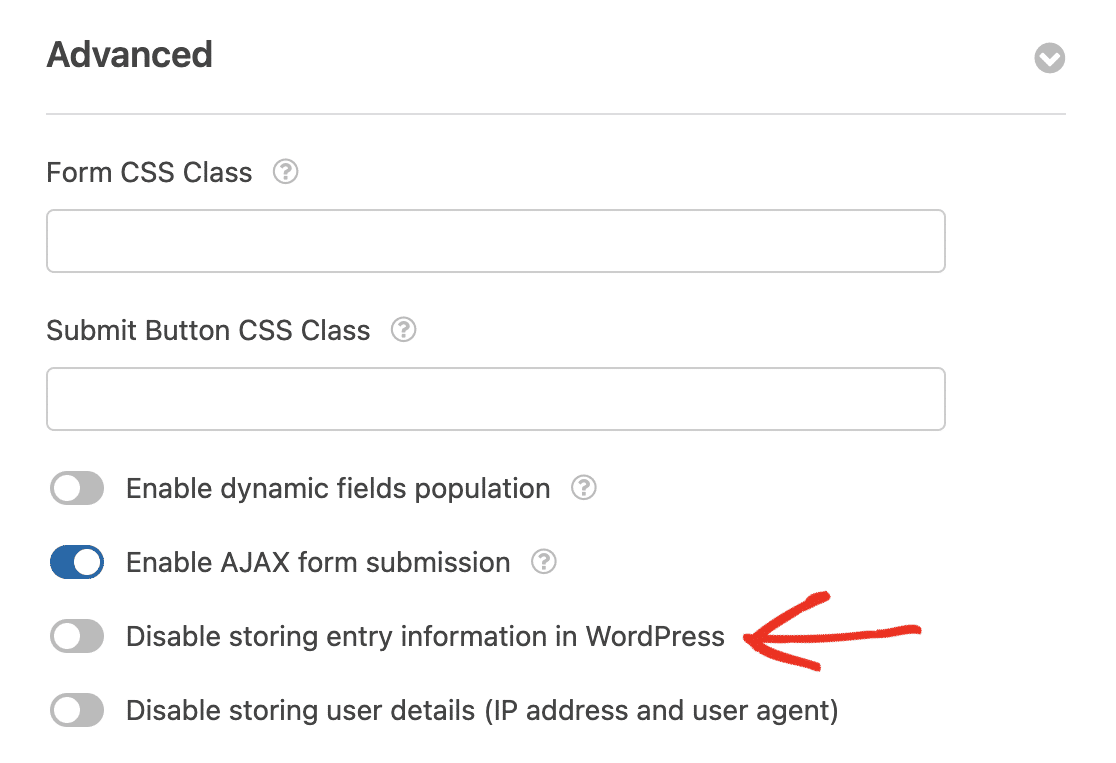
Ensure that the box labeled Disable entry storing information in WordPress is turned off in the Advanced section of the menu.
After you publish your form, test it by finishing and submitting it yourself. This will make a form submission in your WordPress dashboard for you to look at.
Now, in order to view your test entry and other form submissions, navigate to WPForms » Entries and select the contact form you created.
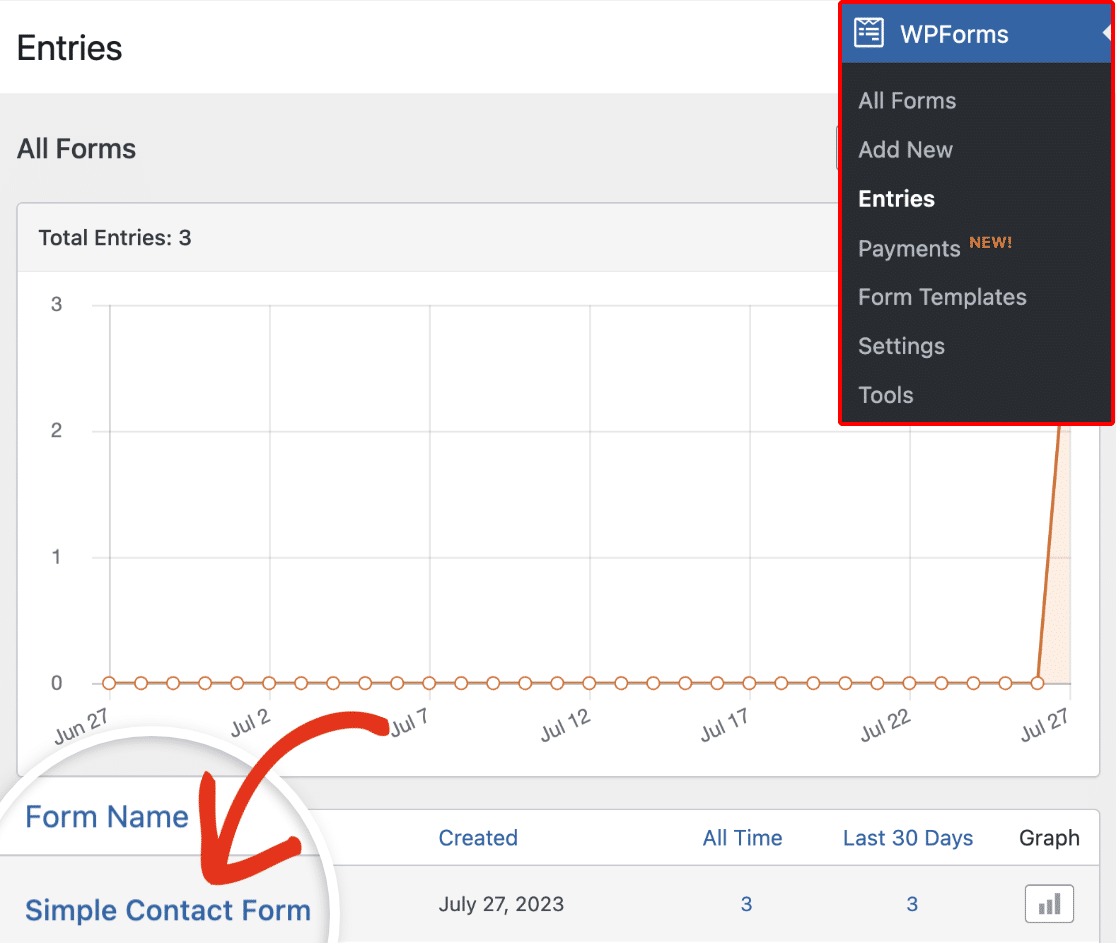
Upon scrolling down, you can mark your entries as read, add them to your favorites, and even delete the ones you don’t want to keep.
You can also quickly search and add filters to the contact form entries. To find a specific entry, you can even do a broad search by Any form field or set conditions.
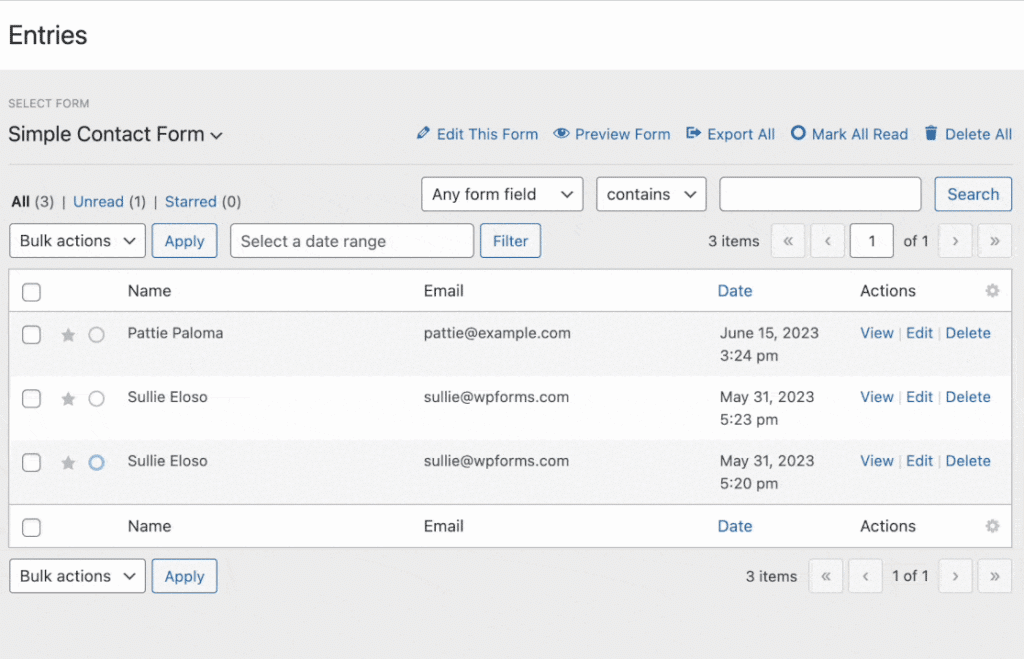
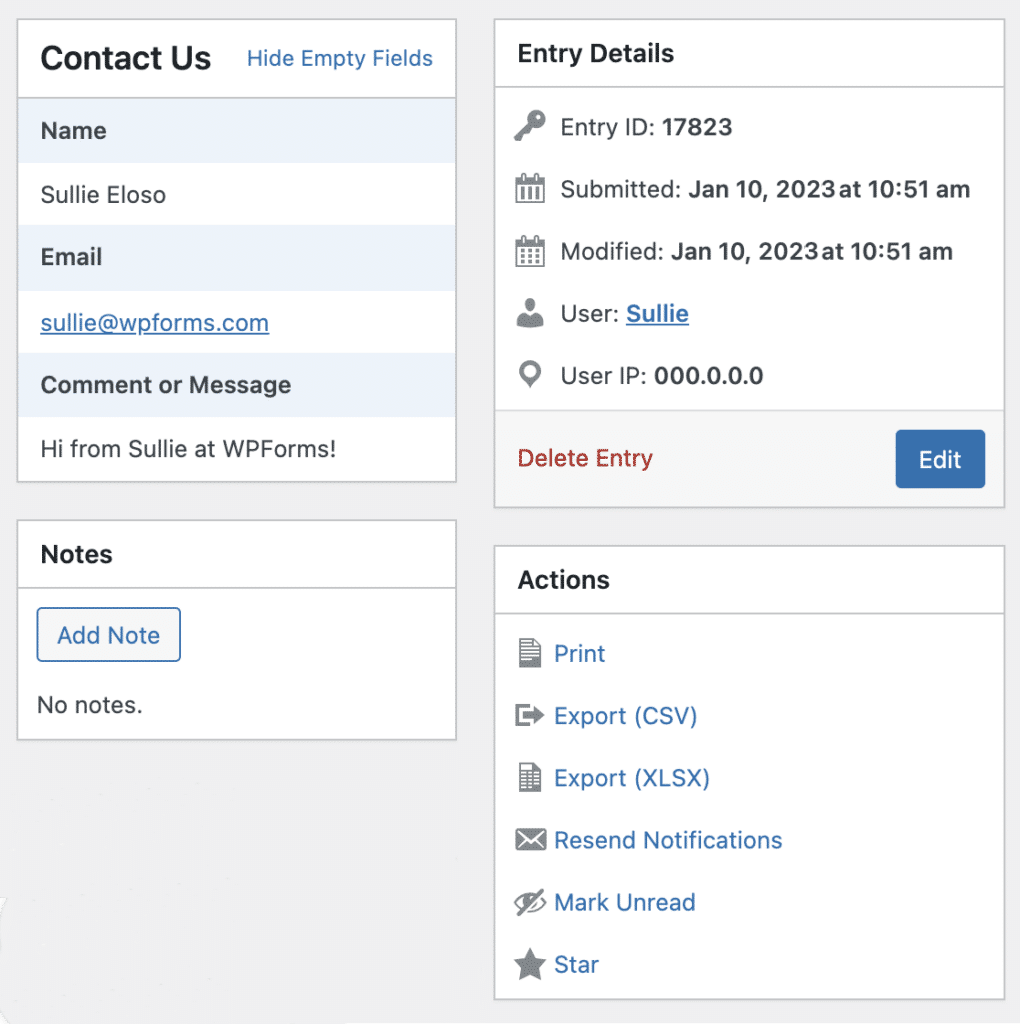
To view a specific form entry, click View in the Actions column. From here, you can also Resend Notifications.
Remember that you’ll need an email logging plugin like WP Mail SMTP to see the entire contents of any emails sent from your contact form plugin.
If you’re collecting payments through your forms, you can access the details through WPForms » Payments for a visual depiction.
In the Payments section, alongside sales and subscriptions, you will also find information about coupons used on your forms.
2. Access Form Data in WordPress Database
When WordPress is first installed, it automatically generates a database for you even though you might not be able to see it on the frontend.
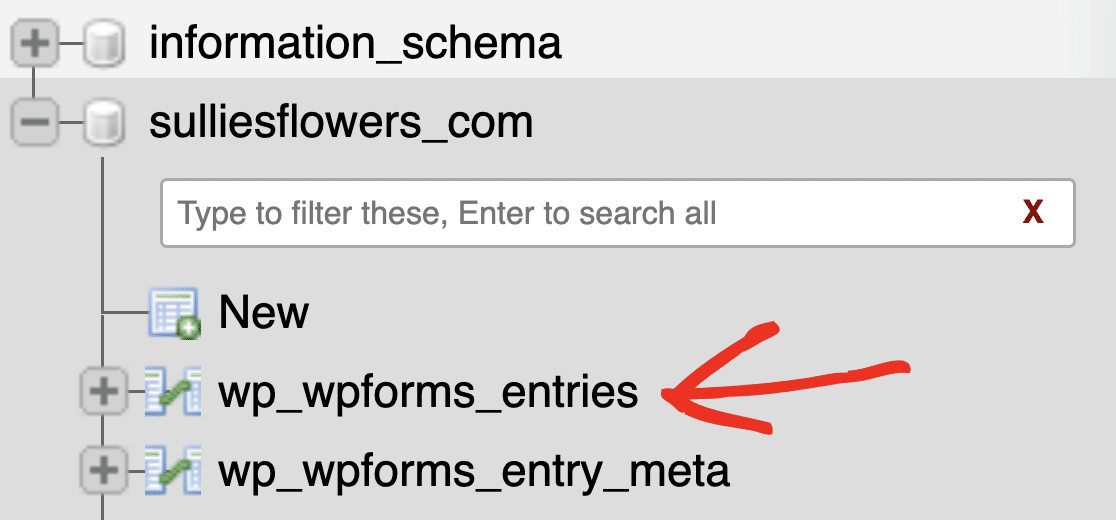
The WPForms plugin will automatically save any data submitted to the native WordPress php database in four tables. They are as follows:
- wp_wpforms_entries — This database table stores the information in the fields (values) of your entries.
- wp_wpforms_entry_meta — This table’s metadata includes entry IDs and creation and modification dates.
- wp_wpforms_entry_fields — This table stores the information entered into your forms in an encoded format.
- wp_wpforms_tasks_meta — This table is used to record information about tasks that are carried out in the background.
- wp_wpforms_payments — This table records data like the status, amount, any discounts applied, currency, payment gateway, and transaction ID.
- wp_wpforms_payment_meta — This table contains extra payment information, such as the customer’s IP address and other internal data.
After installing WordPress, most web hosts will give you simple web programs like phpMyAdmin to manage your MySQL database.
Bluehost users can access the phpMyAdmin database server by going to the bottom of the homepage and clicking Helpful Links » Advanced » phpMyAdmin.
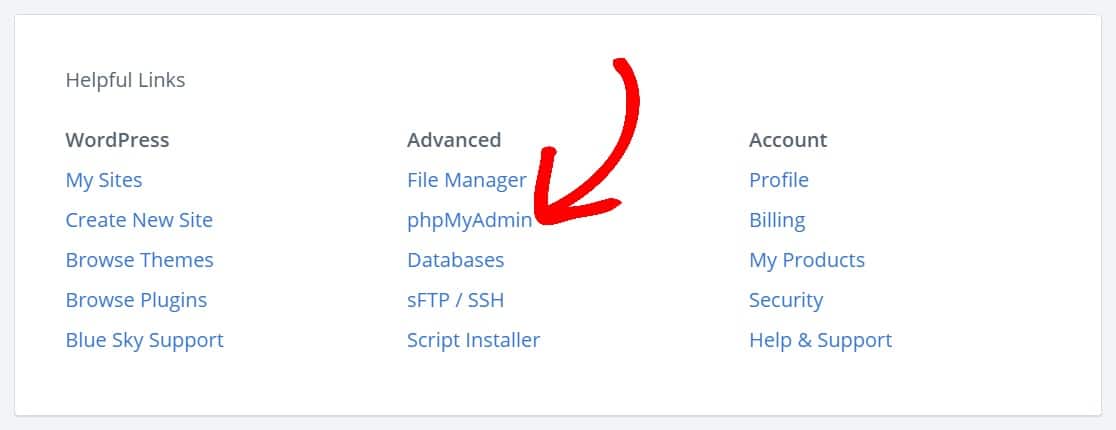
Choose the database that contains your WordPress installation and then navigate to the wp_wpforms_entries table using phpMyAdmin.
There are many things you can do here. You can read this phpMyAdmin for WordPress database management beginner’s guide for additional information.
Next, Export and Save Your Contact Form Emails
Now that you’ve learned how to save contact form emails and form entries in the WordPress database, it may also be a good time to dive into our documentation to learn how to export and save contact form email logs.
Save Contact Form Emails in WordPress
Ready to fix your emails? Get started today with the best WordPress SMTP plugin. If you don’t have the time to fix your emails, you can get full White Glove Setup assistance as an extra purchase, and there’s a 14-day money-back guarantee for all paid plans.
If this article helped you out, please follow us on Facebook and Twitter for more WordPress tips and tutorials.

