AI Summary
Do you need to resend the WordPress activation email to new users? WordPress sends a new user activation email to every new user, but they can sometimes get lost.
If you need to resend activation emails to your users, we’re here to help. In this tutorial, I’ll walk you through each quick and easy step. Let’s get started!
Why the WordPress New User Email Fails
The new user registration email contains information to help WordPress users set passwords and activate their user accounts. It’s not a long email, but it’s an important one.
Unfortunately, if that new user account activation email doesn’t make it to the user, they can’t activate their account, so it’s important that you know how to resend it.
How To Resend New User Email in WordPress
If you’re using BuddyPress, there’s an extra step you need to take to resend the activation email. For more about that, read how to resend the BuddyPress activation email. Ready to jump right in?
1. Install the WP Mail SMTP Plugin
The first step is to take control of how your WordPress site sends email. To do this, we’re going to install the WP Mail SMTP, which is a plugin available for wordpress.org sites.
First, you’ll need to create a WP Mail SMTP account and log in. Once you’re there, switch to the Downloads tab. You can download the latest plugin file by clicking the orange button.
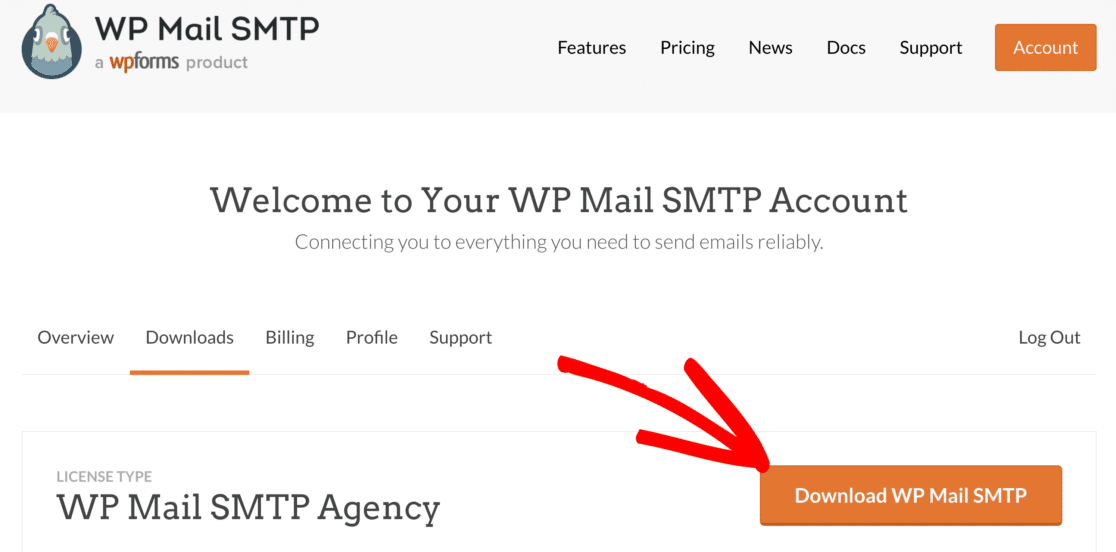
After downloading the plugin’s .zip file, log in to your website’s WordPress dashboard. To install the plugin, go to the plugins page and upload the zip file.

If you need some help with this step, check out this guide to installing WordPress plugins. Once installed, be sure to Activate the plugin.
As soon as you do that, the Setup Wizard will start in your browser. If you ever want to return to the Setup Wizard, you can also find it in the WP Mail SMTP settings, as well.
From the left sidebar navigation in your WordPress dashboard, click on WP Mail SMTP » Settings. You will see the Launch Setup Wizard button near the top of the page.

Now let’s walk through the Setup Wizard steps.
2. Connect Your Website to an Email Service
This is the most important step. Here, you’ll replace WordPress’s broken email function with a professional email service.
This will send your messages, including user activation emails and admin email change confirmations, through a professional email service provider. In the Setup Wizard, click the Let’s Get Started button.

On the next screen, you’ll select your mailer. As you can see in the screenshot below, various free and premium mailer options are available to stop new user activation emails from going to the recipient’s spam folder.
Select your mailer. If you already have an account, you’ll be able to connect using your existing credentials. If not, you’ll be able to create one with your chosen mailer.
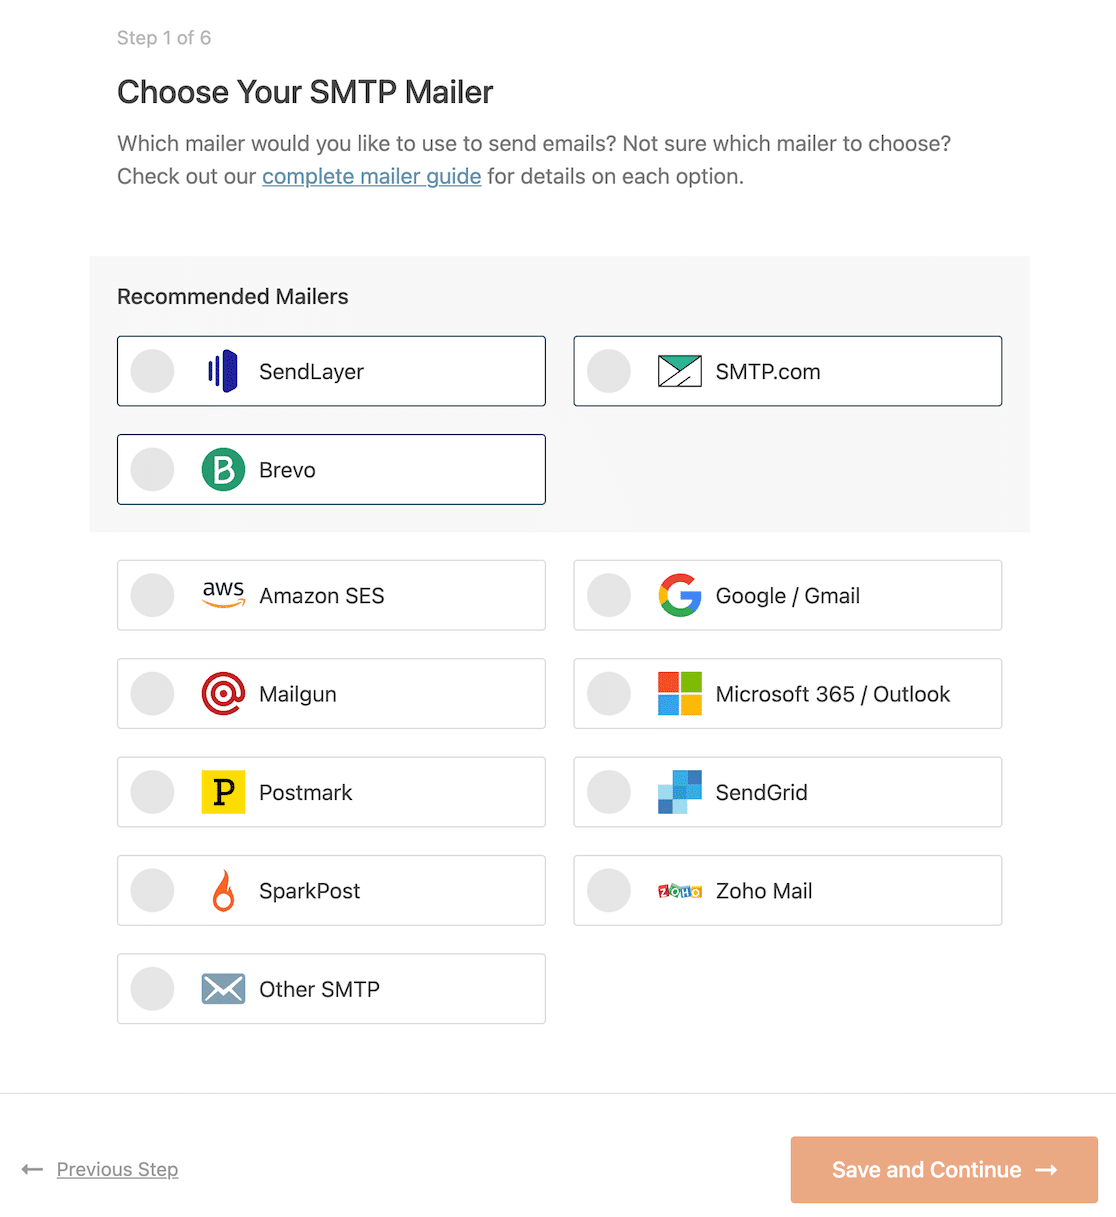
If you have an eCommerce website, we recommend choosing a mailer that supports transactional emails. This is the best option for any site sending a large number of emails, like:
- Multisite networks
- WooCommerce stores
- Membership sites
For extra guidance, we have documentation for each of the available mailers. These guides will walk you through creating your account and connecting to WordPress.
Access the documentation by clicking the link in the table below. We recommend opening the guide in another tab or window.
| Mailers available in all versions | Mailers in WP Mail SMTP Pro |
|---|---|
| SendLayer | Amazon SES |
| SMTP.com | Microsoft 365 / Outlook.com |
| Brevo | Zoho Mail |
| Google Workspace / Gmail | |
| Mailgun | |
| Postmark | |
| SendGrid | |
| SparkPost | |
| Other SMTP |
After you’ve successfully connected your mailer, switch back to this guide to continue with the next step in the wizard.
3. Enable Email Logging
The next step is to turn on email logging. This is the feature that creates a record of every email your site sends, giving you the power to see its delivery status and resend it with one click.
In the wizard, the Improved Email Deliverability and Email Error Tracking features are enabled by default. To unlock the resend functionality, you must also check the box for Detailed Email Logs.
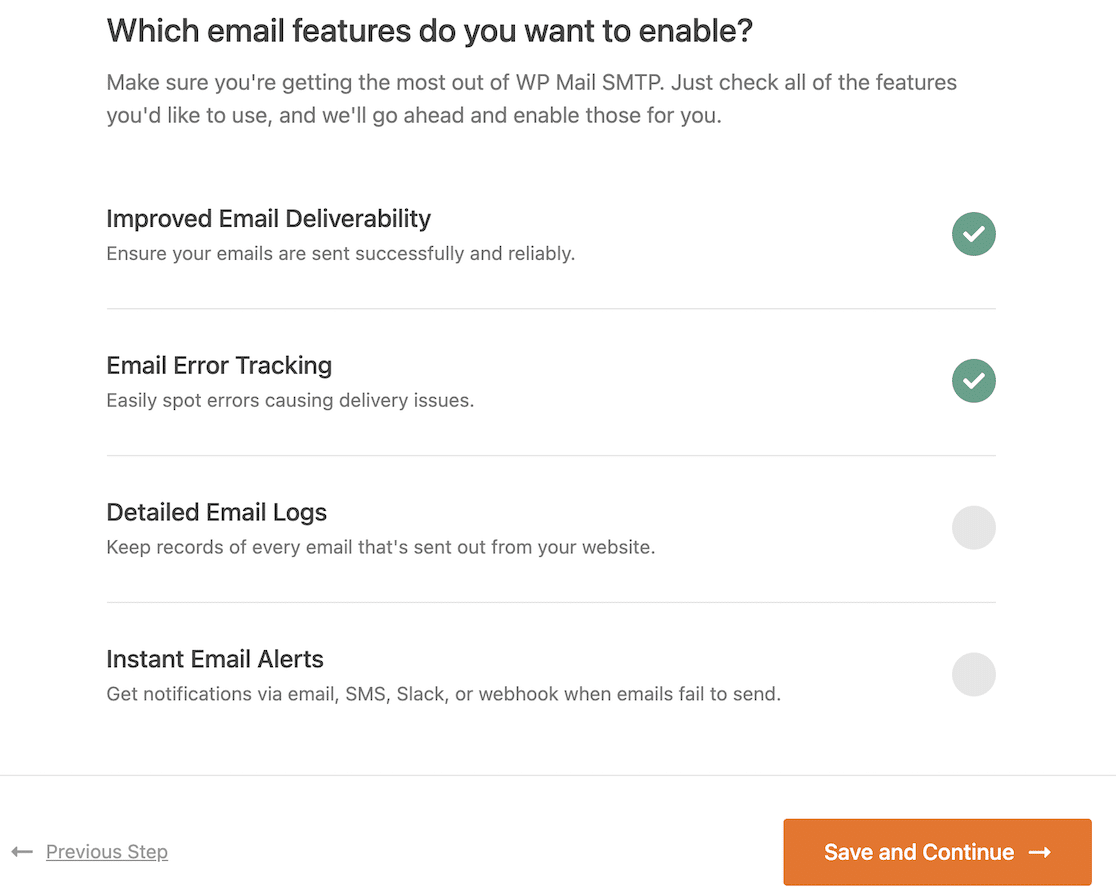
Click the option to enable Detailed Email Logs, as well. Note that when you do, you’ll get options for Complete Email Reports and Weekly Email Summary.
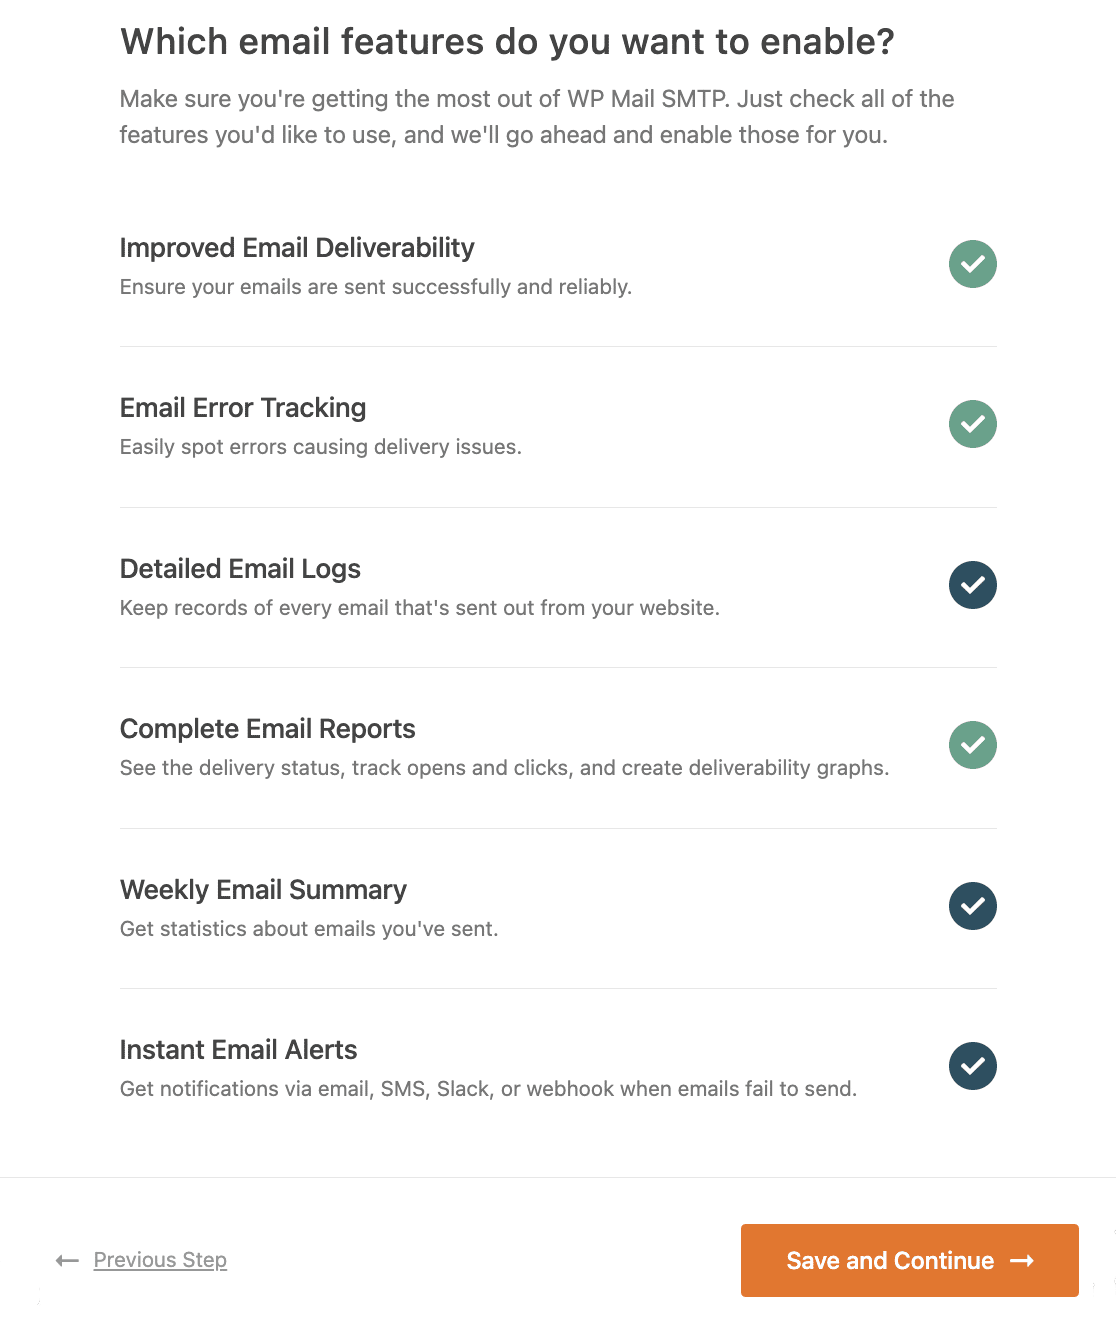
You can also enable Instant Email Alerts, which will send you notifications right away if an email from your WordPress site fails to send so that you fix it.
4. Log the Email Content
In this step, you’ll configure exactly what information WP Mail SMTP saves for each email. This is the most critical step for enabling the resend feature.
To complete this step, you must have selected Detailed Email Logs in the previous step.
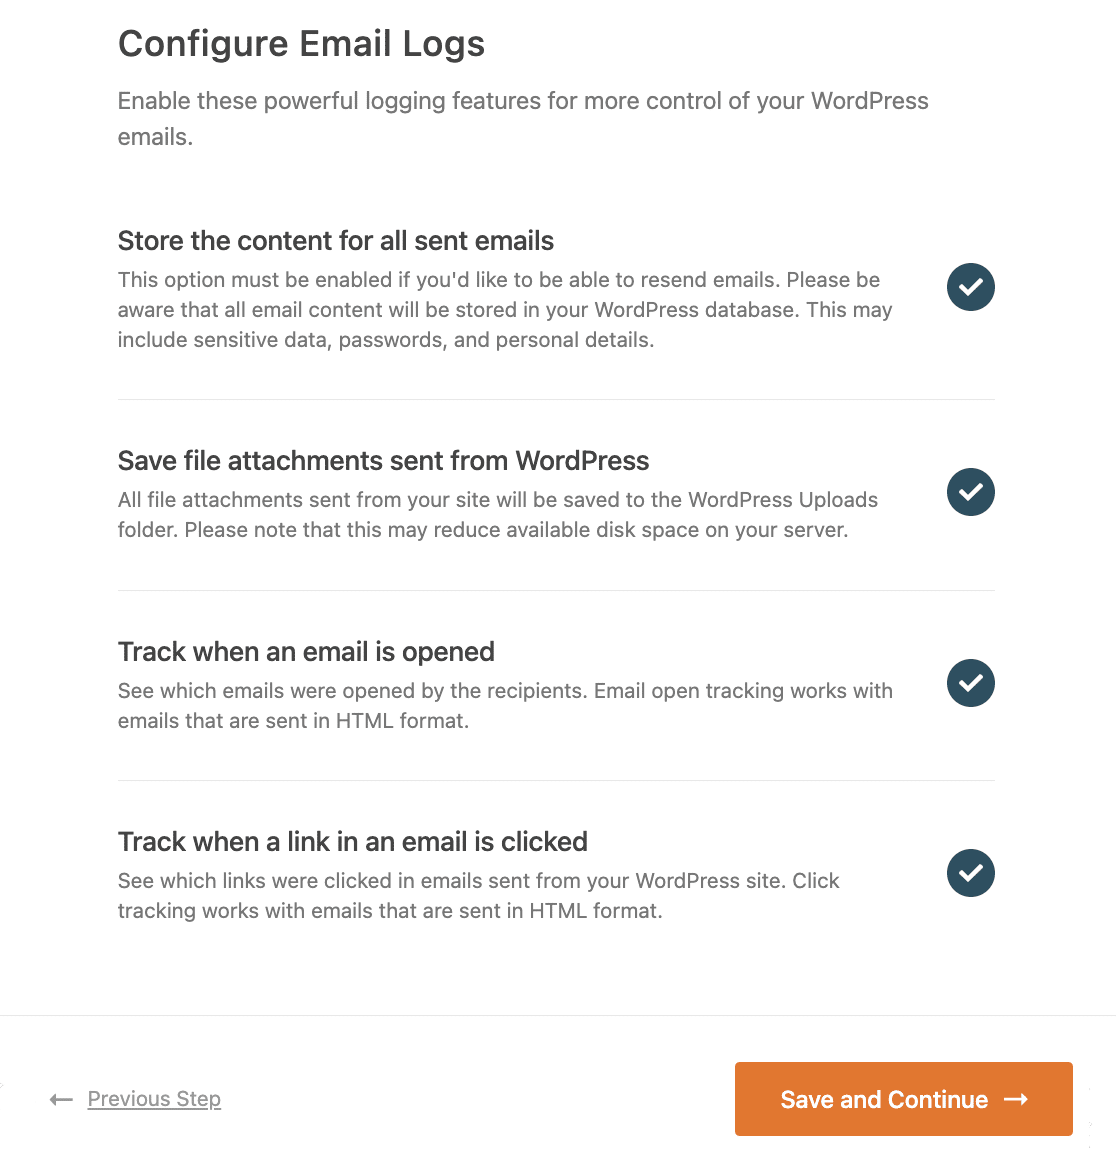
The options here include:
- Store the content for all sent emails. This lets you save the content of your WordPress emails in your site’s database.
- Save file attachments sent from WordPress. When this setting is enabled, email attachments from your WordPress site will be saved in your site’s Uploads folder.
- Track when an email is opened. Use this feature to see if recipients open your WordPress emails.
- Track when a link in an email is clicked. Enable this option to see when recipients click on the links in your emails.
You must enable the Store the content for all sent emails option if you want to be able to resend WordPress emails. After configuring your email logs, WP Mail SMTP will check your mailer configuration.
Copy the license key from the WP Mail SMTP account and paste it into the box to enable the Pro feature and future automatic updates.

Now that we’ve properly configured the plugin, we can resend the new user activation email. This may also be a good time to learn how to save contact form emails in the WordPress database.
5. Resend New User Email in WordPress
Now that your setup is complete, you have the “resend” button that WordPress has always been missing. To start, access your WordPress dashboard and navigate to WP Mail SMTP » Email Log.
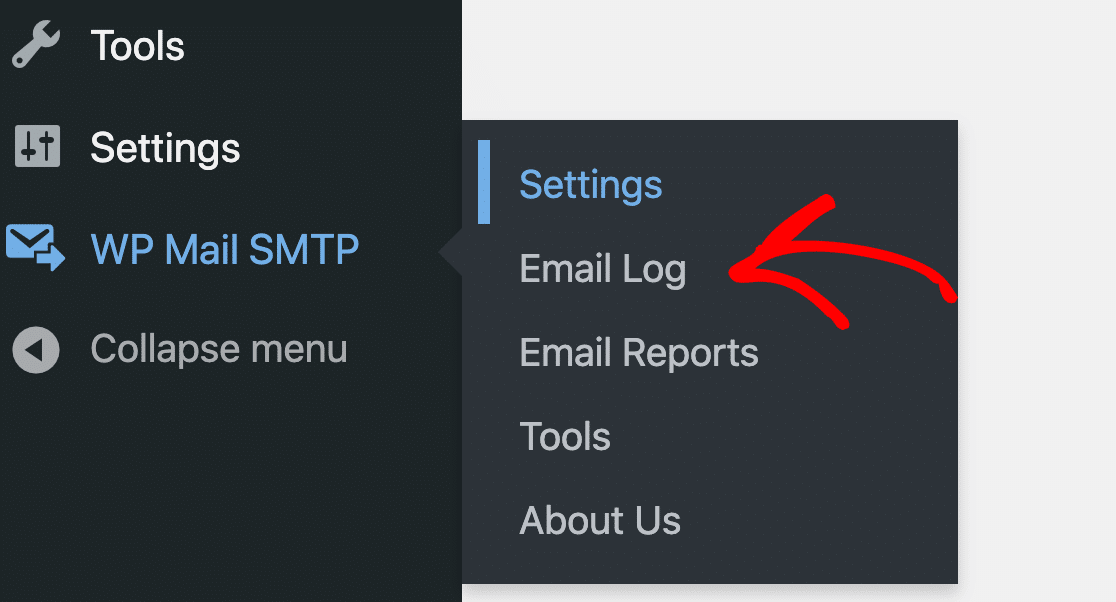
This screen shows a complete record of every email sent from your website. To find a specific user’s activation email, you can use the search bar at the top to search for their email address.
Once you’ve located the correct email, click the View Log icon on the right side. This opens a detailed view of the email, including the recipient, subject, and the exact time it was sent. I

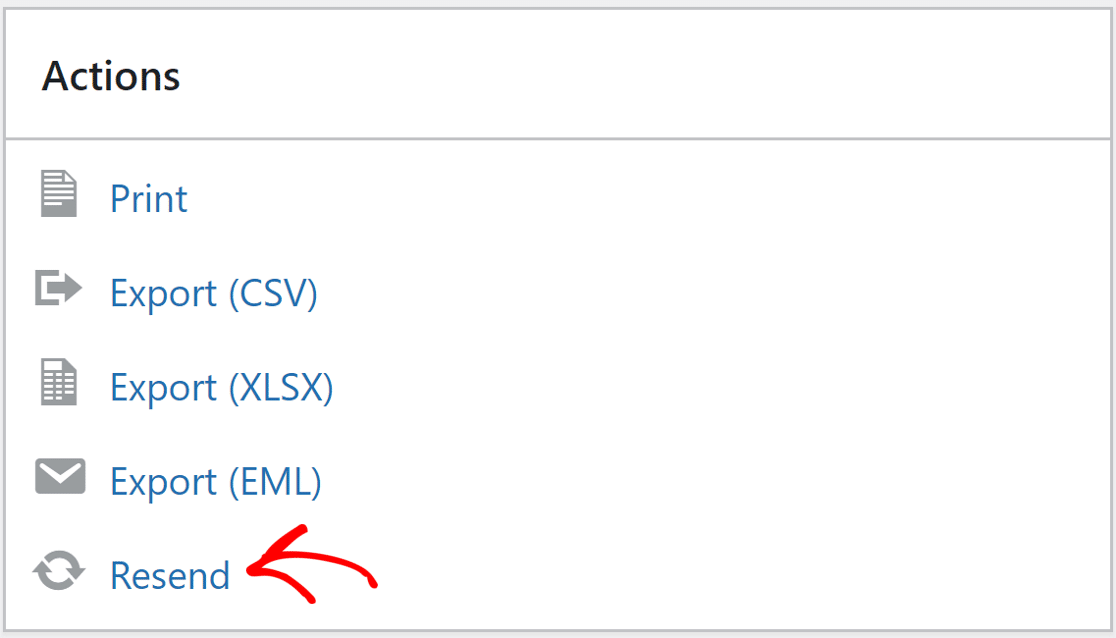
On the log page, you’ll find the Resend button under the Actions tab in the lower right side. Click on Resend, and a popup will appear. The email field will have the user’s email address prefilled.
If your user is having difficulty receiving emails, you can edit this address or add a second email address separated by a comma.
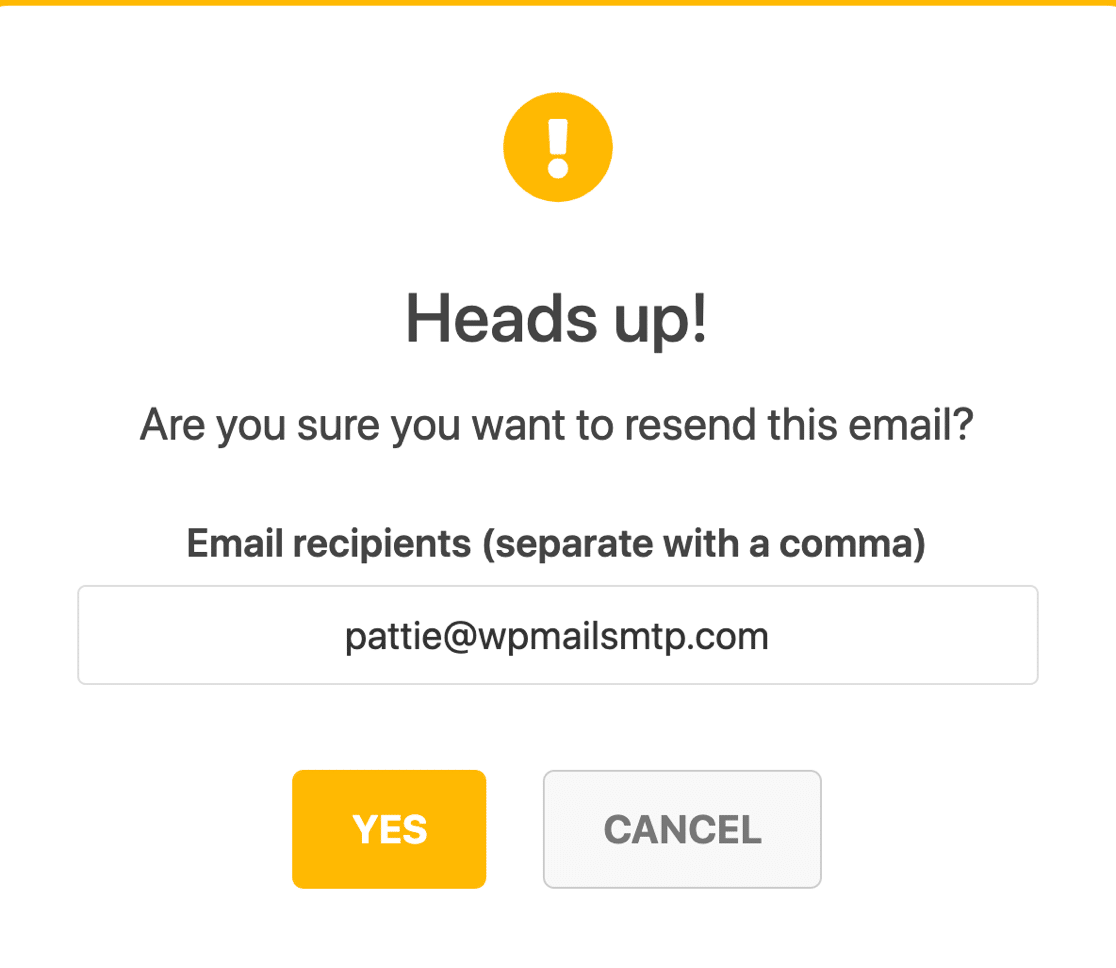
Click on the YES button. WP Mail SMTP will resend the WordPress new user verification email using the email provider we set up so they can click the activation link.
If you have a bunch of failed emails, WP Mail SMTP makes it easy to resend those in bulk from the email log screen. This is a great way to retry sending emails that failed due to an SMTP error.
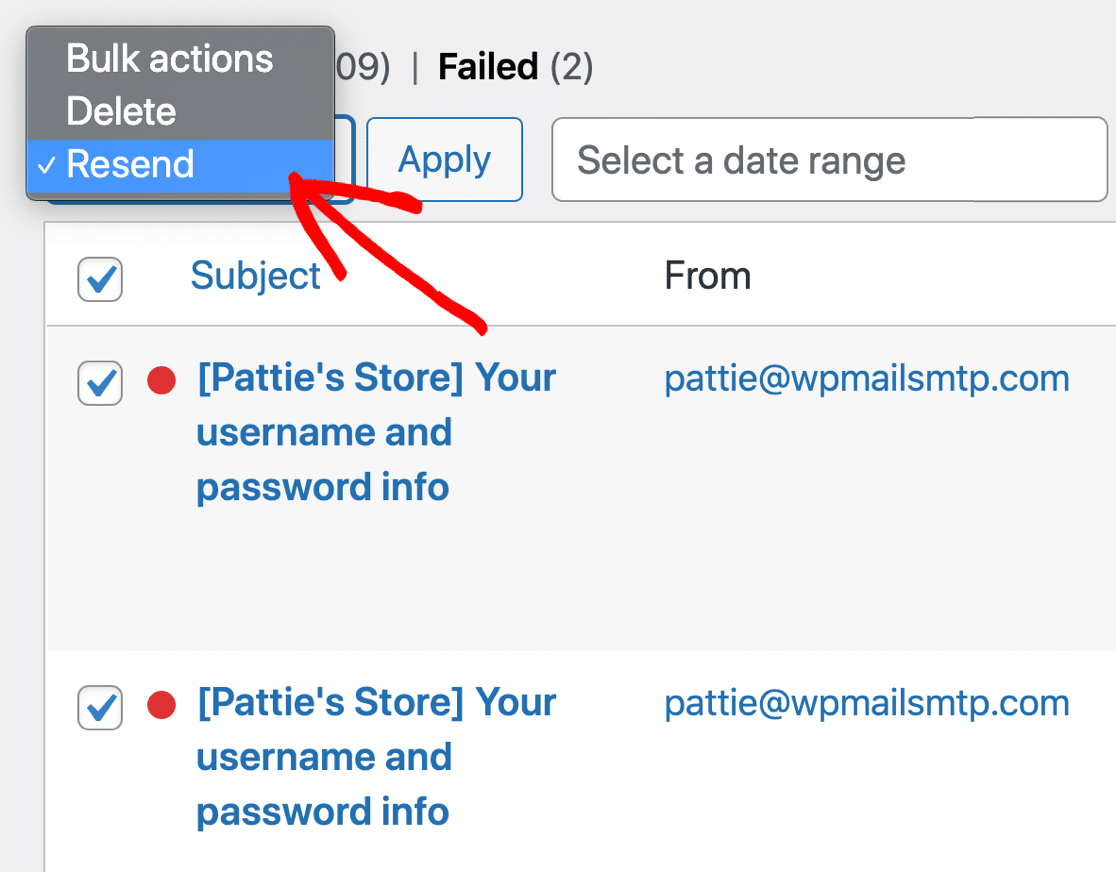
Finally, let’s look at how you can monitor your WordPress emails moving forward.
6. Monitor Your WordPress Emails
Now that you can resend emails, the final step is to monitor your email delivery so you can spot problems before your users do.
WP Mail SMTP Pro turns unlocks full email reporting and tracking for WordPress. This will help you to keep an eye on your activation emails.
You can also see which emails are getting the most opens and clicks. To see statistics about email deliverability and open rates, check out your Email Reports.
You’ll find these under the WP Mail SMTP » Email Reports menu. Your email report can be filtered to show the status and other statistics for any emails sent from your site.
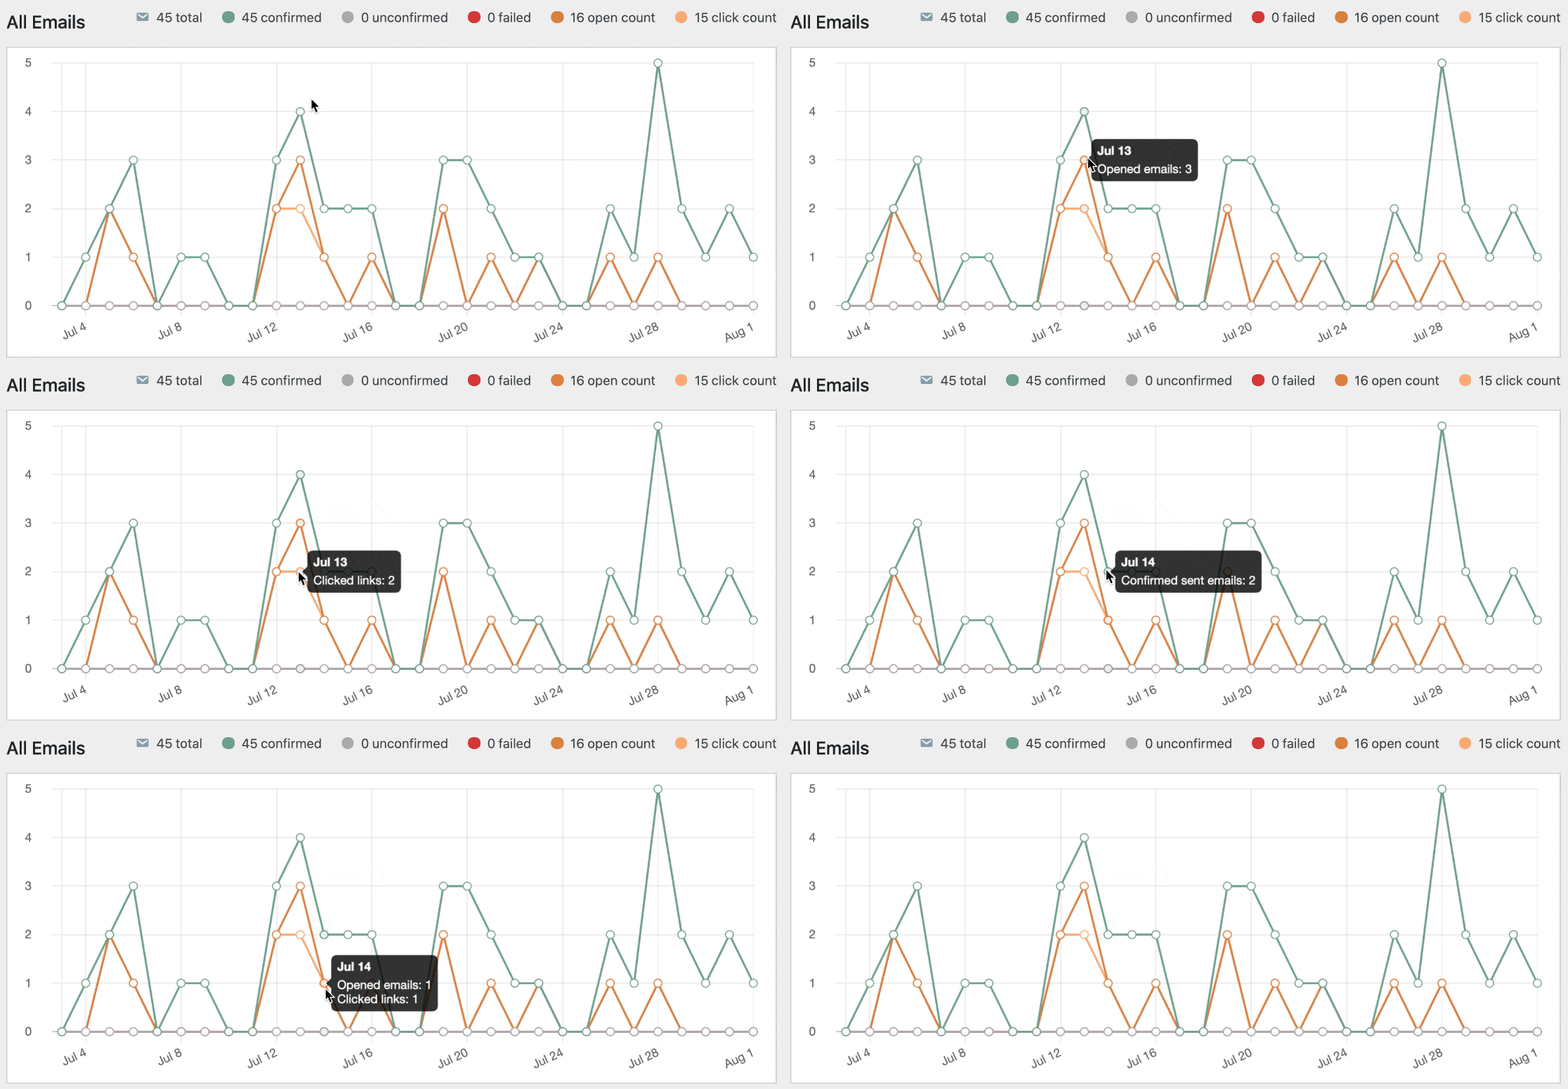
Underneath the email report, you’ll also see open rates and click-through rates for your emails. This makes WP Mail SMTP a valuable user-tracking plugin to help you measure email engagement.
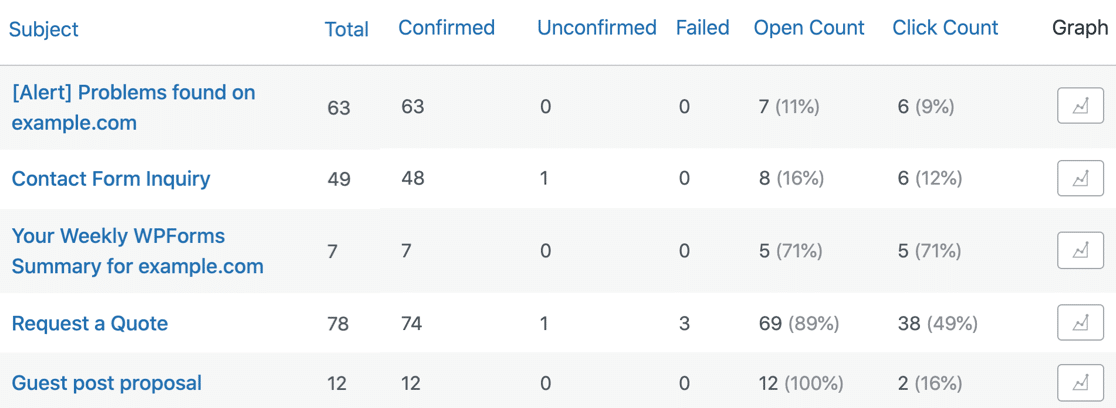
Finally, you might not want to log into WordPress every day to check that your user activation emails are sending, so we have a solution for that too.
Every Monday, WP Mail SMTP will send you a Weekly Email Summary. This lets you monitor your email deliverability without logging into WordPress.
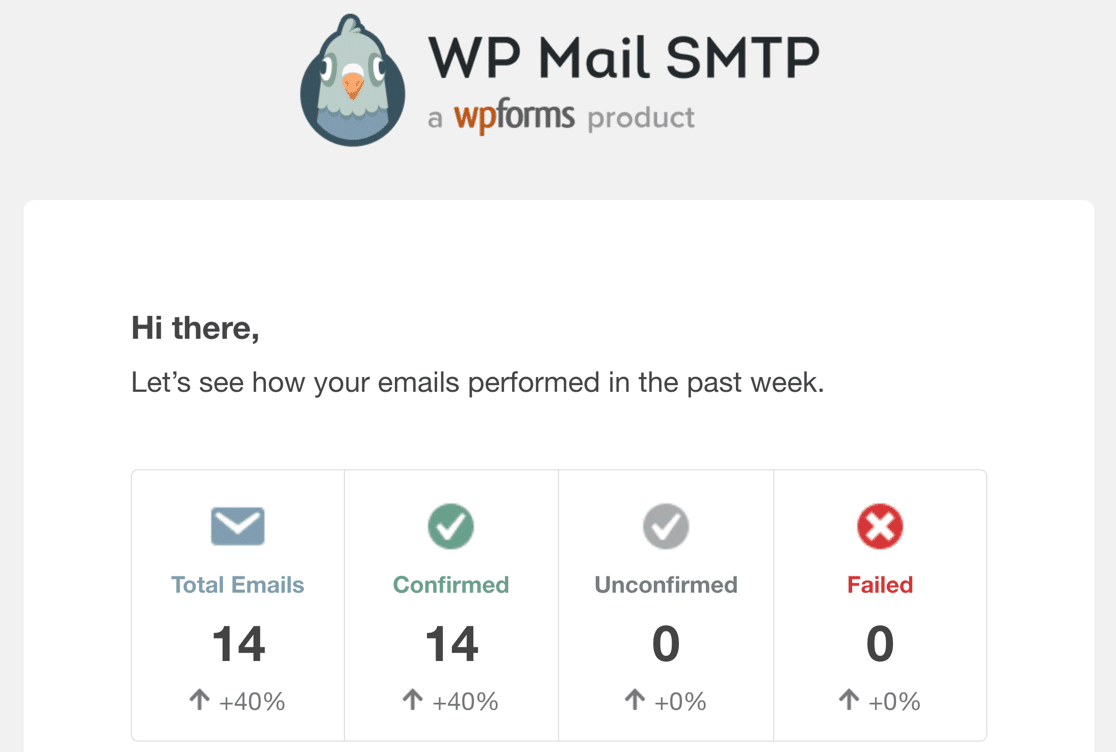
FAQs on How to Resend WordPress Activation Email to a New User
Here are answers to the most common questions we receive about managing and resending new user activation emails in WordPress.
How do I resend the new user activation email in WordPress?
The easiest way is with WP Mail SMTP Pro. Go to WP Mail SMTP » Email Log, find the original user’s activation email in the list, and click the View Log icon. On the next screen, simply click the Resend button to send the email again.
Is there a default “resend activation” button in WordPress?
No, WordPress does not have a built-in feature to resend the new user activation email. This is a common point of frustration for site owners. This functionality is added by the WP Mail SMTP Pro plugin through its powerful Email Log feature.
Why do WordPress user activation emails fail to send in the first place?
They often fail because WordPress uses an unauthenticated email function wp_mail() by default. Services like Gmail and Outlook are very strict and frequently block these unauthenticated emails or send them directly to the spam folder because they can’t verify the sender is legitimate.
How do I know if the activation email was actually sent or if it failed?
The WP Mail SMTP Email Log provides a complete record of every email your site attempts to send. Each email has a clear Sent or Failed status.
If an email failed, the log will also show a specific error message from your mailer, which helps you diagnose the problem instantly.
Can I resend the activation email to a different email address?
Yes. When you click the Resend button in the WP Mail SMTP Email Log, a confirmation box appears with the original recipient’s email address.
You can edit this address directly in the box before clicking Yes to resend, which is the perfect way to fix a user’s typo during registration.
What should I do if the resent activation email also fails?
Check the Email Log for the new error message. The most common reasons for repeated failures are an incorrect recipient email address, a misconfigured mailer connection (like a wrong API key), or your mailer account exceeding its daily/monthly sending limits.
Next, Check Your SPF Records
Email servers often use SPF, DKIM, and DMARC records to authenticate emails. When you send a test email from WP Mail SMTP, it’ll automatically check your DNS settings and alert you if it detects any problem.
SPF records are simple TXT records that validate all outgoing emails to prevent domain spoofing. If you need to have more than 1 SPF record, check out this guide to merge multiple SPF records into one rule.
Ready to fix your emails? Get started today with the best WordPress SMTP plugin. If you don’t have the time to fix your emails, you can get full White Glove Setup assistance as an extra purchase, and there’s a 14-day money-back guarantee for all paid plans.
If this article helped you out, please follow us on Facebook and Twitter for more WordPress tips and tutorials.

