AI Summary
Are you seeing a yellow ‘be careful with the message’ warning in Gmail?
Gmail displays different variations of this warning if it thinks someone might be misusing your email address. Sometimes this can be a false positive.
In this article, we’ll explain how to set up your emails to reduce the number of Gmail errors or warnings.
Why Do I See ‘Be Careful With This Message’?
Google automatically adds ‘be careful with this message’ to emails that could be suspicious.
When Google detects a potentially malicious email, Gmail and Google Workspace users see a warning in a colored bar at the top of the email.

Along with the warning, you might see text like:
- This email claims to come from example.com, but replies will go to an email address at another domain.
- This may be a spoofed message. The message claims to have been sent from your account, but example.com Mail couldn’t verify the actual source.
- Gmail couldn’t verify that example.com actually sent this message.
- This message seems dangerous.
Sometimes, senders will be marked with a question mark icon. When you hover over it, you’ll see the text, ‘yourdomain.com couldn’t verify that example.com actually sent this message (and not a spammer)’.

If you’re seeing ‘be careful with this message’ warnings, don’t worry. Your emails will likely still be delivered.
But any Gmail warning or error is still a problem because:
- People might think your emails are spam or not trustworthy.
- Recipients might hit the Report Spam or Report Phishing button in the warning box, which could cause problems with email deliverability.
- You might have missed a step when setting up your contact form, and that could mean important messages are already being filed as spam. This can affect deliverability for any contact form plugin such as Ninja Forms (see Ninja Forms emails not sending).
You can’t shut these warnings off completely, but you can correct your email and contact form settings. This reduces the chance that your recipients will see them.
How to Fix ‘Be Careful With This Message’ Error in Gmail
Gmail 2024–25 Bulk Sender Rules (A Quick Checklist)
Starting in 2024, Gmail enforces stricter rules for any sender reaching approximately 5,000 emails per day. If you’re sending high volumes of email (like newsletters, notifications, or automated campaigns), you must meet these three requirements:
- DKIM and SPF alignment – Your authentication records must pass and align with your From domain
- One-click List-Unsubscribe header – Recipients must be able to unsubscribe with a single click
- Spam complaint rate below 0.3% – Keep your spam reports under 0.3% as measured by Google Postmaster Tools
Failing to meet these requirements can result in Gmail rejecting your emails entirely, not just showing warnings.
For complete details, see Google’s official email sender guidelines and monitor your performance with Google Postmaster Tools.
Want the Gmail Blue Checkmark?
Gmail now shows blue checkmarks next to verified senders using BIMI (Brand Indicators for Message Identification). To get the blue check, you’ll need: BIMI → DMARC → VMC (Verified Mark Certificate) or CMC (Certificate Mark Certificate). This enhanced verification can significantly boost recipient trust and email engagement.
TLS Encryption: Gmail now more aggressively rejects emails that aren’t sent over TLS (encrypted connections). Most modern email services handle this automatically, but if you’re using custom SMTP settings, ensure TLS is enabled.
ARC (Authenticated Received Chain): If your emails are forwarded through mailing lists or other intermediaries, ARC helps preserve authentication results through the forwarding process. This prevents legitimate forwarded emails from failing authentication checks.
1. Check Your DMARC, DKIM, and SPF Records
The WP Mail SMTP plugin lets you send emails from your WordPress site through a 3rd party mailer service. This is a great way to improve email deliverability from WordPress because these mailer services can add verification to your emails.
But for this to work properly, you may also need to set up DMARC, DKIM, and SPF on your domain.
DMARC, DKIM, and SPF add verification data to the email header, which is the technical part of the email we don’t normally see. Without that data, Gmail will assume the email is suspicious because the From address doesn’t match the server that was actually used to send the message.
Additionally, Gmail is blocking email that does not pass a DKIM or SPF check and rejecting the email with an error message stating that at least one of these authentication methods must be used.

You can run into this issue any time you use a 3rd party mailer service to send emails. For example, it’s also quite common when you send out email newsletters.
The best way to fix this is to check that your DMARC, DKIM, and SPF records are working.
Solution: Check Your DNS Settings
DKIM, SPF, and DMARC are TXT lines in your domain name’s DNS record.
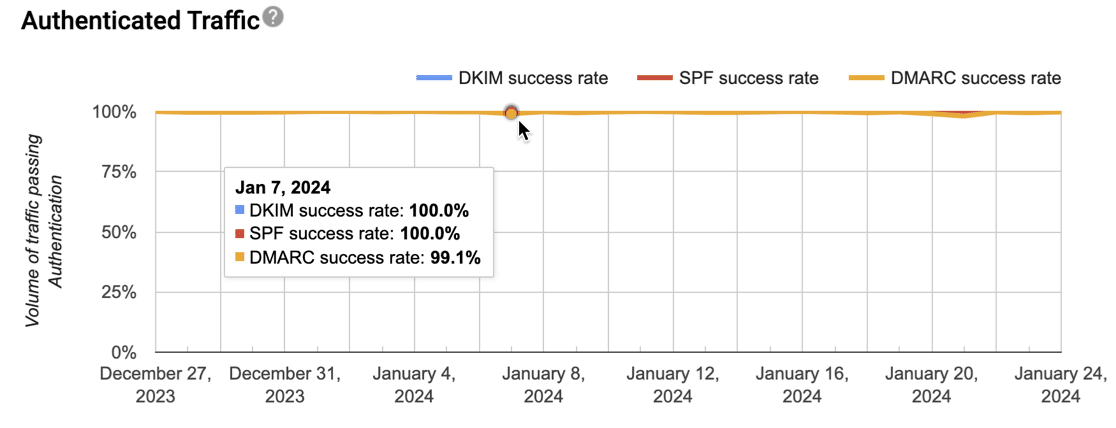
If you’ve already created an account with Google Postmaster Tools, it will tell you whether DKIM, SPF, and DMARC are set up correctly.
If you need to fix these records in your DNS, check the documentation for your mailer service. If you’re using WP Mail SMTP, you can jump to the instructions using these links:
- SendLayer
- SMTP.com
- Brevo
- Amazon SES
- Google Workspace / Gmail
- Mailgun
- Microsoft 365 / Outlook.com
- Postmark
- SendGrid
- SparkPost
- SMTP2GO
- Mailjet
- Elastic Email
- Zoho Mail
- Other SMTP
Review the requirements for setting up DMARC, DKIM, and SPF records, then check each record using MXToolbox to make sure it’s valid.

If you need some extra help, check out our tutorials on:
2. Check the From Address in All Plugins
In WordPress, you might have multiple plugins all sending emails using their own templates and settings.
For example, your contact form plugin and your backup plugin might have different From email addresses. One might be sending email from your preferred From address, but another might be sending emails from the site admin email address or even a completely made-up one.
For example, Contact Form 7 defaults to using a From address of wordpress@[your-domain], which is the default From address in WordPress.
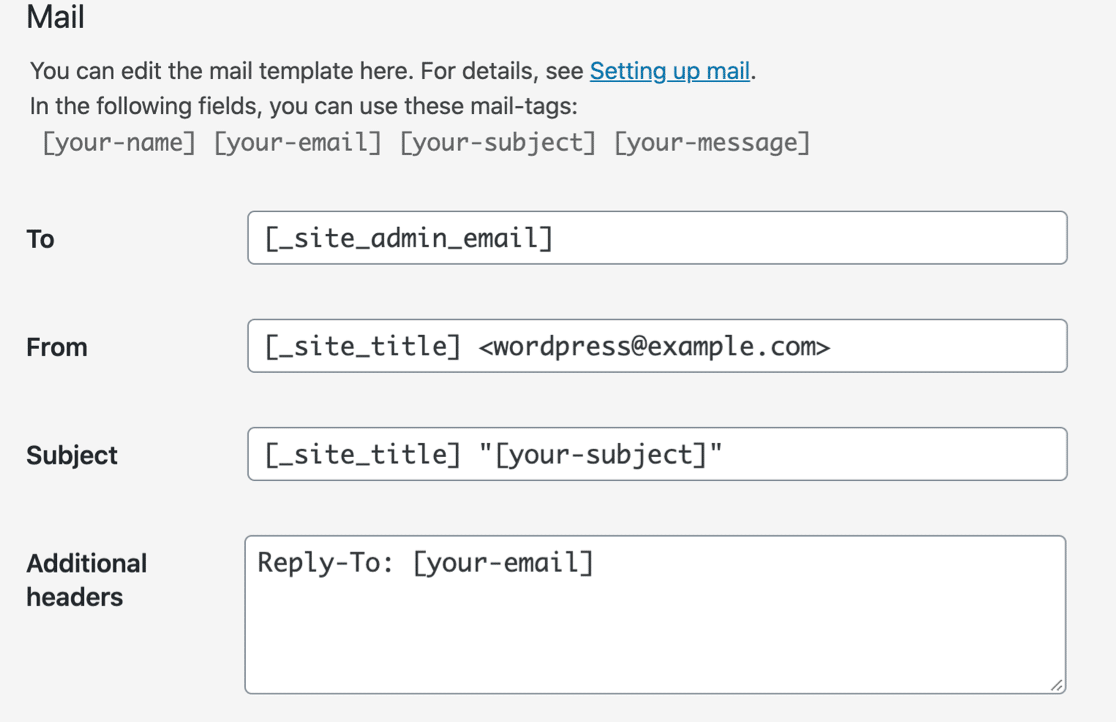
To resolve email problems and make your WordPress site easier to manage, we highly recommend that all of the plugins on your website should use the same From address. This should ideally be an email address at your domain that actually exists.
Solution: Force the From Email in WP Mail SMTP
WP Mail SMTP makes it easy to send all of your emails from the same From address.
You can easily enable this by clicking Force From Email checkbox in the plugin settings.
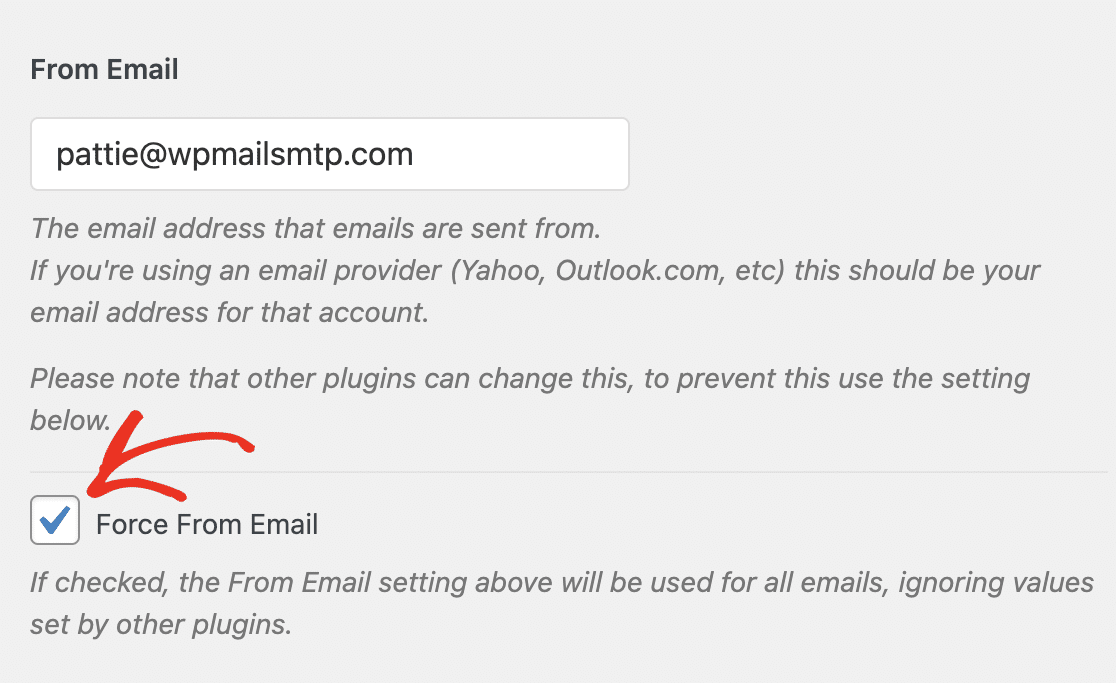
When you click this, each plugin on your WordPress site will use the From address you’ve chosen instead of its own random or invalid address.
This helps to make sure that all of the emails from your site are validated.
If the Force From Email checkbox is grayed out, it means that your mailer requires this setting to be turned on and WP Mail SMTP has already taken care of it for you.
3. Use Different From and To Addresses
WP Mail SMTP has a test email feature that makes it easy to check that your WordPress emails are working.
But you might see a Gmail warning if you send the test email to the same email you used as your From address.
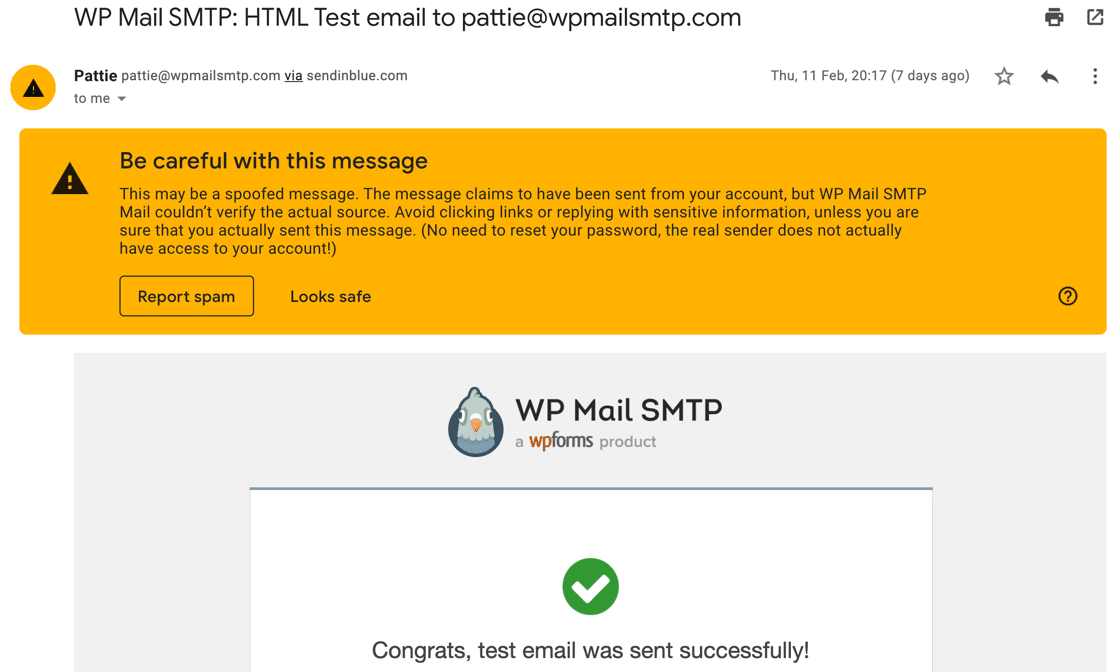
This can also happen with some plugins that send notifications. They might send emails to and from the same address like this:

This email has a Google Workspace From address, but it isn’t sent from Google servers. So if you send it to yourself, it might trigger a ‘be careful with this message’ warning.
Nobody else will see this particular error, but it can be confusing because it looks like there’s a problem with your emails.
Solution: Use a Different Email Address for Testing
In WP Mail SMTP, try sending your test email to a different email address and not the From address you set up in the plugin.
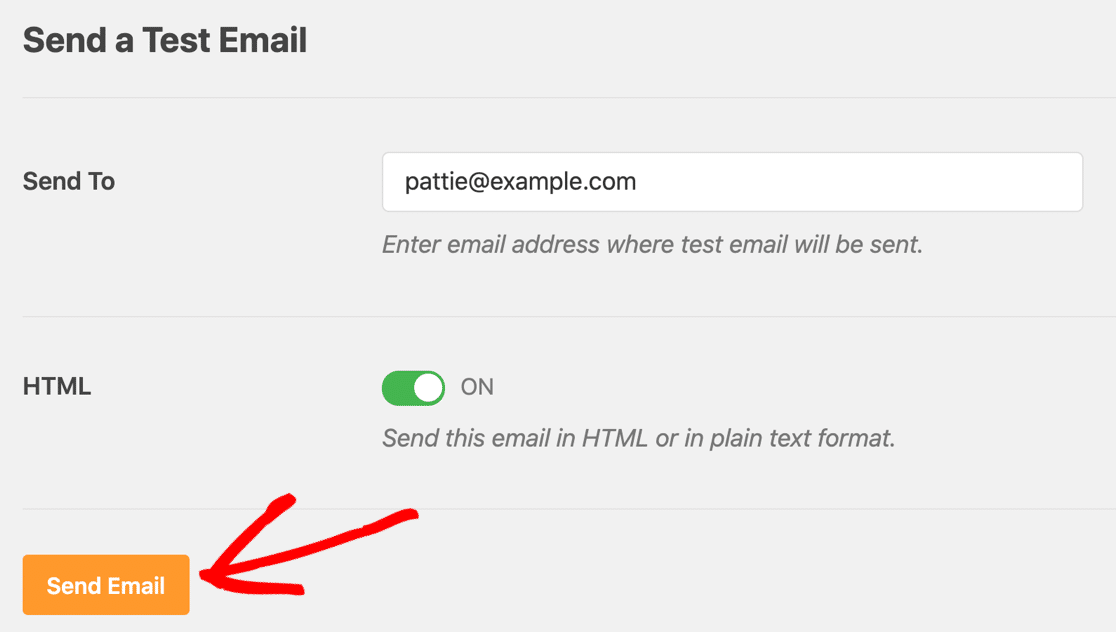
This should remove the error and reassure you that your emails are working.
Additionally, if you’re seeing this error from specific plugin notifications, take a look and see if you can change the sender address for the notifications.
Here’s an example from WPForms. In the settings, we can send form submission notifications using the From address that matches our domain, but we can also have plugin notifications sent to a different email address.
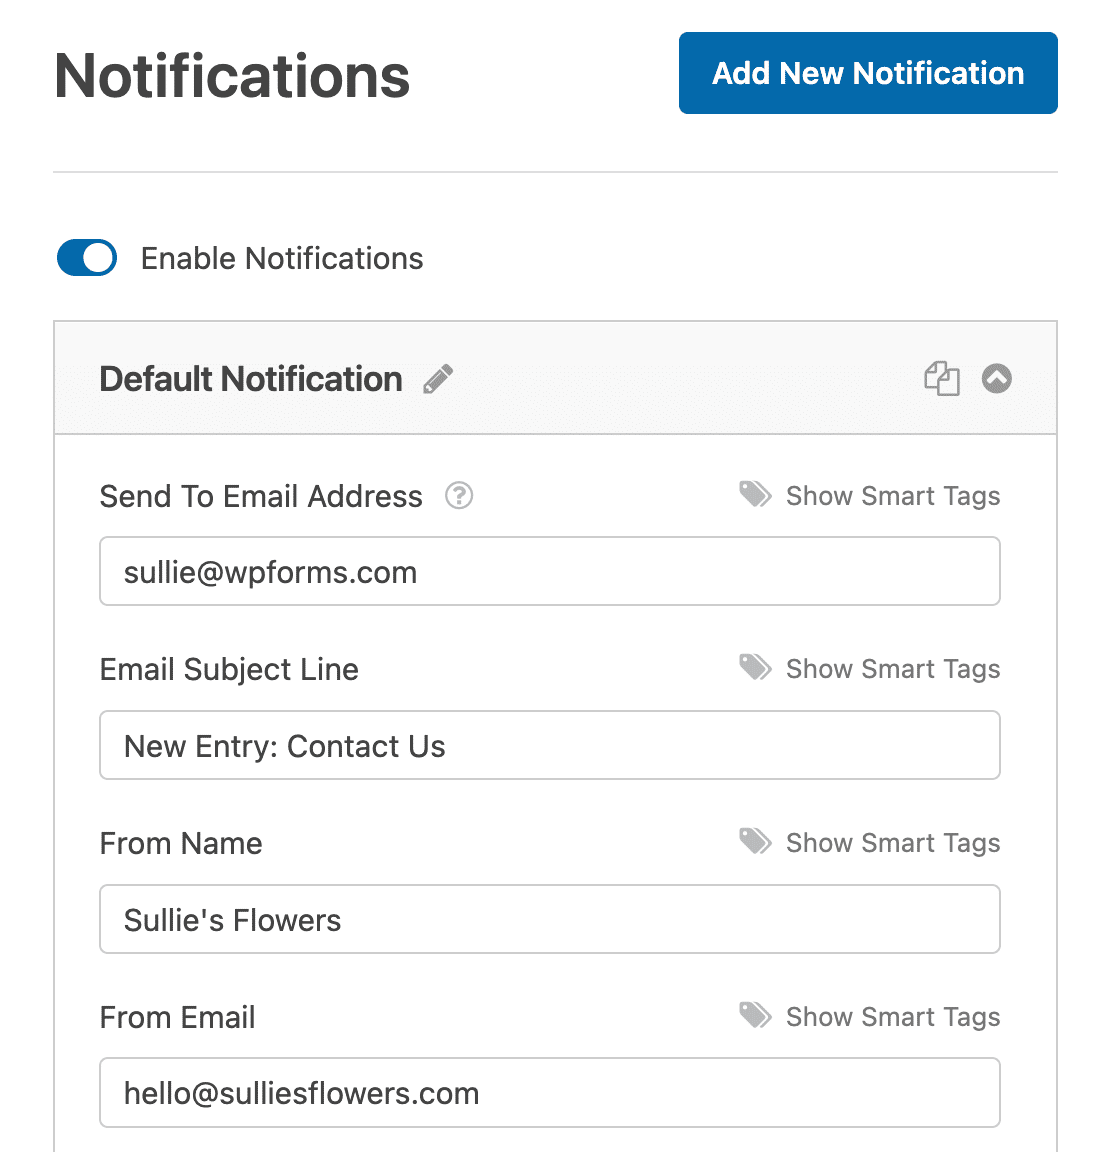
WP Mail SMTP also has an email error logging feature that helps you troubleshoot problems if your WordPress emails aren’t sending for any reason.
And that’s it! We hope these tips helped you to reduce the number of ‘be careful with this message’ warnings in Google Workspace or Gmail.
Frequently Asked Questions
Have more questions about Gmail errors? Here are some of the most common queries our support team answers:
Can I disable Gmail warnings for internal company emails?
No, Gmail warnings can’t be disabled by senders. However, Google Workspace admins can configure trusted domains and senders within their organization to reduce false positives for internal communications.
Why do I still see warnings even with DMARC, DKIM, and SPF set up?
Authentication records can take 24-48 hours to propagate. Also, check that your records are properly aligned – your DKIM and SPF must align with the domain in your From address, not just pass authentication.
Will my emails still be delivered if Gmail shows the “be careful with this message” warning?
Yes, emails with this warning are typically still delivered to the inbox. However, recipients may be less likely to trust or engage with warned emails, and some may mark them as spam, which can hurt your sender reputation over time.
Do Gmail warnings affect my email deliverability score?
While warnings don’t directly impact deliverability, they can lead to reduced engagement and increased spam complaints, which do hurt your sender reputation. Recipients who see warnings are more likely to delete emails or mark them as spam.
Next, Fix WordPress Emails Going to Spam
Are your WordPress landing in the junk mail folder? This often happens if your DNS records aren’t set up correctly, or you’re on a spam blacklist.
To troubleshoot this, check out how to fix WordPress emails going to spam. You can also see this in-depth guide if your Divi contact form is not working.
Or if you’re using Gravity Forms and need troubleshooting help, check out our post fixing Gravity Forms notification issues.
Ready to fix your emails? Get started today with the best WordPress SMTP plugin. If you don’t have the time to fix your emails, you can get full White Glove Setup assistance as an extra purchase, and there’s a 14-day money-back guarantee for all paid plans.
If this article helped you out, please follow us on Facebook and Twitter for more WordPress tips and tutorials.

