
AI Summary
Do you want to know how to fix WordPress not sending email issue? This is a super common problem, and almost everyone with a contact form will run into this issue at some point.
The most common issue I’ve come across is how WordPress handles email by default. It relies on your web server to send messages, and in many cases, those emails never even leave the server.
If you’re missing important notifications, you’re probably frustrated. I’ve had sites where form entries weren’t reaching the inbox, and it caused confusion both for the site owner and their users.
So, in this guide, I’ll show you exactly how to fix the issue by first troubleshooting common issues and then using a method I’ve personally used many times to get WordPress emails working reliably.
Fix Your WordPress Emails Now! 🙂
How To Fix WordPress Not Sending Email Issue
Here’s a good video tutorial that breaks down the issue of WordPress not sending emails, which uses WP Mail SMTP along with SendLayer to authenticate your messages.
If you prefer to follow written steps, the step-by-step guide below provides solutions to some common email notification problems with WordPress.
1. Troubleshoot WordPress Emails Not Sending
If you’re wondering why your WordPress emails are not sending (or disappearing), first run through these troubleshooting steps below.
Check the Spam or Junk Folder
Before you assume something is broken, check your spam folder. I’ve seen perfectly valid WordPress emails land there just because the sender address didn’t match the site domain.
Email providers like Gmail are quick to flag messages that don’t pass basic checks. If you find your email there, mark it as “Not Spam” and move forward with the other steps to prevent it from happening again.
If you want to check if your emails are going to spam, you can check if you’re on a spam blacklist. Test your server IP address using the MXToolbox blacklists checker. Just hit Blacklist Check to scan 100+ blacklists at once.

Make Sure You’re Using a Domain Email
If your website sends email from a generic address like [email protected], that could be a red flag for many email servers. I always recommend using an address like [email protected].
It looks more professional and reduces the chances of your messages getting blocked. When I switched a site over to a domain-based email, the delivery success rate improved immediately.
To check this, go to Settings » General in your WordPress dashboard and verify if your email address is correct. If it’s not a domain email, outdated, or has a typo, your emails will never reach inboxes.

Test the PHP mail() Function on Your Server
WordPress uses PHP’s built-in mail() function to send messages. The problem? Many hosting providers block or limit that function to reduce spam.
If you’re on shared hosting and nothing is getting through, this could be the reason. The default PHP mail() function doesn’t add any authentication to prove that the message is legitimate.
I usually send a quick test email using a tool like Mail-Tester to see if the mail function works. If it fails, it’s time to move on to SMTP.
Similarly, If you’re creating your site on your computer before uploading it, your emails likely won’t work. WP Mail SMTP will fix WordPress not sending email on localhost, so you can receive WordPress notifications as a live site would.
No matter the reason, if you’re not receiving emails from WordPress, there’s a very good chance that WP Mail SMTP will solve the problem.
WordPress Emails Still Not Sending?
If none of these problems apply to you, it’s likely that the problem is simply missing authentication. We can fix that with WP Mail SMTP.
So, whether you have WordPress emails going to spam or any other plugin not sending notifications, WP Mail SMTP should help fix your deliverability issues once and for all.
2. Install the WP Mail SMTP Plugin
We’re going to use WP Mail SMTP to re-route your emails through a 3rd party email service provider (ESP). This will add the authentication required to get them delivered reliably.
First, you’ll want to install WP Mail SMTP on your WordPress site. WP Mail SMTP is a WordPress plugin that reconfigures PHP mailer function wp_mail()to use SMTP rather than PHP.

You can use the free or paid version, but you’ll want Pro or above to use the email logging and reporting features. We’ll talk about these plugin settings later.
To download the plugin, head over to your WP Mail SMTP account and click the Downloads tab. You can download the plugin zip file by clicking Download WP Mail SMTP.

Next, switch to your website and log in to the WordPress dashboard. Head to Plugins » Add New. Upload the plugin zip file and click Install Now.

Once the plugin is installed, be sure to activate it. This will start the Setup Wizard in your browser. Now we’re ready to set up your email provider for WordPress.
2. Connect WordPress to a Mailer
Now, you’re going to route your emails through a separate email provider to fix the WordPress not sending email issue. With WP Mail SMTP, this is super easy to configure.
I suggest you use the Setup Wizard so you don’t have to spend time playing around with the configuration settings yourself. To start, click the Let’s Get Started button in the Setup Wizard.

On the next screen, you’ll see a list of available mailers that you can configure in WP Mail SMTP. I personally recommend using SendLayer, SMTP.com, or Brevo (formerly Sendinblue).

All of these providers will help fix the WordPress not sending email issue. However, some of them aren’t suited to large volumes of email. Here’s a quick guide if you’re not sure what to pick here:
- Small websites or testing: You can use Other SMTP for this. However, keep in mind that most SMTP servers have rate limits, so this could cause your WordPress emails to fail on a busy site. For an alternative option, SendLayer, Postmark, and Brevo (formerly Sendinblue) all have free trial accounts.
- Website sending a few emails a day: The Gmail mailer is a good option if you have a Google Workspace or Gmail account. It’ll allow you to send emails from any of your Gmail aliases in WordPress, which is handy if you want to use different Gmail aliases with different forms or plugins. Gmail and Google Workspace are a little bit more complicated to set up, though.
- Medium to large websites: Websites that send transactional emails should consider a professional email provider like SendLayer, SMTP.com, or Brevo.
If you’re not sure what to pick, Brevo lets you start sending emails for free. It also authenticates your domain name, rather than an individual email address, so you can send email from any address at your domain in WordPress.
When you’ve chosen a mailer, jump to the documentation using the links below. The doc will help you set up a connection between your website and the mailer you chose in the Wizard.
| Mailers available in all versions | Mailers in WP Mail SMTP Pro |
|---|---|
| SendLayer | Amazon SES |
| SMTP.com | Microsoft 365 / Outlook.com |
| Brevo | Zoho Mail |
| Google Workspace / Gmail | |
| Mailgun | |
| Postmark | |
| SendGrid | |
| SparkPost | |
| Other SMTP |
The documentation for your email provider will explain where to find the credentials you need, and where to paste them into the Setup Wizard.
Need a hand?
Our Elite license includes White Glove Setup for SendLayer, SMTP.com, or Brevo.
If you want to set up multiple mailers, you can do so in the Additional Connections settings once you’ve finished the Setup Wizard.
Then you can select a Backup Connection and configure Smart Routing. When you’ve set up a connection, switch back to this guide.
4. Turn On Email Logging (Recommended)
In the next step, the wizard will have two options enabled by default. They are:
- Email deliverability
- Error tracking
Both options will help in improving email deliverability. If you have WP Mail SMTP Pro, you can enable additional features here too.

The first feature you can enable here is Detailed Email Logs. This feature lets you see your emails’ delivery status and other helpful information in Complete Email Reports.
If you’d like, you can also receive a Weekly Email Summary showing an overview of your recent logs. This helps you to actively monitor your contact form emails to make sure you’re not missing any.

Instant Email Alerts let you know when an email from your site fails to send. This way you can efficiently fix the problem and get your emails sending again.

Next, if you enabled email logs, you’ll also have the chance to turn on some advanced email logging features.

These features let you do things like:
- Store attachments in WordPress
- Resend or forward emails that failed
- Export sent emails in EML format
- Export logs in XLSX or CSV format
- Generate email reports
- Track opens and clicks in your WordPress emails

For more details, see our post on WordPress email logging. Now we’re ready to complete the Setup Wizard and test your email.
For the last step, grab the license key from your WP Mail SMTP account and paste it into the box to enable Pro features and future updates.

And that’s it! WP Mail SMTP will send an automatic test email so you can check that everything’s working properly.

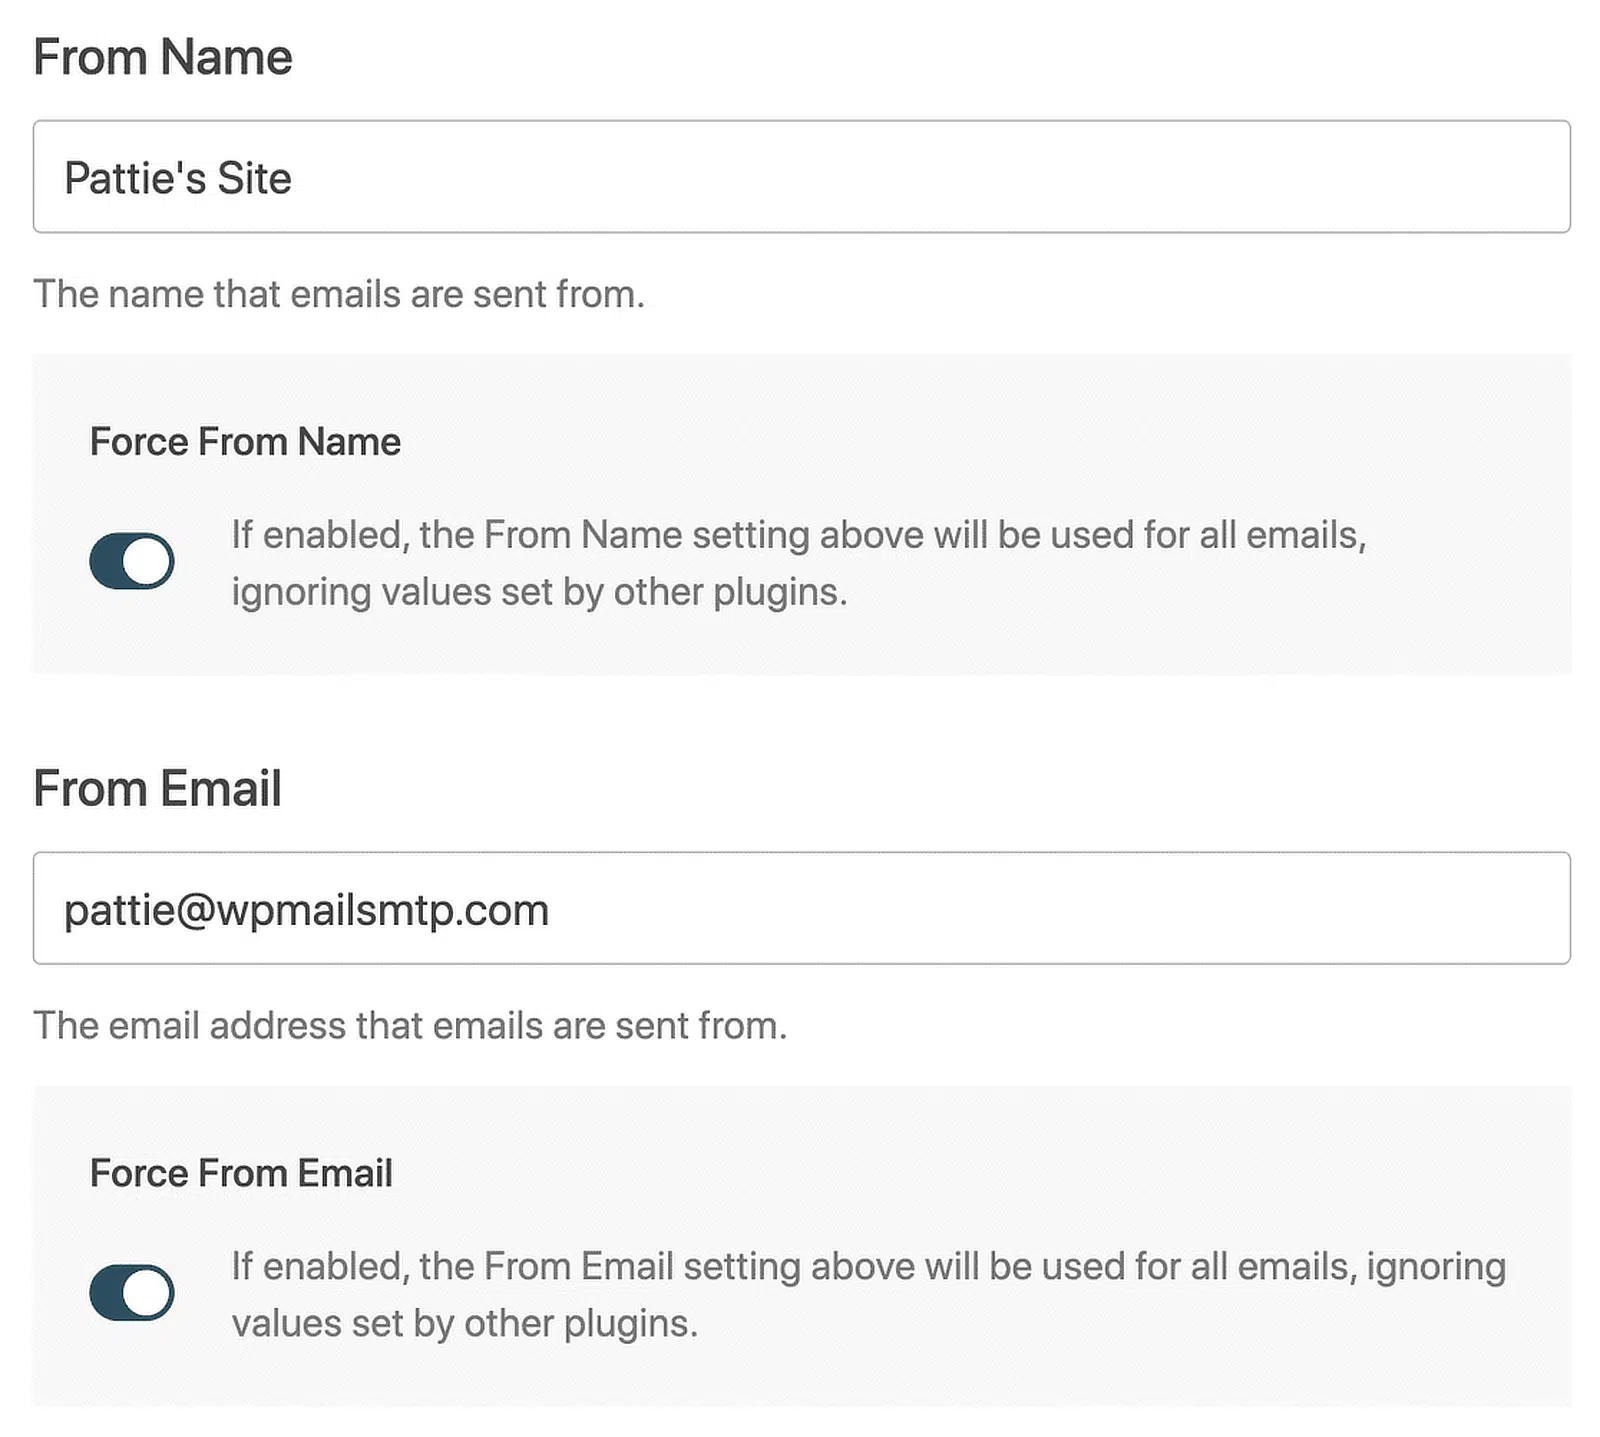
5. Force From Email to Avoid Delivery Issues
When you’re setting up your mailer in WP Mail SMTP, there’s a setting you’ll probably notice called Force From Email. It shows up right below the field where you enter your From Email address.
By default, WordPress uses your site’s admin email to send messages. But I’ve seen that this can cause problems, especially with different WordPress plugins, because the email might not match the address approved by your mailer.
That’s where this setting comes in handy. When you turn on the Force From Email option, it makes sure all emails sent from your site use the address you entered in the From Email field.
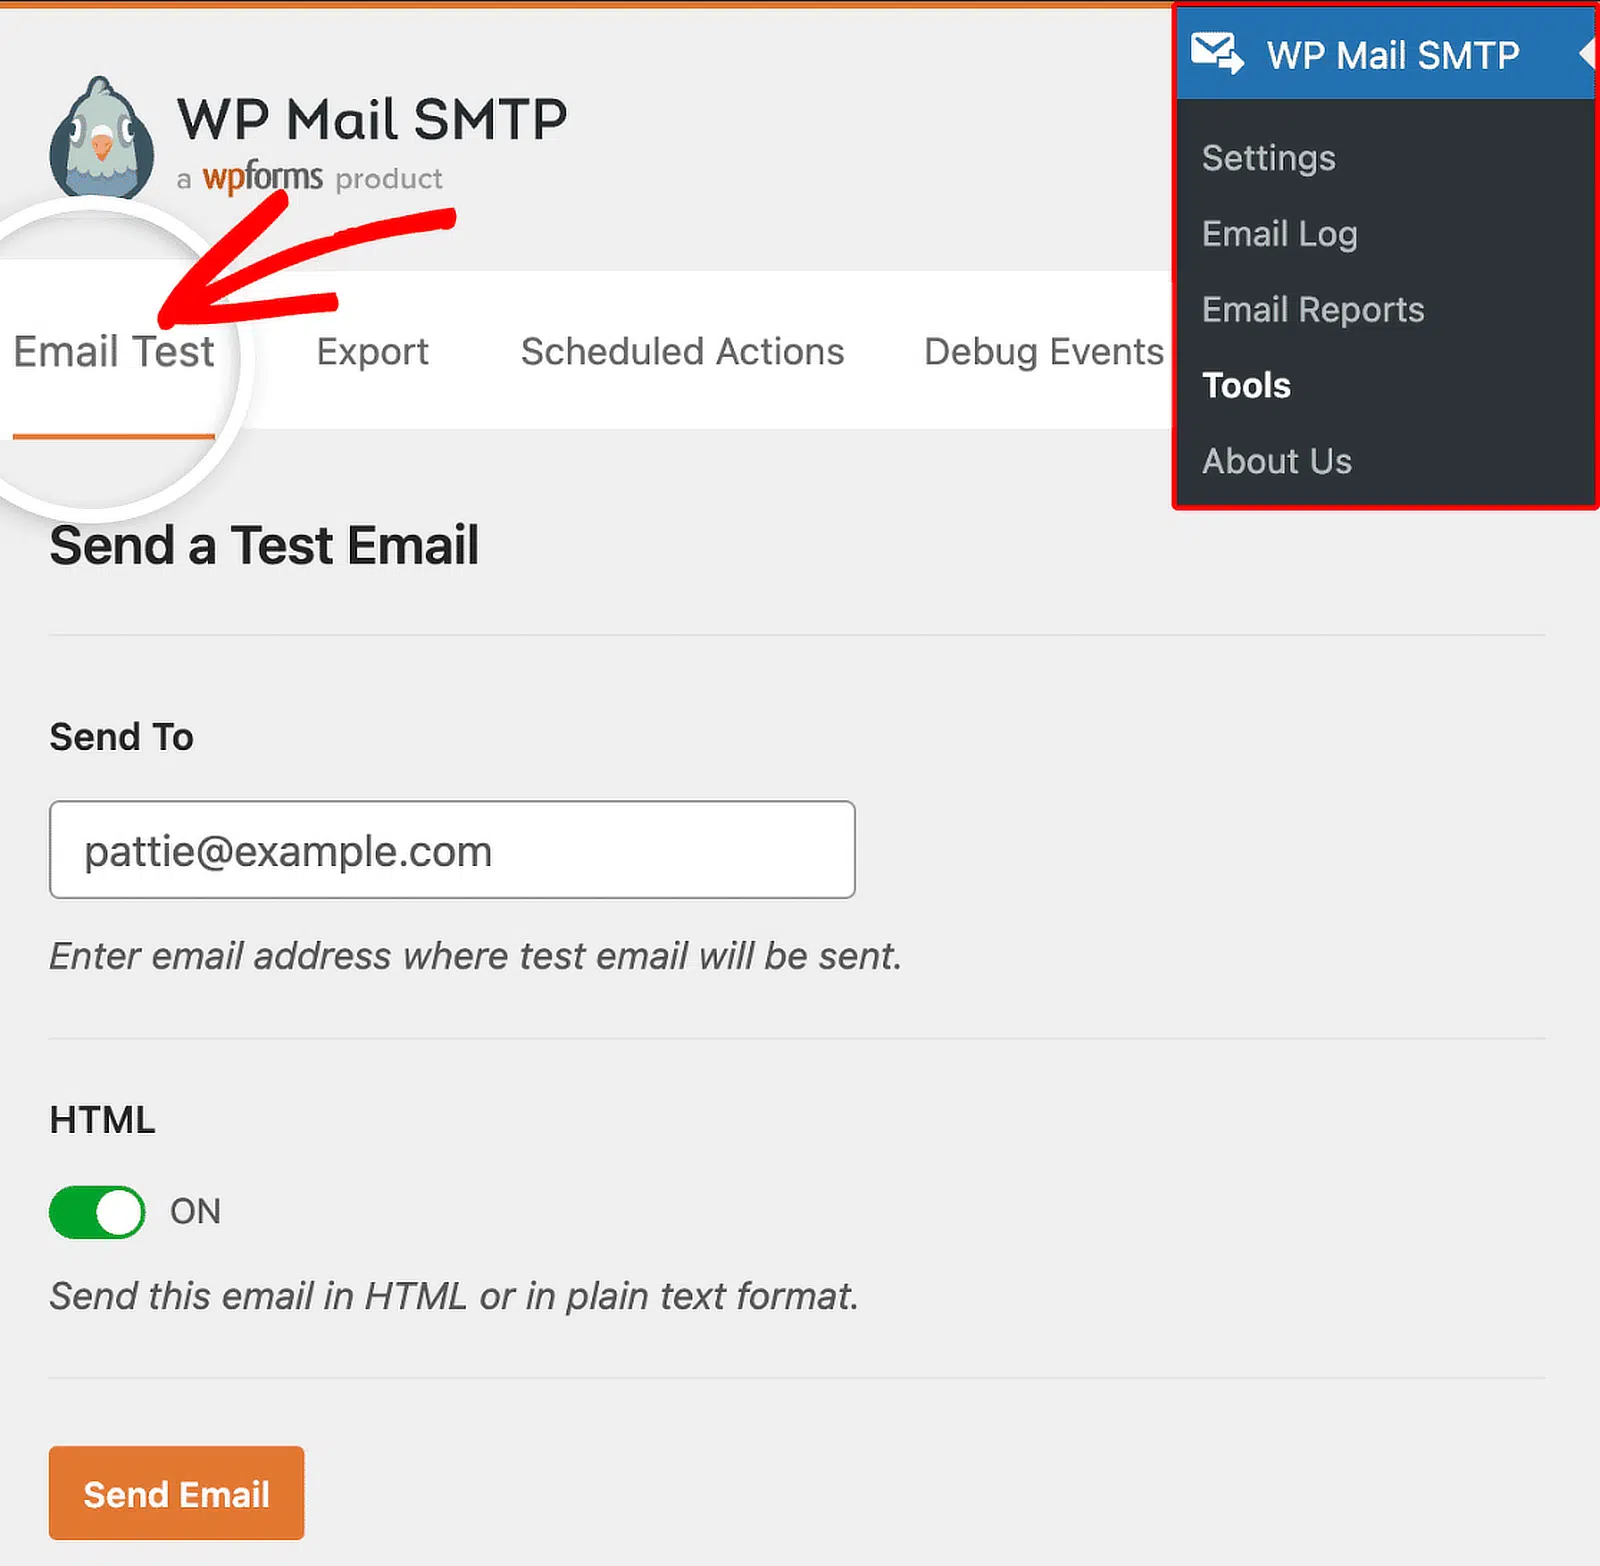
Once you’ve got everything set up, it’s time to double-check that your emails are actually sending the way they should.
Go to WP Mail SMTP » Tools, and click on the Email Test tab. This is where you can send a quick message to see if your WordPress emails are now working properly.
Frequently Asked Questions About WordPress Not Sending Email
Got questions about WordPress emails not working? We’ll answer some common questions below.
What Is SMTP?
SMTP stands for Simple Mail Transfer Protocol. It’s the protocol that servers use to send emails.
In WordPress, you can use SMTP to send emails instead of relying on your web server. This is more reliable because it adds the correct authentication to your emails.
What email address should I use as the “From” email?
Many contact form plugins use the admin email as the From address. This can cause email deliverability issues.
Now that you have WP Mail SMTP installed, you should always use the From Email that you authenticated in the Setup Wizard.
That will ensure that all of your emails have the correct authentication. In other words, the emails from WordPress will be delivered as though they were sent from your email account.
If you have a ton of different plugins all sending email, WP Mail SMTP allows you to force the From Email and the From Name across your entire site.

This is a super easy way to make sure you’re not sending email from a From address that isn’t authenticated.
Can I set up WooCommerce SMTP?
Yes! Once you’ve completed the steps in this tutorial, all WooCommerce order emails will be sent from your chosen mailer.
You can use an SMTP server for WooCommerce, but we recommend that you use a transactional email provider instead. This will make sure your customers get WooCommerce order emails quickly.
Why can’t I use PHPMailer?
PHPMailer is the default method of sending email in WordPress, but it’s very unreliable. With PHP mail(), your emails are sent without any authenticating information. As a result, mail servers typically treat PHP emails as spam, leading to deliverability issues.
To stop your WordPress emails from going to spam, you need to configure your WordPress site to use SMTP, which provides the necessary authentication to prove your emails as legitimate.
The WP Mail SMTP plugin is used almost universally by WordPress sites to stop sending emails with PHP and use SMTP instead. Plus, it makes troubleshooting email problems a lot easier with WP Mail SMTP’s built-in email log feature.
Why Is “Other SMTP” not working?
If the Other SMTP mailer isn’t working, or you’re getting an SMTP error, first check that you’re using the correct SMTP settings in WP Mail SMTP.
In particular, pay attention to the SMTP port since different servers have different requirements.
If that doesn’t work, you may be using a host that blocks SMTP or restricts you from using its own SMTP server. This block is typically put in place to prevent users from sending spam from WordPress, or to encourage you to pay for the host’s own SMTP service.
If SMTP is blocked by your host, you can use any of the API-based email providers like Brevo, SMTP.com, or Gmail to get around that. For more details, check out our articles on:
These guides are designed specifically for customers who can’t use SMTP to send email on their hosting plan.
Why is “Other SMTP” making my site time out?
If the Other SMTP option is causing your WordPress site to time out, that’s a sign that you may have an incorrect DNS setting, or your SMTP server is down.
This is also a common issue for Cloudflare users who have the wrong proxy settings on their DNS zone. Check out this guide to fixing WordPress emails on Cloudflare for full details of the settings you’ll need to change.
Why is WordPress not sending confirmation email to users?
If you’d like user users to receive a confirmation email after submitting a contact form on your WordPress site, you can easily set this up using WPForms.
For more information, see this article on how to send confirmation emails to users after submitting forms.
Why am I seeing a DMARC, SPF, or DKIM warning?
WP Mail SMTP has a Domain Checker that automatically scans your domain’s DNS records. If it spots a problem with your DNS that could affect email deliverability, it’ll notify you when you send a test email.

To fix this, start by reading our guides on DNS:
Once your DNS records are correct, your emails will have the right authentication and will no longer land in your recipient’s spam folder.
Gmail rejects unauthenticated emails, so setting up these records is particularly important to make sure your WordPress emails are delivered to Gmail users.
Next, Track Email Activity in WordPress
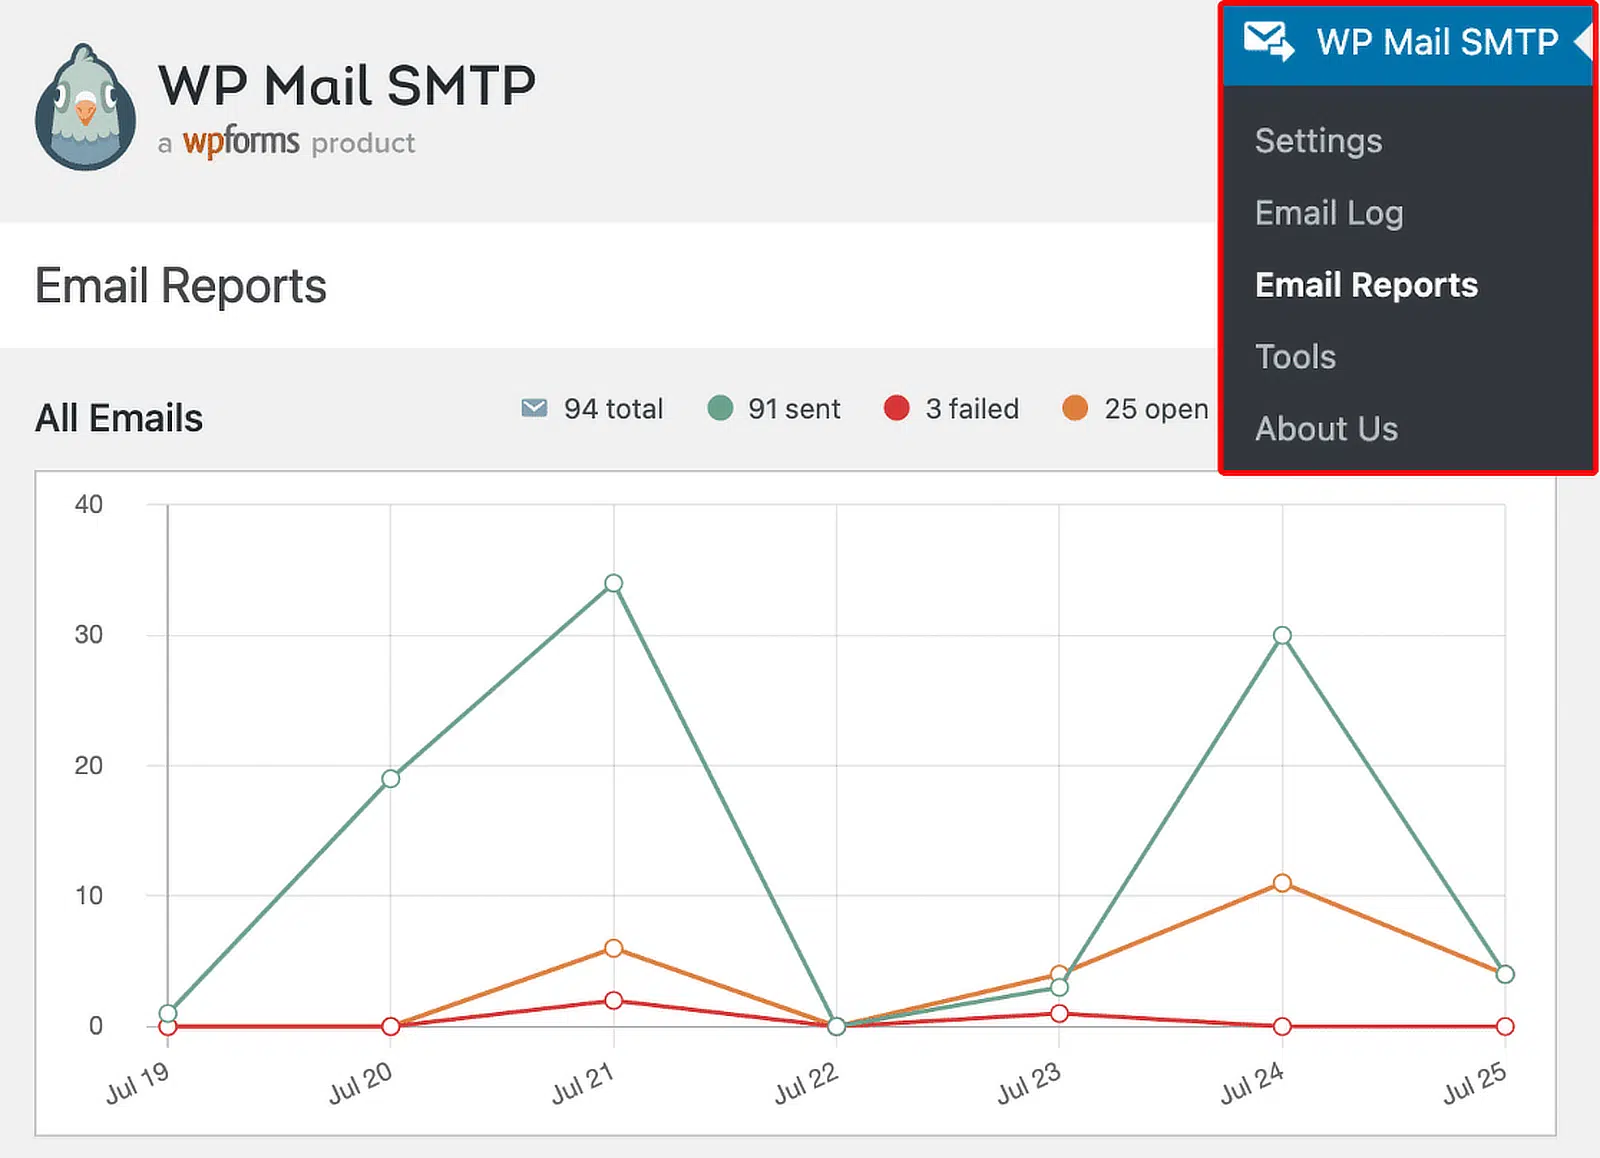
Now that you’ve fixed WordPress not sending emails, check out our open and click tracking. Use WP Mail SMTP to track opens and clicks on individual emails or generate an email report for any subject line.
This makes WP Mail SMTP an awesome user tracking plugin. And if you’re looking for more plugin options, check out our roundup of the best WordPress email plugins.
Ready to fix your emails? Get started today with the best WordPress SMTP plugin. If you don’t have the time to fix your emails, you can get full White Glove Setup assistance as an extra purchase, and there’s a 14-day money-back guarantee for all paid plans.
If this article helped you out, please follow us on Facebook and Twitter for more WordPress tips and tutorials.